angled holes for round objects
Jerry Gibbs
I needed to cut a hole for 3' round duct so that the duct entered the cabinet side at 45 degrees. Is there a way to make a full size pattern for the cutout? My trial and error approach looks ragged. Jerry
Knowledge You Can Build On — Est. 1998
angled holes for round objects
Jerry Gibbs
I needed to cut a hole for 3' round duct so that the duct entered the cabinet side at 45 degrees. Is there a way to make a full size pattern for the cutout? My trial and error approach looks ragged. Jerry
Yes It will be an ellipse.
Keith Newton
The ellipse will have a short axis of 36", and a long of about 51". There are a number of ways to draw a good ellipse, depending on your skill level. Probably the easiest one for this would be the string method.
Start by drawing a straight line through where you want the long axis, then find the middle, and measure out 18", and drive a small tack in just a little way.
Then from that tack, measure back to where 25.5" crosses the long axis both ways, and drive a tack at each of those points.
Now, you will need some fine low stretch line, like some of those high strength braided fishing line. I like to hang a washer on the first tack, tie onto it, then run the string around the other two on the long axis, then back to tie onto the washer again, making a loop, with a washer linking both ends.
Now you can pull the first tack, and replace it with a pencil, and just swing it around, keeping a constant pressure on the string loop. This should give you and ellipse of the size you need.
You don't have to use the washer. Another way is to just tie onto one of the long axis nails, then go around the short axis nail, then tie onto the other long axis nail. After you pull the first nail, just let your pencil push outward against the string while you strike your arc, but I find it to be harder keep from breaking the pencil lead, while the string quickly abrades the lead, when it is not slipping out from under it or riding up the side.
If you have trouble following this, I think Ellis posted a diagram in an earlier post about drawing ellipses with a string method.
Re: Yes It will be an ellipse.
Jerry Gibbs
I meant 3 inches, not feet, but the problem is the same. How do you determine the long axis. Where does the angle of attack figure in. I was a political science major in college. Thanks for the help. Jerry
possible answer
Jerry Gibbs
if I draw parallel lines 3 inches apart and bisect them at 45 degrees, will that line be the long axis for a 3 inch round duct entering at 45 degrees?
It gets harder at that size.
Keith Newton
Your short axis of course stays 3", and your long will be 4.25", unless the 3" is the ID. Is there anything else you would like to share with me now,,,,,, since you gave me bad information to begin with.
If you have something like 3" PVC, which cuts easily on a chop saw, the easiest thing is to just cut a piece at 45º, then trace it. Of course your duct is probably metal, which is not very friendly with a miter saw.
Good luck.
thanks
Sketchup
Tony - Memphis
An easy way to go would be to create the section in Sketchup (or any drawing program), then print it out.
Tony

String method drawings
Ellis Walentine
Here are a couple of images that I uploaded back in 2006. Maybe they'll help you understand the string method.


Ellis
Re: angled holes for round objects
William Duffield
If you want to use the loop of string method, I have found that the best way to tie the string to make it adjustable is to tie a bowline in one end, loop the other end through the eye of the bowline and tie a tent hitch in it. Both of these knots are relatively easy to tie. Google images will find you instructions to tie them.
If you were planning to draw lots of ellipses, in different sizes, and wanted both precision and quick setup, you would want to build an ellipsograph. Again Google images will find you lots of plans. The most elegant one I've seen in person was created by George Wilson at Colonial Williamsburg and used to cut the veneer for the inlay in their reproduction Seaton Chest.


Kari Hultman, the Village Carpenter, posted a photo of the chest on her blog.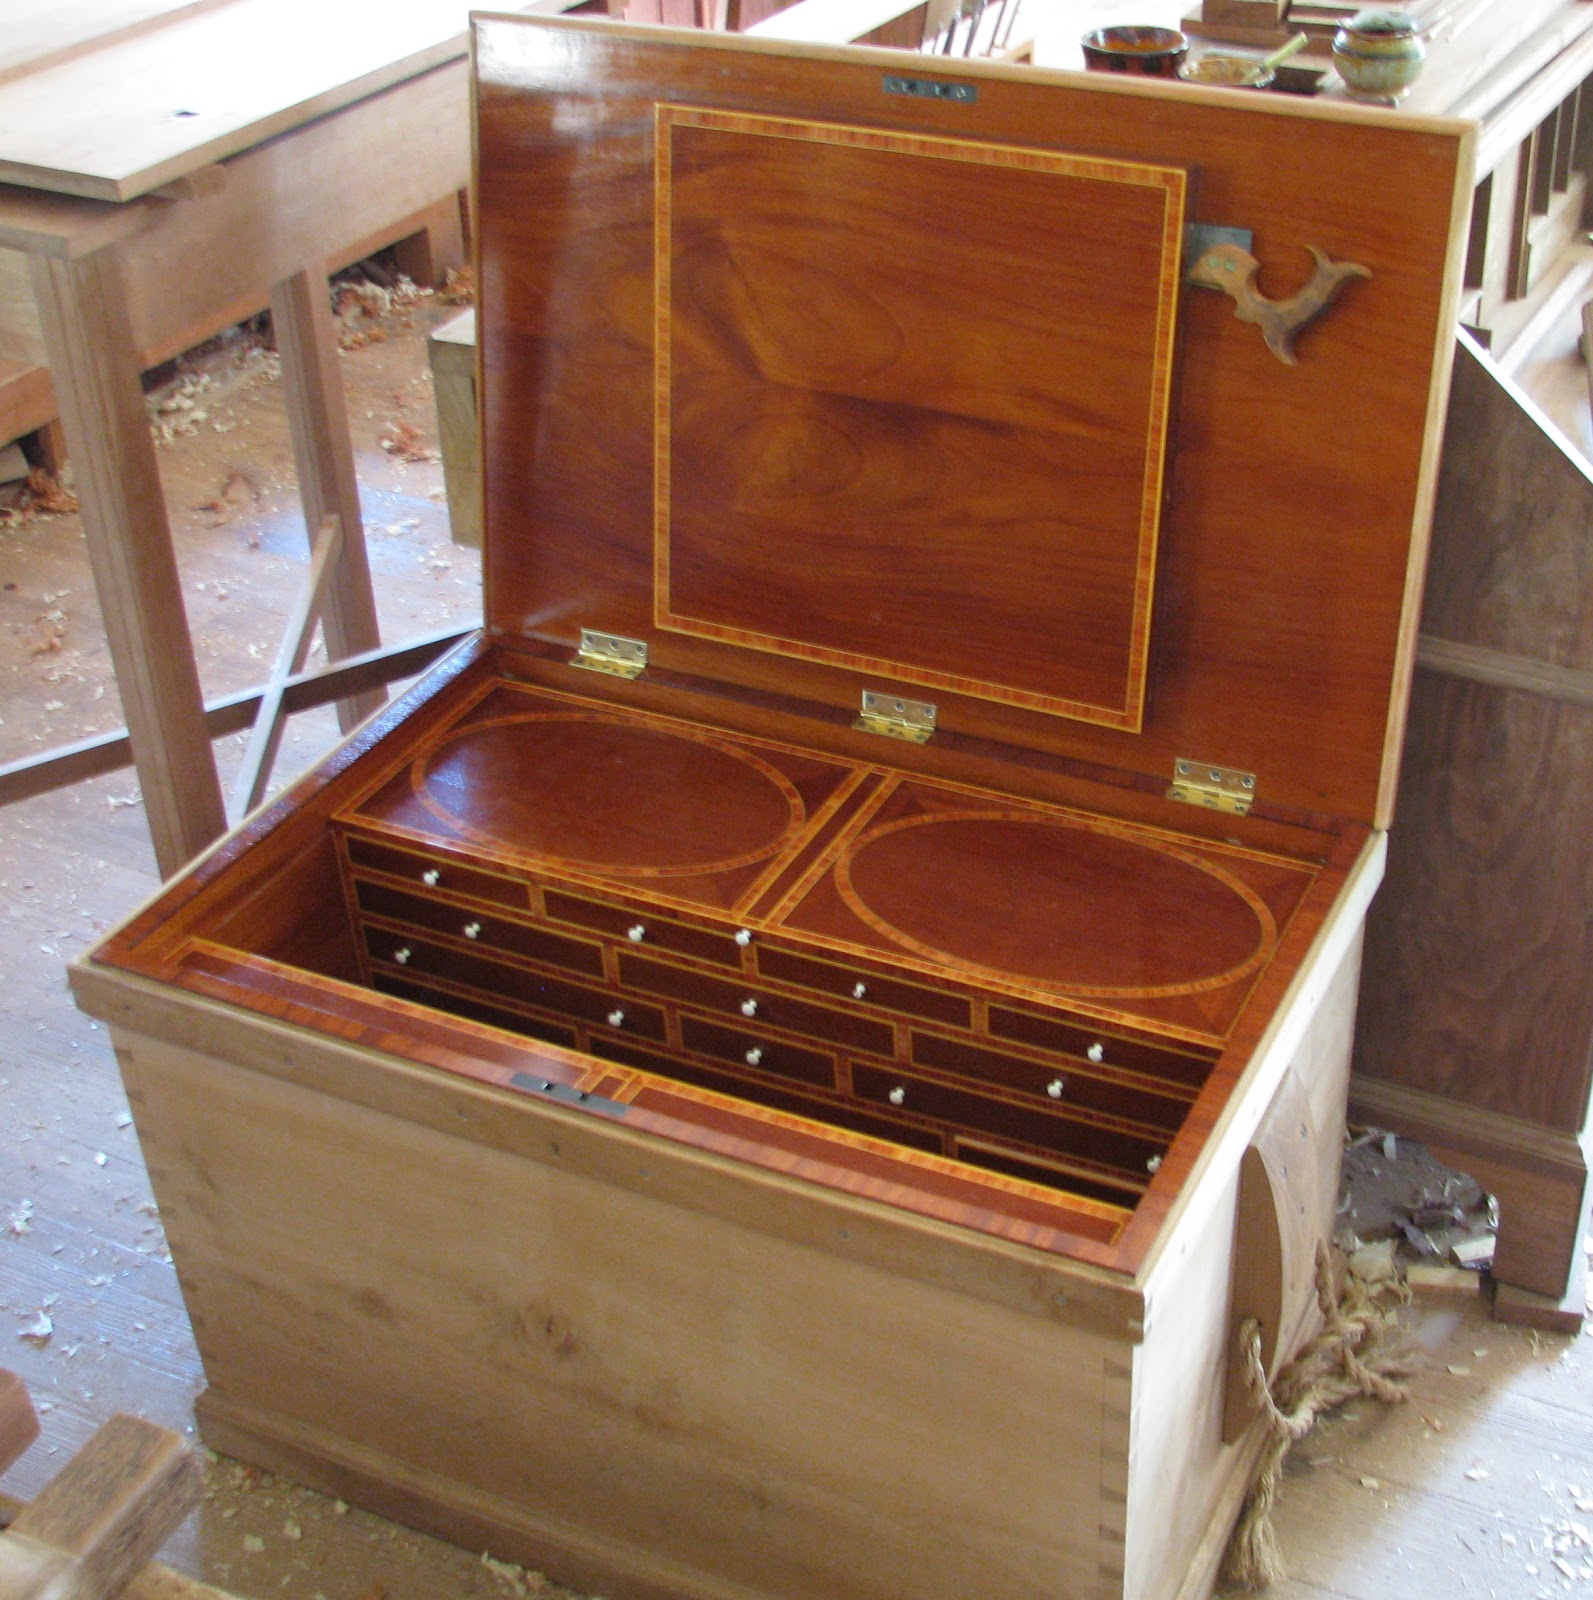
That is a cool ellipse engine.
determining long axis
Jerry Gibbs
Thanks everybody. What is not clear is how to determine the long axis when the angle of entry changes.
Re: determining long axis
Al Stokka - Cambridge, Iowa
Jerry,
Use trigonometry. For your project, duct diameter / sine instersection angle, or 3" / sin 45°.
3"/ .707 = 4.42" (long axis).
Al
Re: angled holes for round objects *LINK*
Galen Vetterick
This may help.
http://www.geek.casaforge.com/code/ellipse2.php
Re: angled holes for round objects
Larry in nw ohio
I made one of those ellipothingys or whatever its called about 25 years ago when I made our oval mirror. I still have it in my shop, only time I used it. Was going to take it apart, but then a couple of days later I`d have to make another. Good luck. Larry
Re: angled holes for round objects
Brian from Monument
That sounds like the incantation of jigs corallary to murphys law.
There are several other ways besides Al's answer
Keith Newton
Since it was a 45*, I was thinking of it as a rise run, like a roof pitch. I used Pythagorean thereom of A square + B square= Csquare, knowing that both A and B were 3.
But it would have been easier to just look on the side of any framing square, and find the length for a 12/12 pitch, then divide by 4, since 3" is 1/4 of a foot.
William, while that is a beautiful tool,
Keith Newton
It is awfully limited in usefulness, given that the length of each of the arms must be the difference between the long and short axis, so if you wanted to make a long narrow ellipse, the length of each wing needs to accommodate that, and it helps if they can be snapped off, and back on.
I made myself such a jig many years ago, out of a bunch of plywood scraps, of assorted lengths. All have a T-slot milled down the length, some have a center cross slot, then all have a little dovetail on each side if the T-slot, which locks them together with 2 little butterfly keys.
The trammel arm, if you call it that is drilled for a router guide bushing, so The router actually makes a perfect cut, rather than marking a line for me to try to saw perfectly.
Back 25 or 30 years ago when I made this, I knew programmers who would spend all day plotting a Cnc path, that I could do in less than an hour, but I'm sure the drawing programs are faster now.
Re: William, while that is a beautiful tool,
William Duffield
Yes, this one is definitely "over the top." To understand it, you have to understand Colonial Williamsburg's Historical Trades and George Wilson and the other things that go on behind the scenes. I don't even try to understand most of their decision process. The ellipses they wanted to use it for were limited to the ones in the picture in my previous post, probably about 60°. And of course, in the 18th Century, there were no routers to do the cutting. I suspect that the veneer in the original Seaton Chest didn't have true ellipses, but pseudo ellipses drawn with four arcs using a compass and straightedge. Yours is definitely more practical, and more flexible. Even for cutting veneer, a 1/8" or 1/16" straight bit in a laminate trimmer makes a lot more sense.
This one's artistry gets even more absurd when you examine the cutting blade that George built to attach to it to cut the veneer. As you know (but probably most of our audience has not thought about until now) the knife kerf is not perpendicular to the beam, except at the axes (plural of axis, not plural of axe). My impression is that this knife holder is designed to swivel, but I'm not sure how practical that would be, since I think it would tend to wander off following the grain.


Here is a photo of a prototype of the wooden part of it, built at the same time, to show the joinery. Obviously, this is not a product of the Hay Cabinet Shop, nor has anyone tried to pretend that it is. Although there was no CNC involved, it has Bridgeport written all over it.

Re: William, while that is a beautiful tool,
Keith Newton
Humm,,,,,,,,, I suspect you are right in your assumption of why he made the knife holder swivel like that, and have to agree, that his attempt to solve one problem may have given rise to another.
I have used mine to cut veneers before, by adding a thin plywood sub-base to the bottom of the arm, then stabbing the tip of my knife just barely through, so there is no room for side tilt.
Even this has a tendency of either scrunching, or stretching a singhe veneer through places, especially if you try to cut all the way through in one pass. I sharpen my knife tip to a fine point which turns back a little. This helps to control scoring half way, then the second or third pass is guided by the scored groove sides, and less likely to follow the grain.
Routers and ellipses (long) *LINK*
Ellis Walentine
While we're on the subject of ellipse jigs (and thank you, William, for posting the photos and story of your superb jig), I thought I would mention an unusual approach to routing ellipses that we cooked up back in my editorial days at American Woodworker magazine. It is essentially an inverted version of William's classic "BS engine" design that you can use to draw or cut out any size ellipse (literally -- from a few inches long to the size of a full sheet of plywood or larger). Click the link below, which takes you to a standing mirror I designed and built using the jig, then backtrack to page 31 of the same issue to view the jig itself.
I wanted to jump in here with a note about routing ellipses, or cutting them out with a swivel-point mat knife or whatever, as this was pointed out to us by a mathematician in southern California after the article came out. When you draw an ellipse using one of these jigs, the single point of the pencil or drafting pen describes a perfect ellipse, within the accuracy tolerances of the jig itself. But, when you rout an ellipse, the width of the router kerf (i.e., the diameter of the bit you use) introduces a tiny error in the perfection of the elliptical piece you're cutting out. The very center of the bit, like the pencil point when drawing, does describe a true ellipse (of which there is only one for any size rectangle -- that's another discussion we can have sometime). But, the cutting flutes of the router bit are spaced away from the center of the bit by half the diameter, so the outline of the piece is parallel to a true ellipse, not actually a true ellipse. This small discrepancy doesn't matter much until you try to use the jig to both cut out a male piece and rout out a female piece to receive it. If you do this, you will see that there are small, incremental gaps at symmetrical points around the perimeter of the ellipse because of this parallax issue. It is so inconsequential that you'd never notice it unless you were attempting a tight inlay job, and the smaller the bit diameter, the less noticeable the effect will be.
So there--- more information than you ever wanted to know. By the way, I still have that jig; in fact, I am using it as my tablesaw extension table, as it comes apart by simply removing the screws that hold the little swivels to the base.
Cheers, and sorry for the nosebleed.
Ellis
Router Ellipse Jig
thanks


