WoodCentral Forums

Est. 1998 — 27 years of woodworking knowledge

Case construction - how do you do this?

Posts

Case construction - how do you do this?

#1

Case construction - how do you do this?

Felix B

>Good afternoon,

This is a case construction question.

I am building a cabinet using veneered plywood for the sides and solid wood for the legs. I'll use biscuits to join legs to the sides. The sides of the legs should be flush with the side panel (see drawing).

However, I am concerned that the edge between the leg and the side may not be perfectly flush (noticeable to the touch). If I plane or sand along the joined edge - I am afraid I'll sand right through the veneer...

How would you clean-up the edge like that?

Thanks in advance,

Felix


img

Re: Case construction - how do you do this?

#2

not a good design

bill tindal, E.TN

>For the reasons you have already discovered it is not a sound idea to make joints like this flush because it is difficult to make them flush and/or they won't stay that way in use. Off-set the leg 1/16 to 1/8" and it will look well and stay looking well. Better still would be to off set 1/8" and set the side panel into the leg with a dado into the leg. I'm skeptical you will get sufficient strength from biscuits. Off-set a 1/16" and a spline would be fine.

If you insist on a flush joint, then overhang a solid leg and plane it to be flush with the panel. Over time the joint will crack the finish and in my mind look worse than setting the panel in a bit.

How do you all come up with these nice illustrations describing the questions?

Re: Case construction - how do you do this?

#3

Just one opinion...

doug f, san clemente, ca

>Felix - This is just an opinion, and the way I've done similar construction for some time. The opinion is free and worth every dime!!

I would not try to miminize the joint by making it flush, but rather emphasize it by setting the panel into the leg by about 1/4". You can do this by cutting a rabbet in the edge of the legs 1/4" deeper than the thickness of your plywood panel. Done carefully on the table saw or with a rabbeting bit in a router, it will guaranty an even reveal the whole length of the legs without the worry of sanding through the plywood veneer.

Like I said, just one opinion. You're going to get a lot of responses on this one.

Have fun with the project.

Doug

Re: Case construction - how do you do this?

#4

Oops! Too late.

doug f, san clemente, ca

>

Re: Case construction - how do you do this?

#5

Re: Case construction - how do you do this?

Doug in Denver

>I agree with what others have said about making the joint flush, but agreee even more on not using buscuits for this. Under the racking forces you will get at each corner, just moving the case during assembly could crack the biscuits.

Re: Case construction - how do you do this?

#6

Ellis Walentine

While I agree...

Ellis Walentine

>...that it is better to have an offset to the panel for all the reasons stated, I also think you can get an acceptably flush and seamless joint from your plywood to the adjacent legs. I don't know what the rest of the cabinet is going to look like, or how the legs will be held in place, but here's what I would do:

Instead of biscuits, use splines, preferably a strong, interlocked wood or plywood. Cut the mating grooves in the legs and plywood with a grooving cutter in a router, possibly offsetting the bit a tiny bit lower for the leg grooves so you can scrape the joint flush to the face veneer later.

For good measure, consider adding a hidden rail or two behind the panel -- certainly at the bottom edge of the panel and possibly at the top edge too, if that edge will not be reinforced by drawer runners or some other structural piece. The mortise and tenons of the bottom rail will hold the legs tightly together regardless of stresses that might come to bear on them.

If you prepare the mating edges well, you should be able to get a seamless look and feel that should hold up over time because -- unlike table aprons, for example, or traditional chests -- there are no expansion/contraction issues with the plywood panel and the legs.

It calls for accuracy, but it can be done.

Ellis

Re: Case construction - how do you do this?

#7

Alan Young

Rabit the Legs

Alan Young

>I have utilized plywood to solid wood joinery like you describe.

I don't know what size your legs will be, but If you start with 1.5" square legs you can run a routed profile on the square leg first, then rip out 3/4" on two cuts of the table saw.


I mortise the legs for 3/4 stock and then glue the plywood panel in the back side.


The ripped off routed profile becomes molding for the inside of the panel.


Alan

Re: Case construction - how do you do this?

#8

Bart Goldberg

Re: Case construction - how do you do this?

Bart Goldberg

>I agree with the others that I would offset the panel to create a 1/4" reveal - I think it looks better. The fastest/easiest form of joinery for this type of application for me is to use pocket hole screws on the interior side to attach the panel to the legs. If needed the pocket holes can be concealed with plugs.

Bart

Re: Case construction - how do you do this?

#9

Anotehr option

Lee Schierer, McKean, PA

>Assuming you have a good reason for wanting the plywood flush. I would cut the plywood 3/4" wider than needed and put a 3/8 rabbet in the edges of the plywood. Cut a corresponding groove in the side of the legs to accept the tounge on the plywood. Offset the groove slightly so the legs are just a hair above the face of the plywood and sand or scrape the excess leg surface off to make it perfectly flush with the plywood. The joint will be quite strong

Re: Case construction - how do you do this?

#10

Here's what I had in mind...

Felix B

>The project is a desk with serpentine front (I took top off and pulled out the drawers for clarity).

The idea of having sides flush with the legs came from the "requirement" to keep it as simple looking as possible....

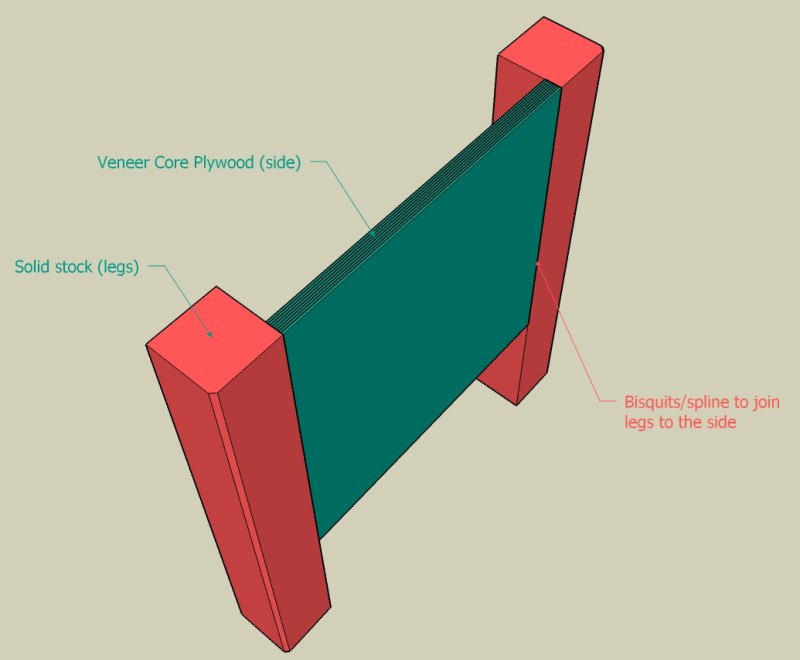
The pedestals (yellow) are veneer core ply (sides) reinforced with the solid wood in the corners.

Additional reinforcing inside the cabinet will not be necessary (as suggested by Ellis) - internal frames (purple) should provide enough structural support. Thanks for a good thought, though.


Each pedestal is mounted on top of the leg assembly (Orange, pegged M&T joint). Molding at the bottom of the pedestal (red) is to cover the visible line between the leg assembly and the pedestal.


Your replies were very helpful and after thinking about what all of you had to say, I agree that the flush edge between the plywood panel and the corner stock can be achieved, but perhaps with the degree of accuracy that is outside of my abilities.

Offsetting the panel and using spline seems to be the optimal solution here. Perhaps a strip of 1/4" ply (as suggested by Ellis)

Once it's done - it'll have one color - Cherry.

Again, thank you everyone for your valuable replies!

Felix

Re: Case construction - how do you do this?

#11

Google has the answer *LINK*

Felix B

>Thanks Bill for the advice... I posted my long(ish) reply with more sketches below...

>How do you all come up with these nice illustrations describing the questions?

I and few others here use Google SketchUp - fantastic 3D cad program. The best part - it's free to download and use. The only feature that's missing (available in paid version; $500) - exporting models to AutoCAD... well, I can get by.

Check out the link below.

felix


Google Sketchup

Re: Case construction - how do you do this?

#12

Bart Goldberg

Re: Here's what I had in mind...

Bart Goldberg

>Felix,

Given that the interior of the case is completely hidden, I still stick to my recommendation that pocket hole screws would be the fastest, easiest and least problematic method of joinery, regardless of whether you make the panels flush or recessed. I think that cutting a stop dado into the legs to accept a spline is a riskier task to perform. Also since the screws will hold the case together as its constructed, the pocket hole screw method will eliminate the problems of gluing/clamping with splines and reduce issue with keeping the case square during assembly.

My 2 cents

Bart

Re: Case construction - how do you do this?

#13

Ellis Walentine

You're welcome, and remember...

Ellis Walentine

>...Flush plywood to solid wood joinery is very common: inset table tops, flush doors, architectural elements... My advice is to not be daunted by it. Splines or tongues will get you there. Just leave enough solid wood above the veneer that you can plane it down with a sharp block plane and scraper.

Ellis

Re: Case construction - how do you do this?

#14

Re: Case construction - how do you do this?

Ted Wong

>As others have said getting a perfectly flush joint may ber difficult. Especially if you're a beginner. Having said that there are aesthetic and design intent issues that may lead you to want to do just what you have described. Leaving a reveal may not fit into the aesthetic route you've chosen. As others have suggested starting with the leg slightly proud of the panel and planing flush is a technique I often use with edgebands applied to sheet stock.

If you are laminating on your own veneer you have a little bit more room for sanding and planing before burning through since most raw veneer is a bit thicker than the veneer found on commonly available plywood or MDF.

Re: Case construction - how do you do this?

#15

Re: Here's what I had in mind...

Doug in Denver

>Whatever joinery method you use, don't be afraid to make it flush if that is what you want. Just make sure that whatever set up you use to cut the mating grooves is set up to give consistent results. And don't be daunted by talk of planes and scrapers if that is not your bag. I guarantee that if I did it I'd use nothing but a random orbit sander for a perfectly smooth joint and no sand through on the veneer.

Re: Case construction - how do you do this?

#16

Thanks Doug for taking time writing!

Felix B

>

Re: Case construction - how do you do this?

#17

Agree, no bisquits

Felix B

>Thanks Doug,

Yesterday, I actually got a Porter Cable bisq. jointer (557 model) just for this... but reading your and bill's posts I agree it wouldn't be the best way to join case together... but I am NOT taking it back - it was on sale (lowe's) for $120...

Felix

Re: Case construction - how do you do this?

#18

Interesting idea

Felix B

>Bart, thanks for the post.

I did not see your post until after I posted my second drawing... Hm, poket screws - sounds possible...

The hold up here is the jig - I know it's not much money (something like $30 or so) but it's something I don't have.

THanks again for the reply,

Felix

Re: Case construction - how do you do this?

#19

Re: Interesting idea

Glenn Madsen near San Francisco

>On the accuracy front, you may find that the splines or biscuits approach is more accurate than the pocket hole joinery. It is with my work, at least.

I use the pocket jigs on kitchen & bathroom cabinets regularly, with good results, but anywhere absolute alignment is needed, splines, mortises and/or biscuits get called on.

Of course, I'm not the best in the world, so I have to know what I can trust most often.

Re: Case construction - how do you do this?

#20

alos you could use

Joe Piotrowski - Chicago Burb's

>a router and a jig to trim the solid hardwood down to the plywood.

over all I believe glue is the best choice to join the hardwood and keep the edge tight. all the wood expansion will push outward since the hardwood is anchored at the glue line.

maybe a few brads to tack it down but I am trigger happy with my nail gun :)

select quarter swan wood and plywood that has all straight grain. I'm not sure if that is called rotary sawn, but it would look great.

a little more fancier, but you can rebate the side of the leg with a miter and all you would see is the plywood.

I not explaining that well but think of the joint a lock miter bit creates. just without the lock.

Re: Case construction - how do you do this?

#21

Well, perhaps I'll give it a shot

Felix B

>and make this project even more challenging then it already is - make the legs flush with the panels. If that does not work, then plan "B" - offset the legs and the panels.

Thank you all again, I sincerely appreciate all of your replies.

Felix

Re: Case construction - how do you do this?

#22

Making 'em flush - not as difficult as it seems

Felix B

>Well, I glued up a mockup of the leg-and-panel assembly to try my hand on making them flush. I used a spline to join them; I also set leg a bit proud of the panel (about 1/32") in order to plane it down.

I have to admit I was a bit skeptical initially, but planing it carefully (the shavings were so thin you could see through them) resulted in perfect joint! I didn't even have to touch a scraper - it came out absolutely smooth and flawless.

Again, thank you everyone for sharing your wisdom and all your help.

Have a great night everyone,

Felix

Re: Case construction - how do you do this?

#23

Of pocket screws, "V"-grooves & flush

DB

>Good excuse to get another tool.

In my previous job making furniture for high end hotels. We would put a lot of solid wood flush with sheet goods using pocket screws and glue. First we would put a "V"-groove on the exposed mating corners with some sandpaper. Just run the sandpaper (on a sanding block) along the edge once or twice. Gives you a nice detail.

Have pocket screws every 10" or so. There are a few of ways to screw the panels to the legs.

#1 Clamp the legs to the panel as flush as you can then drive the screws until just before the leg gets tight. After all of the screws are installed check for flushness with your hand around the leg and adjust the fit as needed, if neccesary back the screw off. After adjusting retighten the screws.

#2 Lay the panel and leg down on the table, hold the leg tight against the table and put the screws in as in method #1

#3 My favorite is just to hold the leg to the panel and drive the screws in as with method #1. With a little practice you could have all of the legs done in less time that it took you to read this post.

We did have a nice Castle pocket hole boring machine to make pocket screw holes instead of a Kreg jig or similiar.

Tell the Wife or whatever that I said it was okay to buy another tool.

Re: Case construction - how do you do this?

#24

Re: Interesting idea

Johanna

>It seems to me that if you are making such an elegant piece it would be inappropriate to use pocket hole screws. I like the idea of the splines.

👍 This page answered my questions

Your vote helps other woodworkers quickly find the answers and techniques that actually work in the shop.