Wow! Oh, wow!
A garden shed
Posts
Re: A garden shed
#27Over the years I found that the bottom of the doors retained rain water and they deteriorated. When I repaired them I I mad the bottoms at a 45 degree angle so that they retained only a few drops of water.
Re: A garden shed
Edited #28Yes, that is on my to-do list before the glue up. Probably not 45 degrees but definitely beveled.
Added later 15 d 9 h 02 min 42 s:
The doors are fit. They move smoothly I'm happy to report. Maybe too smoothly. I expect they will slow down a little once I install the glass for extra mass and some weather stripping for friction.
https://youtube.com/shorts/Lv5XlKzfe-w
Added later 39 d 22 h 07 min 29 s:
The doors are now done after some delay getting the glass. I also replaced the too-small pulls. I liked the design but they were too small and made of cheap pot metal. I got some larger ones of stainless steel. They came with a gloss black finish I did not like so I covered that with a matte black spray paint. 

Re: A garden shed
#29

Nice work. Very nice work.
Planning a very similar project myself once the house is finished.
The size limit for unpermitted garden sheds in Oz is 20 sqm. I've never used Port Orford cedar but Yellow cedar yes. Amazing fragrance but after milling it for two weeks it gets a bit much.
Down under we have Aussie cypress. Hard and brittle but beautiful colour.
Tasmanian myrtle is excellent for Shoji. Clear, tight grained and finishes great.
I am going to use Shoji inside our new house for room dividers instead of stick frame. Can't stand gyproc.
I love Shoji paper though.
My house is a cheeky fusion of Japanese Kura, Minka and English farm house.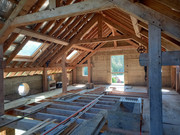
Re: A garden shed
#30Thanks, Maurice. Port Orford cedar is a joy to work with. I'll be sad when this project is over and I've used it all up. I describe the smell as vanilla/ginger. More tolerable to me than yellow cedar. It planes beautifully and is light, strong, and rot resistant.
I designed the shed to have three latticed ranma or transom windows above the doors and window to gain a little more light and ventilation. 
But when it came to make them I decided that they looked too busy and would be too much work for not much extra light and the ventilation wasn't necessary since I had the gable end lattices. I also had one remaining clear vertical grain POC board with a lovely subtle curly figure. I decided to use the board to make solid panels to fit the spaces. I added little re-entrant curves at the corners of the raised part since I saw that feature on Japanese doors and liked it. Here they are after glue up. Wedged through tenons at the corners. 
I made the frames likes those for shoji screens with the coped jaguchi joint that allows one to carry a 3mm bevel around the inside face with clean mitred corner. Here is pretty good one dry fit and before I routed the grooves for the panels. 
Re: A garden shed
Edited #31
Oh man that's just sweet as a nut.
I'm going to model mine after a Japanese temple with the big eaves. Transoms are the business.
Once you get the hang of traditional framing you can't go back. And the natural aromatics in the timber deter mosquito's, flys, spiders etc. So I never ever put a finish over aromatics unless it's an exposed exterior window or door that going to cop direct rain or sun.
My timber frame is native Cypress. Very aromatic. Not as sweet as Cedar of Lebanon but lovely stuff.
I don't need fly screens for my Workshop windows. Never been bitten by a mossie in twenty seven years inside that shop.
Yellow cedar is hard on the nose eh ?
Used to give me a headache after to long.
Lovely timber though.
Cheers 🍻
Added later 4 h 42 min 17 s:
Checked out your YouTube channel Gary.
You the man ! Serious Mojo.
The dovetailing with the bandsaw ?
Brilliant.
You can do so much more than most people realise if you have a well tuned up one.
Well done.
Do I ? Sometimes. Depends on the job. Depends on how many drawer sides.
Often I will have the bandsaw and table saw set up to divide the operations. Whatever is the most efficient.
I sometimes rip the tail's on the cradle of the panel saw with a fine kerf blade. Especially if its a big job. But I still trim and fit by hand because I pare a fine angle on the tail's so they are a taper compression fit. This is how the old boys did it. Much tighter than square edges.
Other times I rip them by hand. Quicker than setting up a machine. Machine cut is to symmetrical and consistent. For some style's of furniture it doesn't feel/ look right.
Hats off to you. Your channel deserves way more hits. Real deal stuff.
Re: A garden shed
Edited #32Sash fit to the shed and held in place temporarily. There will be some narrow trim pieces to hold them in place. 
Added later 43 min 48 s:
Now that the shed is nearly done (save the plastering, floor, and permanent steps) I thought I'd back up and show some of the woodworking that went into it.
After planning and making drawings in Sketchup, I ordered the first round of Port Orford cedar beams and boards from Metcalf Sawmill, mentioned above. Here are some of the beams stacked and stickered next to my garage. The grade of these timbers is STK, which means "small tight knot." Not temple or teahouse grade but better than simple construction timber.

There was another stack of 1"x 12" boards. This was in January 2021.
While the beams were still green I ran a kerf the length of the beam on one surface. In Japanese this called a sewari or "back cut." The sewari expands as the beam dries out so that the other three surfaces don't expand and crack. Some woodworkers also tap wedges into the sewari as the beam dries to enhance the effect. It doesn't always work perfectly but when it does, you get one wide crack on one surface and three intact surfaces. The cracked surface is then placed inside a wall or up or down out of view.
Here is pic of the process:
The freshly cut kerf.
And here is a kerf after about a year of drying.
Using a sewari or "relief kerf" definitely reduced checking and cracking on the other surfaces. I also tried filling in the kerf with a glued in wedge after the beam was dried. That worked sort of OK. A lot of work and hard to make it look better than the look of an open kerf.
Next post I'll show how I squared up the beams after they were dried.
Added later 23 h 06 min 25 s:
After the beams had dried for about 14 months the beams had gone from 32% MC to about 16-18% if I recall. Port Orford cedar dries fairly quickly. I started working them down to finished dimensions slowly. They were short enough and light enough that I could move them over my jointer and through the bandsaw rather than take tools to the work. Here you can sort of see the setup. I have a 26 inch bandsaw with a long outfeed table for ripping off the sides, and a 12" jointer with extra outfeed rollers (and infeed rollers that you can't see). The plan was to remove about the same amount of wood from each face to avoid moisture imbalances, and do it in stages with time for the wood to equilibrate in between. This did take time and effort to cut and restack the beams several times, but it worked. At the end the beams were straight and square. And dry. As you can see here, very little checking. 
And here you can see where I filled the sewari kerf with a long filler strip on a couple of the beams. 
And a few more pix of my setup for milling the beams. 
Added later 02 min 17 s:


Added later 2 d 23 h 45 min 10 s:
Maybe there isn't any interest in this but I'll add a few more pix of the process anyway since I have them.
While the posts and beams were drying I dug holes for the foundation piers.
Before I dug the first hole I performed a jichinsai ceremony to appease the local deities and ask for their permission to disturb the land. https://en.wikipedia.org/wiki/Jichinsai. A builder friend in Japan advised me on this. It can be more or less elaborate and involve Shinto priests and prayers and gifts for children and so on. Or be simple. An offering of salt, rice, and sake, some evergreen boughs, and a few words or thoughts for a safe build. Since I'm in the Pacific Northwest where Shinto priests are rare, I did it myself. I thought the local spirits might prefer salt, home-made sourdough bread, and an Oregon pinot noir. For greenery I took some native Pacific wax myrtle and flowering Ceanothus from my yard and for a Japanese connection swiped some bamboo from my neighbors yard. The little offering table is a step stool my grandfather made for me when I was boy in the 1950's. 
I'm as far from religious as one can be but I do like a ceremony that provides a few moments of thought and appreciation for the task ahead.
Re: A garden shed
#33Some years ago I had a friend who, when leaving after a dinner party, would, drip a small splash of wine outside the front door, and, solemnly intone "My your house be safe from tigers".
When I asked him why, he asked "Seen any tigers around?"
Gary, your ceremony obviously work well as the spirits have been on your side during this build. 
Re: A garden shed
Edited #34Yes, the only injury so far happened when I forgot to duck walking under the scaffolding. Ouch.
The foundation is concrete piers set on footers below the frostline (here only 12 inches deep). Gravel, footer, pier of concrete poured into sonotubes. Before pouring the concrete I suspended a 3/4" stainless steel threaded rod into each sonotube from a template. The template ensured that the rods were placed exactly on the future center lines of the posts, at the correct distances, square to each other, and perfectly vertical. 
After pouring the concrete I prepared river cobbles by boring a 7/8" hole in the approximate center of each one. These were placed over the rods and mortared to the piers. 
Once the posts were dried and milled to final dimensions drilled a hole centered in the base of each one. 
Then I set a post on each stone, squared to the other posts and braced plumb. Then I scribed the post to the stone surface. 
I did the scribing with a pencil and washer. 
Then I started carving to the line. To check where to remove wood on the interior I rubbed chalk on the stone, set the post on the chalk in the right orientation, and then removed the post. Any spots high spots with chalk got carved away. I repeated this until the chalk marks were nearly continuous along the outside edges.

It took about 10 days to get all 6 posts carved. Lots of mounting and dismounting the 37 pound posts. But they came out well fit and exactly (within a 1/16") where they were supposed to be, square and plumb. 
Added later 1 d 35 min 42 s:
Once the posts were scribed to their stones I struck a level line on each post using a water tube. I needed to do this because each stone was a different level from the others. The exact location of a common vertical level line didn't matter. But having one necessary to have a common reference to lay out the post joinery. Sorry, no pix of the water tube method.
Then I layed out the mortises and other joinery on the posts. To do that I first layed out everything on a story pole. Then transferred those markings to each post. That took a long time, checking and rechecking to make sure I was marking the proper faces and using the correct lines. I caught a few mistakes along the way and had to start over. Here is the story pole for the posts. By tradition, the story poles for a build are left behind in the attic for a future builder to use if necessary for reconstruction and repairs. I've saved mine, too. 
I had a second pole for the horizontal components. You can also maybe see that I had cut mortises in the posts near the feet and then plugged them. Those mortises were intended to give access for a nut to screw onto the threaded rods to hold the shed down in case of high wind or earthquake bouncing the shed up off the stones. But after cutting those mortises I realized they would interfere with the the joinery for the floor beams. Rookie mistake. In the end, I decided that having the rods alone without the nuts, and the stability of scribing the posts to stones, would have to do. If we do have an earthquake big enough to jog the shed off its foundation, I'll have other problems worse than that.
Added later 23 h 53 min 44 s:
Here are a few more pix of the shed joinery. These will be the last since there seems little interest. If anyone has questions or wants to see anything else just ask.


Re: A garden shed
#35

Gary, I've enjoyed your posts of the shed construction immensely! I've never imagined a shed as fine furniture. It will give me something to think about (not do) as I rebuild mine next year. The day before Memorial Day this year, a 125-year-old oak that had previously damaged the roof of my shed decided it was time for a suicide attack on it. Took out the shed and about 6 other trees on the neighbors' property.
Jason
Re: A garden shed
Edited #36Thanks, Jason. You are correct that this old style of Japanese carpentry I'm attempting is more like furniture making. Suits me fine since I'm a decent furniture maker but a lousy carpenter. I can't hammer a nail straight to save my life.
Here are the transom panels installed. 
I was kind of moping recently about how long this project was taking me but when I looked at this picture for awhile I realized that I had milled, hand cut the joinery, and finish planed and chamfered every stick and board that you can see. It didn't seem like work while I was doing it but it does explain why so much time has gone by.
Added later 2 d 13 min 34 s:
Some of the joinery that is hidden in the finished shed is that which fixes the barge boards/barge rafters to each other. A scarf joint at an angle, locked together with a single shachi sen or tapered, parallelogram shaped pin or wedge. 


A video of how it comes together.
https://www.youtube.com/watch?v=VyUib2bJ5wk
Re: A garden shed
#37

Jason Roehl in Lafayette, IN wrote:Gary, I've enjoyed your posts of the shed construction immensely!
Appears you are not the only one. I think this is a new record for views on a topic.
Re: A garden shed
Edited #38Hmmm. I wonder how many of those views are bots?
The barge boards are joined to the ridge beam and the eave beam/top plates. The Japanese terms for these don't translate well to English/western terminology but you can probably understand the construction. The joinery solves an interesting problem in that you have two flat boards that are supposed to attach firmly to the end of three sticks with no visible connection from a normal view. Japanese carpenters came up with a handful of joinery solutions. Here is the one I chose.
There is a lot going on here. The barge board is to the left seen from its back side. Inserting into the back side is a loose tenon dovetailed on one end. That style of tenon is called a yatoi hozo. The other end of the yatoi hozo is let into the end of the eave beam/top plate in an open mortise. The end of the eave beam is also housed into the barge board. The barge board also rests on a sloped lip of the eave beam.
When fully inserted the loose tenon is wedged in place with two tapered pins that fit into those angled mortises that are half on the eave beam and half on the loose tenon.
Here is what the the pins look like in a test fit.
I used a similar joinery for the ridge beam. Here are the yatoi hozo in a test fit projecting from the back of the barge boards.
And here is a view after one set of barge boards was in place:
Added later 1 d 10 s:
The last bit to show is the joinery between two floor beams, a sleeper, and the middle post. I don't have good pictures of the actual joint on the shed but I do of a scaled model. Here is a drawing from a Chris Hall monograph on splcing joints:
And here is the model I made:
This is how the floor beams intersect, minus the post so you can see their interaction:


And you can see it assembled on the shed in the lower right corner of this picture. 
Re: A garden shed
#39The bottom horizontal on the door to my shed rotted due to rain water that settled there. So when I replaced the door I cut the bottom at a 45 degree angle to minimize the amount of water that would sit there.