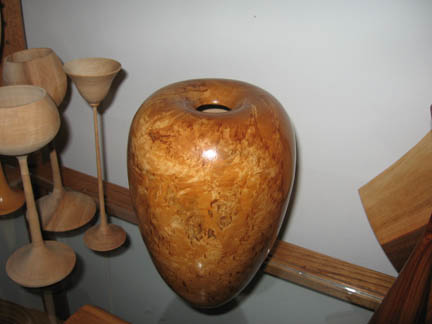
I recently turned a hollow form from a Sugar Maple burl which has very nice figure, but almost no color. I like the fact that the viewer discovers more and more detail as they get/look closer, but it's a bit too dull as is. I'd like to add some color with alcohol-based dye to help the curled figure "pop".
Here's the issue, though..... I've already applied Watch Danish Oil (figuring it might be enough), and its well cured -- it was applied maybe 3 months ago.
SO -- can I still get some color in there? I just received some Artisan dyes from the good folks in Provo, Utah, and will probably experiment, but I'm hoping maybe someone here has some wisdom to share. Ideas? Can I use mineral spirits to help get some finish out, or expose some wood fibers? Ethanol?
I don't have a photo yet (or a decent camera at the moment), so I will probably do my best with a cell phone camera to record the before & after -- haven't done that yet.
...of dyes into the wood, and it seldom works to attempt to sand the surface down to allow better dye penetration. The last time I checked, the Artisan dyes from Craft Supply were anilines, not very light fast compared to the metallic acid dyes like TransTints.
If the walls are thin and the inside is not dosed with Watco, it is possible to get an interesting effect by filling the inside with dye solution and waiting a week or two or three.
The dye will not penetrate through the grIn evenly or uniformly. It can be more even with long soaks, especially if the walls are not thicker.
RISK. It can be ugly blotchy and leave you the alternative of air brush paints.
The other color technique is air brush with transparent paints to tone and shade the surface
It is not likely that mineral spirits would have any effect on Danish oil applied three months ago. The oil and resin in the finish would have cured relatively quickly and be inert now. No reason not to try, but I wouldn't expect results.
but, if you must. I would soak it with lacquer thinner, scrub with scotch-brite, wipe down, then sand it again. I think you will wash the Watco off the surface, but not on the porous sections. That makes it the opposite of what I like to do with dye. I like to dye it black, then heavily power sand it with a random orbit sander off the lathe. That leaves the black only in the porous sections and lets you add the contrasting color on the hard sections. The real danger here is if you keep chasing a technique, and never like the result. Beware!
You can do this. Here is how. When I apply dye to my pieces, I almost ALWAYS seal the wood with lacquer before applying dye. "But what about penetration?" you ask. Over sold. Here is how Don Derry gets his amazing finishes and how I do it.
1- Sand the surface of the piece. Use 180 or 220, but no finer. Get any oil layer off the surface, but do not worry about the oil cured in the pores. Dust and damp wipe. If you get any grain raised, sand again. 180 or 220, but not finer. Emphasis should be on regular sanding pattern. Remove obvious marks.
2 - Apply dye with an airbrush (assuming you have one). Soaking the wood with dye is a false promise propagated by Jimmy Clewes' demos on highly figured platters. I poke fun at Jimmy because he and I have discussed this at length and we agree. Here's why. When he demos dyeing platter rims, the wood is mostly in one plane of the grain and has figure. On more plain woods and on round forms, you will have obvious side grain and mostly end grain. Where the side grain is, the dye will be noticeably lighter because of a lack of penetration. For example, I turn end grain vessels and dye them. these have a band of side grain around the girth, but everywhere else has exposed end grain. You end up with the "white ring of death" where the sidegrain is.
You could argue that the cured oil will prevent uneven penetration, but the catch is that, most of the time, the solvent in the dye will poke holes in the oil barrier, then you have a worse problem: pinhole dots of very dark color. YUK.
Don Derry layers the dye on with an airbrush. You can always add more color, but you can never take it away. Keep in mind that when you spray dye on dye, the solvent in the wet dye will reactivate the dried dye and could cause runs. Apply dye judiciously.
3 - Once the dye has dried, apply spray lacquer over the whole surface to seal the dye. Again, DOT NOT spray a heavy coat because the solvent in the lacquer will reactivate the dye and cause runs. A few light coats to seal.
4 - Once sealed, you can apply lacquer more liberally. Don goes for a glassy finish. After five or six coats of a heavy-bodied lacquer, he we sands the lacquer with 400 to 600 grit. Use a raking light to eliminate any transmission of the wood texture (pores) through the lacquer. The goal is to have a dead-flat lacquer surface. DO NOT sand through the lacquer to the dye.
5 - Once you have a dead flat surface, it will look flat due to the sanding. you can then polish the surface to a very high gloss. I use McGuire's Autobody polishing compounds. Again, I examine the entire surface for dull or hazy spots. My personal test is to use a student desk lamp to shine on the surface. If the gloss is good enough, I can CLEARLY read the text on the lightbulb in the reflection on the vessel. You can hold any white paper with small text near the surface and read it in a properly polished surface.
For some reason, Don does not often teach coloring in detail. I asked him many years ago if I could develop a demo around his technique and he said yes. So, I often teach the Don Derry method. Don learned it in the electric guitar-making business as how they make highly polished "axes".
I have a handout on my website that goes into more detail: AirbrushingWood.com Look in the reference page.
I really appreciate the information in a topic about which I know nearly nothing. I can turn wood pretty well, but coloring is something I've never tried. I especially appreciate the very detailed response from Joe Flemming and the references to his work and that of Don Derry -- two excellent mentors!
I scuffed it up a bit with a Scotch Bright pad, and I think, since I have a perfectly good hollow form now, that I will smooth it out again, and experiment with color on the next one, and before I apply any oil finish! I sometimes apply a penetrating oil to freshly-turned green pieces (a la Luke Mann) to help slow down the drying and allow the burl figure to create ripples without small checks.
I have a number of other Sugar Maple burls to play with, and the trick will be to judge which I need to try to color, and which should be left alone "au naturale".
Since I don't have -- or have access to -- an airbrush, I'll have to play around with brush-on or wipe-on methods for now. I can also practice on some low-stakes wood, or even a little hollow form turned from a core removed from a burl bowl. The only camera I currently have available is a crappy cell phone camera, but will try to post a photo of the piece as is.