Home Articles Forums Gallery Marketplace Videos

WoodCentral Forums

Knowledge You Can Build On — Est. 1998

Compare cordless drills on the numbers that matter

another way of wrapping for hollowing

Posts

another way of wrapping for hollowing

#1

another way of wrapping for hollowing

phillip Medghalchi

I have struggled in the past when I wanted to hollow out inside of a large bowl or vase. It was said that use some duct tape, or reinforced packaging tape ( which is expensive per roll) to wrap around the outside to eliminate the chances of chatter and possible blow out. You all know that duct tape or packing tape is not that flexible across the width of the tape, therefore makes it hard to wrap it around a curved area like a bowl which is not a straight line and specially if you gave it a curve or even did some beads and coves on the outside. To make this effect even worse is that when you try to wrap it around when the radius is reduced then you end up having too much material(tape) puckering up on the lower curve than the upper side of the tape.

So, below you would see something I thought of a long time ago and even bought it and put it away until today when I found it where it was not supposed to be and used it.

Ok, no it is not my hip bone or leg that is warpped up it is


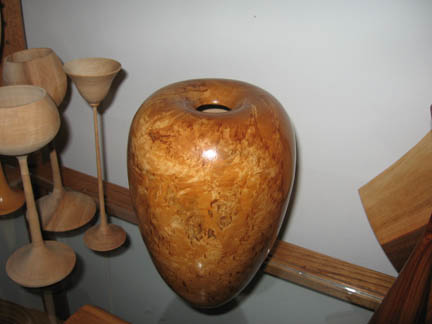
A red cedar vase (local) which was given to me by a friend and she asked me to make something out of it for her.

Now, here is my reasoning for use of this warp. This is the wrap you get when you go have blood drawn (wrapped around your arm- different dia. across your forearm) or if you have a spring or strain in a limb or joint(wrist, ankle). 3M was smart to come up with this and the idea is that it tightens as hard as you can wrap it,it takes shape of anything it's wrapped around, but it gives when you have to move your limb, wrist or ankle. It can also be reused few more times if you don't get it wet or dirty and it locks on its own self ,(duct tape is only used one time). My idea was that we needed something that keeps the bowl from flexing too much so it would not blow out. The duct tape is awkward to wrap around the rounded curve. Ok, you see the idea that if you are really pushing to hollow out it gives a little, but keep the whole thing in place when too much force is exerted.

Now, word of caution: on my first try I did not pay too much attention that I wrapped this vase tightly and so I could not tell the true thickness of the piece( as you can see in the pic.). I went about hollowing it out, however, only in one place I went too far and the vase is too thin, so like paper thin.So, if you chose to give it a go, be mindful of the thickness you are aiming for and leave your self a little room for final touch so you don't end up in my situation.

The whole idea was that this piece as you all advised before against the red cedar cracked every time I came back to it and I could not figure out how to hollow the remainder 1/2 without it blowing up on me. So, I managed it nicely, and hollowed out w/o blowing up on me.

this tape is a little expensive ,but can be reused few time. If anyone tries it and you like it,please let me know. Since I used to sell medical supplies before I amy be able to get it in a large qty. for much lesser than what you can buy it for at the store, and also larger roll too. but I have to have enough responses from you guys that you want to buy it before I venture to put out that kind of money.
Re: another way of wrapping for hollowing

#2

Re: another way of wrapping for hollowing

John Lucas

Why do you have to wrap them? I have only wrapped a few pieces I. All the years those were pieces with huge voids that would have flown apart from centrifugal force.

On pieces with large voids where tape actually goes into the void I cover it with wire screen before taping

Re: another way of wrapping for hollowing

#3

Lyle Jamieson

Re: another way of wrapping for hollowing

Lyle Jamieson

I agree with John L, why wrap it?? Than I saw the following post. The bowl you have there is full of cracks. Do you like the cracks?? If you like the cracks then you should try to wrap it somehow. But you are still flirting with danger. There is a ton of wood out there without cracks. This stuff grows on trees. The wrap is some help for turning the inside. BUT what about the danger of turning the outside. BUT what about the danger after you take the wrap off to sand or reverse?? As John J says..." life is too short to use crappy wood" I personally turn only wood without cracks and there is no need for wrapping.

Re: another way of wrapping for hollowing

#4

Re: another way of wrapping for hollowing

Dick Coers

Is that the same stuff they use to wrap horse legs? Go to a farm supply store. No comment on the viability or safety.

Re: another way of wrapping for hollowing

#5

Re: another way of wrapping for hollowing

phillip Medghalchi

"Why do you have to wrap them? I have only wrapped a few pieces I. All the years those were pieces with huge voids that would have flown apart from centrifugal force.

On pieces with large voids where tape actually goes into the void I cover it with wire screen before taping"

John, the reason I had to wrap it was that:

1- Piece was too deep and I only managed to hollow the first 1/2(almost)W/O wrapping it on the first go round, then I put the piece in the same shavings from the same wood to slow down the drying process. Then I think next day or two I went back to start hollowing the rest of it, but I found out that it started the cracking. I then put some CA glue trying to stop it from further cracking. I went then to hollowing it and it chattered a lot and could not get a smooth cutting edge on it ( all this was done W/O having any steady rest to support that much wood dangling from the chuck). In the meanwhile, a pice of it came off because of a crack developing so i glued it back togethe and left it alone for almost a month or two so. I kept getting catches no matter what tool I used. So, I left it alone and decidecd to try out my wrapping method to see if I could go further with it. Even, by wrapping it with this method I was still getting catches and it ws hard to get the scrapers or round carbide tool in there to hollow it out. the only thing I had little luck with was a 1/2 scraper. On the way of cleaning the ridges left from tool id ehrn I could not tell the true thickness.

I do not pick up the cracked wood like Lyle was metnioning in his reply on purose. However, I try to finish what I already started. This wood as others said is prone to craking and I was trying to do my best to save the time I put into it. If we don't take the challange and give up eveytime how else we are going to learn.

I like to master my skills to the point that I create something w/o warpping.

Could you be kind and share how you would hollow out a piece that deep, please? If you were to work on this piece? I just aqquired Lyle Jamison's hwolloing rig which I am going to try on the next vase I got which the outside is already turned and see how it goes. but. ilike to hear if you done your pieces W/o using any hollowing rig? Appreciate your input.

Re: another way of wrapping for hollowing

#6

Re: another way of wrapping for hollowing

phillip Medghalchi

Lyle, that's what I was doing hollowing the inside. i haven't gotten around to use your rig yet. I have to move some stuff around to make room for me to use the long handle on your ring. i was just trying to do this with the tools I got. of course, this was the first Red Cedar (local) wood and didn't have any experience with its characteristics. I have prepared a Bradford pear vase before i bought your rig which I am going to try your hollowing rig with it to see what kind of result I'll get.

None of the woods that I have at my disposal are wet anymore, remember when you came to waco, we still had that kind of heat all the way to middle of Nov. that sucks the water out of anything we have out there.

Re: another way of wrapping for hollowing

#7

Re: another way of wrapping for hollowing

phillip Medghalchi

Dick, I am sorry, I am city boy and I haven't been around horses that much. I can not verify if it is the same thing they use for horses, if it is strech wrap then it may be the same. This stuff wraps around any shape of any parts of the body and it streches to get tighter and it clings on its own texture. what I like about it that it conforms to any shape without wrinkles. I'll look into it when I go to the feed store to get things for my dog, thanks for the suggestion.

Re: another way of wrapping for hollowing

#8

Re: another way of wrapping for hollowing

John Lucas

This will be a short response because I can't type

On this phone. That vessel isn't that deep. I'd probably just use my bowl gouge but my Hunter Herculese would do it easily.

You shouldn't need a steady rest for something that size. If your getting your getting chatter the piece may not be mounted siliy or your tool usage could be a problem.

Whenever you stop working on a piece put it in a plastic bag. That will keep it moist. If your slow at hollowing spray the outside with water every so often to keep the cracks at bay.

I haven't turned much cedar but what I have turned didnt seem to be any more crack prone than other woods

Re: another way of wrapping for hollowing

#9

Ace bandage or elastic bandage

John Lucas

I haven't used those but did find that putting rubber bands around very thin turnings reduced the chatter. I assume the elastic bandage would do the same or more. Being some what athletically inclined (read that as I often sprain something while playing) I always have a few Ace bandages on hand

Re: another way of wrapping for hollowing

#10

Re: another way of wrapping for hollowing

phillip Medghalchi

John, thanks for replying so quick. I didn't expect you to use your phone and text. You should your phone for really important stuff, but I am grateful for that. i try to look into it and see what was the problem, so I won't repeat again. Thank you.

Re: another way of wrapping for hollowing

#11

Lyle Jamieson

With voids

Lyle Jamieson

I would not have been so pushy if I had not seen the bowl photo from your template post below. It is full of cracks and very dangerous to turn. You will see the process of how I turn hollow forms in the DVD I sent. If you follow my process you will not need a wrap or steady rests. Do the vessel in stages, on a faceplate, using solid wood, and turned to a uniform wall thickness you will be good to go. The trick to hollowing with voids (not cracks) is to have a "bridge" of wood securing the top of the vessel to the bottom. Starting between centers find the axis that works while you are hogging off the outside. If there is no support bridge don't hollow it. Toss it out or change the shape to insure the piece will not self destruct when hollowing. I have done hollow form vessels that have a lot more then 50 percent air spaces, safely and easily. A wrap would stretch over the void and get in the way for hollowing. Once the outside shape insures a chunk will not fly off when hollowing, the trick is to hollow the inside in small stages. Do a half inch near the mouth opening, get it done, get it thin, get it clean, get it uniform wall thickness, get all the tool marks out. Hollow the next half inch the same way and DO NOT GO BACK!! Lightly transition between the stages but never go back to the top again. Don't go back to the first stage, its done. You can not go back because there will be no support to hollow there and soon it will not be round anymore. So, you work your way down into the vessel in small supported stages and don't go back. Did I say, Don't Go Back??

Some locations have a challenge using green wood. There are trees coming down everywhere. Just get them fresh and work them fast before they crack. Or use smaller pieces that can be dried without cracking. This might sound like strong language but I would take up knitting rather then turn dangerous wood. Mesquite is very forgiving and is what I would look for down there.