Home Articles Forums Gallery Marketplace Videos

WoodCentral Forums

Knowledge You Can Build On — Est. 1998

Fast and affordable laser cutting – so you can make the parts you can’t find anywhere else

Gnarly Void Problem - HELP!

Posts

Gnarly Void Problem - HELP!

#1

Gnarly Void Problem - HELP!

charlie belden

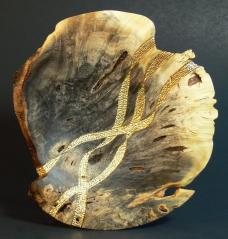
Following John Lucas's suggestion (I think he was the one), I found a gnarly piece of what is probably driftwood with really interesting textured, weathered to gray , surfaces,

A little bandsawing to get a piece I could turn on my JET VS Mini, a 1" forstner bit drilled shallow hole for spigot jaws and it was Roughing Time. Beneath the gray weathered surface - hard, rich reddish wood - with feather grain around some of the depressions in the surface. Oh Boy!

Had the makings of a profile I liked and intended to turn either a tenon or a recess in the bottom to grip the piece for hollowing. That's when I discovered The Void Inside. Here's the situtation.


Here's a detail shot of the texture on the top


And here's a detail shot of some of the feather figure.


I REALLY want to save this thing - but short of filling the voids with epoxy, I'm at a loss for a solution to my problem.

HELP!

Re: Gnarly Void Problem - HELP!

#2

Re: Gnarly Void Problem - HELP!

Colin

What about making a donut chuck? (Lots of results on Google)The are usually used for finishing the bottom but could be used for hollowing. Or maybe carefully use a vacuum chuck with some wrap to stop the voids letting air pass?

Re: Gnarly Void Problem - HELP!

#3

Re: Gnarly Void Problem - HELP!

john lucas

It looks like you've already turned the outside and need to hollow the inside. Is that correct? Just make the bottom flat and glue it onto a wasteblock. If you need accuracy just make a very short tenon and then bore a hole in the wasteblock to match this.

Re: Gnarly Void Problem - HELP!

#4

Re: Gnarly Void Problem - HELP!

Don Evans

This looks like an accident just waiting to happen!

BUT, what a great base it would make for the right carving!!

If you don't do any carving, maybe now is the time to consider it, use the weather side up with a finish on it, flatten the bottom with belt sander.

Consider giving it to a carver if you don't know one I can make suggestions.

Don

Re: Gnarly Void Problem - HELP!

#5

Re: Gnarly Void Problem - HELP!

Barry Irby

You could use a glue block. If the bottom is flat enough, you could glue a piece onto it and use a face plate or you could mount a piece in your chuck and face it off to match the bottom of your vessel and glue it on. Takes some careful centering, but it should work. If the bottom of your piece is not flat and you can't flatten it easily, you could turn a matting piece like a shallow bowl and glue it to the wall of your piece beyond the foot. Some people would use hot glue, but I am skeptical of it. When you are finished with the part you can get to, you reverse chuck it and turn away the glue block or chuck mount. I would glue it by using the tailstock to press it against the glue block.

Re: Gnarly Void Problem - HELP!

#6

Re: Gnarly Void Problem - HELP!

Bob Macgregor

As-is, that's a really solid tea-light base.

Re: Gnarly Void Problem - HELP!

#7

Re: Gnarly Void Problem - HELP!

Doc Green

What John said above . . . use a waste block.

It appears you have drilled a recess in the bottom of the piece. My suggestion would be to turn a tenon on the waste block to fit into the recess so that centering is not an issue.

If you can, flatten the bottom of the piece a bit more to give as large a glue surface as is practical. Use tailstock support as much as possible during the hollowing operation.

Good luck, ~Doc

Re: Gnarly Void Problem - HELP!

#8

Re: Gnarly Void Problem - HELP!

charlie belden

re: Donut Chuck

Since the top is not flat, but slanted, gnarly and asymetric, it won't work in a donut chiuck without a LOT of custom shimming

re: Vacuum Chucking

As you may have noticed in the Top and Bottom photos, this thing is riddled with voids and crevices that start on the outside of this asyemetric beasty, sealing all the openings would be impossible.

Great ideas - for some future turning problem - but not so good for this one.

Re: Gnarly Void Problem - HELP!

#9

Re: Gnarly Void Problem - HELP!

charlie belden

The bottom where a tenon, recess or glue block might be used is riddled with voids. I'm amazed the tail stock center didn't break through into the interior voids, it's like swiss cheese on the bottom and voids running up through the center.

I guess I may have picked the wrong piece of the larger piece of driftwood this was taken from. Could be that there ARE pieces of wood that can't be turned.

Re: Gnarly Void Problem - HELP!

#10

Re: Gnarly Void Problem - HELP!

charlie belden

I really really, really like the texture and color of the top of this thing and had planned to leave a lot of it when I hollowed the inside to show off the wood under all that weathered surface. The juxtapostion would be pretty dramatic - asymetric gray with heavy "organic" texture and symetric polished interesting reddish grain. Great set up for Don't Judge a Book by Its Color.

I just may have to carve rather than turn the inside of the "bowl".

I've got more of this stuff and know of a local Carvers Club. If I can't turn it and can't carve out the "bowl" - I'll donate it.

Re: Gnarly Void Problem - HELP!

#11

Re: Gnarly Void Problem - HELP!

charlie belden

Drilling a large hole into the bottom and plugging it with sound would turned to fit might work. If the plug were of the same wood it would make it less noticable in the bottom of the finished piece. THAT has possibilities.

Thanks.

Re: Gnarly Void Problem - HELP!

#12

Leo Cuellar

Re: Gnarly Void Problem - HELP!

Leo Cuellar

I haven't tried it yet, but I would consider making a sled for it of the sort that Terry Scott used in his article (in Woodturning?, can't quite remember) on turning a sedar. It would also provide better support if you intend to make the walls on the thin side.

Re: Gnarly Void Problem - HELP!

#13

Re: Gnarly Void Problem - HELP!

charlie belden

Except for the fact that there's swiss cheese just barely under the hole I drilled for the Spigot Jaws. The existing hole is too shallow for a Tea Light. If I drill any deeper, the hole won't have a bottom, or rather the bottom of the hole would be WAY inside the piece. Fire with wood around it above it? I think not.

Thanks for the idea though.

Re: Gnarly Void Problem - HELP!

#14

Re: Gnarly Void Problem - HELP!

charlie belden

I didn't drill a hole in the bottom - the tail center's in a recess in the bottom of the blank. And just above where I placed the tail center is the bottom of a large void that starts just below the surface of the top of the piece. Since the bottom is swiss cheese, even if I flattened it - there'd be very little solid surface to glue to.

I picked up some plastic beads at a recent Makers Faire that can be molded once warmed to 150 degrees. I'm thinking I could warm it up and push it into enough of the void space to create enough solid surface for a glue block to be used for the hollowing. After the hollowing is done I could heat the piece, soften the plastic and remove it. Will look into THAT possible solution.

(See, there's always a reason to buy stuff that is interesting but for which you have no specific application when you acquire it. I pick up Solutions Looking For Problems To Solve all the time - with no idea at the time what the problem it will solve might be. Done that often enough to trust my instincts.)

Re: Gnarly Void Problem - HELP!

#15

Ps...

Barry Irby

I agree with whoever said this looks like an accident waiting to happen. Look the piece over carefully for flaws and consider what would happen if this thing explodes. Wrap it in packing tape, Wear your PPG, stay out of the line of fire, and dial 911 on you phone so you only have to press Send.

Re: Gnarly Void Problem - HELP!

#16

Re: Gnarly Void Problem - HELP!

John Lucas

Charlie I don't have any photos on this computer showing the technique but you can make sort of a custom form to hot glue it to.

What I do is take one of the wire pattern gauges that you use to duplicate molding. Push that against a section of the piece. cut this out on the scroll saw. Your making a wedge with the 2 sides of a triangle and the 3rd being the shape of the piece. make about 6 to 8 of these go go around the vessel. Then hot glue them to the piece. then glue this to a large wooden faceplate. that will allow you to turn hollow it out.

When your done take some fishing line or thin wire held between 2 sticks. Use this to sort of saw down through the hot glue joint. that will pop your forms off. the it's just a matter of getting the hot glue off. most you can rub off with your fingers. The rest you can remove with alcohol. I forgot to tell you it's easier to remove if you put some sort of finish on the outside before you apply the hot glue.

Re: Gnarly Void Problem - HELP!

#17

Re: Gnarly Void Problem - HELP!

charlie belden

I'm afraid the piece is too asymetric for some sort of support jig. And if I surround the outside with support structures, how will I be able to check wall thickness?

I think the low temperature moldable plastic just might hold the answer to my problem.

Anyone else have any ideas?

Re: Gnarly Void Problem - HELP!

#18

Re: Gnarly Void Problem - HELP!

robo hippy

I am thinking like Charlie, make some sort of negative form that fits the outside, and use it as a big jam chuck. If you want to get fancy with it, cut some slots in it for checking wall thickness, or just add the thickness of the jam chuck to your calipers. Might have to tape it in place, or hot melt glue to it, and do a lot of hollowing with the tailstock on a long spigot till you are almost through. Doughnut chuck could work, but it would involve padded hooks that come up over the rim, in a number of places, through a piece of plywood, maybe added after you turn a good chunk of the rim with the bowl pressed in with the tailstock. This will be a piece that you turn slowly.

robo hippy

Re: Gnarly Void Problem - HELP!

#19

Re: Gnarly Void Problem - HELP!

charlie belden

I think I understand the idea for a "custom form". Is this what you had in mind?


I think I have an easier way to go.


Re: Gnarly Void Problem - HELP!

#20

Paraffin

Dave Belser

Hey Charlie, I was resisting the urge to suggest paraffin, but you are headed in that direction anyway with the plastic stuff you are talking about.

I've been using wax to hold and support all sorts of weird stuff and it was the first thing I though of when I saw this.

It's really quite simple. Make a large-ish bowl shaped mounting block that you can set the bottom of you piece in. Allow for some form of registration to keep you on axis. Melt enough wax to fill the bowl/mounting block and then heat the bottom of your piece. When the wax is just skimming over press them together.

Surface area is your friend. The wax will flow into all of the voids etc. You may want heat the work in an oven a little bit instead of using a heat gun. The reason for heating is that the wax will flow into the wood and grip it better, this is true for the mounting block also - otherwise there is a tendency for the wax to quickly cool on the surface before it binds with the wood.

At the end just heat it up an soak out any remaining wax. Best to use an oil and wax finish, but you can cook most of the wax out and then shellac spray followed by finish of choice.

- Dave

Re: Gnarly Void Problem - HELP!

#21

exactly what I had in mind

John Lucas

Re: Gnarly Void Problem - HELP!

#22

Re: Gnarly Void Problem - HELP!

robo hippy

Actually, I was thinking of turning a bowl that would fit the outside of your piece. Using the wax to firmly seat it and hold it seems like a good idea. You would most likely need to use a WOP for a finish rather than a spray lacquer as the residual wax wouldn't let the spray stick.

robo hippy

Re: Gnarly Void Problem - HELP!

#23

Katherine Kowalski

Re: Gnarly Void Problem - HELP!

Katherine Kowalski

Good suggestion. David Nittmann often uses this technique to turn burls.

He turns a bowl the fit around the burl cap, then uses hot-melt glue to attach the piece. After hollowing, (and doing his famous basket illusion), he then removes the burl from the form... and there are no chucking marks to mar the pointed surface.

Katherine

Re: Gnarly Void Problem - HELP!

#24

Re: Paraffin

charlie belden

Leave it to David to make what seems impossible possible. But in this instance wax probably isn't the answer. This piece of wood has too many deep narrow crevices - and that's just based on what I can see from the outside and from peeking into the voids down the middle I can see from the OUTSIDE. What's INSIDE will only be known as the hollowing progresses.

I want to keep as much of the gray weathered textured surface on the top as much as possible because it has such an unusual look - that will contrast dramatically with the turned, sanded and finished inside. So I don't want ANYTHING to change the colors. Sand the inside and the sides to 12000 maybe - to get a luster - nothing else. OK, so maybe a wipe with garnet dewaxed shellac on the inside and sides to pop the figure. I', afraid hot wax getting on the top surface will be impossible to get off since heating it also means it can penetrate. Once in the wood there's no way to get it out - without destroying the weathered gray surface.

This ShapeLock stuff doesn't flow like hot wax does, but works more like modeling clay - that HARDENS to a machineable solid plastic - transparent when hot enough - opaque white when cooled to a solid.

Maybe, just maybe - I can use it in the bottom first, while I can still hold the top side in my spigot jaws, to keep things centered, then turn a recess in it on the bottom for expansion chucking. That would make hollowing so much EASIER.

Will report back what I discover.

Re: Gnarly Void Problem - HELP!

#25

Re: Ps...

charlie belden

Charging the TREND AirShield Pro, will look into a BMX/Downhiller chest protector and have a buddy over - - with a charged portable phone in hand - just in case. And I'll keep the JET VS Mini's speed cranked to its lowest speed - about 300 rpms - 5 revs per second - to minimize the Punching Power should something go wrong.

There's much to be said for the safety of small spindle work.