We value your privacy.
We use cookies to enhance your browsing experience, analyse site traffic, and personalise content.
By clicking “Accept all”, you consent to our use of cookies. You can also choose
“Essential only” or learn more.
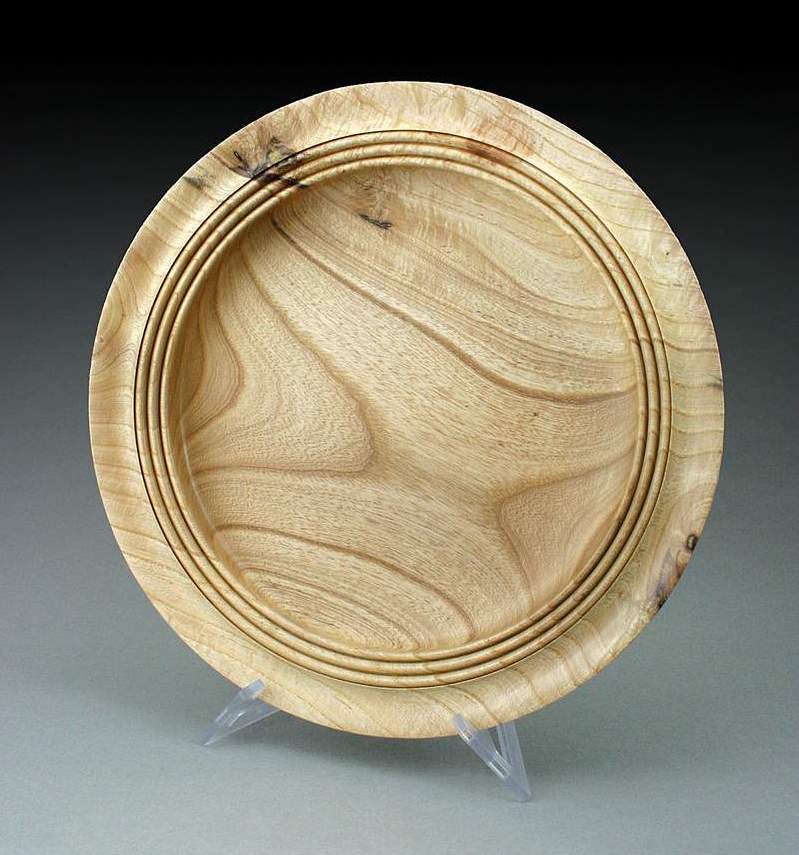
>This is the chunk of Maple Burl given to me by Ray Carson. It's about 8"D x 4"H. I dyed it with water base fabric dye. The finish is 4 or 5 coats of Seal-a-Cell.
Jamie / John -- I need help with photographing shiny surfaces. Any advice would be greatly appreciated. I used a photo cube with 150W curly florescent lights. Shot with a Cannon Digital Rebel on manual mode on auto white balance.
All comments welcome and thanks for looking. ~ Paul
My photo setup and camera is identical to your's. I have found that sometimes it works best to get the photography done before the final buffing. That is, make the surface look good, do the photography, then do the final polishing.
That's easier than spending hours with Photoshop modifying the pics, and you can still get excellent results.
>Hi Paul, both forms are excellent and perfectly finished as usual. Could you tell me the size of the opening? It would help me, as I am struggling with proportions you do so well. Is this the first dyed form you have done? I do not remember you posting a dyed piece previously. Is water based dye �Rite�?
>Paul, I love both of them! I have noticed that you and I tend to favor the same types of forms except mine are usually much smaller. :) I am going to have to try some of that Seal-a-Cell stuff. Does it have a decent shelf life?
Am interested in John's and Jamie's replies to the photo question since I have the same problem. The best I have been able to do is aim my lights through a double layer of white sheet which helps diffuse it for a less sharp reflection.
>Hey Rick, I didn't buff this piece. This is the shine after 5 or 6 coats of finish. I think I'll try putting some kind of defusers in front of the lights. The only manipulation I do in PhotoShop is color correct. When I try to fix something like this reflection, I usually mess it up pretty bad.
>Hi George, the openings on these two pieces are about two inches. The dye I used is something I bought at an art store. It is a powder so you can mix different intensities. It dyes your hands pretty good too.
>Hi Carole, thanks for the comments. I usually buy the smallest can of Seal-a-Cell I can find. I can get through about half of that before it turns to jelly.
>paste wax applied applied with a brush and not buffed out will matt down a shiny spot. the trick in applying the wax it to dab it on so you don't leave any brush marks.
>Diffusers over the light won't help. All they will do is even out the tonality of the panels so that you don't have as bad a hotspot. You will still see the panels. Really glossy pieces like we are all starting to do are going to be really difficult to photograph. The piece "sees" anything you put in front of it whether it's a panel or a small light. The difference is the size of the reflection. A very large panel will produce a very large soft edge reflection with a soft shadow. A very small light will produce a very harsh very small reflection( and a hard shadow)
So how do you use this to your advantage? First is to try what was stated earlier. Photograph the piece before you make it really glossy is the best solution.
Next is to get away from multiple panels or most photo cubes because you see every joint and corner. If you need to use the photo cube try to light it as evenly as possible. You can bounce light off the ceiling (if it's white) and maybe bounce a light off the walls. You will definitly have to use a tripod then because the light will be very low in power.
The way I shoot these things is to use a very small light source in line with the camera but a little higher. This produces a small harsh highlight on the piece and a hard shadow behind the piece. Then I use a moderately large soft box above the piece. The softbox produces a larger highlight on top of the piece and reduces the harshness of the shadow. I move the softbox around until the glare is the least objectionable.
I've tried using cross polarizion but the affect is similar to the above except the small harsh glare is now a more subtle blue dot. You still have to deal with the harsh shadow.
For home use with quartz lights I would try bouncing one or more lights off the ceiling. You may have to move the piece deeper into the cube to get the front and underneath to light up. That's why I use my photo booth instead of the EZ-cubes and that sort of thing. By booth doesn't have a back so I an move the piece and the background as far forward or back as I need.
>Paul If I don't forget, somewhere on some CD at home is a photo example of what I'm talking about. I'll try to find it. I don't have a good photo filing system yet.
>Paul Here is an example of what I'm talking about. This piece is so glossy we had to cover the ceiling air vent with white cloth. The main light is about 16" above the camera and is about 5" in diameter. You can see the reflection hiddend in the middle of the decoration. sometimes I get lucky and can move the light up or down to disguise that little reflection.
The top light is that bright rectangle you see in the tip of the piece. It helps light the lip of the piece but mostly is there to get rid of or reduce the god awful shadow the first light makes. You can see a hint of the shadow below the piece.
I've tried shooting these with all different sorts of lights from big 4x 7 foot reflector to just bouncing off the ceiling. it is so glossy that anything you put near it is reflected in the piece. I had to cover the left wall with black cloth because we have our backgrounds propped up and Had to hand a gray muslin background in front of our lightstands that hang on the ceiling to the right.
I use a middle gray background on these because light or dark backgrounds show up as a light or dark line through the middle of the piece.
sometimes you can put a light behind the piece aimed at the bottom to get rid of the shadow but on a piece this shape that same light would be reflected very harshly on both sides of the piece by the neck. Looks much worse than the soft box shape.
>John has covered about everything- glossy surfaces are a PITA! One thing that give shooters the most control is limiting the number of light sources- I use only 1 if possible, then fill shadows with diffused(white) bounce cards. This limits the number of specular highlights to 1, and that is necessary to show that the surface is actually shiny. I could tell some horror storys about assignments to shoot shiny subjects!!
>Me too Jamie. This one was easy. One of our glass artists decided to make mirrored balls. You talk about hard to shoot. Jewelry is easy compared to that.
>I know absolutely nothing about turning bowls and enough about photography to get a decent reproduction of my pens(I use no software other than resizing)
I do a little bit of Dyeing my stock for the effect I am after.
BUT
THAT IS ABSOLUTELY GORGEOUS!!!!!!!!!!!!!
As far as the "flash line" it just shows me how good the finish is.