WoodCentral Forums

Est. 1998 — 27 years of woodworking knowledge

Photo Survey...

Posts

Photo Survey...

#1

Photo Survey...

DW

>From time to time, someone asks a question about how to take good pictures with their digital camera that accurately portrays the object. In viewing many of the pictures posted here, it is apparent that some of you have it figured out.

I would like to ask that anyone that feels they are getting accurate representations from the pictures they take, to post a picture of their "set up" along with an explanation why it works and how they compensate for different elements that influence the picture.

The resulting thread should be very beneficial for current members as well as those in the future that want to "search" for information on the topic.

Just a thought�.

DW

Re: Photo Survey...

#2

Re: Photo Survey...

John Lucas

>DW

I will glad to answer your questions as best I can. I shoot artwork for a living at Tennessee Tech University. I also travel and teach demo's using simplified inexpensive lighting. I'm working on putting a web site toghether and I think I finially have it ready to go but the lady who is going to put it toghether for me has to work as much as I do this time of year so we haven't been able to get together.

I can e-mail a copy of my handout if anyone who wants it. The handout describes a technique that I've found works well for most 3D artwork and is easy for students to use. It can be set up in minutes and is inexpensive to build. The lights I teach with are just Quartz shop lights. It still requires practice and playing to achieve really good results and is definitely not the only way to get the end photo.

When I get to work I'll post a photo of the basic booth so you can get an idea of what I teach.

Re: Photo Survey...

#3

John, Jamie, and others have helped me

Mike Schwing from Md.

>John, Jamie Donaldson, and a bunch of others have helped me with my photo technique over the past few months. I'm to the point where I'm relatively satisfied with my photos and I have it down to where I can set up my tent in a few minutes.

Here you can see the nuts and bolts of my "tent". It is simple PVC that can be arranged however I want. Taller, wider, shorter whenever needed, using the same pieces. The only things you can't see are my tripod and camera. I have an Olympus C500 Ultra Zoom and I use it on the aperature setting for my close up photography. That sets the speed automatically based on the aperature I select. I find it produces the best photos for me. The tripod is crucial because as John taught me, digital cameras take quite some time from click to actual shoot, and it is easy to move out of focus in that short time. Plus, slower shutter speeds need a steadier support than humans can generally provide.

Use of a single light source has been crucial, and I have developed lots of little pieces of foil/paper etc. to spread the light around and under the workpiece.

My background is simple art paper draped/taped across the back upper support and the sides are white foam posterboard. The light bounces off of the side closest to the light and off of the top, then bounces off of the right side and back down on the work, illuminating all 3 sides pretty well. Add'l light is redirected as needed, or by repositioning the work in the tent.

I save the photos in TIFF format and edit them in either AC/DSee or "The Gimp". I favor the gimp by far. Hope this helps. I'm just now learning, but I have done some work. John is a great source and more than willing to help.

Since this photo was taken I have lengthened those short vertical PVC pieces to provide about 50% more height, and I have another top that has a metallic silver art paper on one side and metallic gold on the other. They both produce interesting effects.

Here is a link to the photo that came out of that session.

http://schwingwoodworks.com/hform11large2.jpg


img

Re: Photo Survey...

#4

Re: Photo Survey...

John Lucas

>Here is kind of an expanded form of my photo booth. It's just PvC pipe with white cloth on it. I use Quartz work lights. I did build a boom arm to support the light on the right. It's not needed but makes it easier for me to demonstrate different lighting techniques. The light on the left was moved back to give a better ration on the lighting of this piece. You could simply put 2 layers of cloth on the panel on that side to achieve the same thing.


img

Re: Photo Survey...

#5

Re: Photo Survey...

Mark Kauder, Phenix City, AL

>Like Mike, I have received a great deal of help by listening and talking to Jamie and John.

My booth is a direct result of John's articles and postings on WC.

I have a much lower tech 2 Megapixel camera. I finally got the colors pretty good by using the Tungsten lighting setting (that I did not know was there until I looked). I also learned not to give the piece too much light - but even lighting is important. Cheap work lights from Lowes are as good as any - like in John's photos above. A tripod is essential for a clean, clear picture. I am using one I got at a yard sale 20 years ago.

Last, because my camera has the ability to over or under expose with a change of setting, I usually take pictures at a Zero setting, +1, +.5, -.5 and -1, and then pick which one I like best when I see the results.

Just my little bit of experience.

If I could change things in my current pictures, it would be that I could have a totally white room with nothing in it to show up as a reflection in the gloss of my bowls. Right now I have to use the family storage room.

Mark

Re: Photo Survey...

#6

Re: Photo Survey...

John Lucas

>Mark

Actually you probably need a black room most of the time. Anything light will show in the piece. The problem with really high gloss is it "see's" everything and you have to figure out ways to control that. It's tough. I'm going to have to work on a simple way for people to do that sort of lighting thanks to you and Russ and others who are teaching better finishing techniques. We're seeing a lot more high gloss finishes these days in woodturning.

Now sandblasted pieces are easy to shoot.

I have one furniture maker who brings be pieces that are sanded to 600 grit with a light finish. Then after we shoot it he takes is back and French polishes it. The photos don't look all that different but it takes me 1/4th the time to shoot them. Saves him money and time. Also if you get that little mark from handling you can take that out before final finishing.

Re: Photo Survey...

#7

Re: Photo Survey...

Mark Kauder, Phenix City, AL

>Hmmm, I may try that sometime. Take a picture of a piece while it is still at dull level in the finishing process.

A dark colored room - guess you are right (of course you are. What if I were to encapsulate the front of the booth with dark cloth/posterboard, etc and shoot through a hole it it?

Mark

Re: Photo Survey...

#8

Refections

Fred in NC

>I have a black cloth with a hole for the camera lens.

Lots of PVC here too !! I am playing with Tinkertoys all over again.

Fred

Re: Photo Survey...

#9

Why not take photos at night??

Russ

>I am the farthest away from knowing anything about photography, but I have asked a few questions. The answer was always diffusion of the light, and take photos at night so I would have total control of the lighting.

I can do the diffusion better with white umbrellas and photo light stands, and flat white reflective surfaces. Sometimes white light works best, and other times the gold of an incandescent i better. The advantage of the umbrellas (for me) is that I am not restricted to the confines of a tent.

High gloss is always a problem, and I doubt that it is possible to take a photo without reflections. So, why should we be trying?? Isn't the better solution to control those reflections and hot spots, and make them work for us to enhance the photo and accent the gloss??

Re: Photo Survey...

#10

Re: Photo Survey...

John Lucas

>Mark

sometimes making a complete light tent works well but most of the time It takes away the color of the piece because the white produces an overall glare. If you use a lot of depth of field to keep the piece in focus you may even see the wrinkles in the light tent. I use that most often for shiny metal pieces because they need to see white.

For pieces like yours, especially the black ones I use the smallest light source I can get by with and then keep the rest of the room dark. To get rid of the shadow I put a second light on the back of the piece aimed mostly at the background right behind the piece. It's a lighting battle because the back light also produces a shadow so you have carefully balance them. The backlight also sometimes produces a very harsh reflection on the top of the piece.

Re: Photo Survey...

#11

Re: Why not take photos at night??

John Lucas

>Russ

I argue that with clients constantly. A glossy piece needs reflections to look glossy. The trick is making the reflection of the light look pleasing or at least less objectionable.

Umbrellas work pretty much like soft boxes except light tends to spill all over the room. Sometimes this is good sometimes you don't want the extra light.

BAsically you just have to experiment and see what works best for you in your situation and with your lights.

Re: Photo Survey...

#12

Compare these two photos (glossy issue)

Mike Schwing from Md.

>Ignore the color problem with the pink one.

These are the same object. The first is taken with multiple light sources and shiny photo tent sides. It appears WAY glossier.

The second is the same with only one light source, and matte surfaces for the light to bounce from. It still suffers from a hot spot, but most of the gloss is gone, and I think that is a shame. If I were going to take this picture with me to a gallery to show my work, I would want to take the glossier one for sure, color corrected, even though most photographers would think it is a poor example of a photo.

Another example of taking photos for other photographers, but not buyers?


Re: Photo Survey...

#13

Cloud Dome.... *LINK*

DW

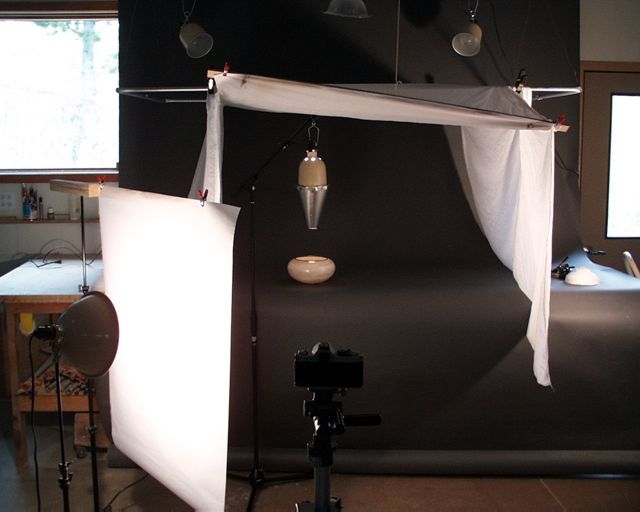
>Part of what initiated my "survey" was this site I stumbled across... (something called the Cloud Dome), while looking for information on digital photography lighting. I searched for Jewelry photography because I thought it might have a lot of the same issues we face, lighting, depth of field, color, etc.

This got me to wondering how successful WC'ers set up their picture taking. My goal was to arrive at an inexpensive setup that would produce accurate pictures that did not need any software enhancements... something I could almost "point and shoot" so to speak.

This Dome thing (see the link below the picture of Max Krimmels setup) seems to achieve the same results relative to muting the harshness of the light as the fabric tents. I like the tents because they are more adjustable relative to the size of the objects. However, the openness of the tents means we have to deal with lighting in a different manner... and, I assume, even use a flash under certain circumstances.

Max Krimmel turns Alabaster and Wood. Amazing work. One one of his web pages, he showes his picture taking booth (image attached) Much like the ones we are describing, however he has a uniques light above the piece. Perhaps someone here recognizes what he is using and can speak to it.

In any event, I appreciate everyones input. Hopefully we can arrive at a condensed version of ideas and applications that can eventually become an article of sorts that others can visit and learn from.

Thanks again....

DW


img

Cloud Dome

Re: Photo Survey...

#14

Re: Compare these two photos (glossy issue)

John Lucas

>Mike

I think I would try half way inbetween. Leave a panel on the upper left so you get the large but softer glare spot. Then use the matte reflector on the right to fill in. This should give you a glossy look with out having a really large brocken up highlight. The larger light panel on the left should help fill in the front and side as well but since one side will be darker than the other you'll still have a round looking shape.

I tried one time putting tape on the panel to resemble a window with mutons but that really looked tacky.

Re: Photo Survey...

#15

Re: Cloud Dome....

John Lucas

>DW

One of my students at an Arrowmont Workshop had the Cloud Dome. She was trying to use it to shoot jewelry. It didn't work very well and you had trouble positioning the camera exactly whre you wanted it. it was also expensive.

Just for giggles we bought a tupperware bowl and cut a hole in it and achieved the same thing for $3.

To solve her problem we cut a hole in apiece of white cardboard and then used a styrofoam cooler cut up to fit over the jewelry. We made a very professional looking shot of her jewelry and had less than $40 in everything from the light on.

Good photography is more about learning to see than what equipment you have. If you can see the problem you can usually come up with a solution if you think about it long enough.

Re: Photo Survey...

#16

Monitor option?

Russ

>My camera has a video plug so the image can be put on a TV screen. I don't know how many cameras can do this, but you can use it if you have it. The image is not always accurate, but it is a larger format than the camera view panel, and a definite aid to getting the right lighting on a difficult subject.

There is a problem with the glow from the TV screen having an effect on the image lighting, but turning it away from and putting a partition between it and the photo set up takes care of that.

Re: Photo Survey...

#17

Re: Monitor option?

Charles Bjorgen

>Russ's idea about plugging your camera into a TV monitor can be very instructional in showing the way photo lighting can be varied for best effect. I did a photography lighting demo for my local club a couple years ago using this technique only I used a digital video camera at the time. What works very well is to build a lighting setup one light at a time to show the effects of a main light source and then turn on addition fill and highlight lights to show how they contribute to the overall effect. Seeing the lighting on a two-dimensional TV screen can be really instructional. By moving the lights around, it's easy to see how small changes in a lighting setup can change the overall photo. It's also pretty easy to control unwanted reflections this way.

I generally use three small photoflood lights with 250 watt bulbs on a seamless paper background .

Re: Photo Survey...

#18

Re: Cloud Dome....

Scott Thorburn

>DW, I suspect that what Max is doing with that unique light is to provide a glow for the Alabaster, by creating a beam of light that shines only inside of his bowl. Alabaster is somewhat translucent when thin.

👍 This page answered my questions

Your vote helps other woodworkers quickly find the answers and techniques that actually work in the shop.