WoodCentral Forums

Est. 1998 — 27 years of woodworking knowledge

Sycamore Bowl (Feedback Welcomed)

Posts

Sycamore Bowl (Feedback Welcomed)

#1

Sycamore Bowl (Feedback Welcomed)

David Eaves

>Hi there,

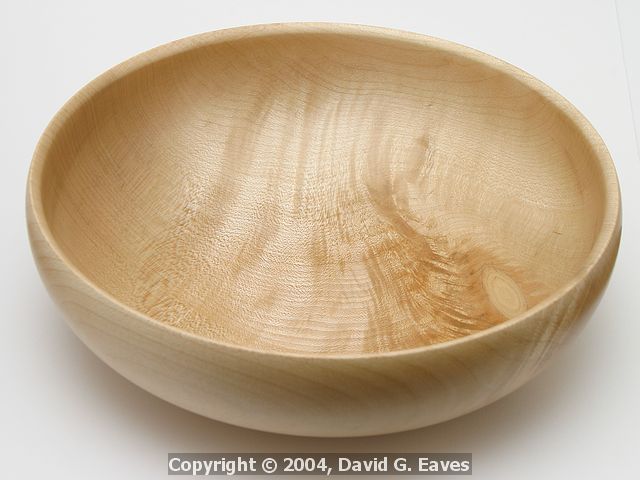
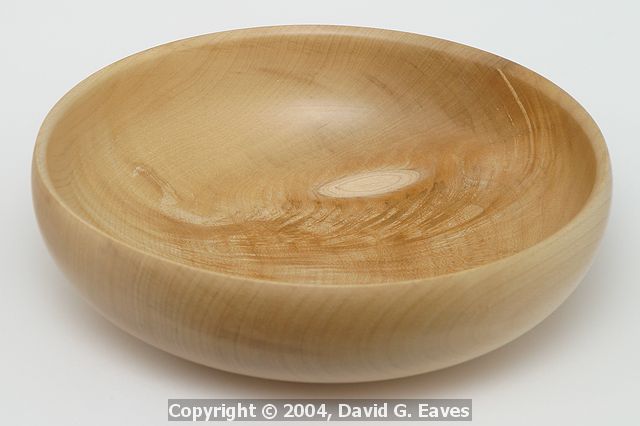
I managed to turn my latest bowl today, continuing the round footless base theme. Thanks to the feedback from here I hope this is an improvment on the last one. I feel it is, this is probably the best bowl I have turned so far. Of special mention is the rim after some excellent feeback from Richard Allen, who got me thinking about rims on my last bowl I went for a sloping in rim on this one.

One of the major breakthroughs on this is the use of vacuum chucking to get the spigot (tenon) off the base. Previous attempts have involved doughnut type chucks and just a live centre and sanding the pip off. Both methods working but having their disadvantages.

It was at the start of the week I realised the plastic power tool adaptor for my dust extractor fitted snugly over the outboard end of my lathe and could be lashed there without spinning round. I did an experiment with a plywood disc and some draft excluder strip to seal it. It worked a treat. On the actual job today it worked well. To start with I brought the live centre in to get it running true against my centre mark. Got the vacuum going. Turned most of it off with the live centre there for safety. Then brought it away and got the pip off. Sanded it all up and finsihed it without and diasters and was pleased how it worked and how it gave me full access to the outside.

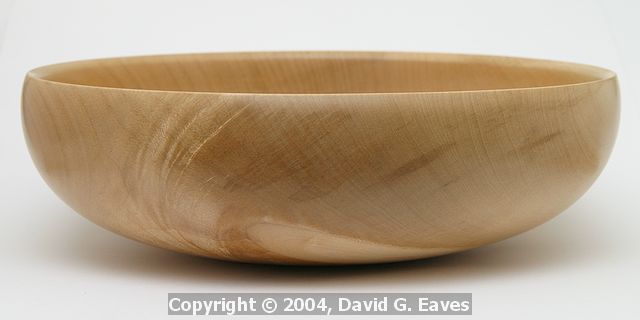
The bowl is made from Sycamore (Probably not what you know as Sycamore in the US, this is Acer pseudoplatanus. It's sanded up to 600 grit, and finished with Tung Oil and Wax (sanding sealer applied as well). The bowl is very light and is pretty much a constant 1/4" thickness all the way down to the base. Diamter is 9" height approx 3".

Heres some shots of it, I've included quite a few to give a feel of it. They're only small files so hopefully I won't be annoying fellow modem users :o)

I'd appreciate any feedback on the form and any areas for improvement.

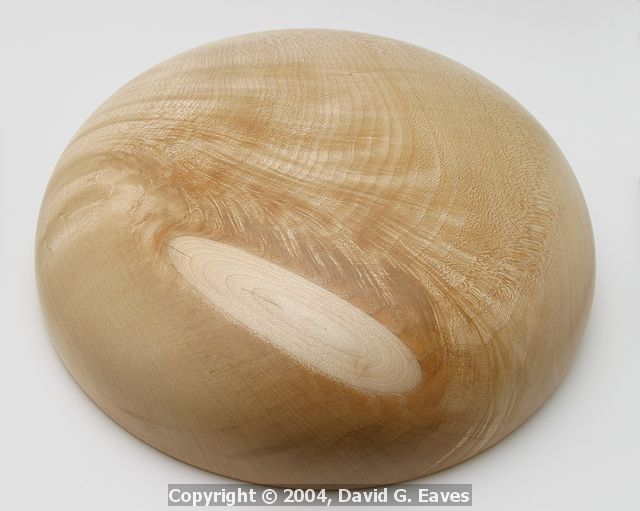
I'd also be interested to hear what you think of the bright oval splash of wood. In some ways I think it's a bit distacting on the outside. However, it is probably responsible for all the nice figuring so I'm not complaining.


Thanks

David
Re: Sycamore Bowl (Feedback Welcomed)

#2

Re: Sycamore Bowl (Feedback Welcomed)

Bert Smith

>Very nice, David! The bottom is beautiful, with good flow from the edge to the center.

Bert

Re: Sycamore Bowl (Feedback Welcomed)

#3

Re: Sycamore Bowl (Feedback Welcomed)

Wally Dickerman at Green Valley, Az.

>David you did very well on this one. I like the rim shape, which goes well with the slightly closed form. The curve is continuous all the way to the rounded bottom. The inside curve is also very good. No flat area at the inside bottom, which is very important to the overall appearance.

Wally

Re: Sycamore Bowl (Feedback Welcomed)

#4

Re: Sycamore Bowl (Feedback Welcomed)

Glenn Hodges

>Nice job David. You did a super job showing the flame, it looks great on this bowl.

Nashville, Ga.

Re: Sycamore Bowl (Feedback Welcomed)

#5

Re: Sycamore Bowl (Feedback Welcomed)

Terry Quiram

>David

I find this to be a very pleasing shape. I believe I will copy it. Thanks!!!!

Terry

Re: Sycamore Bowl (Feedback Welcomed)

#6

Richard Allen

Re: Sycamore Bowl (Feedback Welcomed)

Richard Allen

>Hi David

The slope in rim does add to the piece. To project that effect the second picture, the far rim needs to be in focus. The rim effect works very well in the first and third pictures. Of course the rim is just a small part of what makes this bowl work so well.

In the first picture there appears to be some tearout. And in the third picture there appears some mark in the middle of the flash bounce. I say appears because pictures can hide as well as add "stuff" that isn't there.

If the marks I see in the first picture are indeed tearout (I am using a term for tearout that is a mark which appears man made vs "God" made). I will often have tearout slightly anti-clockwise from the endgrain position on the inside of the bowl about 1/2" or 3/4" down from the rim. Because I know that this is a place where I get tearout I try to make sure I make light cuts in that area with a freshly sharpened tool. I will also examine that part of the bowl closely as I sand so that I can sand those areas with the lathe off if necessary.

The mark in the flash looks like a finishing mark. I could be wrong. It might be a reflection from the light source. It could be caused by loads of reasons. If it is a mark in the finish then buffing should easily take it out.

You must know that this bowl is a splendid piece of work. So the things I mention are very likely not going to make enough difference in the impact the bowl has to be worth concerning yourself with.

The white splash on the bottom reminds me of the solar system. It might be fun to burn and paint the sun and some little planets on the "orbital" paths described by the rings of the white wood. If the planets were small and subtile it might make a nice surprise when the bowl is turned over without detracting from the impact of the bowl. Adding "stuff" like that is a personal thing and should be found from within.

Thanks

Richard

Re: Sycamore Bowl (Feedback Welcomed)

#7

Re: Sycamore Bowl (Feedback Welcomed)

gary clarke

>very nice bowl David, may I ask what finish did you use and what was the final sandpaper grit did you use?

Re: Sycamore Bowl (Feedback Welcomed)

#8

Re: Sycamore Bowl (Feedback Welcomed)

JamieDonaldson

>David- your photos are first class- do I recall that you are a Pro? Not everyone has a "softbox!" The profile of this bowl is much improved by the rolled rim.

Re: Sycamore Bowl (Feedback Welcomed)

#9

Thanks Bert

David Eaves

>

Re: Sycamore Bowl (Feedback Welcomed)

#10

Re: Sycamore Bowl (Feedback Welcomed)

David Eaves

>Thank you Wally, glad you like it. I made a concerted effort on this one to get that continuous curve internally. I also wanted to get the figuring to show up as much as possible.

Cheers

David

Re: Sycamore Bowl (Feedback Welcomed)

#11

Thanks Glenn

David Eaves

>

Re: Sycamore Bowl (Feedback Welcomed)

#12

Re: Sycamore Bowl (Feedback Welcomed)

David Eaves

>No problem Terry don�t thank me though�, the shape is very Raffan inspired, and I think he got his inspiration from old English dairy bowls :o)

Cheers

David

Re: Sycamore Bowl (Feedback Welcomed)

#13

Re: Sycamore Bowl (Feedback Welcomed)

David Eaves

>Hi Richard

The slope in rim does add to the piece. To project that effect the second picture, the far rim needs to be in focus. The rim effect works very well in the first and third pictures. Of course the rim is just a small part of what makes this bowl work so well.

Thanks, good point with the focus. I will have to have a further play taking photos. With the camera I used (an DSLR) I don�t think I can get enough depth of field to get both in focus. I�ll have a go though, with it manually focused and stopped down all the way. I might actually be able to get that sort of shot with my other fixed lens digital camera as I can get a lot more DOF with that.

In the first picture there appears to be some tearout. And in the third picture there appears some mark in the middle of the flash bounce. I say appears because pictures can hide as well as add "stuff" that isn't there.

Right the tearout, I was careful to try and minimise it and sand the rest of the damage away, so hopefully there is negligible about. I�ve just been buffing the bowl up and looking at those marks. I think they are colouring in the wood. There are a number of them which run through and follow patterns. Comparing how these look to an Ash Bowl I did that does have tear out I think it�s just the wood.

Thanks for mentioning the mark. I just polished it up and out. It was caused by some dust and stuff round where the vacuum chuck had been sealing, it had got pulled in and I hadn�t cleaned it off well enough,

If the marks I see in the first picture are indeed tearout (I am using a term for tearout that is a mark which appears man made vs "God" made). I will often have tearout slightly anti-clockwise from the endgrain position on the inside of the bowl about 1/2" or 3/4" down from the rim. Because I know that this is a place where I get tearout I try to make sure I make light cuts in that area with a freshly sharpened tool. I will also examine that part of the bowl closely as I sand so that I can sand those areas with the lathe off if necessary.

What you mention about the tearout position is what I experience, glad to know it�s not just me :o) I find it hard to get my bowl gouge in a good cutting position on the inflexion there. I use a freshly sharpened scraper which makes lovely shavings shearing round that bit. That got rid of most of it and I sanded from 80 grit to make sure they were gone there. I�ve also been sanding in different directions recently to help get a good finish. As mentioned above I hope all the marks you can see are just the natural wood and not my doing. It�s certainly something I need to watch though. Thanks for pointing it out as it keeps me on my toes with it.


You must know that this bowl is a splendid piece of work. So the things I mention are very likely not going to make enough difference in the impact the bowl has to be worth concerning yourself with.

Thanks glad you like it. I appreciate you bringing all the points up too as they are how I will improve.

The white splash on the bottom reminds me of the solar system. It might be fun to burn and paint the sun and some little planets on the "orbital" paths described by the rings of the white wood. If the planets were small and subtile it might make a nice surprise when the bowl is turned over without detracting from the impact of the bowl. Adding "stuff" like that is a personal thing and should be found from within.

That�s a good point I never though of that. For this bowl though I think I�ll leave it. I have someone in mind to give it to and don�t want to mess it up at this late stage :o) I do like your idea though� it has lots of potential.

Thanks again

David

Re: Sycamore Bowl (Feedback Welcomed)

#14

Bowl finishing...

David Eaves

>Hi Gary,

Thanks, my finishing was in this order.

Sand from 80 grit to 400. Applying cellulose sanding sealer and let dry. Then sand 400-600 grit. Then I burnished with brown paper. Applied some Tung Oil let it soak in for 10mins or so. Wiped the excess off and sanded with 600 and then burnished with brown paper again. Finally I applied a general woodturners wax and burnished and buffed this in. It seems to work.. just what I have adapted from reading about other peoples finishing.

David

Re: Sycamore Bowl (Feedback Welcomed)

#15

How I take my photos...

David Eaves

>Thanks Jamie. I�m really pleased Richard mentioned the rim on my last bowl it got me thinking.

I�m not a Pro.. just been taking photos longer than I�ve been woodturning :o) I�ve had a few things published not enough to live off though.

I sort of used an improvised softbox. The way I do it is with lots of white paper and a bounced flash. I have an external flash which I bounce off the ceiling into the area I�m taking the photo. I have big pieces of white card at around 45 degrees to the horizontal around the item. The light comes in from above and is then bounced onto the sides by the paper, if a bit comes out dark I get some more card or move it about. Apart from the external flash, which costs money, this is a really low cost way of taking photos of stuff.

Thanks

David

Re: Sycamore Bowl (Feedback Welcomed)

#16

Re: How I take my photos...

JamieDonaldson

>Well done- you qualify for the "Phrugal Photo Way" award! Is the flash dedicated to the camera for exposure or all done with digital trial and error on manual settings?

Re: Sycamore Bowl (Feedback Welcomed)

#17

Re: How I take my photos...

David Eaves

>Hi Jamie,

Thanks! it's simple but quite effective. I'd like to set something better up eventually but it's amazing what a bit of card can do.

The flash is dedicated to the camera family (Canon). It does do auto exposure, it's just a case of set what shutter speed and aperature you want, and it powers the flash to the correct exposure. It does need tweaking mind. Due to the way camera light meters work lots of white or light coloured objects can cause it to underexpose by around -2/3 EV (Or Stop) so I just bump the flash compensation up. As you hint at the great joy of digital is I can just play until it's right.

Cheers

David

Re: Sycamore Bowl (Feedback Welcomed)

#18

Re: Sycamore Bowl (Feedback Welcomed)

Mike Schwing from Md.

>I'd say you're getting really good at this form David. Its very nice and Russ' ideas about rim treatment made a nice impact on this turning, too. I like the little knot in there as well. I'd bet you could sell this type of bowl very easily.

Re: Sycamore Bowl (Feedback Welcomed)

#19

Re: Sycamore Bowl (Feedback Welcomed)

David Eaves

>Thanks Mike,

Richard's help with the rims was really useful.

As regards selling, I think I'm going to have to soon the house is going to be overun with them so (there are only so many people you can give them away to :o) )

Cheers

David

👍 This page answered my questions

Your vote helps other woodworkers quickly find the answers and techniques that actually work in the shop.