WoodCentral Forums

Est. 1998 — 27 years of woodworking knowledge

First post - Small Bowl (PIC)

Posts

First post - Small Bowl (PIC)

#1

First post - Small Bowl (PIC)

David Eaves

>Hello there,

I'm new round here, I've been lurking about for a week or so now, reading a lot of the old posts. There sure is a wealth of information here, I have picked up some excellent points/tips.

I'm quite new to woodturning and at the moment I can really only have a go in batches. I turned a fair bit this Christmas, the last time I had turned anything much was the previous Christmas and that was when I really started.

I've included 2 pictures of one of my recent pieces. It was a tricky one to photograph with the shape to avoid distortion from the lense, and also the finish just throws light back at the camera. I'd appreciate any critiques of the piece and how to improve form in the future. I was going to sweep this piece back more. However I decided that I wanted to keep the bark edge and also some of the contrasting sap/heart wood that would have been lost if I had. I ended up radiusing the corners to match the natural edge, and also to avoid damage when it's moved about. It's a piece of Africa Blackwood wet sanded up to 600 grit, then finished with Briwax.
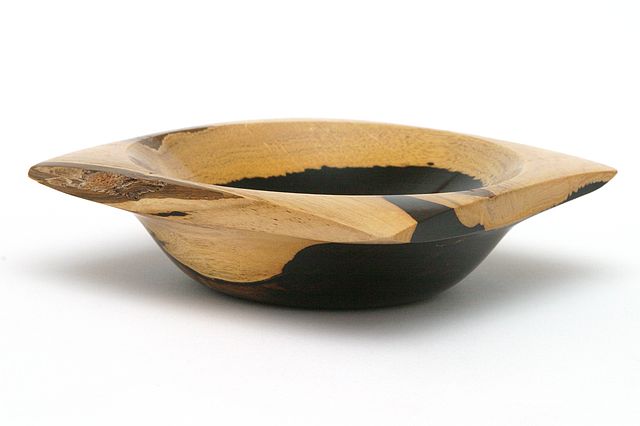
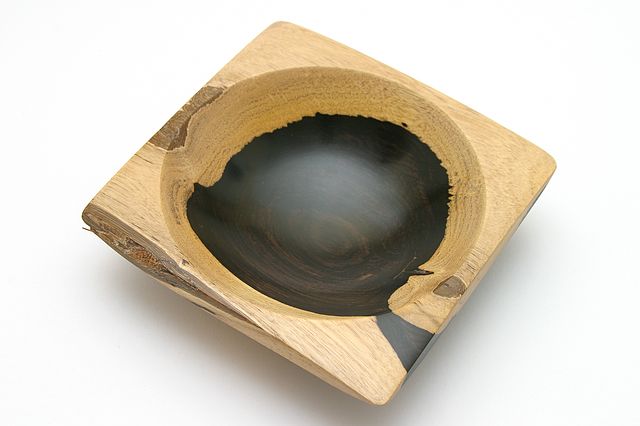


Thanks

David
Re: First post - Small Bowl (PIC)

#2

Keith Tompkins

Re: First post - Small Bowl (PIC)

Keith Tompkins

>Nice piece, David. Welcome aboard!!!!

Re: First post - Small Bowl (PIC)

#3

Re: First post - Small Bowl (PIC)

Mike Schwing from Maryland

>Welcome from one of the other (there are many) new turners around here. That is a very nice piece you've shown there, with impressive photography to boot.

Re: First post - Small Bowl (PIC)

#4

Re: First post - Small Bowl (PIC)

Peter Teubel

>Hey, I like it! So much so that I think I'll turn a few. I particularly like the way the edges form an eliptical shape. BTW, your photography is excellent.

Re: First post - Small Bowl (PIC)

#5

Re: First post - Small Bowl (PIC)

Bill Grumbine, Kutztown PA

>Very nice David! I think a turner of any skill level could be proud of this one. Very nice photography too.

Bill

Re: First post - Small Bowl (PIC)

#6

Re: First post - Small Bowl (PIC)

John Lucas

>David

Beautiful bowl and nice photography. when you shoot a bowl looking down on it you will get a reflection of the light source. The only way to get rid of this is to change the location of the light source. The shape of the inside determines where the light should be. Sometimes no matter where you move the light you get a reflection. The interior is parabolic and picks up light from a very large angle.

I've had good luck sometimes by lighting from the sides with panels or softboxes. Keep up the good work. John

Re: First post - Small Bowl (PIC)

#7

Thanks Keith

David Eaves

>

Re: First post - Small Bowl (PIC)

#8

Re: First post - Small Bowl (PIC)

David Eaves

>Thanks Mike, I appreciate your comments. From looking through your old posts, I realise some of the pieces I thought I had a high sheen on.. don't even begin to compare to what you have achieved. It has certainly given me something to aim for in future.

David

Re: First post - Small Bowl (PIC)

#9

Re: First post - Small Bowl (PIC)

David Eaves

>Thanks Peter, glad you like the edges. The eliptical shape wasn't really planned. I was intending to leave it flat, however to get rid of some nasty surface marks I had to keep taking a bit more off on the underside. I started putting a shallow curve in. Then I reaslised I could copy this on the top and get the eliptical shape.

David

Re: First post - Small Bowl (PIC)

#10

Re: First post - Small Bowl (PIC)

David Eaves

>Thanks Bill. It was via your website links I found this forum. I was searching on cutting logs up and found your page on harvesting a large tree. Your site is a great resource. (Though your unfortunate incident page has put me off high torque lathes! :o) )

David

Re: First post - Small Bowl (PIC)

#11

Re: First post - Small Bowl (PIC)

David Eaves

>Thanks John, I plan on making a softbox setup eventually for photographing my work. At the moment I am doing it with bounced flash and a number of white card pieces acting as reflectors.

Such a dark coloured wood is quite a challenge too to get the full detail that is there.

David

Re: First post - Small Bowl (PIC)

#12

thx - here's how it is applied

Mike Schwing from Md.

>Thanks David. That super glossy finish I put on display pieces is achieved thusly - borrowing from bits and pieces of knowledge given on both the turnings and flat woodworking side. It is not at all durable - banging it around in a bag with something else will ruin it (ask me how I know), and water will kill it (again - sister in law "used" one of my display bowls). But it sure is pretty if displayed/treated properly.

Sand using standard papers up to 400, then continue on with micro mesh, using each successive grit, up to 12000. Burnish with a brown paper bag till glossy(er), then apply a coat of mylands cellulose sanding sealer, which is a laquer based product. I usually burnish with a paper bag again - more of a fine sanding treatment to knock off the fuzz, but it gives a very nice soft, almost glossy finish. Then I recoat with sanding sealer. After that dries out come the buffing wheels - trip, white diamond, and finally carnuba. If I want the finish to be "deeper", after the first white diamond wheel treatment is done, I'll recoat again with the sanding sealer, and then go back to the trip wheel, white diamond, and then carnuba. That makes a finish a custom car junkie would appreciate.

Most of the folks I've talked to our read use a different approach with the wheels - they soak in a coat or two of tung or some other oil, let it harden, then buff. Its probably a more durable finish, nah, it IS a more durable finish. The drawback is it takes time. From finishing sanding to a showroom shine takes about an hour with the method described above.

Please stick around, looks like you have plenty to share.

Re: First post - Small Bowl (PIC)

#13

Re: First post - Small Bowl (PIC)

Ron Sardo in PA

>Very Nicely Done! I really like the dark color on the bottom of the bowl contrasting with the top of the bowl.

Re: First post - Small Bowl (PIC)

#14

Thanks, a quick question

David Eaves

>Thankyou for the detailed run down there, it's very useful. I will have to get some micromesh, in time for my next turning run.

I was interested about how you were using the sanding sealer as a laquer. Do you find this is necessary with all woods even the hard exotics? The African blackwood was building a polish just with the tools and is very tight grained. I haven't tried the Mylands stuff, is it quite thick? The stuff I've got would need thining down a lot on a hard surface to get a nice thin coat.

Thanks

David

Re: First post - Small Bowl (PIC)

#15

Thankyou Ron

David Eaves

>

Re: First post - Small Bowl (PIC)

#16

Re: Thanks, a quick question

Mike Schwing from Md.

>David - it depends on the type of finish you're going for. Dense hardwoods that polish well from sanding and burnishing - maybe I won't apply the sealer, but it won't take on the same gloss that the sealed wood will. It'll look nice and polished, and more wood texture will be present. It'll have a very pleasant sheen but not be "glossy". The buffing wheels will polish bare wood, in fact I'm looking at some apple on my work desk right now that looks perfectly acceptable with nothing applied to it other than the wheels/carnuba wax. But the turned maple egg that sits next to it, finished with the glossy method looks completely different - the only difference being the sanding sealer.

The caveot to this would be more open grained, softer woods like poplar or pine - they don't, IMO, buff out well, a sealer is really required for that, to get the look I'm seeking.

I'd very much like to read about what the oil/buffing wheel users think about this issue.

Re: First post - Small Bowl (PIC)

#17

Thanks, very helpful

David Eaves

>I'll bear that in mind wilth regard the depth of shine of the finish. It will be interesting if anyone else adds their experience.

I haven't used oils much. Howevever, since reading here about applying Tung oil on the lathe and then buffing up I will have a go with it. I finished a Cherry Bowl in Tung oil but just let it dry off, so it has a very Matt finish.

Thanks again

David

👍 This page answered my questions

Your vote helps other woodworkers quickly find the answers and techniques that actually work in the shop.