WoodCentral Forums

Est. 1998 — 27 years of woodworking knowledge

Credentials for reentry (the workbench)

Posts

Credentials for reentry (the workbench)

#1

Credentials for reentry (the workbench)

Guillaume Dery

One good thing about the pandemic and forced working from home is that it got me back into the shop and making shavings.

I Finally, after sitting on parts for a few years and on the lumber for over 1 year, completed my workbench about 2 weeks ago

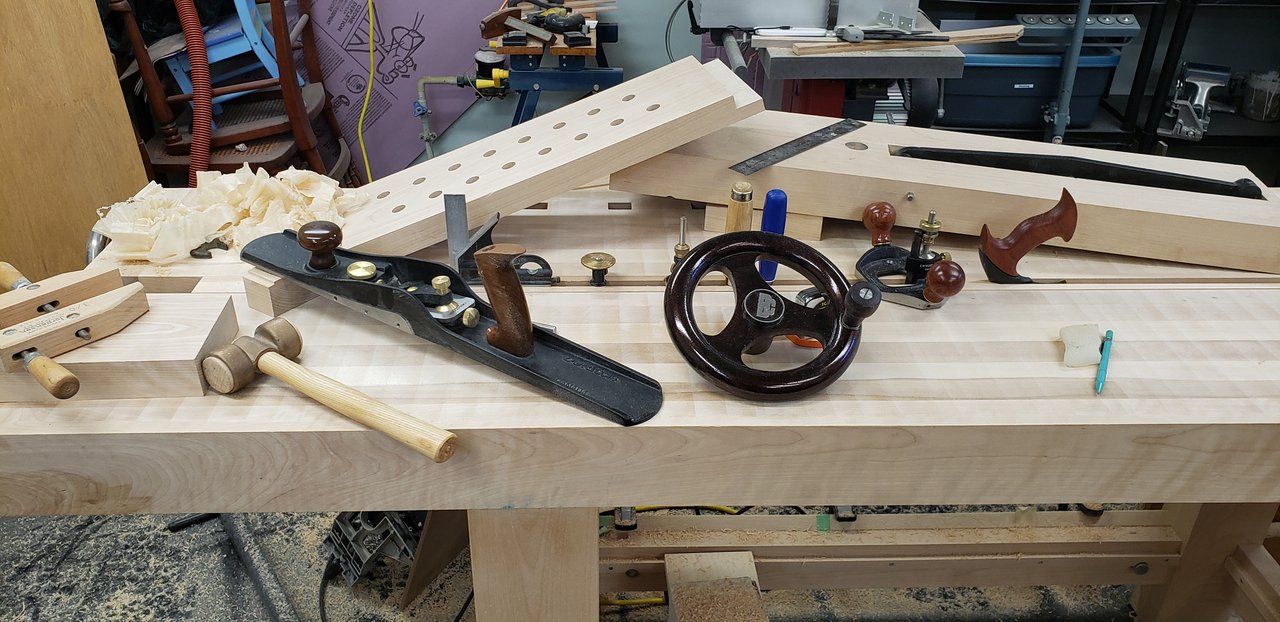
In progress, top flat, deadman and chop ready for shaping - baked linseed oil finish on handwheel (wives do not appreciate the smell of baked linseed oil, word to the wise)


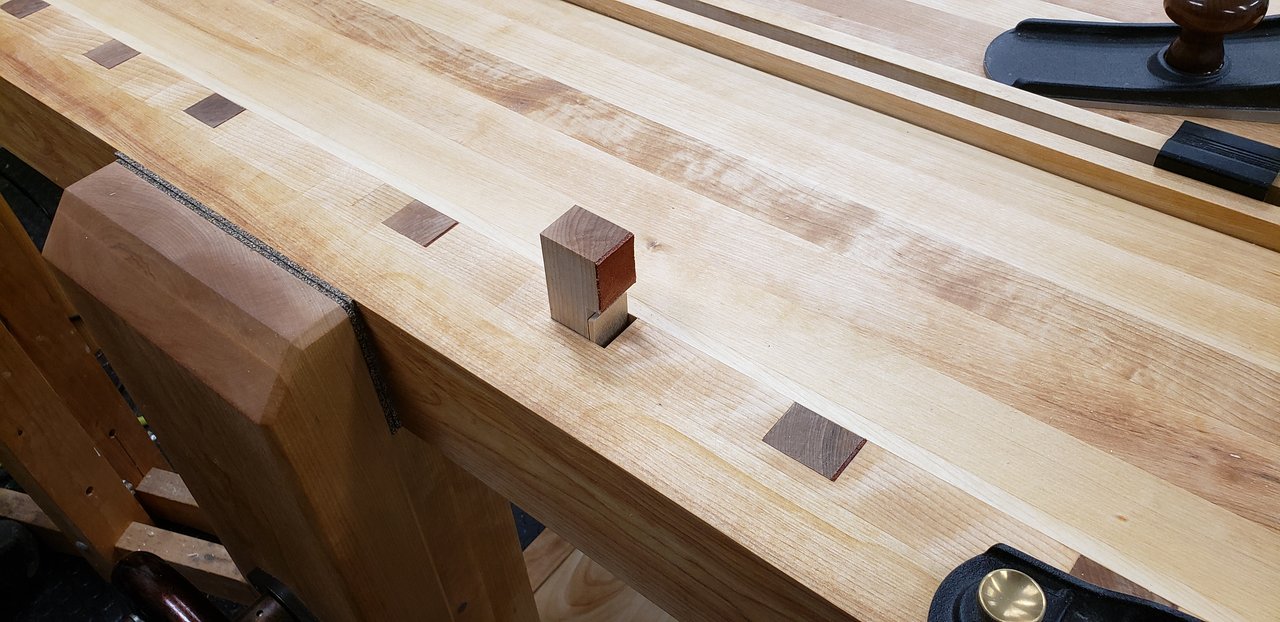
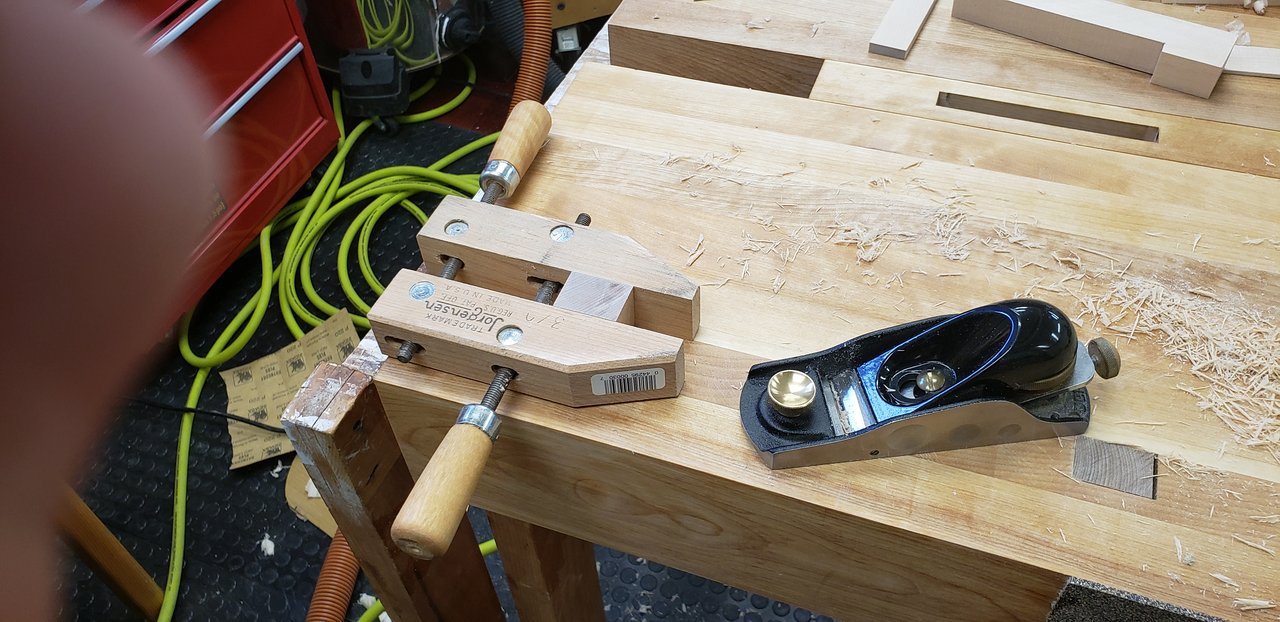
Handscrews are perfect for trimming dogs perfectly parallel to the bench and just a bit shallower. Just rest on the bench, tap dog to just a bit proud of handscrew and plane away. No measuring or faffing with angles. idiot-proof .


Proof in the pudding, this idiot got all the dogs perfectly leveled in a few minutes. Got lucky, the leather lining made them a spot-on perfect fit. Incidentally, hot hide glue is the absolute best for attaching Crubber and leather lining. Much less mess or nerve-wracking than contact cement or spray adhesive, easy cleanup, repairable and reversible.


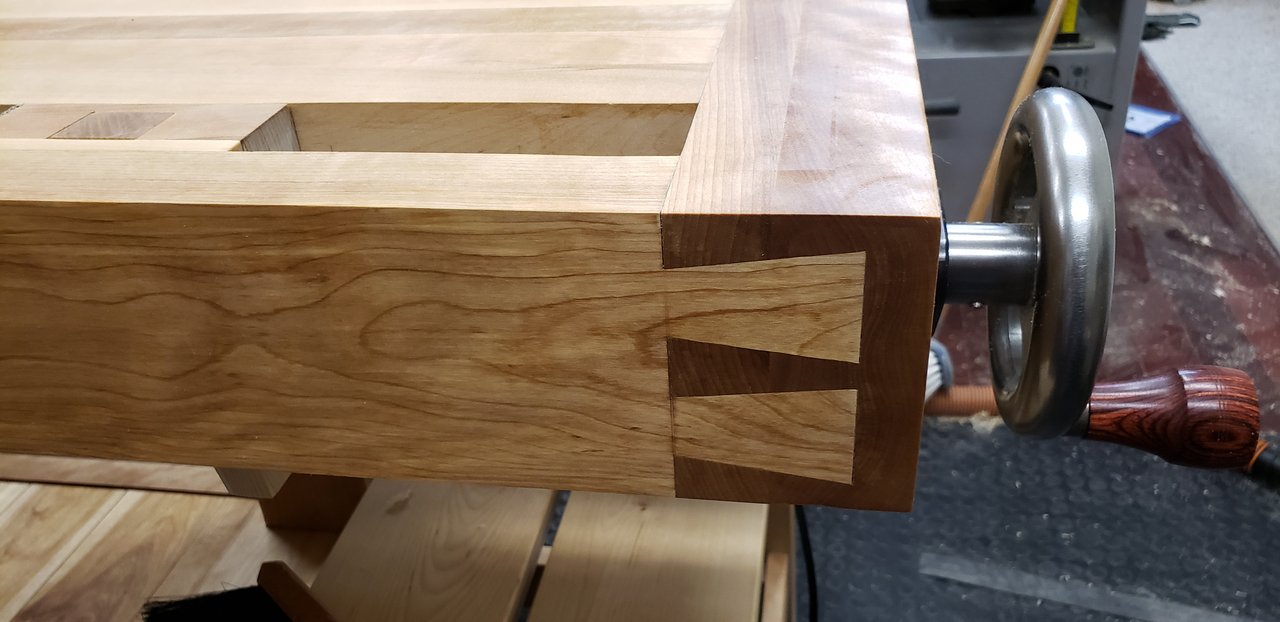
A few minor gaps on the dovetail but first one of this scale and I am way rusty so am overall pleased with it.


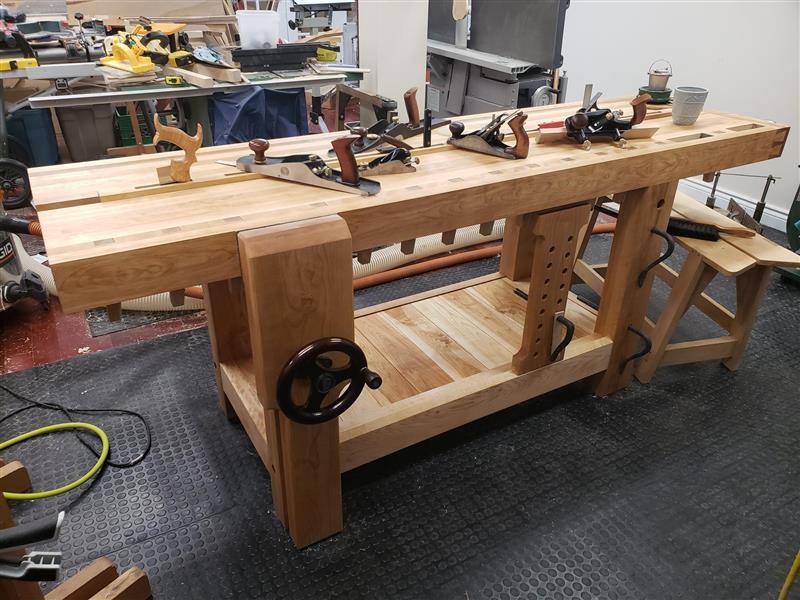
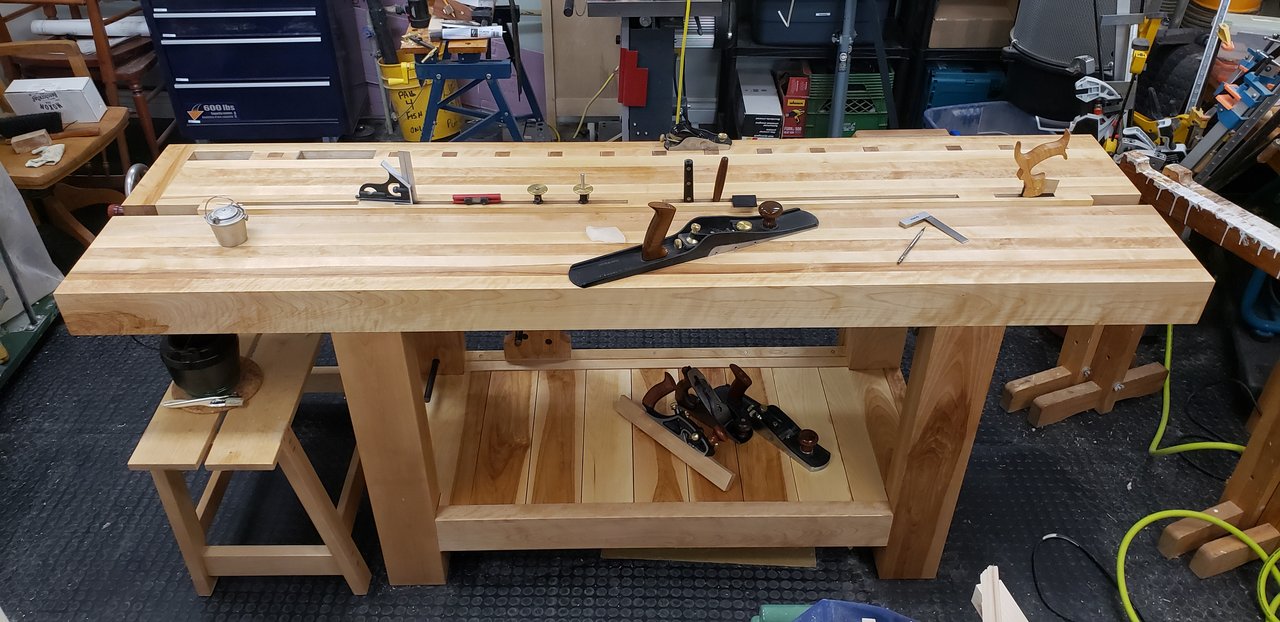
And finally, here she is, all done front and back!


Incidentally, for anyone doing a split-top bench. Laminating the gap-stop center is MUCH easier than chopping it out and through morticing it all the way. DAMHIKT.

Cheers,

Guillaume from Ottawa

Re: Credentials for reentry (the workbench)

#2

Re: Credentials for reentry (the workbench)

Wiley Horne

Guillaume,

Just beautiful!! I have one or two questions on the assembly: Did you build the base first, and use it as a proto-bench for completing the top? If so, when it came time to drop the top onto its tenons, how did you manage it?

Welcome back!

Wiley

Re: Credentials for reentry (the workbench)

#3

Re: Credentials for reentry (the workbench)

Charlie

Good Lord that thing is perfect.

Re: Credentials for reentry (the workbench)

#4

Re: Credentials for reentry (the workbench)

Oskar

well done, thats a handsome bench!

Re: Credentials for reentry (the workbench)

#5

question

Bill Tindall, E.Tn.

I have never see a bench of that design and have a question. How is dividing a bench width in half by storing tools down the middle of it convenient/efficient/etc.? What kind of wood working is done on such a narrow work area available in front of the divider? It seems inconvenient to build furniture solely with this bench. Once lumber begins to be assembled into components or the final product the size of the assembly requires bench depth. Do you have another bench for gluing panels, assembling, working on a top or drawer, and other operations that require bench depth?

I have a shelf under my bench and find it essential. I sit for some woodworking and the shelf provides a foot rest as well as convenient storage for bulky items.

Re: Credentials for reentry (the workbench)

#6

Re: Credentials for reentry (the workbench)

Guillaume Dery

Hi Wiley,

I did indeed build the base first and positioned it onsite. Very simple reason, I couldn't fathom moving it about unassisted. The whole bench complete is probably north of 300 lbs and half the top is at the weight limit of what I can manoeuver by myself (not to mention swinging around 87" of top in a cramped workshop is a recipe for disaster when you are as prone to clutter as I am).

As to dropping the top onto the tenons, it was much easier than I thought. I had a solid core door spanning the base that I used for top assembly and flattening the bottom. When that was done I just cut spacer blocks same height as the tenons. put that under the top, slid it to the final position, scribed my mortice. Flip over, cut out mortice and chamfer the to allow easy registration (that would be key right there). Slide top on top of tenons and spacer blocks then bash about until the mortices just engage on the tenons. Knock out spacers and it just slides right in (sometimes with a bit of encouragement from trusty mallet). Easier to do than to explain :)

So the short answer is spacer blocks.

I also kept cut-offs from the top to allow me to lift out and slide onto the second half if I needed to tweak the joint (which I did for the second half, the joint was a tad too tight). Clamps in spreader configuration are also your friends for removing or supporting when you slide blocks in or out and to gently lift the top off the tenon if needed.

Guillaume

Re: Credentials for reentry (the workbench)

#7

Re: question

Guillaume Dery

Hi Bill you may have missed a crucial detail there. The center piece is loose and notched to sit on the top stretchers. so when sitting in the notch it gives me a continuous flat top (see my first picture where it is sitting flush with top which gives me about 26" of bench depth, more than adequate for any operation.

When sitting on top of the notches, it's raised about 5/8th of an inch which gives me lateral support for traversing and similar operations. So it's really no more inconvenient than a solid top. Since it takes about 5 seconds to raise or drop the center piece I don't really find it an inconvenience. The piece can also be removed, allowing clamping in the middle of the bench which could be convenient (haven't had the opportunity to do that yet).

As final flattening is done with everything in place, the 2 pieces of the top and the center piece are completely flat and coplanar.

I do agree that if that piece was fixed in the raised position it would be a very inconvenient workbench!

Re: Credentials for reentry (the workbench)

#8

Indeed I did

Bill Tindall, E.Tn.

Hi Bill you may have missed a crucial detail there.

There was a lot of visual information to assimilate for a bench design I had never see before. I was focused on the baked oil wheel in the picture that would have revealed the flush center piece.

Re: Credentials for reentry (the workbench)

#9

Re: Indeed I did

Guillaume Dery

We'll blame that one on my poor photo skills and glossing over some details.

I also can't take credit for the design. That is from the maker of the vise hardware, Benchcrafted (spendy but wonderful). It just made sense to me and seemed a lot easier than trying to wrestle a slab that would weigh a few hundred pounds so I cribbed it :)

Incidentally, small world, I think. I assume the E Tn stands for Eastern Tennessee? Although I am a proud citizen of the Great White North, my wife's family comes from Chattanooga and a lot still reside in Chatanooga and Soddy-Daisy so we visit fairly regularly.

Guillaume

Re: Credentials for reentry (the workbench)

#10

wonderful...

David Weaver

i have a much less nice bench than yours, but bits of it similar style.

I see your answer to wiley - I built mine in parts, put it upside down and flipped it over and if I were 10 years older, I probably wouldn't do the latter again. I could tell once the bench was halfway up and switching from "pulling" off the floor to flipping straight up that if I slipped or lost control of it, I might be in the ER.

You will love having a heavy bench with strong legs. Things have popped up that I didn't expect (like having a leg vise strong enough to clamp a board and resaw with a large frame saw - not much else will tolerate that other than this design unless you use supplement clamps -and you'd never tolerate doing that for long as you have to pull the board up in the vise every 10 or 12 inches. Claims are intolerable.)

Re: Credentials for reentry (the workbench)

#11

Question?

Brian retired gunsmith from Colorado

Looking good!!!

what did you use to hold the tops down? What make of screw?

How closely did you follow the benchrafted bench plans ?

I am about a year behind you on my bench.

I have all the hardware, hard maple wood for the leg assemblies and about half the wood for the top.

Still need to buy some tooling and the rest of the wood for the top.

I have the benchcrafted bench plans, leg vise and the lie-nielsen tail vise.

Re: Credentials for reentry (the workbench)

#12

Re: Question?

Guillaume Dery

Answers in order.

Top held in place by gravity and massive Mortise and Tenon on the legs. This is reinforced by a lag screw through an elongated hole in the rail just to keep it flat and keep from lifting the top off when attempting to move it. The brand doesn't really matter. I think mine are Spax but I could be wrong.

Plans? There are plans? All kidding aside, you can feel free to be fairly liberal on interpretation, you just have to think things through a bit so your joinery doesn't interfere with your hardware. At the end of the day, it's really 2 square assemblies, connected by 2 stretchers with heavy rectangular slabs sitting on top. Many ways to skin that cat. Do pay close attention and cut out all your joinery and fit leg vise hardware before assembling the leg and base. Much easier to bore holes at the drill press than as an afterthought.

hard maple seems spendy for any part of the base, I'd use that for the top if I were you. You aren't really going to be abusing your legs that much.

Not much tooling required, a couple of planes, some handsaws, brace and auger bit (although I did end up snapping a nice Jennings auger bit when doing the holes for the holdfast :( )

Now hand tool purists can block their ears but a router with a half-inch spiral bit lets you hog out a lot of waste in short order and speed up your build considerably as there are a fair number of very big holes to cut.

But a jointer-planer does make life a lot nicer. That being said, I originally had visions of running my top slabs through the planer but was quickly disabused of this notion when I tried to lift and maneuver one. I did it by hand, anything else was an accident waiting to happen. It's actually fairly easy.

So on the power tool side, I would say:

Jointer-Planer is a must unless you are a masochist

Tablesaw definitely not needed. You would be better off with a tracksaw for the same amount of money and you can use a jointer-planer to square things up and bring them to final dimensions due to the large size of members

Bandsaw on the nice-to-have list for quickly cutting out tenon cheeks but mostly for resawing your 8/4 lumber and minimizing waste. Joints can be cut by hand easily and fairly quickly as they are all straightforward M&T.

A drill press is darn near a must so you can keep critical holes at exactly 90 degrees and there are some large ones to bore (bigger than my collection of auger bits can accommodate)

Chopsaw would be on the very-nice-to-have list as most members will be too large and/or heavy to do on the tablesaw (if you aren't going the hand tool route)

Cordless drill, not needed, get by with a brace and auger. Plus some of the torque needed will quickly cook your batteries

mid-size plunge router with 1/2 spiral bit, very nice to have but not a must.

Hand tool-wise

Handsaws, rip and cross-cut, full-size - unless you power tool it, then again you still need the cross-cut one to final cut your slabs as they will be too big for your chopsaw by a fair margin (unless you have a monster tool and budget)

backsaws, rip and crosscut: carcase or tenon saws to cut out all your tenons. Trust me you won't be needing or breaking out anything finer at this scale of work. Your dovetail saw and dainty joinery saws can just collect dust for the duration of your build.

Bowsaw or something to cut curves You could always shape your deadman and chop to not have curves and negate that need. It was much more pleasant using a bowsaw. Mind you it was slow going with mine as my Grammercy blade was too fine and I was too lazy to go get a coarser blade. In hindsight, I would have spent less time cutting those out if I had just driven to Lee Valley and purchased a coarser blade than powering through.

Chisels, all you need are stout bench chisels for this. You won't even need to break out the mortice chisels as the mortices are too large. Paring chisel and a chisel to deal with cleanup of corners are on the nice-to-have list. I did break out my Japanese chisel to clean up the dovetail to avoid bruising but that's not even needed as long as you don't have huge lands on your chisels. My old Marples Blue Chip from the hardware store are butt-ugly but still some of my favorite user chisels.

Bench Planes:

Jointer plane- kind of a must if you are flattening. Longer reference stops you from making dips and hollows.

Jack plane - definitely on the must side due to size. Forego smoother and just use a jack. If you can swing 2 irons on it, one with a large radius for scrubbing and one with a minor camber for final dimensioning and smoothing, that's nice.

low-angle block plane. I love that sucker, great for end-grain like the dogs, doing quick chamfers, easing edges, etc.

Specialty planes:

Router plane. REally a must for cleaning out the bottom of some of your major excavations. Dirt cheap on the used/fleabay market.

Shoulder plane. Unless you are one of the gods of this forum who get perfect joints off the saw.... VERY nice to have. I used mine constantly to tune all my tenons after dry fit and cursing. I have the LV medium one and wish I had the large

Rebate plane. Nice to have. I used mine to shiplap my shelf boards among other things but there are other ways to do this, either power or hand tool.

I assume you have all the marking and measuring so I won't go into that but I will say that having multiple marking gages is a very nice bonus and expedient to layout your joints repeatedly and consistently. I am partial to wheel gauges but that's because they are idiot-proof and this idiot often has a problem with pin gauges following the grain. I am also fond of dividers for marking and layout, finding center, et. As opposed to a compass, I find my dividers cut nice arcs that can be followed or the intersection of which can be used to register against.

Definitely get a cabinet makers rasp. Good for shaping, refining curves, and fine-tuning joints.

The needed toolkit is quite minimal when you come right down to it. Guess what I am saying is don't let the tools you don't have stop you from getting a start on it. Of course, take this with a grain of salt as it's coming from the guy who sat on the project for a few years. When I buckled down it was a few months of work, stealing an hour here and there on evenings and weekends when I could sneak away from the 3 kids and the wife or after they were all in bed (another argument in favor of the hand tool method)

Cheers,

Guillaume

PS: Get on the wood for the top stat. The longer it sits in your shop, the less it will move when you get around to it

PPS: I forgot a crapload of clamps for gluing up the top and other parts :)

PPPS: Don't know about the lie-nielsen one but a general rule is that planning for your leg-vise as you put your top together can be a real headache-saver or mandatory (which it definitely is for the Benchrafted wagon vise and the dogstrip if you are doing square dogs).
Re: Credentials for reentry (the workbench)

#13

Re: Question?

Brian retired gunsmith from Colorado

Thanks,

That was more info about tooling than I needed.

When I was mentioning getting tooling, I was referring to a couple of bottoming taps for the lie-nielsen tail vise (I have the taper tap) and couple of longer bits for the holes in the bench leg and the chop for pins to hold the top of the X-brace parts. Also need to check my collection of forstner bits for the holes needed for the leg vise screw.

I do have a electric jointer and thickness planer. I have a band saw, drill press many routers and I also have a mill that will help with morticing, I hope. I also have cabinetmakers rasps from my gunsmithing days.

I have done very little mortice and tenoning work so I wanted to have plans to double check my layout against. The benchmade plans while simple do show a good view of what I was concerned about. I have never deployed a leg vise.

Re: Credentials for reentry (the workbench)

#14

Re: Question?

Gu

Sorry about misunderstanding the tooling. Just did a brain dump there :)

I definitely needed to buy some extra Forster's for the leg vise. For the cross brace, you don't really need the extra long bit. If you layout very carefully then come in from both sides, you'll end up with a through hole when you excavate the cavity for the brace. That's what I did rather than try to find a bit that is 9 inches in length. That's one I did on the drill press to ensure accuracy and that they would meet up. Worked like a charm, steel rod slid right through

Re: Credentials for reentry (the workbench)

#15

Re: Credentials for reentry (the workbench)

Curt Putnam

Very Nice! Did you follow the Benchcrafter plans? If any deviations then for what & why?

Thanks for posting

Re: Credentials for reentry (the workbench)

#16

Re: Credentials for reentry (the workbench)

Guillaume Dery

Hi Curt, everything was sized for my height and ideal handplaning height. Top sized for comfortable reach across (slightly more than 2 feet. I'd have to go down and measure to get you an exact size. WE all have different reach so what works for me may not work for you.24" is a good starting point as most casework is rarely wider than that. The Length was based on what I could fit in available shop space and comfortably walk around.

I did follow and refer to the Benchrafted detail construction and installation notes for the vises extensively and did not deviate from them much as it was my first time installing either a wagon vise or a leg vise. Those docs are a godsend free download so you can wrap your brain around how things go together and why. Theh wagon vise has to be accounted for as you laminate your top and has crucial dimensions for the front.

For the leg vise, I did put the vise screw down as far as I could while still accomodating the St-Peter's cross in order to maximize throat depth in the front vise. In hindsight, my back is not thanking me for that as the bench is suitably low for hand planing, this means I bend down some to turn the handwheel. I have more throat depth than I reasonably need and just ended up inconveniencing myself some... Live and learn

Re: Credentials for reentry (the workbench)

#17

Re: Credentials for reentry (the workbench)

Derek Cohen (in Perth, Australia)

What a beautifully constructed and appointed bench! May you use it in the best of health building wonderful projects for many years to come. It certainly would add a dimension of pleasure for someone like myself.

Regards from Perth

Derek

👍 This page answered my questions

Your vote helps other woodworkers quickly find the answers and techniques that actually work in the shop.