Home Articles Forums Gallery Marketplace Videos

WoodCentral Forums

Knowledge You Can Build On — Est. 1998

Entry hall table for a niece: Part 3

Posts

Entry hall table for a niece: Part 3

Edited #1

Entry hall table for a niece: Part 3

Derek Cohen (in Perth, Australia)

I've been away from the workshop for a month, travelling around a few cities in Austria and Germany, as well as Prague. It was a good trip, but it's great to be home.

The current build was on hold. This is the entry hall table my niece asked me to build ...


... and this is where we left off last time - ready to fit the first corner ...


Past builds:

Part 1: http://www.inthewoodshop.com/Furniture/EntryHallTableForANiece1.html

Part 2: http://www.inthewoodshop.com/Furniture/EntryHallTableForANiece2.html

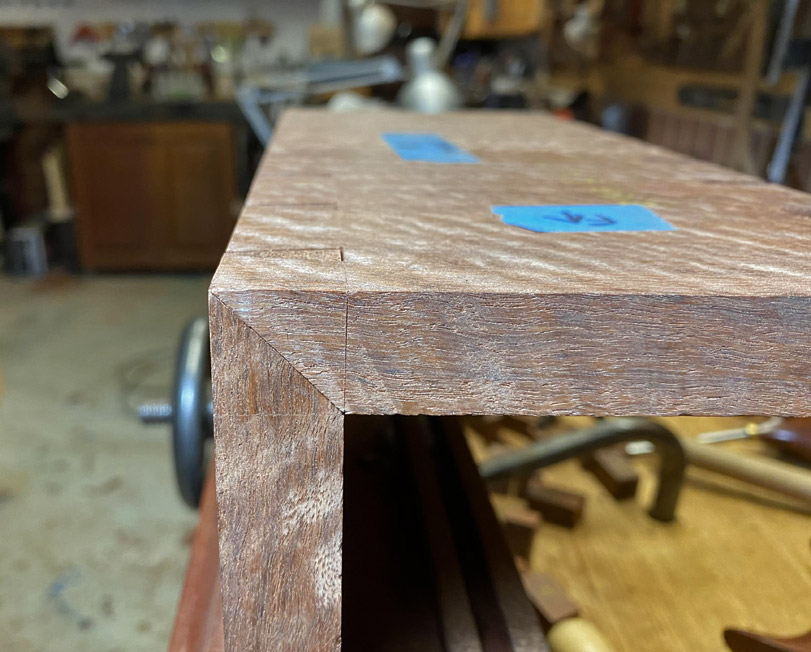
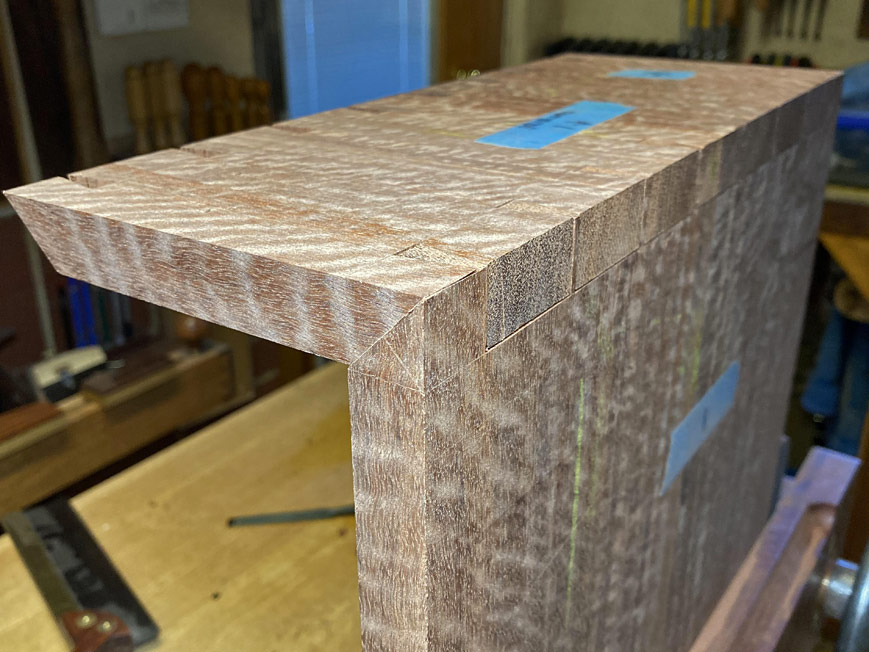
Today we shall put the complete case together. What I wish to focus on is the dovetailing. Not just any dovetailing, but mitred through dovetailing in unforgiving hardwood (here, Fiddleback Jarrah).

Of all the commonly used dovetails, I consider the through dovetail more difficult than the half-blind dovetail. Why ... because two sides are exposed against the single face of the half-blind.

In my opinion, by mitering the ends, the level of complexity is tripled .. at least. Not only are there three faces now, but each needs to be dimensioned perfectly, otherwise each is affected in turn.

This is more difficult than a secret mitred dovetail, where mistakes may be hidden.

I have posted before on building the mitred though dovetail, and it is not my intention to do this again. Instead, what I wish to show are the tuning tricks to get it right.

This is the model of the tail- and pin boards …
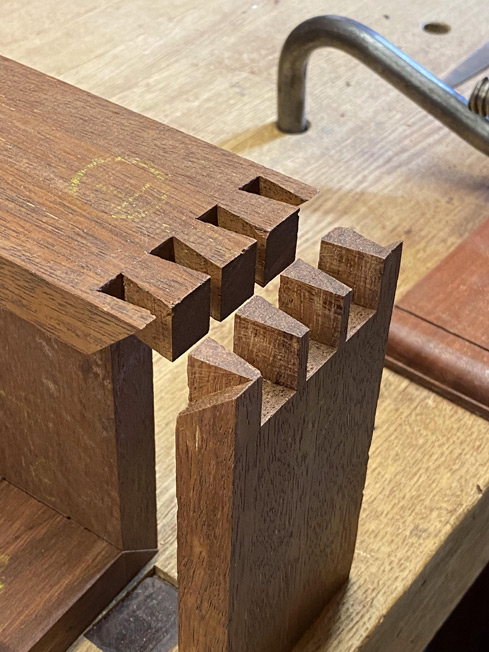

In a wide case, such as this, it is critical that the parts go together ideally off the saw or, at least, require minimal adjustment. The more adjustments one makes, the more the dovetails will look ragged.

Tail boards are straightforward. Let’s consider this done. Once the transfer of tails to pins is completed, the vital area is sawing the vertical lines … well, perfectly vertical.

I use blue tape in transferring the marks. The first saw cut is flat against the tape. Note that the harder the wood, the less compression there will be, and so the tail-pin fit needs to be spot on. Where you saw offers an opportunity for ensuring a good fit: if you hug the line (edge of the tape), you get a tight fit. If you encroach a smidgeon over the line, you loosen the fit slightly.
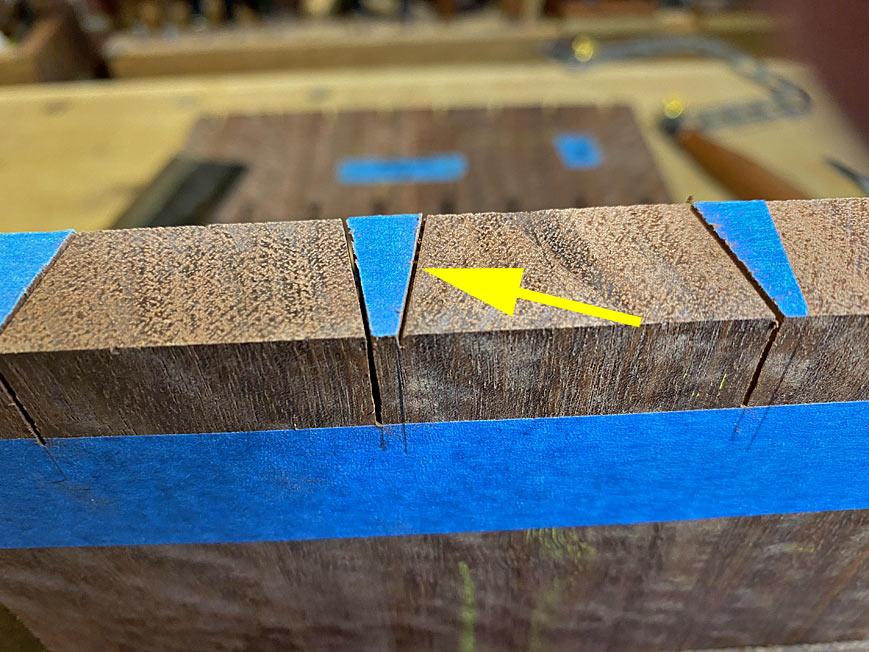

Saw diagionally, using the vertical line as your target …
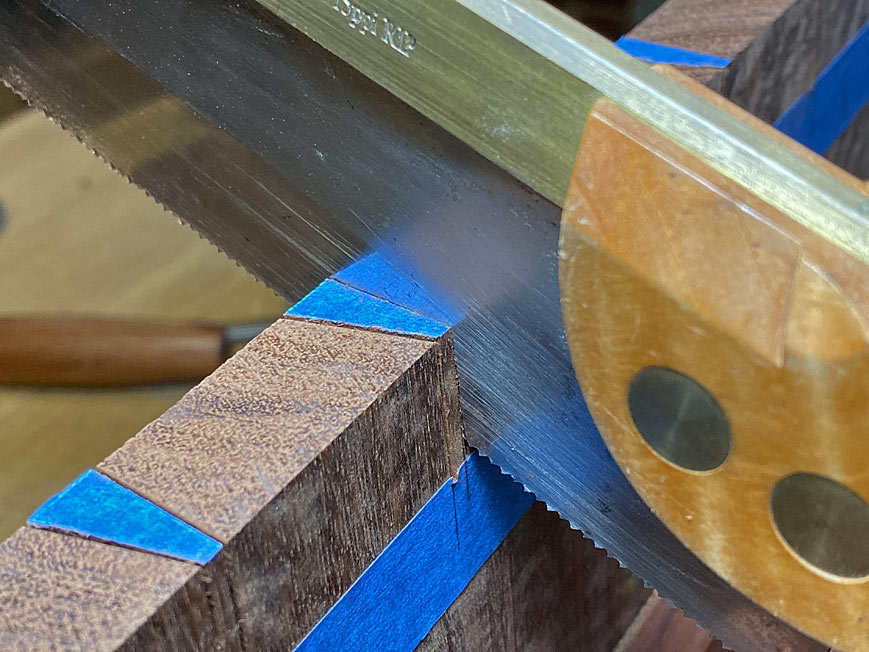

Only then level the saw and complete the cut …


I do not plan to discuss removing the waste. That was demonstrated in Part 2.

So, the next important area is the mitre. These are scribed, and then I use a crosscut saw to remove the waste about 1mm above the line on both the tail- and pin boards …
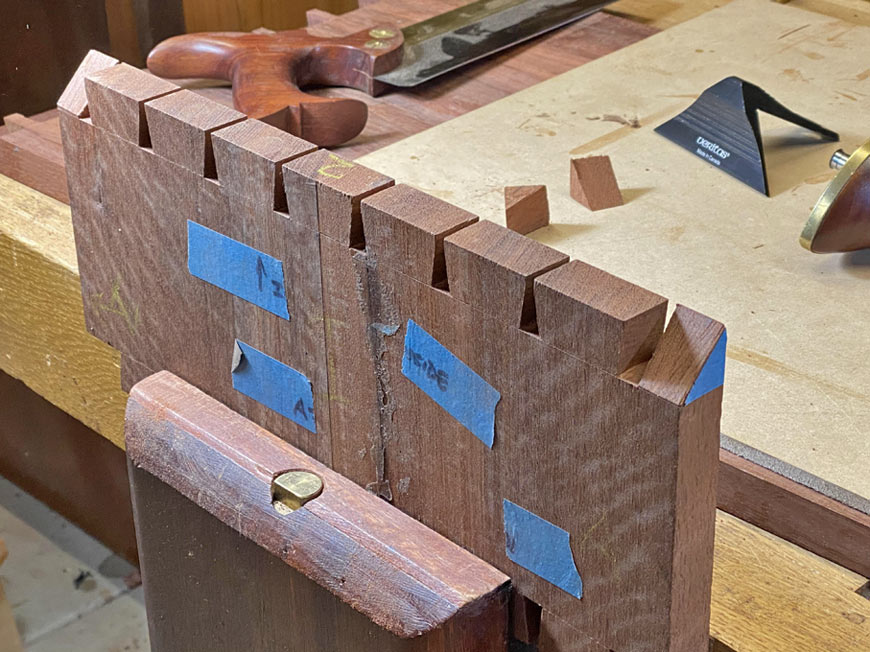

Now we are ready to test-fit the boards …


Mmmm …. not a great fit …


… even though the mitres at the sides are tight …
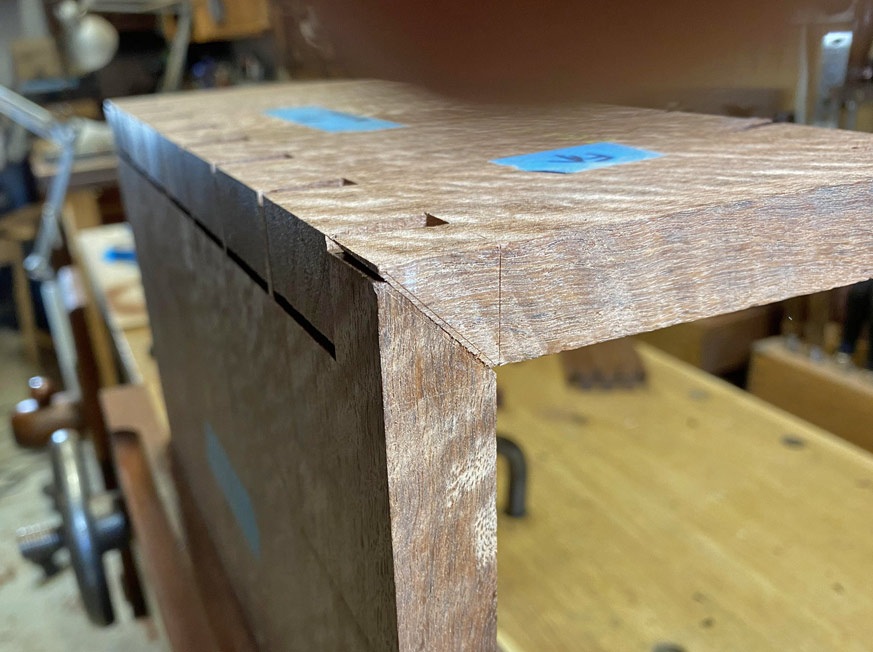

The problem is that the mitres are fat, and the extra thickness is holding the boards apart …
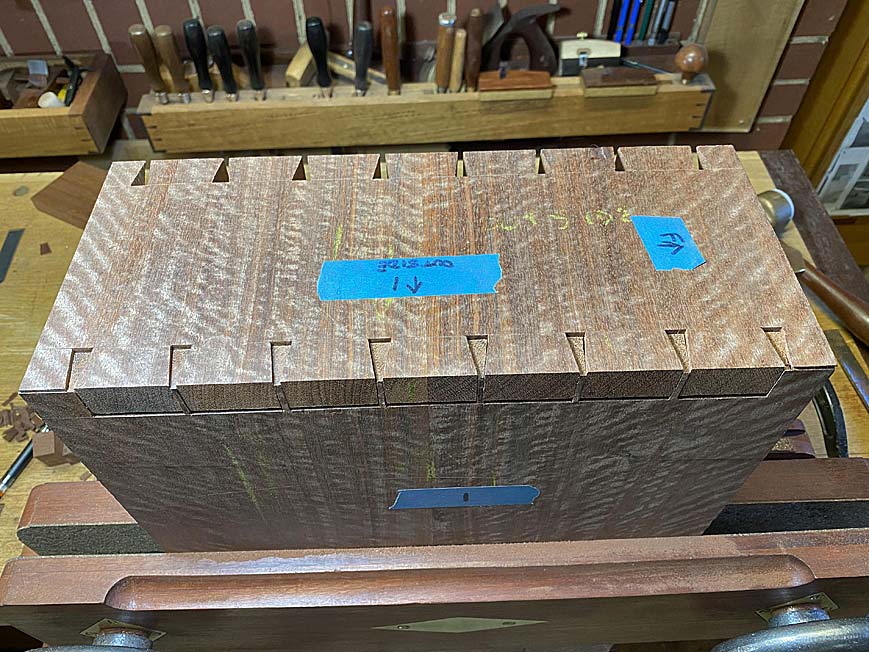

Even sawing to the lines here is likely to leave some fat, which is why it is a waste of energy to try and saw to the line in this instance. It needs to be pared away with a chisel, using a 45-degree fixture.
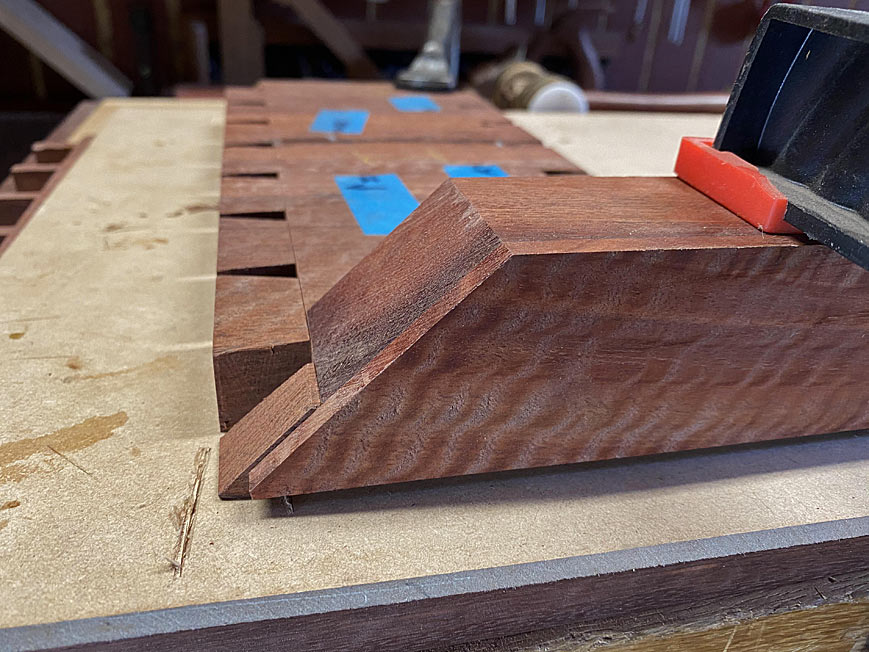

As tempting and logical as it seems to pare straight down the guide …
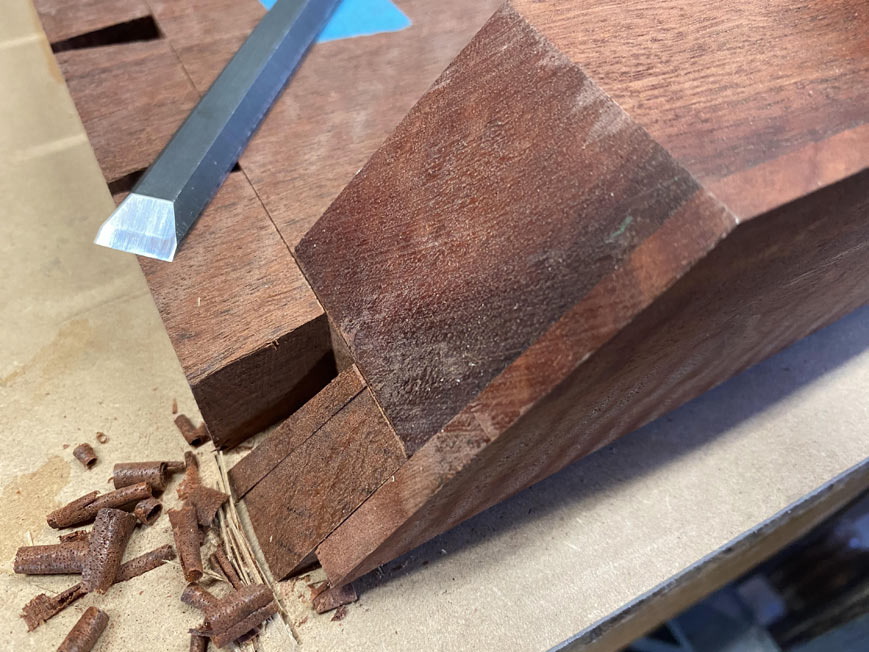

… what I experience is that the chisel will skip over the surface of the hard wood rather than digging in and cutting it away. What is more successful is to pare at an angle, and let the corner of the bevel catch the wood …
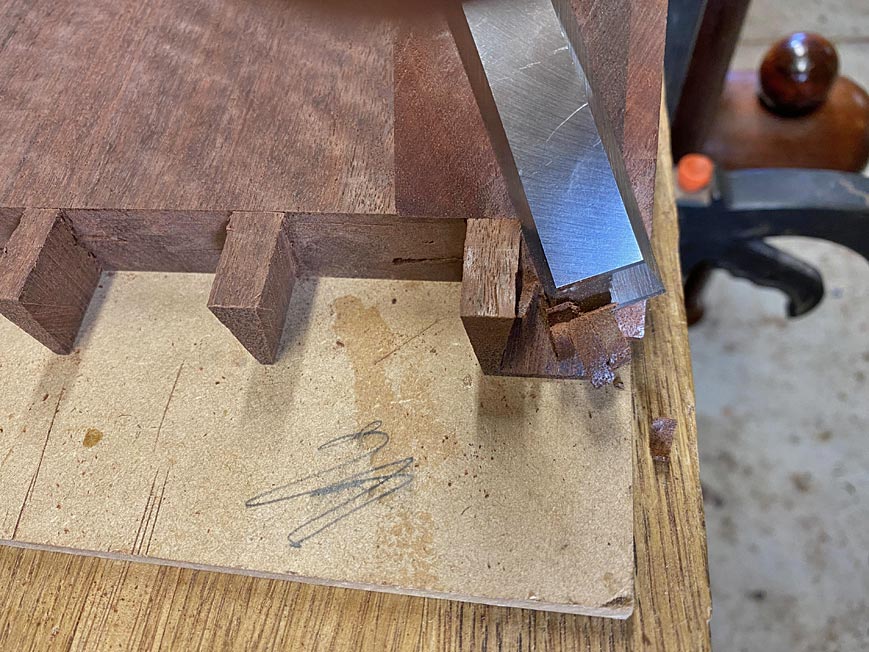
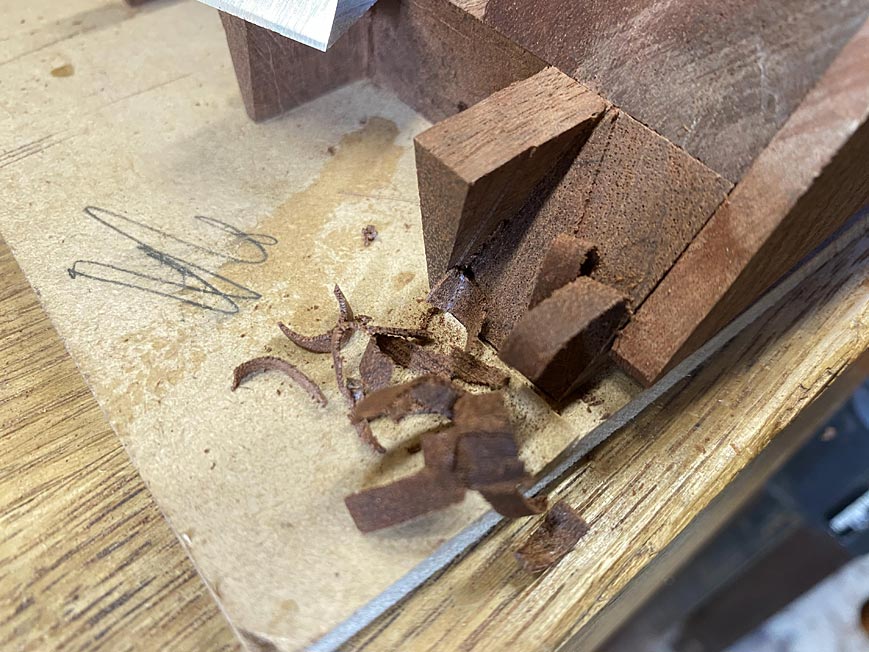

This is what you are aiming for …
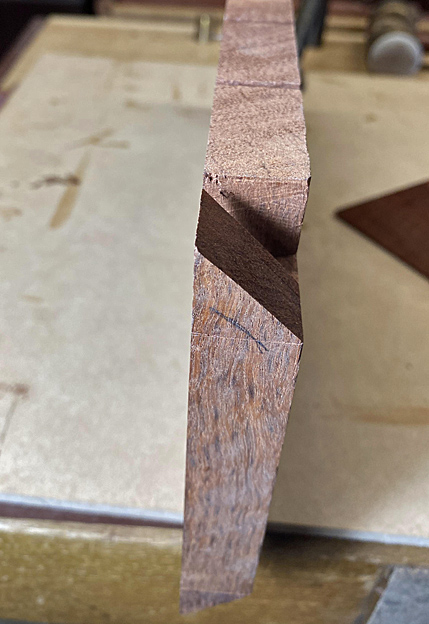


Okay, we do this. And this is the result …
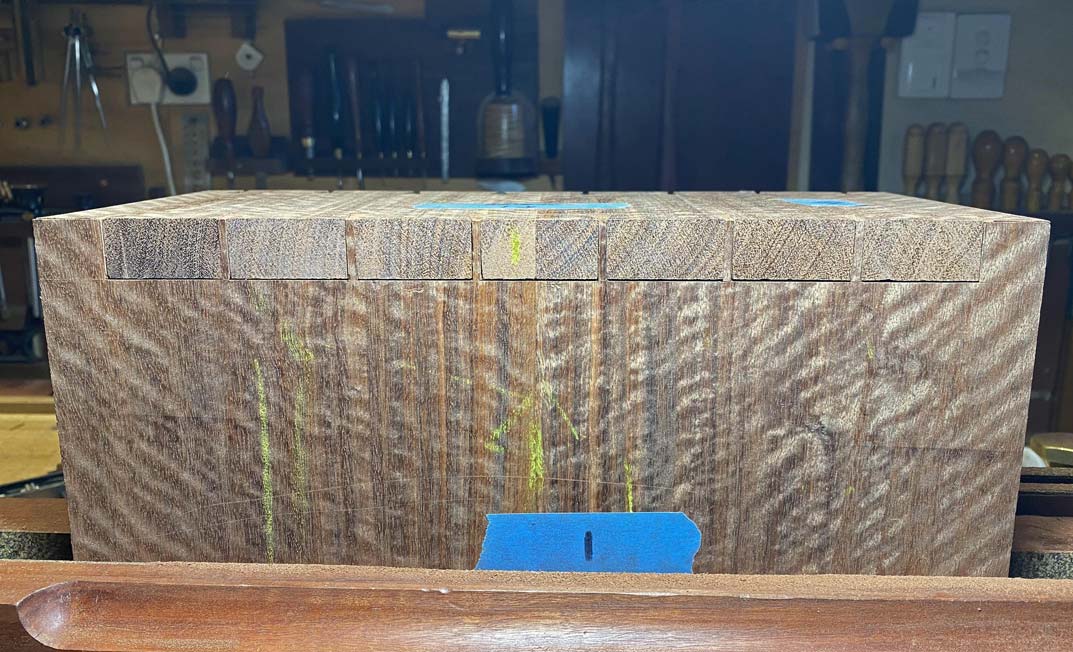


Not bad. But not good enough. There is a slight gap at each side, quite fine, but evident close up.

The source is traced to the mitre not being clean enough. It is like sharpening a blade – look for the light on the edge. If it is there, the blade is not sharp. If there is a slight amount of waste on the mitre, the case will not close up.
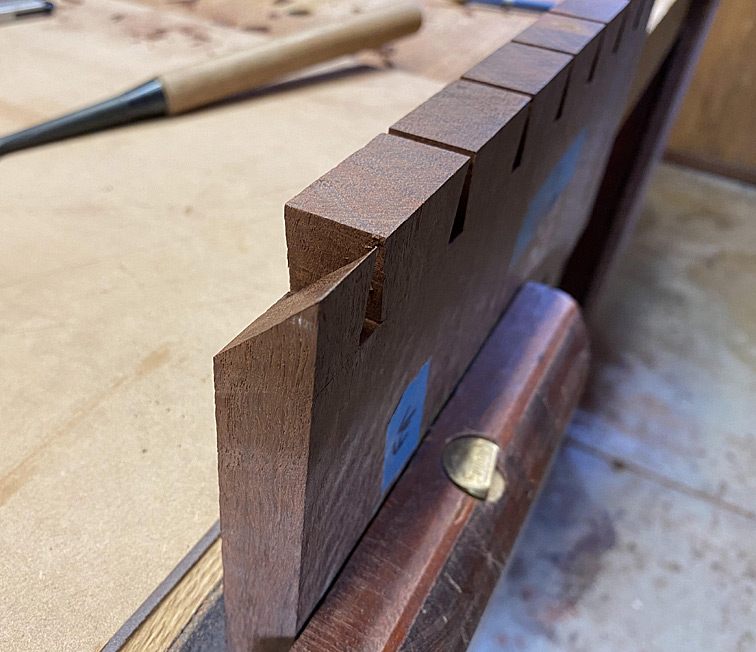

To clear this, instead of a chisel – which is tricky to use for such a small amount – I choose to use a file. This file has the teeth on the sides ground off to create “safe” sides.
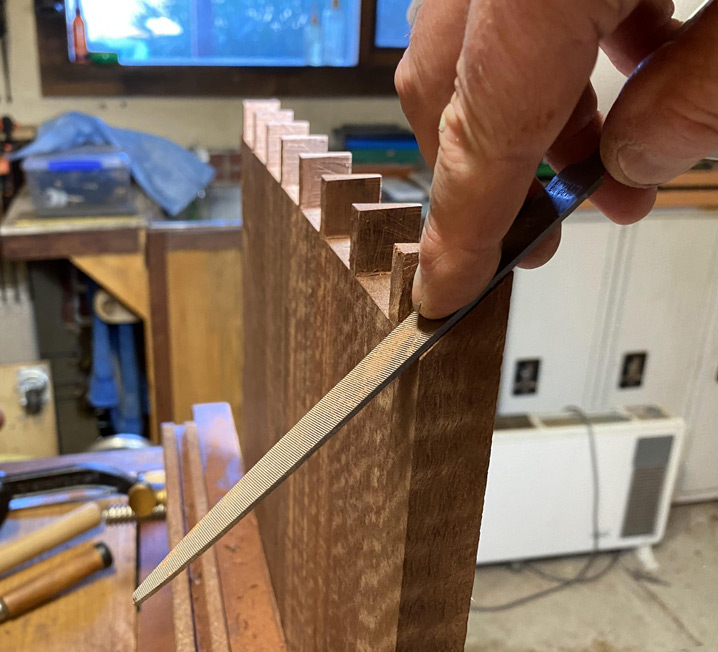

Try again. The fit is now very good. I will stop there.
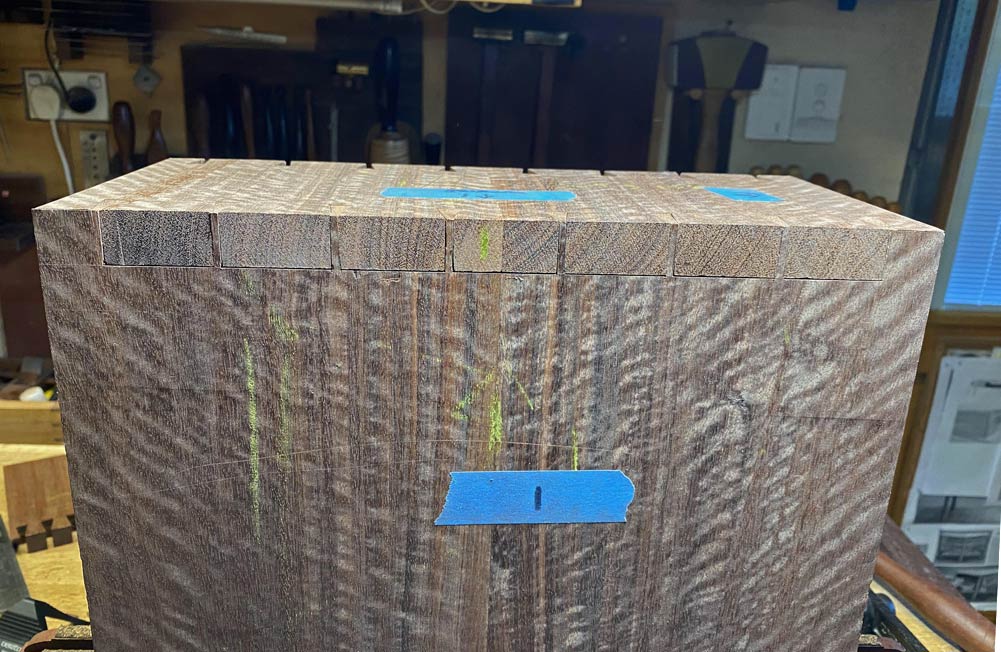


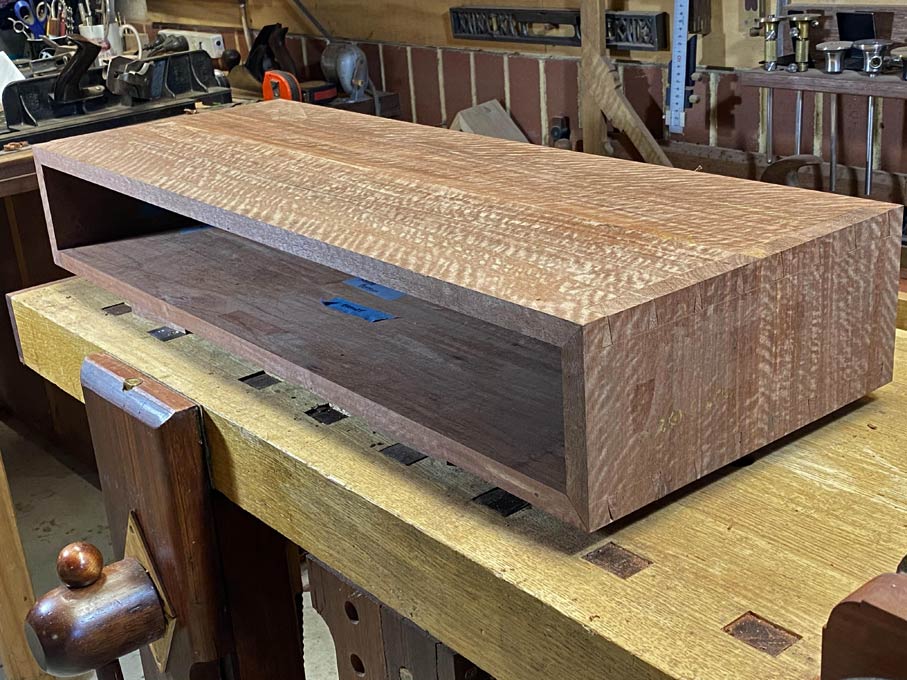
So, this is the stage of the project: the case is completed. This is a dry fit …
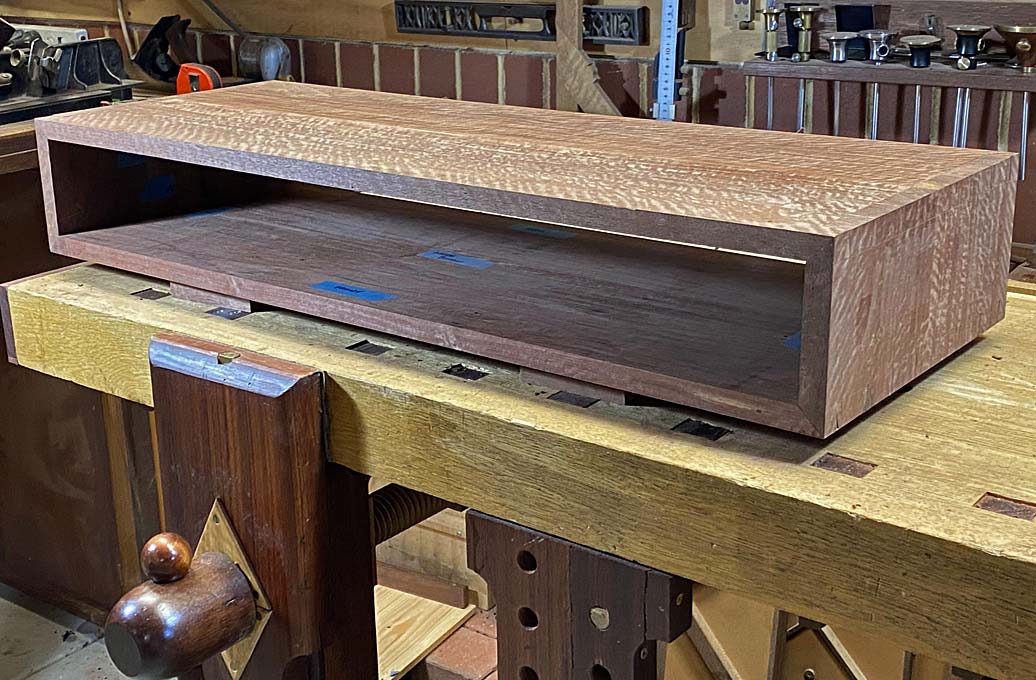

One end …
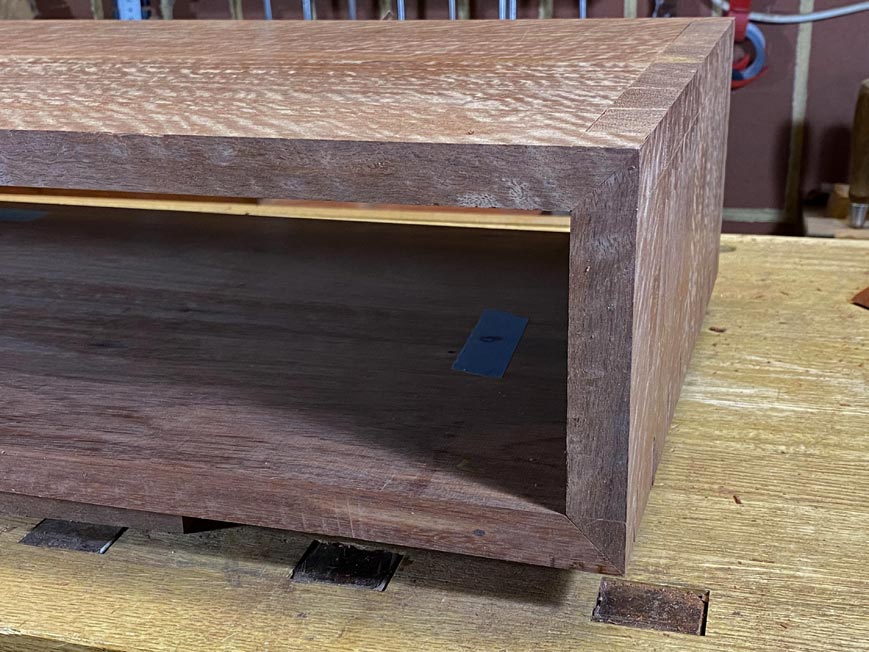


The other …
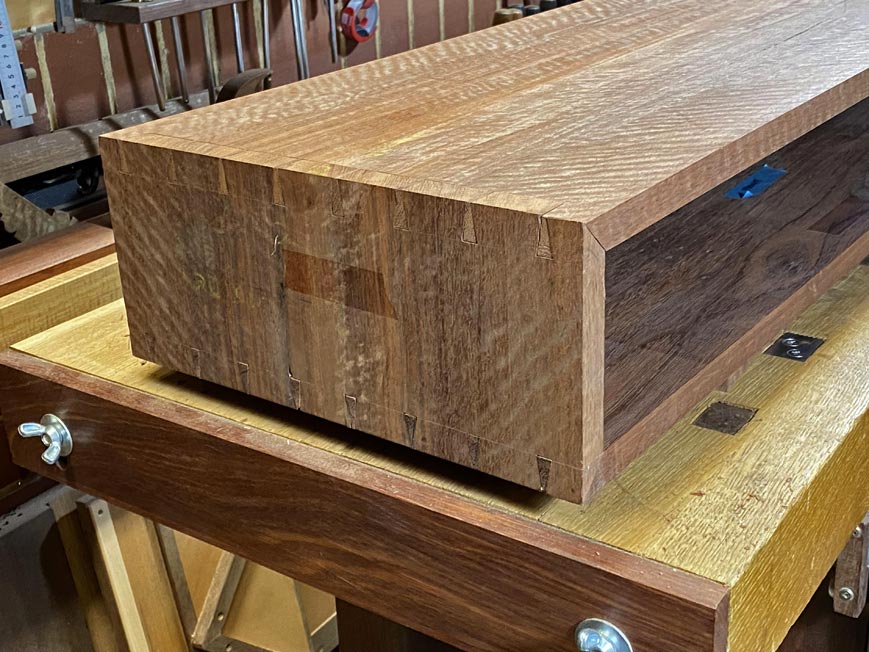

The waterfall can be seen, even without being smoothed and finished …

Regards from Perth

Derek

#EntryHallTable

Re: Entry hall table for a niece: Part 3

#2

Re: Entry hall table for a niece: Part 3

Oskar

Nice Derek, thanks for showing and describing!

Last time I did mitered corner dovetails like yours I remember I slightly undercut the mating surfaces of the miters, leaving the two visible edges of the miter untouched until last fitting. Just to make sure nothing in the miter was obstructing the dovetails to come together, and aiming for a tight seam. Like in lightly undercutting tenon shoulders. I found this joint somewhat nervewrecking, as there is no way of test fitting the dovetails without going all in on the miters.

Re: Entry hall table for a niece: Part 3

#3

Spectacular! Great explanation


Re: Entry hall table for a niece: Part 3

#4

Re: Entry hall table for a niece: Part 3

Derek Cohen (in Perth, Australia)

Hi Oskar

Thanks for describing your experiences.

You are spot on when you say “all in”. In the current build it is not possible to undercut the mitres to make them fit. The reason is the inside edge on the model calls for a bevel/mitre all the way around. I plan to do a slight cove. In any event, this open up the mitre from the inside, and any undercutting would show.

Regards from Perth

Derek

Re: Entry hall table for a niece: Part 3

#5

Re: Entry hall table for a niece: Part 3

Hank Knight

Derek, thanks for the tutorial. It never occurred to me to use a file on the miter. Great tip! Also, the waterfall figure in your wood is really nice. I'll bet it's going to be spectacular when you get some finish on it.

Re: Entry hall table for a niece: Part 3

#6

Re: Entry hall table for a niece: Part 3

Wiley Horne

Derek,

The joinery is so impressive. Because both the miters and the dovetails show. It all has to close exactly together, everything on the money at once, and I can’t figure out a way to finesse it. You can’t even start testing the dovetails until the miters are very close. Really a beautiful join, but so difficult. Yours is perfect.

Wiley

Re: Entry hall table for a niece: Part 3

#7

Re: Entry hall table for a niece: Part 3

Derek Cohen (in Perth, Australia)

Thanks Hank.

Ellis raised the use of rasps and files on the Messages forum, and I posted a similar reply ..

Rasps and files can be a tremendous aid in fine tuning pins (when necessary, I always tune a pin and never the tail).

The provisor with these tools is that they have safe sides, otherwise you cannot use them into a corner.

Files are easy to make safe - just grind away the teeth on the edges. You cannot do this with rasps as a good rasp will be destroyed - they are typically round on one side and flat the other, meeting at a point. However, the Japanese Iwasaki rasps come with safe edges.


With the figure in that fiddleback Jarrah, it should turn out similar to this (which was a wedding present for a nephew - and the sibling of my niece, who is getting married in March) ...


Superficial similarity in the pieces at this stage.

Regards from Perth

Derek

Re: Entry hall table for a niece: Part 3

#10

Re: Entry hall table for a niece: Part 3

William Duffield

otherwise you cannot use them into a corner

But, you can use unsafe files and rasps "out of the corner." I use this method for final finessing only, because it is slow and I have to pay very close attention. I lay the file down right in the corner, stopped. Then I apply pressure to the top, and push forward and away from the corner. This removes a small amount of material from the bottom of the corner without removing any appreciable material from the side of the corner. I repeat as many times as necessary. The only reasons to do this technique instead of using a safe file or rasp, is if you don't have one that is safe and the appropriate profile, or you are trying to fit while shaping and find yourself wasting time repeatedly swapping tools (Not applicable to your dovetails with all faces flat).

Re: Entry hall table for a niece: Part 3

#11

Ditto

Bill Tindall, E.Tn.

I don't own any safe files. But I proceed the other way from what you describe. For example, I face case pieces to cover up the dovetails. My family regards exposed dovetails with the same disapproval as just wearing underwear in public. I spent extra time making presentable drawer divider dovetails on a dresser for son in law. While it was under construction he asked if the dovetails could be covered up like on his wife's dresser. Sigh. I make the facing about 1/32 wider than the thickness of the frame and dividers. After the glue dries the overlap needs to be cleaned up. I use a 14" file, often the same one I sharpen lawn mower blades with.

I start in the middle of the drawer opening and work to the case side. As I approach the side I am filing against a shoulder, which offers resistance. It is a simple matter to be careful and file to the corner. That said, I am sure there are operations where a safe file is beneficial, if not essential. I just don't encounter the need, yet.

Re: Entry hall table for a niece: Part 3

#12

Re: Entry hall table for a niece: Part 3

Derek Cohen (in Perth, Australia)

My statement: otherwise you cannot use them into a corner

William's comment: But, you can use unsafe files and rasps "out of the corner.

William, I agree with you that an unsafe file or rasp can be used in the way you describe. My warning was not to use an unsafe file into a corner. No matter how careful you are, it is likely you will do damage to the adjacent side. DAMHIK! :)

Regards from Perth

Derek

Re: Entry hall table for a niece: Part 3

#13

Re: Ditto

Derek Cohen (in Perth, Australia)

I don't own any safe files. But I proceed the other way from what you describe. For example, I face case pieces to cover up the dovetails. My family regards exposed dovetails with the same disapproval as just wearing underwear in public.

Bill, what can I say .... my family are happy to walk around the house stark naked, as nature intended. :)

Regards from Perth

Derek