New WoodChat!
Home Articles Forums Gallery Marketplace Videos

WoodCentral Forums

Knowledge You Can Build On — Est. 1998

Personalized Wooden Watches, Engraved Free

The Butler's Desk - Workspace

Posts

Re: The Butler's Desk - Workspace

#2

Re: The Butler's Desk - Workspace

Bill Tindall, E.Tn.

I didn't understand the "splined batten". Where is it on the finished door and what is its purpose"

Also didn't understand how leather was installed. It looked to be something I would like to do .

Re: The Butler's Desk - Workspace

#3

Re: The Butler's Desk - Workspace

Bill Tindall, E.Tn.

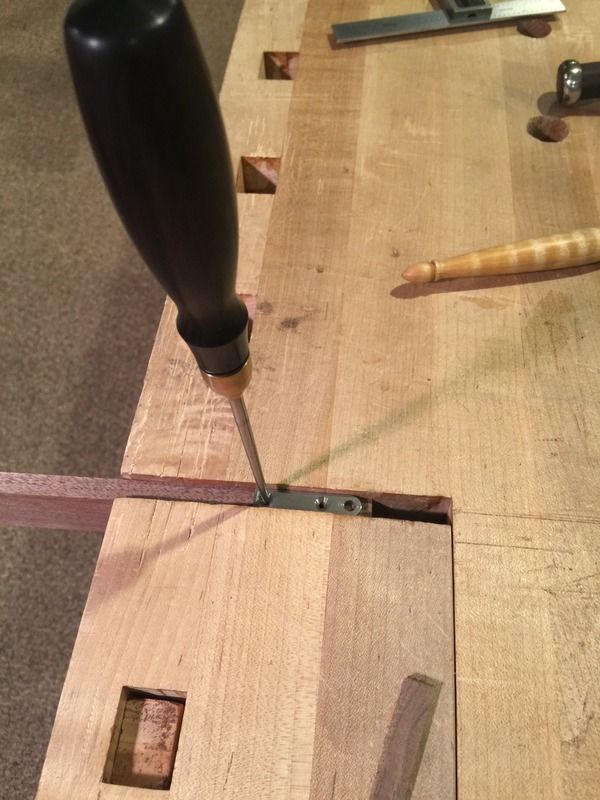
A picture should have a purpose. A worthy purpose is to teach or explain. I would like to see pictures showing more results and less trivial operational steps along the way. For example there is a picture screwing some piece of hardware. I don't know what the hardware is, where it goes, what it does, where it wound up in the final piece. At first I thought we were dealing with the drop leaf, but then the piece looks to be something different. A picture showing its function would be valuable in this narrative.

The last picture shows the final result but I don't understand how the first two relate to the result. I suppose the sawing in picture 1 is performing some function hidden in picture three somewhere, and ditto for picture 2.

How is the drop leaf hinged?

Re: The Butler's Desk - Workspace

#4

Re: The Butler's Desk - Workspace

Brian Holcombe

Bill, thanks for your questions. The splines running along side of the door are what I'm calling battens since they do serve that purpose. I suppose it would be fair to simply call them splines.

What part of the leather work did you want more detail on? Let me know and I will post up some specifics.

Re: The Butler's Desk - Workspace

#5

Re: The Butler's Desk - Workspace

Brian Holcombe

I appreciate the feedback, but I'm not sure how much more detail I can get into;

I provide the picture of the door (drop leaf), then the groove in the door, then the part that goes into the groove in the door, finally the hinge, then the hinge in the corresponding mortise in the case and the assembled unit both up and down.

What you are asking is for more detail or different detail? What's vague in this scenario?

Re: The Butler's Desk - Workspace

#6

leather

Bill Tindall, E.Tn.

The result is the leather neatly and tightly tucked around the plywood and inset in the frame. I like the result better than with molding around the edge. Looks perfect.....but how did it get that way? There seems to be a tool involved to stuff it? I understand there is the frame, a piece of plywood and leather but how does it go together to get the favorable result?

Re: The Butler's Desk - Workspace

#7

Re: leather

Bill Tindall, E.Tn.

"Next I mold the shape of the corners into the leather and trim the sides back."

getting the leather shaped, stretched and stuck to the plywood is part I don't follow. There seems to be a tool I have never seen involved but I don't know what it is doing.

Re: The Butler's Desk - Workspace

#8

opitcal dilusion

Bill Tindall, E.Tn.

Is picture 2 the door? In the picture it looks 1 1/2" deep and I thought it was the side of the leather insert frame and hinged so it would fold up to reveal a compartment beneath?

Spline: I presume the purpose of this piece is to keep the door from cupping, ie. stiffen the door, your answer to a bread board end? It would seem a dreaded grain mismatch has been created, but probably I don't understand how it was employed or how the differential expansion was mitigated.

What is the size of the door?

Re: The Butler's Desk - Workspace

#9

Re: opitcal dilusion

Brian Holcombe

I'll reply more shortly, but wanted to touch on the grain mismatch. The spline is free floating currently and will be attached in the center, which will of course require room between the top of the spline and top of the door.

It's 12"~ radial grain mostly. I plan to bias the fixed location so that most of the shrinking happens at the bottom 2/3. Leaving the top gap as a match with the top drawer's gap.

Re: The Butler's Desk - Workspace

#10

Re: leather

Brian Holcombe

Bill,

I just took a block of wood and used it to work the corners. The key is to stretch the leather away from the face of the plywood as you work it into the groove, thus keeping it taught.

I dont stretch the face a lot, but I do keep it fairly taught..

Re: The Butler's Desk - Workspace

#11

Re: opitcal dilusion

Brian Holcombe

My plan is flawed if I want to keep the bottom gap the same all year round, that much I realize, but I've increased the chamfer at the bottom of the drawer in the hopes that I will be able to minimize the mismatch.

This January or February I'll drop in an check on it.

If its anything like the cabinet I built last year I planned on 1/8" of wood movement and I've barely noticed any at all winter to summer (quarter sawn). Walnut has been good to me in that I dont see extreme movements out of it like I do in other woods.

I did a rosewood cabinet some years ago and suffice to say I would not take this same chance in rosewood unless it had been drying in my shop for many many years.

I did mention this to my client and he said he preferred the solid wood door over veneering, the gaps may not always match but overall he feels it less risk of irreparable damage.

Re: The Butler's Desk - Workspace

#12

stability

Bill Tindall, E.Tn.

I have followed a 12" piece of flat sawn walnut in my shop for many years with a written record of the measurements. It doesn't change more than 1/16" total season to season. But, the change is dependent on the individual tree in addition to the grain orientation. After finishing the changes are even less. Finish greatly slows water transport (at least the finishes I use)

Re: The Butler's Desk - Workspace

#13

Re: stability

Brian Holcombe

Thanks Bill, that puts me at ease a bit.

I've been paying close attention to this piece since I brought it into the shop, it's been behaving very well, and that was one of the reasons I was ok to risk this approach.

Re: The Butler's Desk - Workspace

#14

hinge

Bill Tindall, E.Tn.

So if I understand correctly the hinge is screwed to a spline that is attached (by glue) to the door some inches removed from the hinge?

I'm not convinced that the spline is either necessary or will work to prevent cupping if there was an inclination to cup. If some unusual event occurred that resulted in the door wanting to cup I believe the thin lip capturing the spline will simply split off.

A barrier finish on the door will prevent cupping in all but the most extreme circumstances, say a leak from above as what happened to a drop front desk in my mother-in-laws home.

Re: The Butler's Desk - Workspace

#15

Re: hinge

Brian Holcombe

The spline is installed but not glued, in these photos and IRL it's still free floating. It will be tied in with the installation of a stay. It's hard to explain but will be intuitive in photos.

Part of the purpose of the spline is to provide side grain for the hinges to screw into.

Short of unforeseen circumstances I do not expect much cupping to occur from this walnut.