New WoodChat!
Home Articles Forums Gallery Marketplace Videos

WoodCentral Forums

Knowledge You Can Build On — Est. 1998

Find a woodworking club near you

How to make a stopped rabbet?

Posts

How to make a stopped rabbet?

#1

How to make a stopped rabbet?

mdclor

I am making 2 mirror frames with white oak and need to make stopped rabbets that are 1/2" x 1/2". My process was to cut the rabbets at the router table, then I needed to square the ends so I got out my trusty Marples (I know they aren't the best, but it is what I have) chisel and mallet and chiseled out the ends. After completing 4 ends, my once sharp chisel is ready for some major resharpening. There must be a better way to do this that won't kill a chisel this quickly. What is the preferred method for doing this? TIA

Re: How to make a stopped rabbet?

#2

Re: How to make a stopped rabbet?

Darren Brewster

I've made exactly one frame to hold a mirror which was for a medicine cabinet. I followed Robert Wearing's steps in The Essential Woodworker, starting on page 185. It was pretty challenging that first time getting the layout and order of operations correct, but having done it once I feel I could probably do it twice as fast a second time. If you have that book give the method a try. It is one of my favourite hand tool books.

Re: How to make a stopped rabbet?

#3

Re: How to make a stopped rabbet?

Warren in Lancaster, PA

I am not sure what your design is, but we usually cut the rabbets with a fillister before assembling the frame. In some designs an extra half inch is left on the rails to fill a half inch rabbet on the stiles.

I don't think I have made a stopped rabbet in my career, but if doctoring the corners wears out your chisel, you might think about ways you can be more gentle and deliberate with the chisel to preserve its edge.

Re: How to make a stopped rabbet?

#4

Re: How to make a stopped rabbet?

Darren Brewster

That is the method Wearing illustrates. One of the tenon shoulders is 1/2" closer to the end to fill in the rabbets in the stiles. It sounds exactly like what your are describing.

Re: How to make a stopped rabbet?

#5

Works for me

Bill Tindall, E.Tn.

I've made lots of them but I use a more robust chisel. There is none better than the LV PM V11 but others at half the price can be good enough. I have found the steel in the Hirsch chisels (identical to Two Cherries) to be good. I don't know anything about the Japanese brands.

Along those lines a new club member stopped by for a sharpening lesson. We worked on a plane blade and a chisel set she bought from Woodcraft. I have sharpened enough kinds of steel to know from how it was going that these chisels were soft. Sure enough after sharpening I had her chop a single dovetail in maple, then look at the edge at 10X. Predictably it was folded over as soft steel will do.

I advised her to not buy a set of chisels at first. I suggested she figure out what size dovetails she preferred for the boxes she contemplated and buy a pair of chisels that would do the pins and tails.

Re: How to make a stopped rabbet?

#6

Cut-and-Pasted demonstration.

Derek Cohen (in Perth, Australia)

I am making 2 mirror frames with white oak and need to make stopped rabbets that are 1/2" x 1/2". My process was to cut the rabbets at the router table, then I needed to square the ends so I got out my trusty Marples (I know they aren't the best, but it is what I have) chisel and mallet and chiseled out the ends. After completing 4 ends, my once sharp chisel is ready for some major resharpening. There must be a better way to do this that won't kill a chisel this quickly. What is the preferred method for doing this? TIA

I wrote the following about the stopped rebates in my current build - easier just to copy-and- paste. Apology for being lazy.

Of note, the frames here are curved, not straight - just another little complication.

Not really significant, but just for reference.

A warning about the rebates – they are stopped rebates, which is risky to do and not generally recommended for this type of construction. The rebates terminate short of dovetails that lock the two sides via the top rail. It is easy to weaken and damage them. The only reason I am going down this route is to maintain a clean exterior – I want to finish the back of the chest at the same level as the front. The joint will be strong (again) once the parts are glued up.

This is where the rebate will go …


The plan is to use a rebate plane. Those who have tried this are aware that planing from one end to the other will create a curve, with the depth deepest in the centre of the side, and tapering off to the ends. Eventually the plane will stop cutting ..


To plane this successfully, first remove enough waste from each end to enable the rebate plane to continue planing to depth ..


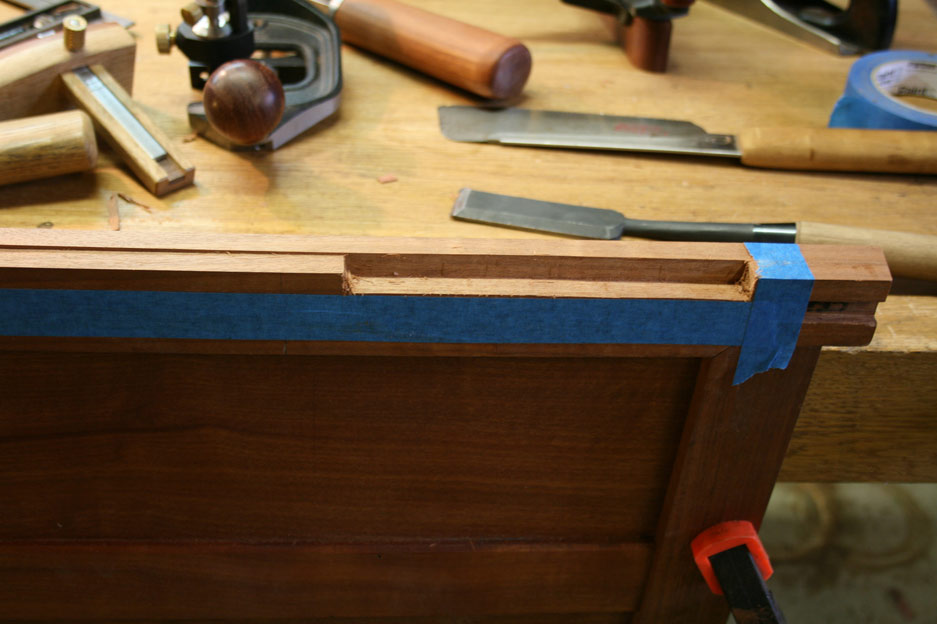

Do the same at the other side …


Now you can plane with confidence as the rebate can be taken to full depth along the whole length.


Those familiar with the Veritas Skew Rabbet Plane will notice that the front knob has been removed (as well as fitting a deeper sub-fence). The knob seems superfluous to me since I cannot find a reason to use it. There is far more control pushing the plane into the rebate, that is from the side.


What I have discovered is that the place where the knob went makes a handy position for the thumb – better than the fence alongside the edge of the blade … where inevitably I cut myself!
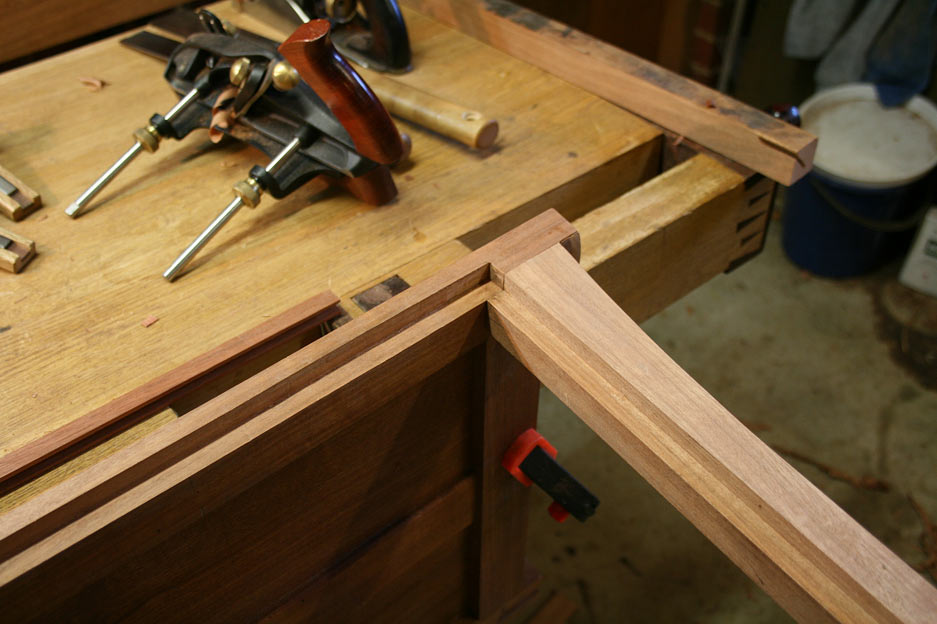

This is the completed rebate. The rear panel will sit in a frame that fits in the rebate. The sizing of this rebate enables the rear sliding dovetails to be sawn inside it and then hidden behind the frame.

Regards from Perth

Derek

Re: How to make a stopped rabbet?

#7

Jack Guzman from Maine

Re: How to make a stopped rabbet?

Jack Guzman from Maine

To help preserve you chisels edge,try removing most of the waste with a forstner bit. The chisel will have less resistance to overcome.---Jack

Re: How to make a stopped rabbet?

#8

Re: How to make a stopped rabbet?

mdclor

Thanks for all the great replies!

Darren & Warren, I will order The Woodworking Essentials from LV tomorrow after I have had a chance to get my wish list completed. They are doing the free shipping thing until 11-2. It looks like there is more knowledge in the book than I will ever be able to assimilate.

Bill, I will hold off on new chisels until I sell enough product to cover their cost, but thanks for the recommendations. :)

Derek, that is exactly what I am making, except for the curved part and I'm not doing dovetails. Your pix look so much better than my project.

Jack, I will use your suggestion to complete these frames. I should have thought of it myself. :/

Re: How to make a stopped rabbet?

#9

Re: How to make a stopped rabbet?

Peter Evans

My original edition 1988 only has 159 pages, you are I guess referring to a later edition. What is the relevant figure number. A quick scan and I cannot see the section referred to.

Thanks

Peter

Re: How to make a stopped rabbet?

#10

Re: How to make a stopped rabbet?

Darren Brewster

It starts with figure 404 in my Lost Art Press digital edition. Hopefully the figure numbers are the same between editions.

Re: How to make a stopped rabbet?

#11

Something wrong

Warren in Lancaster, PA

I think something is very wrong here, Bill. A chisel should not fold cutting maple. Maybe it has lost its temper. This morning I took a Marples chisel and made seventy chopping cuts in hard maple end grain, each a half inch deep. Afterward it still cut white pine end grain nicely, still shaved arm hair.

Re: How to make a stopped rabbet?

#12

It may depend on the vintage of the chisel

Bill Houghton, Sebastopol, CA

Quality of the Marples chisels seems to have gone down over the years. You may have an earlier one, Warren.

Re: How to make a stopped rabbet?

#13

You just discovered... *LINK*

John in NM

Where Marples got their horrible reputation :D

I gather they used to be good tools, but every one of those blue handled ones I've ever used did exactly what you described.

The only suggestion I have is that when you resharpen, maybe, just maybe, a steeper bevel will improve the tendency to fold. Should be easy enough to find a recommended angle, but I don't know it off the top of my head. I've found that good chisels are insensitive enough to bevel angle that one can simply eyeball it, so that's what I do.

Check out the Narex chisels from LV. I've bought a couple and found them to be good utility tools, excellent even if you factor in the price. That means you can find many better options, but they all cost at least 3 times the price of the Narex, if not 6 times.

I find my two Narex to be slightly more sensitive to bevel angle than the Sandvik's I've used for years, but not much more.

As to your actual process - you did it exactly as I do it, and as most custom/production shops do it. I've seen router only guys try to freehand the corners out with 1/4" or even 1/8" bits, which always struck me as both slow and risky. The chisel/router method is quickest and gives you as good results as anything.

Derek's procedure is the hand tool only method - which I have to say is very cool to see. I knew there was a way, just never came across it before, being a composite sort of woodworker myself. One of those things where I say "of course, that makes perfect sense" but might never have thought of on my own.

EDIT:

Forgot the link!


Narex chisels

Re: How to make a stopped rabbet?

#14

Re: How to make a stopped rabbet?

Peter Evans

Thanks Darren, still the same text/figures

Re: How to make a stopped rabbet?

#15

Re: Works for me

TomD

There is a range of soft chisels that can even be sharpened with a file. As Jim Cummings showed, they can be hardened pretty easily. They will fold over real fast on maple, but they will hold an edge a practical amount of time in woods up to cherry. Fun stuff, I keep a few in my framing rig.