New WoodChat!
Home Articles Forums Gallery Marketplace Videos

WoodCentral Forums

Knowledge You Can Build On — Est. 1998

A natural, durable finish with minimal coats and fuss popular among woodworkers, flooring professionals, and furniture makers

Shooting Board

Posts

Shooting Board

#1

Shooting Board

Joe in a Cleveland suburb

I have a little problem with my shooting board. I get tear-out on the back of the piece I am shooting. Why is that?

I made it several years ago with some scrap Cherry 3/4" plywood. The top piece of ply has a piece of Ash glued to it for the plane to run along. The backer piece is a scrap piece of Walnut.

Everything is square (the Walnut piece is adjustable). When I shoot a piece and check it with a square, it's square, but there's (almost always) a little tear-out on the back.

Could the Ash piece be worn or something? I don't have a lot of experience with this.

I wonder if it's the Ash because of the small area that doesn't get planed. It leaves a really small gap between the plane and the Walnut backer piece. Not sure that makes sense...

In the picture below, you can see the small gap between the Walnut and the plane. The piece of Maple being shot is tight against the plane.

Thanks for any advice.


Re: Shooting Board

#2

Re: Shooting Board

Bill Tindall, E.Tn.

The "fence" must extend to the tip of the plane blade. If there is a gap the fibers will not be supported.

Re: Shooting Board

#3

Re: Shooting Board

wilbur

Eventually the fence on a shooting board wears down, so although setting the fence so that it’s even with the plane helps, it’s not a viable solution in the long run, unless you like adjusting your fence a lot.

A better method is to us a chisel or a small plane to put a back bevel on the end grain on the side of the workpiece that will be up against the fence. The back bevel will be even with where you want to stop the shooting process. That way, the fibers will be supported as you shoot the end of the board up until the point where you’re done.

Re: Shooting Board

#4

Re: Shooting Board

TomD

The fence should stay at a constant length unless you have cause to vary the blade extension a lot.

The back bevel helps, though it may not suit certain cases where the squareness of the shoulders is paramount and where there is a risk that the last squaring cuts will break out anyway. Another variation is to get some gain on the end cut so it is like a full width bevel.

One other detail to watch is if the piece is projected a little to allow rapid stock removal, and the edge is unsupported...

Other ways to deal with the problem are to ensure the fence is truly rigid, mine is very wide; and to maximize cutting power. Sharp blade; low angle presentation; descending ramp angle, both lowers cutting angle and reduces the event leverage on the rear fibers, and allows them to be more supported. The same is true of the purpose built planes that have skewed blades.

Re: Shooting Board

#5

Re: Shooting Board

Wiley Horne--So. Calif.

Hi Joe and all,

The leading edge of the fence can get dinged over time, to where it's not fully supporting the work. Maybe caused by shooting with too much blade exposed on a rare occasion. If the fence's leading edge gets recessed, even a little, it can cause spelching on the exit side of the work piece.

After you run in the shooting board, the ash piece (part exposed to the blade) should be coplanar with the fence.

Diagnostics:

1. If the run-in surfaces of the ash and fence are lined up flush with each other, but still leave too much air between their surface and the plane sole, then it may be that the shooting was done once or twice with more blade exposed than you normally like to use. In this case, take a rabbet or shoulder plane and take a couple of shavings off the ash piece--all the way to its base--and re-run-in.

2. If the run-in surfaces of the ash and fence are not lined up flush with each other--like if the fence has receded from the ash face, then they need to get flush with each other. The solution is still the same: take a rebate or shoulder plane and take a couple three shavings off the entire ash face, and re-run-in. Do this until you have flushed the ash face (exposed to the blade) and the fence.

Bottom line: Get the exposed part of the ash flush with the fence end grain.

$0.02.

Wiley

Re: Shooting Board

#6

Re: Shooting Board

Derek Cohen (in Perth, Australia)

I have a little problem with my shooting board. I get tear-out on the back of the piece I am shooting. Why is that?

I made it several years ago with some scrap Cherry 3/4" plywood. The top piece of ply has a piece of Ash glued to it for the plane to run along. The backer piece is a scrap piece of Walnut.

Everything is square (the Walnut piece is adjustable). When I shoot a piece and check it with a square, it's square, but there's (almost always) a little tear-out on the back.


Hi Joe

The "tear out" is called spelching. This occurs when there is too little support at the end of the board.

Imagine that you were planing endgrain in a board held vertically in your face vise ... you would either add a backing board to the far end, or you would chamfer that end, both to avoid this spelching.

The shooting board is no different. It is simply a controlled planing of end grain. If the end of the board is unsupported (that gap that you refer to), then spelching is likely to occur. The gap simply develops over time when the blade is projected a little further than usual - it is really not reasonable to expect that the end of the fence remains untouched over time, that is, that it will stay the same length.

You could replace the fence, but I consider that this is unnecessarily time consuming.

You could use a fence that may be adjusted to the ideal length. This is a good idea when building a board. Here is one like that ...


Better practice is to simply add a chamfer to the rear of the board. That way one learns not to rely on the fence as a backing board. Below is an example (exaggerated).

Butt the end of the board against the fence and chamfer the end with the plane on the shooting board. This assures a square chamfer.
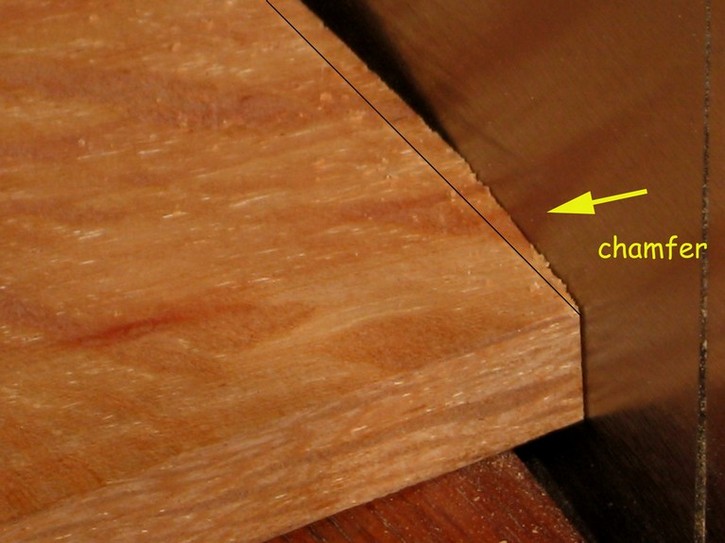

Now turn the board around, rest the reference side against the fence, and plane to the end of the chamfer.

Regards from Perth

Derek

Re: Shooting Board

#7

Question

Bill Tindall, E.Tn.

Twice chamfering has been mentioned. Is this approach common or commonly needed? I was doing some drawer sides last night and it occurred to me that I have never encountered the need to chamfer. I purposely left a 1/16" or less unsupported and had no problem. I wonder if some wood is more prone to splintering where the plane exits. I am usually dong poplar and occasionally other common furniture wood. I have encountered some maple that seemed to have a brittle texture when thickness planning it.

Another though is depth of cut. There is going to be more exit force with a deep cut than a light one.

Re: Shooting Board

#8

I think you...

Joe in a Cleveland suburb

are on to something with #'s 1 and 2.

I need to take a close look at that.

Thank you.

Re: Shooting Board

#9

Re: Shooting Board

Joe in a Cleveland suburb

"spelching", right. Doh.

I've seen your site and shooting boards Derek. Making one similar has been on my to-do list for some time.

Thanks for the info.

Re: Shooting Board

#10

Re: Shooting Board

david weaver

Just another reason why a shooting board should be an easily made throw-away tool until someone loses the urge to tilt their planes.

There are gobs of shooting boards out there that cost into the several hundreds of dollars, and I'm completely dumbfounded about why such a thing would ever be needed.

Re: Shooting Board

#11

Re: Shooting Board

Lars Parrington

I have the same short fence and spelching problem. I usually employ the chamfer method others have mentioned, and that works fine.

I think my fence is short not so much because of have too much blade exposed (ie trying to take to heavy of a cut), but rather because I tend to accidentally roll the plane over towards the fence every so often.

Re: Shooting Board

#12

Re: Shooting Board

TomD

I wouldn't call that a chamfer (which it may well be), that is more like what I was talking about when saying you could lay off the cut, that is a good way to go. With a chamfer I tend to imagine that people are putting a 45, or 30 on with some freehand plane strokes, or a chisel. Partly because that is fast and often good enough. The only problem with chamfers of either type is when one takes that one extra cut and crosses over the line and blows out a piece. Probably just me.

A related technique to chamfering is a stop cut. You just cut to a line on the far side, you could use a saw, or a chisel, or knife. This a deep cut of maybe 1/16" and it will stop blow out, if you don't go past it. If you were making a tail board or a tenon, you could make quite a deep cut, off the line since that piece will be waste, and will get cut off, this eliminates the overcutitng by a pass problem.

Another way to go with the end of a piece of wood is to plane the last bit from both ends, mostly concentrating on the center so one is hollowing, but actually setting the end to within a few thou of totally straight. There are too ways to use a shooting board at least. One is to transfer the template of the board itself to the end of the wood, which is basically the method of locking in the piece, then planing till nothing more comes off. The other method is use the jig to align and hold the piece, while essentially planing it from the sole of the plane, using that as the template, which is normally more accurate a reference (not necessarily more accurate a method). If you are using the second method, then flipping the piece goes well with it.

Re: Shooting Board

#13

Re: Shooting Board

David Charlesworth

I have taken to using a sacrificial stick which is clamped in place by a toggle clamp fixed to the fence.

Very simple and easier than truing the board and fence.

I have a lot of beginners who tend to tip the plane!

best wishes,

David

Re: Shooting Board

#14

Re: Shooting Board

Derek Cohen (in Perth, Australia)

Hi David

I have seen my share of beginners at wood shows (and some better than beginners) tip the plane on a shooting board as well.

Many – both experienced and novices alike – would draw the plane back to the start of the runway, and then push it forward fast in an attempt to create momentum, as if this was necessary to power through the end grain. Shooting in this manner would lead to user losing control of the plane.

What is necessary for control is minimum run up. Place the plane with the blade nearly touching the near edge of the board, and then simply push the plane forward, with even pressure and firmly. Since the shaving removed is very fine, a plane with a sharp blade will cut without much effort.

Regards from Perth

Derek

Re: Shooting Board

#15

Re: Shooting Board

David Charlesworth

Derek,

Good observation.

David

Re: Shooting Board

#16

Re: Shooting Board

TomD

That makes it clear, I don't get why people need to replace the fence, it shouldn't wear, but I can see tipping the plane.

If I personally had that problem, I would be telling myself to pretend that I was planing the surface directly below the plane. The large reference surface on most designs is the jig bed, and the fence to the plane's left is less important, because failing to be tight to it is not really going to be a big deal. You might miss the workpiece entirely, but you have another chance next time. If the blade happens to cut the workpiece, great, but pretending you are trying to plane the bed to sole interface keeps everything nice and square.

Some of the planes are set up to plane into the corner, but I don't have that kind of plane, and it is probably still possible to tip it like that.

Re: Shooting Board

#17

Re: Shooting Board

Joe in a Cleveland suburb

"I have a lot of beginners who tend to tip the plane!"

I spent a few minutes this weekend looking at my problem. I noticed that that is what I am doing. Well, at least that is a big part of it. Thanks for pointing this out.

I am re-working my shooting board a little and adding a little 'ramp' to it. Should help. That and making sure I don't tip and use too much force (e.g. starting the plane way back and getting enough forward momentum...)

I think it all boils down to a user issue. :)

Thanks all.