New WoodChat!
Home Articles Forums Gallery Marketplace Videos

WoodCentral Forums

Knowledge You Can Build On — Est. 1998

Veritas - Innovation in Tools

One down . . .

Posts

One down . . .

#1

One down . . . 

CJ in MPLS

A while back I posted about some chisel handles I intended to replace. So naturally I waited a long time to finally get around to starting the actual project. Nothing like working with cold tools. Here is the first handle:


I picked up leather scraps from Tandy and will glue those down with hide glue momentarily.

I had some success in getting the handle to fit by using the age old and freaking tedious process of spotting the handle using the pre-existing filth inside the socket and then scraping the filth off. Many, many times. I got a very good fit, if I do say so myself. I ended the process when I couldn't easily remove the handle from the socket, which was a logical if unplanned stopping point. It would have been easier to glue on the leather washers if the handle wasn't in the chisel. I might also have been able to chuck the handle for a bit of truing on the lathe, but a sander will likely be used to smooth a roughly shaped leather surface.

This is the first one and it took about 3 hours with stock prep (note to self, leave more wood on ends of blank to steer clear of the live and dead centers), turning and scraping. Since I have 8-9 more to go I hope this time comes down considerably. ;)

Cheers,

CJ

Re: One down . . .

#2

First one always takes the longest

Bill Houghton, Sebastopol, CA

You get faster with practice. Nice progress shot.

I thought Minnesotans were prohibited under the state constitution from using the word "cold."

Re: One down . . .

#3

Re: First one always takes the longest

CJ in MPLS

I grew up in Wisconsin, so I'm already somewhat sketchy by local standards.

Re: One down . . .

#4

Re: One down . . .

John Pappas

From current issue of Popular Woodworking. Might try this.

"When turning a new handle, use aluminum foil to make a model of the socket. Pack the socket with foil and be sure to leave some hanging out to act as a handle to remove the plug."

Re: One down . . .

#5

Re: One down . . .

CJ in MPLS

I actually tried that and was a bit unimpressed. It takes a lot of foil and it is quicker to simply roll up a sheet of paper, drop it into the socket and then let it unroll into the frustoconical shape of the socket itself. You can measure the dimensions directly. I'm not certain where I got the idea, but someone did me a solid with that one.

Re: One down . . .

#6

Re: One down . . .  *LINK*

Patrick Gibbons

I once used my children's left-over playdoh. It wasn't ideal. Modeling clay or Quikwood epoxy putty with Vaseline lining the metal to prevent cohesion will work.


http://www.leevalley.com/US/wood/page.aspx?p=20057&cat=1,190,42997

Re: One down . . .

#7

Re: One down . . .  *LINK*

Derek Cohen (in Perth, Australia)

I think that method truly misses the mark. The issue is that you need to measure the inside of the socket so that you can use the marks at the lathe. Reproducing the shape inside the socket does not do this.

There are three important measurements to take. The first is to obtain the internal diameter of the top of the socket. This will provide the dimension for the base of the tenon …


The second is to measure the diameter at the bottom of the socket, which will provide the dimension for the top of the tenon …

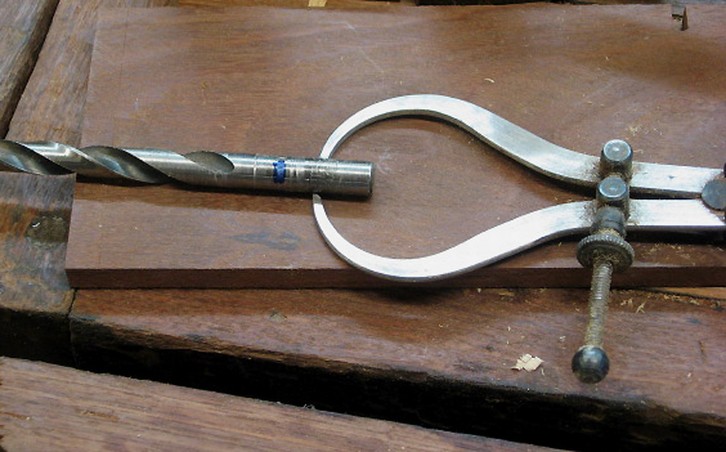
For example, use a drill bit of known diameter (in this case 5/16”), and insert into the socket …


Record the depth of the tenon, and transfer this diameter to a calliper …


The last measurement that you will require is the diameter of the “transition” (my term – the section between the socket and the handle. This will enable multiple handles to have the same dimension. Measurement was taken from a handle that I had already turned …

In the picture below I have created the base of the tenon. The tip of the tenon is turned next. This is pretty standard stuff.


Below is the completed tenon. The shape of the transition is created by following the fine of the tenon and leaving the thickness of the steel.


Regards from Perth

Derek


So you want to make a dovetail chisel

Re: One down . . .

#8

Re: One down . . .

William Duffield

Rub and scrape works. When I've rubbed off all the old crud, I just look for the burnish marks on the handle taper. If you are working with an old hand forged socket that is not nearly round, it helps to mark the socket and the handle so they go together at the same point in the rotation every time.

Foy laying out the taper, I start with two dowels, one just smaller than the largest diameter of the taper, and the other just larger than the smallest diameter of the taper. I insert each dowel into the socket and mark the outer end of the socket on the dowel. Then, I turn a shoulder in the handle, just a little oversized. Then, I transfer those marks to the handle, measuring from the shoulder of the taper. Two pairs of inside calipers set to the diameters of the dowels then tell me how deep to turn two diameters, using a parting tool, with the tool to the side of the mark with the smaller diameter. Then, I turn a taper from the shoulder to the depths of the two diameters with a skew chisel (or a straight scraper). Finally, I remove the handle from the lathe and cut the end of the taper off just short enough it won't bottom out in the taper. If that's not clear enough for you to figure out, let me know, and I'll try to draw a picture, or take a few photos.

Re: One down . . .

#9

Re: First one always takes the longest

Bruce, a MN Galoot

I've been making a trestle dining table with a couple extensions for some friends and finished it the day before the other shoe dropped. I hauled it off to the cabinet shop for spray finishing just in the nick of time. I won't go out into the shop now, even to clean! This early winter nastiness would be for the birds if there were any left (although I did see one of our resident bald eagles out prowling for lunch the other day).