New WoodChat!
Home Articles Forums Gallery Marketplace Videos

WoodCentral Forums

Knowledge You Can Build On — Est. 1998

Nearly 100 Exotic Wood Species, Direct-Imported Since 1972. Shop Slabs & Turning Stock.

Planning the lingerie chest II

Posts

Planning the lingerie chest II

#1

Planning the lingerie chest II

Derek Cohen (in Perth, Australia)

The forum is a little slow, so I thought I'd post the developments in designing the lingerie chest.

The overall height has dropped to 51" since I plan to incorporate a hidden mirror into a swing-up lid. The lid will look like a moulding, and the hinges will be hidden at the rear. I would like to fit a secret catch that will also unlock the top drawer (this will replace the keyhole mentioned early on).

The base is 25" wide and the top is 20". The moulding/lid is 22" wide.

The lid is planned to be a breadboard construction to minimise movement. Any comments?

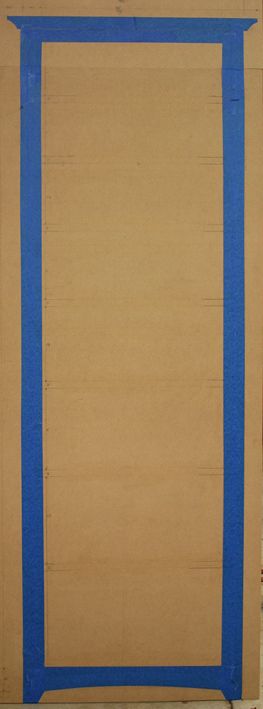
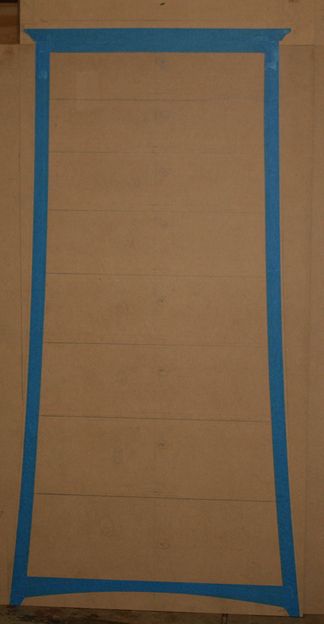
I drew the front elevation to scale with blue tape representing the actual thickness of the carcass:


There are 8 drawers. These taper in depth, although the top two are the side, both 4 1/2". Then comes 5", 5 1/2", 6", 6 1/2", 7", and 7 1/2".

The drawer rails are 1/2" high and will be hidden behind each drawer front. The top of each drawer front lies flush with the underside of the rail, and then drops to cover the rail below. The rail then doubles as a drawer stop.

At this stage I am undecided whether to curve the drawers as this may cause it to be too busy (too many curves). If they are, they will have a very shallow convex (curve to the front). It is difficult to visualise this, and so I will leave that aspect to later.

The rear elevation will repeat the lower curved rail. Construction of the rear and sides will be frame-and-panel. The panels will be flush to the side rails, creating a flat surface.

The sides look a little bland in this elevation, but visualise that they curve outward. The depth of the chest is 16 1/2". The lid adds another 1" at each end. This dimension enables the chest to fit neatly into the alcove in the bedroom. Any comments on this depth? The last chests I made were 17" deep, which does not seem to me to be significantly different.


The side panels are expected to be 1/4" thick and rebated into the curved side rails. The interior of the side panels will be reinforced by the side rails for the drawers.

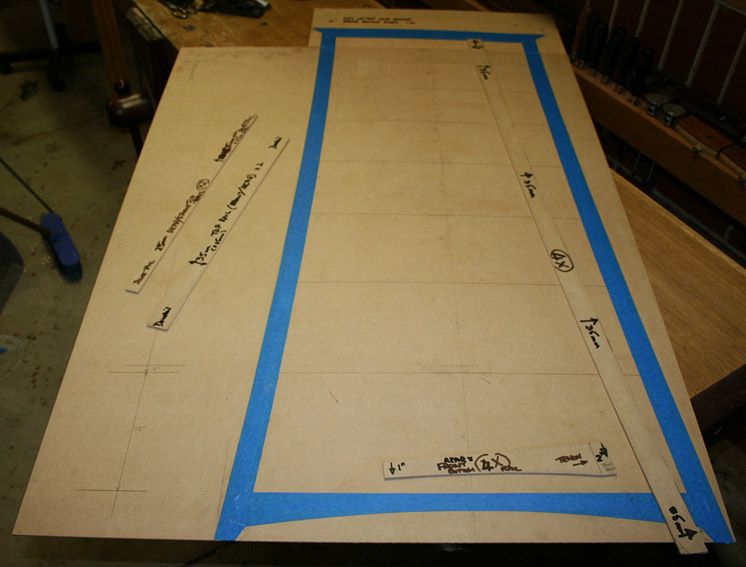
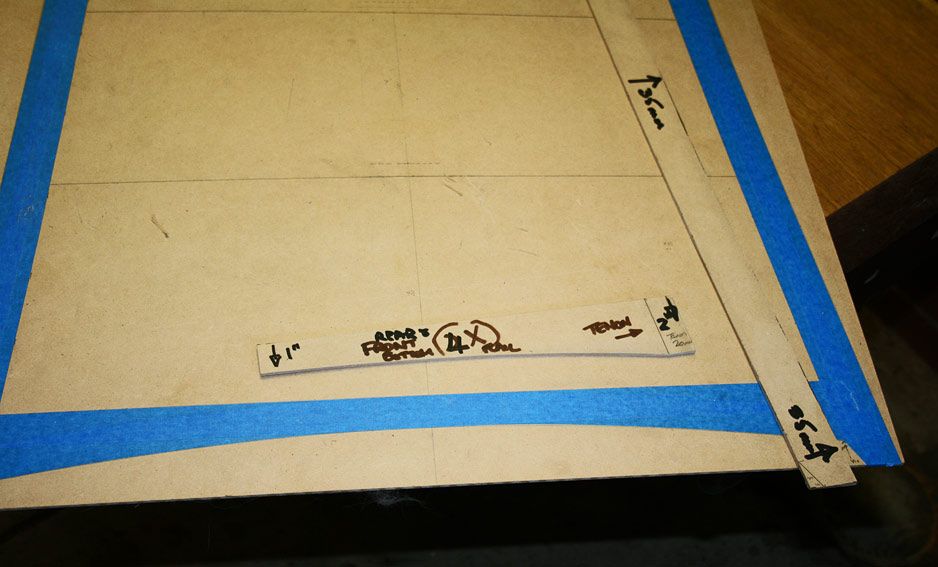
From these elevations I began making templates ..


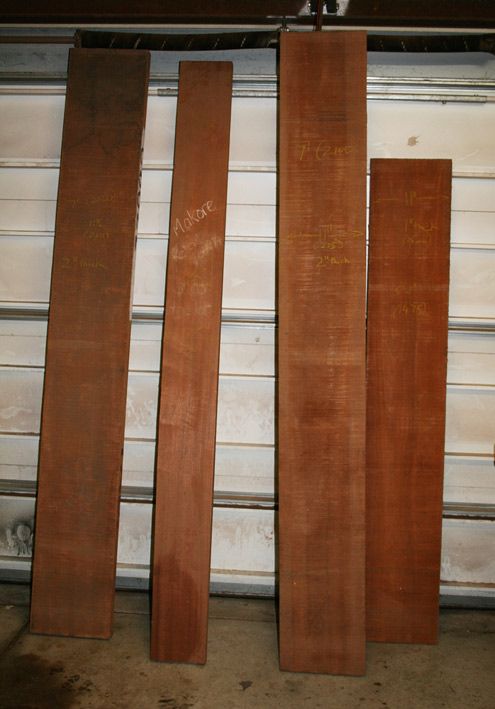
These are also needed to determine how to use the wood I have. I would like to use the Makore. I fear it will not be sufficient. Either I will need to find more - which will be difficult, especially since the boards I have are from the same tree - or I need to change to a different wood.

My thought is that I will mix the Makore with Jarrah. It should compliment each other really well as the tonal colours are the same brown-red.

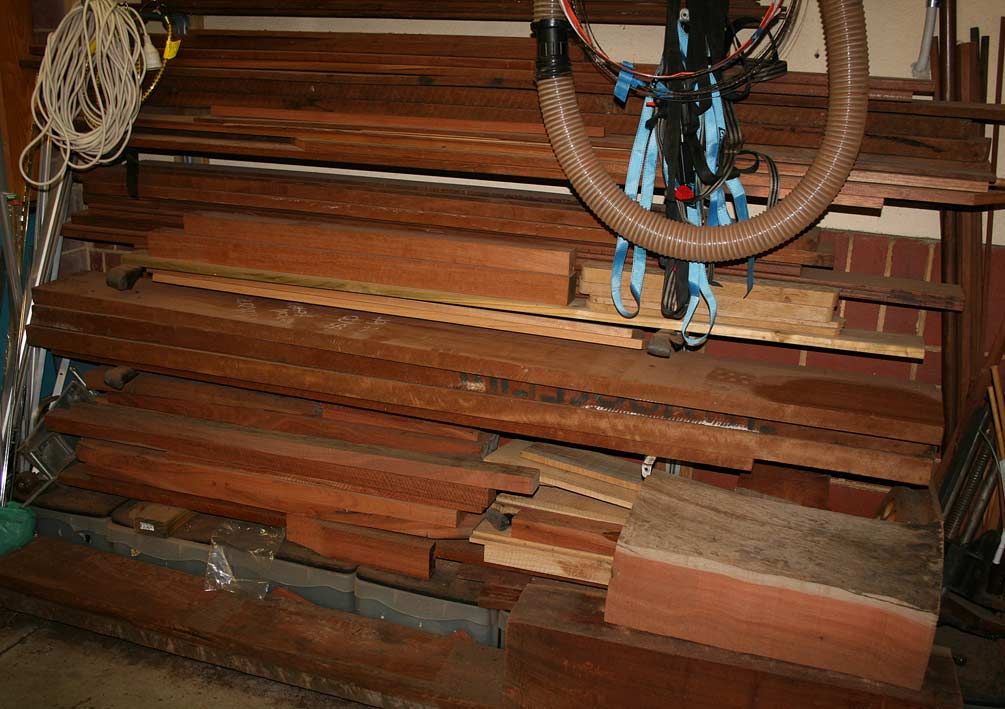
Below is a wood stack. The second-from-the-bottom shelf is the Makore (4 boards), and the remainder is Jarrah.


Three of these boards are 7' long and 2" thick. Two are 11" wide.


The drawers and panels could be Makore, with the frames and rails in Jarrah, or vice versa. Comments?

Regards from Perth

Derek

Re: Planning the lingerie chest II

#2

Re: Planning the lingerie chest II

Bruce McCrory

"My thought is that I will mix the Makore with Jarrah. It should compliment each other really well as the tonal colours are the same brown-red."

I have one piece of Jarrah. Makore is a question mark. Looking at googled images I can only think: Same color. One stock is from one tree, and the other from another tree which is a different genus. So, what is different becomes a critical contrast. Texture? Grain? If everything is the same, but off, are you simply saving money?

Re: Planning the lingerie chest II

#3

Re: Planning the lingerie chest II

Lars Parrington

you could make the lid a frame and panel, where the panel is wood on top, mirror on bottom.

you could steam bend the curve into the long veritcal corner pieces of your case instead of sawing them. just as a way to conserve wood. you wouldn't necessarily have to get the bends perfect. you could leave the material oversize and then saw/plane/shave the curves to final shape after bending.

Re: Planning the lingerie chest II

#4

Ellis Walentine

Re: Planning the lingerie chest II

Ellis Walentine

Looks like a serious process going on here.

The overall height has dropped to 51" since I plan to incorporate a hidden mirror into a swing-up lid. The lid will look like a moulding, and the hinges will be hidden at the rear. I would like to fit a secret catch that will also unlock the top drawer (this will replace the keyhole mentioned early on).

I'll be interested to see how you do the hinges, Derek. And the secret catch is sure to be of interest.

The lid is planned to be a breadboard construction to minimise movement. Any comments?

Depends on how the mirror will integrate with the lid. Mirrors are rigid, and breadboards are all about floating. Frame and panel might be better, but you can design your way through this one.

There are 8 drawers. These taper in depth, although the top two are the side, both 4 1/2". Then comes 5", 5 1/2", 6", 6 1/2", 7", and 7 1/2".

Seems like a plan. I wonder how this jibes with Bill Tindall's new article. I'll have to check that out.

The drawer rails are 1/2" high and will be hidden behind each drawer front. The top of each drawer front lies flush with the underside of the rail, and then drops to cover the rail below. The rail then doubles as a drawer stop.

I'd consider splitting the difference, so you don't end up with spaces at the tops of the drawers that are obviously straight through to the interior of the drawer/case. With the right tolerances, it really shouldn't be noticeable.

At this stage I am undecided whether to curve the drawers as this may cause it to be too busy (too many curves). If they are, they will have a very shallow convex (curve to the front). It is difficult to visualise this, and so I will leave that aspect to later.

The design comes first. If this will be a really important piece for you, don't hold back on the curved fronts. But, then, consider how the fronts how they will be built and how they will integrate with the drawer bodies. Will you laminate them or bandsaw them. If they will be directly joined, then how will that happen? If you plan to make separate drawer boxes, will the fronts be bandsawn in front to the curvature and flat in the back to engage the boxes?

The rear elevation will repeat the lower curved rail. Construction of the rear and sides will be frame-and-panel. The panels will be flush to the side rails, creating a flat surface.

No comments here.

The sides look a little bland in this elevation, but visualise that they curve outward. The depth of the chest is 16 1/2". The lid adds another 1" at each end. This dimension enables the chest to fit neatly into the alcove in the bedroom. Any comments on this depth? The last chests I made were 17" deep, which does not seem to me to be significantly different.

This is not too shallow for a chest with this intended function. The fact that you are designing for a particular alcove is reason enough to dimension it this way, with the understanding that the piece will have solid value irrespective of its surroundings.

The side panels are expected to be 1/4" thick and rebated into the curved side rails. The interior of the side panels will be reinforced by the side rails for the drawers.

Consider the flimsiness factor, and the tonal quality of knuckle on 1/4" panel. I personally would want the side panels to be at least 3/8" thick, or more. If you're trying to avoid another laminating step, I'd reconsider. The drawer rails won't keep the sides from sounding tinny.

These are also needed to determine how to use the wood I have. I would like to use the Makore. I fear it will not be sufficient. Either I will need to find more - which will be difficult, especially since the boards I have are from the same tree - or I need to change to a different wood. My thought is that I will mix the Makore with Jarrah. It should compliment each other really well as the tonal colours are the same brown-red. The drawers and panels could be Makore, with the frames and rails in Jarrah, or vice versa. Comments?

Not sure how the two will interact, but you can get into visual trouble using two woods of similar color but different texture. Sometimes it pays to go with a more dramatic contrast, on one dimension or another, either hue or value or texture.

Re: Planning the lingerie chest II

#5

Clint Searl

Re: Planning the lingerie chest II

Clint Searl

I think the simple trapezoid looks better than the curved sides, and equally progressive drawer heights likewise. The interior heights of the top two can be made equal if desired.

MM

107.373

118.877

130.381

141.885

153.390

164.894

176.398

187.902

Re: Planning the lingerie chest II

#6

Re: Planning the lingerie chest II

Derek Cohen (in Perth, Australia)

Derek: The lid is planned to be a breadboard construction to minimise movement. Any comments?

Ellis: Depends on how the mirror will integrate with the lid. Mirrors are rigid, and breadboards are all about floating. Frame and panel might be better, but you can design your way through this one.

I was thinking of a solid top, and therefore breadboard ends to ensure that there is no cupping (what I meant by "movement"). In my mind a breadboard lid looks less busy than a frame-and-panel.

Derek: The drawer rails are 1/2" high and will be hidden behind each drawer front. The top of each drawer front lies flush with the underside of the rail, and then drops to cover the rail below. The rail then doubles as a drawer stop.

Ells: I'd consider splitting the difference, so you don't end up with spaces at the tops of the drawers that are obviously straight through to the interior of the drawer/case. With the right tolerances, it really shouldn't be noticeable.

Again, my thoughts run to "clean" lines. I'd prefer to keep the drawers coplanar at the top.

Derek: At this stage I am undecided whether to curve the drawers as this may cause it to be too busy (too many curves). If they are, they will have a very shallow convex (curve to the front). It is difficult to visualise this, and so I will leave that aspect to later.

Ellis: The design comes first. If this will be a really important piece for you, don't hold back on the curved fronts. But, then, consider how the fronts how they will be built and how they will integrate with the drawer bodies. Will you laminate them or bandsaw them. If they will be directly joined, then how will that happen? If you plan to make separate drawer boxes, will the fronts be bandsawn in front to the curvature and flat in the back to engage the boxes?

Ellis, I agree with you. It has always been my intention to add curved fronts. The only reason I hesitate is that Lynndy questioned it. I do believe that a very gentle curve will balance the view from the side.

I plan to bandsaw the drawer fronts. The curve is to shallow to go to the effort of laminating. The plan is to dovetail flat tapered sides, which will be coped to fit the curved inside of the carcass, and then plane the outside of the drawer face to a curve. I am thinking of leaving the inside straight rather than bandsawing and scraping this to a complementary curve - comment?

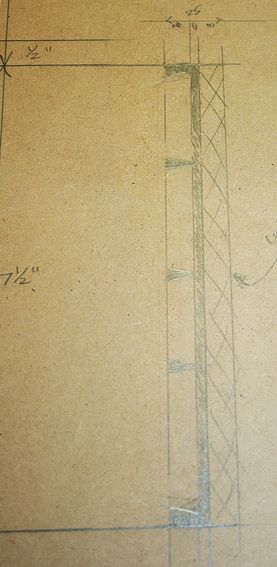
Here is a rough side elevation I made to show how the dovetailing might proceed ..


Derek: The side panels are expected to be 1/4" thick and rebated into the curved side rails. The interior of the side panels will be reinforced by the side rails for the drawers.

Ellis: Consider the flimsiness factor, and the tonal quality of knuckle on 1/4" panel. I personally would want the side panels to be at least 3/8" thick, or more. If you're trying to avoid another laminating step, I'd reconsider. The drawer rails won't keep the sides from sounding tinny.

Earlier I had suggested 3/8" as well. I would prefer that as it would accommodate a wider tongue for a groove. My concern is that the panel needs to flex enough to slide down the curved frame's groove. I will test this out before it is built.

The alternate method is to laminate thinner panels into a curved thicker panel. That is also doable. Your thoughts?

Derek: These are also needed to determine how to use the wood I have. I would like to use the Makore. I fear it will not be sufficient. Either I will need to find more - which will be difficult, especially since the boards I have are from the same tree - or I need to change to a different wood. My thought is that I will mix the Makore with Jarrah. It should compliment each other really well as the tonal colours are the same brown-red. The drawers and panels could be Makore, with the frames and rails in Jarrah, or vice versa. Comments?

Ellis: Not sure how the two will interact, but you can get into visual trouble using two woods of similar color but different texture. Sometimes it pays to go with a more dramatic contrast, on one dimension or another, either hue or value or texture.

My thoughts here were that Jarrah might be used with the drawer fronts, where I could use something with a little figure. Alternately, it could be used with the frames, and then I would use a darker wood than the Makore for contrast. What I meant by similar tonal colour was that they share a brown-red. The Makore is lighter than the Jarrah I have.

Many thanks for your thoughts.

Regards from Perth

Derek

Re: Planning the lingerie chest II

#7

Ellis Walentine

Re: Planning the lingerie chest II

Ellis Walentine

Derek: The lid is planned to be a breadboard construction to minimise movement. Any comments?

Ellis: Depends on how the mirror will integrate with the lid. Mirrors are rigid, and breadboards are all about floating. Frame and panel might be better, but you can design your way through this one.

I was thinking of a solid top, and therefore breadboard ends to ensure that there is no cupping (what I meant by "movement"). In my mind a breadboard lid looks less busy than a frame-and-panel.

Agreed. I meant to suggest that you need to secure the mirror somehow that it won't be subjected to shrinkage or expansion pressures, perhaps an applied bezel?

Derek: The drawer rails are 1/2" high and will be hidden behind each drawer front. The top of each drawer front lies flush with the underside of the rail, and then drops to cover the rail below. The rail then doubles as a drawer stop.

Ells: I'd consider splitting the difference, so you don't end up with spaces at the tops of the drawers that are obviously straight through to the interior of the drawer/case. With the right tolerances, it really shouldn't be noticeable.

Again, my thoughts run to "clean" lines. I'd prefer to keep the drawers coplanar at the top.

Perfectly understandable.

Derek: At this stage I am undecided whether to curve the drawers as this may cause it to be too busy (too many curves). If they are, they will have a very shallow convex (curve to the front). It is difficult to visualise this, and so I will leave that aspect to later.

Ellis: The design comes first. If this will be a really important piece for you, don't hold back on the curved fronts. But, then, consider how the fronts how they will be built and how they will integrate with the drawer bodies. Will you laminate them or bandsaw them. If they will be directly joined, then how will that happen? If you plan to make separate drawer boxes, will the fronts be bandsawn in front to the curvature and flat in the back to engage the boxes?

Ellis, I agree with you. It has always been my intention to add curved fronts. The only reason I hesitate is that Lynndy questioned it. I do believe that a very gentle curve will balance the view from the side.

I value my wife's design feedback, but sometimes I have to explain the wisdom of doing things a little differently. I am thinking of the overall bearing of this piece of furniture, the slopes and curves and how they will define the volume of the space. This piece will have essentially flat sides (flat in the front to back plane, your panels slid into grooved legs), so you should consider your curves in that context. I think it would be lovely either way, but personally, a slight curve might add a little sensuality to the character of the piece. I recall seeing a little lingerie chest by a guy named Michael Cullen when he was a student of Krenov's. It was shaped like a pillow. Blew me away.

I plan to bandsaw the drawer fronts. The curve is to shallow to go to the effort of laminating. The plan is to dovetail flat tapered sides, which will be coped to fit the curved inside of the carcass, and then plane the outside of the drawer face to a curve. I am thinking of leaving the inside straight rather than bandsawing and scraping this to a complementary curve - comment?

I'd do it that way in a heartbeat.

Here is a rough side elevation I made to show how the dovetailing might proceed ..

Derek: The side panels are expected to be 1/4" thick and rebated into the curved side rails. The interior of the side panels will be reinforced by the side rails for the drawers.

Ellis: Consider the flimsiness factor, and the tonal quality of knuckle on 1/4" panel. I personally would want the side panels to be at least 3/8" thick, or more. If you're trying to avoid another laminating step, I'd reconsider. The drawer rails won't keep the sides from sounding tinny.

Earlier I had suggested 3/8" as well. I would prefer that as it would accommodate a wider tongue for a groove. My concern is that the panel needs to flex enough to slide down the curved frame's groove. I will test this out before it is built.

The alternate method is to laminate thinner panels into a curved thicker panel. That is also doable. Your thoughts?

Makore heartwood is classified as moderate for bending. The limiting radius for unsteamed bends in 1/8" material is 6 1/5", which is quite tight. I would think you could form those long, shallow curves rather easily with 3/8" stock. Might not hurt to spritz them with water and try to limber them up a bit over a hot pipe. A little experimentation is probably in order.

Derek: These are also needed to determine how to use the wood I have. I would like to use the Makore. I fear it will not be sufficient. Either I will need to find more - which will be difficult, especially since the boards I have are from the same tree - or I need to change to a different wood. My thought is that I will mix the Makore with Jarrah. It should compliment each other really well as the tonal colours are the same brown-red. The drawers and panels could be Makore, with the frames and rails in Jarrah, or vice versa. Comments?

Ellis: Not sure how the two will interact, but you can get into visual trouble using two woods of similar color but different texture. Sometimes it pays to go with a more dramatic contrast, on one dimension or another, either hue or value or texture.

My thoughts here were that Jarrah might be used with the drawer fronts, where I could use something with a little figure. Alternately, it could be used with the frames, and then I would use a darker wood than the Makore for contrast. What I meant by similar tonal colour was that they share a brown-red. The Makore is lighter than the Jarrah I have.

Hmm. I wish I could see actual samples side by side. I have worked both woods in the past, and the jarrah was darker and grainier than the makore. I like the idea of having the case be makore and the drawer fronts be jarrah, but that's only my personal preference. I wouldn't want the strong contrasts on the sides. But, at least they're both on the same hue range, which I consider an important design consideration. You can always tone things to suit, but I have the feeling you prefer the natural wood color. So do I, unless there's no other good way to get the visual results I want.

What a beautiful piece this will be.
Re: Planning the lingerie chest II

#8

suggest frame and panel top

ian in Sydney

Hi Derek

I think the best way to incorporate a pop-up mirror in the top is to use frame and panel construction.

The mirror could then be considered the lid on a till inserted into the frame.

A solid top with an inserted mirror (= a hole in the top) is only asking for grief.

There is no reason that the frame couldn't use different widths for the rails and styles and mitred corners -- which would give you a clean look from any angle.

I'll try and do a sketch later

Re: Planning the lingerie chest II

#9

Re: suggest frame and panel top

Derek Cohen (in Perth, Australia)

I think the best way to incorporate a pop-up mirror in the top is to use frame and panel construction.

The mirror could then be considered the lid on a till inserted into the frame.

A solid top with an inserted mirror (= a hole in the top) is only asking for grief.

There is no reason that the frame couldn't use different widths for the rails and styles and mitred corners -- which would give you a clean look from any angle.

I'll try and do a sketch later

Thanks Ian, I look forward to your sketch.

My thoughts have been to rout away the depth to fit the mirror on the inside of the lid (lift the lid and the mirror is facing forward). The recess would also include a recessed frame to hold the mirror itself.

Since the lid is expected to be 1" thick, there should be plenty of depth to fit the mirror and frame.

With regard the breadboard ends, what I visualised was these in line with the inside top of the carcass (to continue the line).

Ellis remarked that breadboards are intended to float. However that is also my conception of a panel within a frame. Would a solid top with breadboard ends not be more solid and rigid that a frame-and-panel?

I welcome all idea and discuss - don't mind my apparent defensiveness. I am not, just thinking out aloud about the pros and cons.

Regards from Perth

Derek

Re: Planning the lingerie chest II

#10

Ellis Walentine

Breadboard would work

Ellis Walentine

...as long as you leave enough room for the wood to move around the mirror. If you recess the mirror into the underside of the top, you can tack in some stops around the opening to hold it there. Some double-sided foam tape will hold the mirror and keep it from rattling.

If you go with frame-and-panel, the mirror would still have to float in the frame somehow, and you'd have to deal with the panel detail on the top.

Ellis

Re: Planning the lingerie chest II

#11

Re: suggest mold for top

Wiley Horne--So. Calif.

Hi Derek and all,

I suggest a stuck mold for the top, following the general outline of the blue tape in your first post of this thread. Reasons: It's at eye level; as I understand it, the rest of the piece is free of ornament (excepting the grain/figure of the wood); would add snap to the piece. You could use mitered breadboards to avoid having to mold end grain on the sides.

2 cents.

Wiley

Re: Planning the lingerie chest II

#12

Re: suggest mold for top

Derek Cohen (in Perth, Australia)

I suggest a stuck mold for the top, following the general outline of the blue tape in your first post of this thread. Reasons: It's at eye level; as I understand it, the rest of the piece is free of ornament (excepting the grain/figure of the wood); would add snap to the piece. You could use mitered breadboards to avoid having to mold end grain on the sides.

Hi Wiley

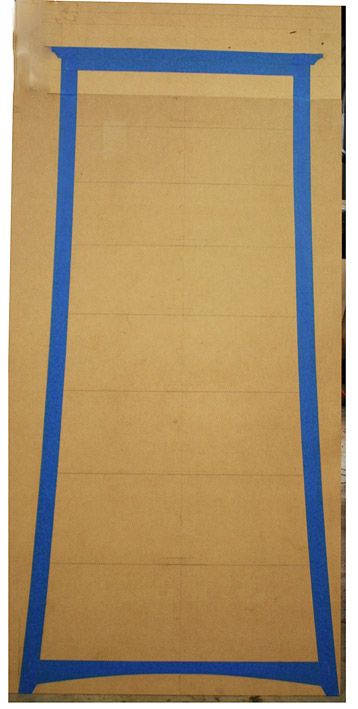
The design has been evolving a little. I've dropped the height to 48 1/2" (It began at 51", so a total of 3" lower). This was for two reasons. Firstly, Lynndy is 5'4" and the new height makes it easier to look into the top drawer. Secondly, she gave me hell for not making the top drawer slimmer (than the 4 1/2" it was) - it is intended for jewellery, and her idea was to make this thin. I tried several configurations, but they looked odd unless there was a progression of drawer heights. Eventually I came up with one she accepted. I also had to explain to her that the insides of the drawer was not as high as it appeared on the outside (overlapping drawer fronts and drawer bottoms taking up some of the apparent height) :)

The 8 drawers start at 3 3/4" (external height) and increase in 1/2" increments to 7 1/4" for the bottom drawer.

To accommodate the lower height I changed the front thickness of the side rails from 35mm to 30mm (The side faces will be 45mm wide). Overall the proportions look the same as before ...


The important part - in view of your comment - is that the top is now below eye level.

How does this alter your thoughts?

Regards from Perth

Derek

Re: Planning the lingerie chest II

#13

Wood, glorious wood ...

Derek Cohen (in Perth, Australia)

It's amazing how much wood is needed for a piece of furniture.

I have enough that I believe will work well together. There is Makore for the entire carcass, and some nicely figured Jarrah for the drawer fronts. All I have to source now is a light wood for the drawer sides. I may go with Tasmanian Oak, as most of this is sold quarter sawn.


These are to be resawn for the panels ...


Here is the Jarrah for the drawer fronts. This is 1 1/2" thick ..


I got lucky with the Makore for the side rails. This piece (2" thick) has a naturally curving grain that will suit the curve of the side rails ...


Marking the saw cuts ...


Regards from Perth

Derek

Re: Planning the lingerie chest II

#14

Drooollll!

Tony - Memphis

Wow, Nice wood. I built a couple of chairs out of makore a few years ago. Nice stuff. I had never used it before and the wood store had it on sale (6/4), so I tried it and was very happy with it. I stained it to match the mahogany pieces I've built, but it certainly didn't need any stain. I've got a couple of pieces of highly figured makore that I forget about. Need to drag those out and make somethign with them. Same deal - sale at another wood store. Sadly, there are no longer any wood stores here. Bummer.

Tony

Re: Planning the lingerie chest II

#15

Re: suggest mold for top

Wiley Horne--So. Calif.

Great story, Derek! The part about 'giving me hell' is particularly evocative :) .

I didn't mean 'eye level' perfectly literally, so the comment stands, but I'll try to put some flesh on the notion. And to back off a little, you're at a point, with the bones of the piece pretty well in mind, to consider the ornament.

I like in your blue-tape mockup, the wing flare of the top. Looks like it belongs. Am also thinking, what will Lynndy see when she opens the top to look in the mirror, which will be a frequent activity since she will have jewelry near to hand. Well, in the drawer itself I am seeing a baize lining, or silver cloth, or the like; then the mirror would be surrounded by some sort of inlay, cross banding, or stringing. Perhaps where the mirror side of the top makes its close, it would have an inset of baize to soften the close and seal against dust (optional). The mold I was speaking of would do 4 things: carry out the wing-like exterior look shown in your mockup; provide a welcoming hand hold for tilting back; provide a finished interior look when open; and complement the pulls. What would be the profile? Dunno, but that top has several jobs to do, some of them aesthetic.

The project will be wonderful, given your skill and cooperation from Lynndy. I'm just getting pulled into the fun, and perhaps these ideas are far behind your own thinking. They're offered just in the spirit of the occasion....

Wiley

Re: Planning the lingerie chest II

#16

Re: suggest mold for top

Derek Cohen (in Perth, Australia)

Well, in the drawer itself I am seeing a baize lining, or silver cloth, or the like; then the mirror would be surrounded by some sort of inlay, cross banding, or stringing. Perhaps where the mirror side of the top makes its close, it would have an inset of baize to soften the close and seal against dust (optional). The mold I was speaking of would do 4 things: carry out the wing-like exterior look shown in your mockup; provide a welcoming hand hold for tilting back; provide a finished interior look when open; and complement the pulls. What would be the profile? Dunno, but that top has several jobs to do, some of them aesthetic.

Hi Wylie

Great ideas. We are thinking along similar lines.

I have two ideas for the lid. The first is, as mentioned earlier, a top with breadboard ends that lifts up, with the mirror set into the lid.

The second idea, which I like better, however poses an extra challenge. This is that the "breadboard" ends are fixed to the top of the carcass, and the centre section lifts up to display the embedded mirror. The drawing below shows the moveable section in yellow (this could either be hinged at the base of the lid, or hidden hinges - rods - through the sides) ...


This way the moulding at the front would act as a lift. The problem is how to ensure that the one-piece lid remains flat? Thoughts?

With regard inlay and lining, the latter is easiest - midnight blue felt. The inlay is tricky. I would envisage a simple line around the mirror in a contrasting wood, one that will be continued in the jewellery drawer dividers.

Regards from Perth

Derek

Re: Planning the lingerie chest II

#17

Re: suggest mold for top

William Duffield

In your second idea, your "breadboard ends" no longer serve their primary function, which is to minimize warping of the panel. Also, in attaching them to the case sides, you have the problem of cross-grain wood movement. With breadboard ends, there are well established, traditional methods of addressing that problem.

There are special mirror adhesives, that will attach it to plywood without peeling off the silvering. You'll need to ask someone else for brand recommendations.

I think I would make a plywood panel (either with breadboard ends or frame and panel) and veneer it. Frame and panel also solves the problem of matching the front edge of the top to the veneer.

Have you considered quadrant hinges, which are designed for jewelry box tops?

http://www.brusso.com/hd-680/

They also make a smaller pair, but I wouldn't consider those, due to the weight of the mirror, not to mention the density of the jarrah.

Re: Planning the lingerie chest II

#18

Re: suggest mold for top

Derek Cohen (in Perth, Australia)

Hi William

You capture well the dilemma I have if I change the design of the top. I just cannot see a way to keep the centre section flat without breadboard ends if using solid wood. I must stay with this early design choice.

The quadrant hinges are also one of the options I had thought of. In particular, the type I favour are the ones that have a built-in stop just past vertical.

Regards from Perth

Derek