New WoodChat!
Home Articles Forums Gallery Marketplace Videos

WoodCentral Forums

Knowledge You Can Build On — Est. 1998

A natural, durable finish with minimal coats and fuss popular among woodworkers, flooring professionals, and furniture makers

nicker for moving fillister

Posts

nicker for moving fillister

#1

nicker for moving fillister

Lars Parrington

picked up a nice moving fillister plane at a garage sale this weekend. it's complete except for the nicker (knicker?). i'm planning to fabricate a nicker for it out of some tool steel, but i'm not sure exactly how the nicker is supposed to work.

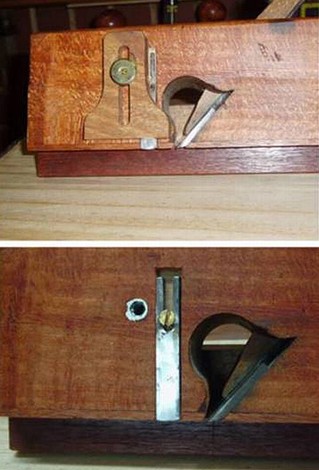
the slot for the nicker on the plane is a tapered groove with slightly angled sides. kind of like a tapered sliding dovetail joint. the groove gets a bit deeper as it approaches the sole of the plane (from 0.090" to 0.105"). the groove actually stops just before reaching the sole of the plane.

should the nicker just be made the same shape as the groove and tapped into place with a hammer? in that case it seems like there would be little to no ability to adjust its depth. it would also be difficult to remove it for planing with the grain.


Re: nicker for moving fillister

#2

Re: nicker for moving fillister

Bill Houghton, Sebastopol, CA

Can't help on your real question, but I think it is nicker, because it nicks; as opposed to knickers, which you shouldn't wear out in public.

Re: nicker for moving fillister

#3

Re: nicker for moving fillister

Brian from Monument

I have a moving fillister plane similar to the one you have and the outside edge of the nicker ie even with the side of the plane is sharp and should be cutting the grain ahead of the right edge of the blade.

The nicker is dovetail shaped in cross section.

The narrow end of the dovetail is sharp while the broad end does not extend as far.

Re: nicker for moving fillister

#4

Re: nicker for moving fillister

Derek Cohen (in Perth, Australia)

Hi Lars

The nicker is held in its own wedge.

If you are concerned about its security, you could grind a slot at the tail of the blade, and attach it with a screw ...


Regards from Perth

Derek

Re: nicker for moving fillister

#5

Re: nicker for moving fillister

John Aniano in Central NJ

Lars,

As noted in the other responses, the nicker for this type of English/American plane is a tapered dovetail. There is no wedge to hold it into position as Derek suggested, although you could certainly add one. The plane was not originally made with anything but a tapered nicker. Sort of like the tapered Japanese plane blades - they can often hold in just the right position without a wedge.

To facilitate removing the nicker, I have often seen a notch filed in the the upper section of the nicker - the notch faces outward - something like a little ledge to be able to apply some pulling motion leverage to remove it. I use a narrow screw driver to remove a nicker with this type of notch. This is used when the top of the nicker does not protrude up past the stock. In others, I've seen a forged tab - I think the term is "snecked" to be able to remove the nicker. Just like what is often seen on plow (plough) plane blades.

Other than that, just get the new nicker to be just flush with (or ever so slightly proud) of the sole width. You can use thin paper shims glued to the inside surface of the tapered groove to better position the new nicker where it should be and/or improve the proper fit to the tapered groove. You can file/grind the nicker shape to be sort of like a broad marking knife, slightly convex at the end. That way, you can initiate the cut, i.e. score the work, by pulling backward and it will also cut in the forward motion when you begin stock removal with the skewed main blade.

Hope this helps,

John

Re: nicker for moving fillister

#6

Re: nicker for moving fillister

John Aniano in Central NJ

A picture of my fillister plane nicker...


Re: nicker for moving fillister

#7

Re: nicker for moving fillister

Lars Parrington

thanks for all the nicker info guys. i made one up and it works fine. it has sufficient depth adjustability just by controlling how far i hammer it into place.

turns out, it's not so difficult to remove from the plane as i was imagining. i like the idea of filing a notch to make it even easier to remove, but i forgot to do so before hardening it, so it's a little too late now. however, it comes out pretty easy with a pair of needle-nose pliers.

along with making the nicker, i also did some other work on the plane. the boxing was falling out, so i glued it back in. afterwards, the boxing no longer aligned perfectly with the sole and side, so i took the opportunity to flatten and square them up. that led to refinishing and needing to grind down the width of the blade a bit.

sharpening the cast steel blade turned out to be a bit challenging. the edge seems to chip out easily when rubbing it on my coarsest stone (a several month old 1200 grit diamond eze-lap which is still coarser than my 1000 grit norton waterstone). not sure whether it can be blamed on the diamond stone, or some mechanical or thermal stress left over from the 36 grit grinding wheel i used for shaping. regardless, it's sharp now and seems to hold an edge OK.

so finally, it's back together and i got to make some shavings. but i'm not totally satisfied with how it cuts. it does make nice square rebates, and cuts just fine across the grain, but stumbles when cutting along the grain. it squeals loud enough to make me want earplugs, and leaves behind a washboard surface somewhat similar to what you might get out of a thickness planer. is chatter the technical term for this? in comparison, my stanley 78 is much much quieter, leaves a smoother surface, and is a bit easier to push when set to take the same cut.

perhaps an iron seating issue? the sharp end of the iron makes excellent contact with the bed across its entire width, but only for the first 1/4" or so of its length. above that there is a gap between iron and bed for at least an inch. it does make contact again higher up.

i don't have tons of experience with wooden planes. is the bedding of the iron the most likely culprit here? is there anything else i should look into?


Re: nicker for moving fillister

#8

Bedding and wedge fit

Wiley Horne--So. Calif.

Hi Lars and all,

Great job on your filletster! It does sound like there is vibration in the blade when the load is heavy. Cross grain is less loading than with-grain.

You've already checked the blade/bed fit. More on that in a moment. But first, check the wedge fit if you haven't already. Many times, the wedge can get very slightly convex along the line of contact, meaning its exerting most pressure in the middle and less at the business end down near the cutting edge. Check with a straight edge, and also visually. I find wedges work best if they are ever so slightly concave, like a couple thousandths concave, so that the wedge is very slightly 'sprung' in the housing and exerting max. pressure at its lower end. So check that, and retest cutting action.

If still screaming at you, it is a straightforward matter to fix the blade/bed fit. The classic diagnostic is soft pencil on the back of the iron, insert and see where contact is not happening. From there, two options. The easiest is to shim with paper--a Post It note is usually 3-4 thousandths thick. See how many folds it takes til you get solid bedding, as evidenced by good cutting sound and feel. From there, either continue to use the paper shim, or if you want a permanent fix, saw a piece of veneer and scrape it down til it's in the right thickness ballpark (you know how thick you need, because you've either mic'ed the paper shim, or counted the required number of folds). Glue in the wooden shim, and when the glue dries, file it down til the bed is flat and showing pencil evenly from the blade.

Again, great job of restoration!!

Wiley

Re: nicker for moving fillister

#9

Re: Bedding and wedge fit

Kees

The Dutch planemakers, especially the guys from the city of Rotterdam, made the bedding hollow on purpose. I have some 19th century planes with up to 1mm of space under the iron in the middle. This helps of course to get solid bedding near the edge.

I too think the problem with your plane is with the wedge.

Re: nicker for moving fillister

#10

Re: Bedding and wedge fit

Warren in Lancaster, PA

Sometimes with a plane like this the right edge (outside edge) of the iron gets a little floppy. The wedge is way over on the left side and it can be nice and tight, but fail to secure the right side. As a test you can put a thick narrow shaving under the right side of the iron near the edge. This will distort the iron's depth of cut a bit, but may indicate where your chatter comes from.

Re: nicker for moving fillister

#11

Re: nicker for moving fillister

Derek Cohen (in Perth, Australia)

so finally, it's back together and i got to make some shavings. but i'm not totally satisfied with how it cuts. it does make nice square rebates, and cuts just fine across the grain, but stumbles when cutting along the grain. it squeals loud enough to make me want earplugs, and leaves behind a washboard surface somewhat similar to what you might get out of a thickness planer. is chatter the technical term for this? in comparison, my stanley 78 is much much quieter, leaves a smoother surface, and is a bit easier to push when set to take the same cut.

Hi Lars

Chatter is usually always due to the blade being loose to vibrate. In a wooden plane it is usually the wedge that is not holding the blade firmly against the bed. This can occur as a result of the wedge shrinking, or if it is a replacement and not a good fit. Or the blade may be a little bent and not seating flat.

Check whether the blade is flat. Check whether the bed is flat.

Try adding some blue tape under the end of the wedge to increase the down force there. That is quick enough to do. You may need a new wedge.

Regards from Perth

Derek

A

Re: nicker for moving fillister

#12

Re: nicker for moving fillister

Lars Parrington

ok, i spent a couple hours last night fettling the blade to bed interface and also the contact surfaces of the wedge.

the side of the iron that rests against the bed was not at all flat, so i addressed that first. i coarsly sanded that side the iron, smeared a thick coat of epoxy onto it, and then clamped it to a flat piece of wood covered with packing tape. when the epoxy cured i lapped it a bit with some sandpaper on a flat surface, and then set about ajusting the bed of the plane to fit the iron.

i rubbed pencil lead on the iron to see where it marked the bed, and then removed material from the bed in those spots using either chisel or sandpaper. after many iterations, i am now getting good contact for at least the first 3/4" of the iron's length, and even further up in the area underneath the wedge.

somewhere during that process i also fettled the wedge. pencil markings show it is making good contact at its tip and also at a couple other places along its length.

after all that, the performance might be marginally improved, but it's hard to say for sure. i no longer feel quite as much need for ear protection, but it's still considerably louder than my metal rebate plane and still leaves a washboard surface, although you have to look close to see it.

i think warren has a good point about the wedge only holding down one side of the blade in this type of plane, and the other side being allowed to flop around. i did try jamming various thickness shims under the floppy side, but it no difference for better or worse.

at this point i am ready to consider this restoration project done. although i'd still be willing to experiment if anyone has a good suggestion, really i'm thinking that maybe this is just how all wooden moving fillister planes perform. so, can any of you other fillister owners deny that you planes leave a subtly washboarded surface and/or make a higher pitched squeal than their metal equivalents? for reference, i've been testing on cherry and walnut, cutting a 3/4" wide rebate, and taking approximately 0.010" thick shavings.

Re: nicker for moving fillister

#13

Re: nicker for moving fillister

Wiley Horne--So. Calif.

Hi Lars,

First, to answer your question, I had a vintage Marples moving filletster, and it required me to flatten the bottom of the stock, to keep the blade from diving. But other than that, it performed correctly. I still have a C&W filletster, which is perfect, but that's what you get with Larry Williams or Don McConnell.

I don't believe your problem is inherent; there's something the matter. You've done a very good job of repair and trouble-shooting, but still it can be only one little tiny hard-to-notice non-intuitive thing. For example, the edge of the cutter getting timber bound against the wall of the rebate. There is a complex geometry happening at the business end of a skewed rebate plane. Make sure that the cutting tip has clearance or relief angle, not only behind the cutting edge, but also on the side of the blade behind the tip. The very tip of the iron should be out there by itself, with relief both behind and beside.

Still, the fact that you're getting undulations speaks to something in the blade bedding, rather than tip binding which might account for the noise.

I noticed in your photo that the blade edge might be getting fouled with the fence--if this is a possibility, cut a shallow (like 1/16" or 1/32") channel in the fence, right under the blade edge, so it doesn't foul.

Wiley

Re: nicker for moving fillister

#14

Re: Bedding and wedge fit

Kees

Thanks for the tip Warren. Never thought about it like that.

Re: nicker for moving fillister

#15

The more I think about it,

Wiley Horne--So. Calif.

the more I think the blade is gradually diving, digging in, pulling back up and out, diving again--which is causing the ripples in the surface.

So far, we've talked mostly about the bed and wedge. There is another thing that causes weird behavior, and that is having a low place right ahead of the cutting edge.

I know you prepared the sole, but please check again. With blade retracted, straight edge along the sole on different transects, left, middle, and right. You don't want to see any daylight just ahead of the cutting edge. That causes much mischief.

As a second diagnostic, on the theory that the blade is diving, back off the 10 thousandths shavings, to a thin shaving, and find out where the blade is cutting first--all the way across, or out at the tip, or in at the heel. Starting with the fine shaving, test until you find out which part of the blade, and at what depth, is causing the rippled surface.

Wiley

Re: nicker for moving fillister

#16

Re: nicker for moving fillister

Dale Stansbery

I'm a little late to the party here, but I was just looking at mine. The nicker is just slightly proud of the wood surface, and the depth stop acts as a clamp as well as depth stop. It's also notched about a third of the way down to use a screwdriver like tool to tap it out. I'd be careful tapping it into the tapered slot to tighten it as you could easily damage the wood slot.


Re: nicker for moving fillister

#17

Re: The more I think about it,

Lars Parrington

Thanks for the tips Wiley. I was out of town this weekend, but took another look a the plane this morning. The sole was out of flat with a hollow spot in front of the cutting edge, just as you described. Not sure how that happened since I had used my jointer plane to flatten the sole in the first place. But anyway, I fixed it with a bit of smooth planing followed by lapping on sandpaper.

That reduced the volume of the plane quite a bit, but it still leaves a corrugated surface. I then repeated Warren's experiment of shimming under the corner of the iron. That didn't help, actually it made the plane noticeably louder.

There is sufficient clearance on side of the iron, and that edge is also sharp. as you suggested, i cut a groove in the fence to clear the blade.