New WoodChat!
Home Articles Forums Gallery Marketplace Videos

WoodCentral Forums

Knowledge You Can Build On — Est. 1998

Build it. Rock it. Rockler has your woodworking tools.

Slipping Cap Iron On Wooden Jointer

Posts

Slipping Cap Iron On Wooden Jointer

#1

Slipping Cap Iron On Wooden Jointer

Jim

I recently purchased an old 30" wooden jointer with double irons. I can't get the cap iron to stay in place. It rides up on the cutting iron and then the cutter acts more like a scraper. I planed the sole to flatten it which opened up the mouth, slightly. It was fairly open to begin with, compared to my Clark & Williams Try pane and smoother.

1. Should I patch the mouth to close it up slightly? Would that help?

2. Could I try a thick, single iron? If that would work does anyone know where I can find a long, thick single iron? I tried the iron from my C&W try plane and I think it would work, OK, but it it really short in this plane.

I would appreciate any advise as I like the old plane but it's not working for me, now.

Re: Slipping Cap Iron On Wooden Jointer

#2

Re: Slipping Cap Iron On Wooden Jointer

Wiley Horne--So. Calif.

Hi Jim,

Woodie jointers and trys are great! As for the mouth, I'd get it working first, then think about that. It may never be what your C&W try is, though!

Some questions as to whether the various parts are original to the plane:

1. Is the iron slotted, or solid like the C&W?

2. Is there a screw coming up through the slot in the iron into a brass nut on the cap iron? Does the cap iron have a brass nut brazed onto it?

3. Is the wooden bed of the jointer mortised to accommodate the screw head?

4. Is the wedge slotted to accommodate the nut on the cap iron?

Reason I ask all this stuff is that, if the cap iron is slipping, it doesn't sound like there is a screw holding the iron and cap iron together.

Wiley

Re: Slipping Cap Iron On Wooden Jointer

#3

Re: Slipping Cap Iron On Wooden Jointer

Jim O'Neal

1. Is the iron slotted, or solid like the C&W? slotted

2. Is there a screw coming up through the slot in the iron into a brass nut on the cap iron? yes Does the cap iron have a brass nut brazed onto it? yes

3. Is the wooden bed of the jointer mortised to accommodate the screw head? yes

4. Is the wedge slotted to accommodate the nut on the cap iron? yes

Re: Slipping Cap Iron On Wooden Jointer

#4

Re: Slipping Cap Iron On Wooden Jointer

Warren in Lancaster, PA

Something is very wrong here, Jim. The iron and cap iron should be screwed together and act as one unit, keeping the setting until the screw is loosened for sharpening. On rare occasions I have gotten interrupted and forgotten to tighten the screw all the way. The result is that when the iron is advanced the cap iron stays back with the wedge and the distance form the edge to the cap iron is increased.

It could be that your iron and cap iron are mismatched. Perhaps when you tighten the screw it bottoms out on something other than the cutting iron. Screw the two together, makes sure they are secure and place the assembly in the cavity and see that it can go in freely to where the iron can cut. Put the wedge in with slight pressure and adjust the iron by sight before lightly tapping the wedge home.

Re: Slipping Cap Iron On Wooden Jointer

#5

Re: Slipping Cap Iron On Wooden Jointer

Derek Cohen (in Perth, Australia)

One more thing to check is whether the chip breaker is warped or bent. If so, it could be mating on a small section only, and this may not be enough to hold them together when the plane is used.

Regards from Perth

Derek

Re: Slipping Cap Iron On Wooden Jointer

#6

Re: Slipping Cap Iron On Wooden Jointer

TomD

Most of the stuff that I would check has been mentioned.

One thing to look at is the overall fit, is it nice.

How much sping is there in the iron.

Is the contact point around the cap iron threading, like a donut, so you have essentially a point of contact. Blueprint the contact area.

Then things you can consider are improving the friction between the plates, like talc, bearing, surface area, and so forth.

Just out of curiosity, what are the block dimensions of the try plane. I would like to make a finer one. All the antique jointers, etc... I come across are like railway sleepers. Mouth location along the sole would also be interesting.

Re: Slipping Cap Iron On Wooden Jointer

#7

Re: Slipping Cap Iron On Wooden Jointer

Wiley Horne--So. Calif.

Jim,

The only way I can understand what you're saying is if the iron itself is not staying in the cut, but rather is being pushed up out of the work by the planing pressure. And then, when you tap the iron back down into cutting position, it takes the cap iron down with it--which would account for the 'scraping' action--i.e., the cap iron is doing the scraping. And when you say the cap iron rides up on the iron, you mean it actually moves toward the cutting edge, and in fact, overtakes the cutting edge. Does this make any sense? Does the wedge loosen too, as you plane, so that it has to be tapped back down, or does it stay in place?

What Warren said still is the key--the iron cannot be moving relative to the cap iron if the screw is holding them snug together.

I would check a couple more things:

1. The threading between screw and nut--is the threading of either screw or nut worn or even stripped, so that the screw can't keep its grip? If the threading is stout, then what could cause the iron and cap iron to move relative to each other? Is there oil or wax between them?

2. Put a straight edge along the length of the wedge, from each fork in turn, back as far as the top of the slot routed in the wedge--this is the holding portion of the wedge. The wedge should not be convex in this area--should either be straight, or better, just slightly concave to ensure the two forks have good contact down low in the throat. If they don't, so that contact is occurring high on the wedge, but there is air between the iron/cap iron sandwich and the forks down low in the throat, you could get some strange indications.

Please let us know what you find out!

Hope this helps!

Wiley

Re: Slipping Cap Iron On Wooden Jointer

#8

A finer try plane

Wiley Horne--So. Calif.

Hi Thom,

I missed your comment about making a finer try plane, and that so many of them are like railroad sleepers.

I notice that Old Street (former Clark & Williams) has gone to narrower widths in both try and jointer, and smoother too, for that matter. I think they were always 2" for fore plane, which is considerably cambered, but they are at 2-1/4" for try and jointer:

http://www.planemaker.com/products.html

My favorite long plane by far is a 2" wide x 26+" jointer, from C&W some years ago. Larry and Bill had gone to a show, and seen a vintage 2" wide long plane that they fell for. When I heard, I ordered one right away. The handling difference between that plane and a 2-1/2" wide x 30" long model is like night and day. The narrower plane is easier to keep plumb, more maneuverable on the edge (as in edge jointing), and you just naturally like to pick it up. Even the iron is easier to maintain. I'll be glad to provide any specs if you're interested, and a photo.

Wiley

Re: Slipping Cap Iron On Wooden Jointer

#9

Re: A finer try plane

Bill Houghton, Sebastopol, CA

I've seen several vintage long planes that were surprisingly narrow to eyes accustomed to Stanley's No. 8 dreadnought. But it makes perfect sense for a plane mainly for shooting edges; how frequently do you need to shoot an edge wider than, say, 1-3/4"?

Re: Slipping Cap Iron On Wooden Jointer

#10

Re: A finer try plane

Wiley Horne--So. Calif.

Hi Bill,

Maybe these long planes varied by regional usage. I tried checking some early 20th century catalogs. The Preston (1909) catalog showed only 2-1/2" iron widths for trying planes (22" to 28" lengths). In America, the Sandusky 1925 catalog shows 24" to 30" jointers having 2-1/2" irons; the 1914 Chapin-Stephens catalog shows jointers from 24" to 30" shipped with 2-1/2" to 2-3/4" irons.

I checked Wolfgang Jordan's site for German planes, and found Karl Emmerich's 1906 catalog offering Rauhbankhobel in many different widths and lengths, from 2" to 2-1/2" irons and lengths from 20" to 30". Here is the link, and I hope Wolfgang will not object to my linking to his site:

http://www.holzwerken.de/museum/hersteller/kataloge/kem1_02.jpg

Adam used to talk about using a very wide jointer, because he was doing match-planing--planing both mating edges in the same pass. Is anyone here doing match-planing? For me, getting the two boards mounted perfectly would just about involve nailing them together. So I much prefer single-board edge joining, or shooting thins on their sides.

One other thought about plane widths. An acquaintance most people felt was a guru on Japanese tools told me that he varied plane widths according to the wood density, going down to 42mm widths IIRC for rosewood.

Wiley

Re: Slipping Cap Iron On Wooden Jointer

#11

Re: A finer try plane

Ron Harper

I love my 608 for truing the face of boards and panels. I will have to admit to having some challenges edge jointing with it. I have just acquired an good looking wooden jointer. I hope to have better results with it.

Re: Slipping Cap Iron On Wooden Jointer

#12

Match planing

Warren in Lancaster, PA

I don't do match planing. Nicholson (1812) suggests planing two boards together for making straight edges, but he says boards to be joined are shot individually. In order to make a joint with match planing, the boards really ought to have flat faces already, then later the glue up ought to flattened , altogether more work. Rough boards can be shot individually and then glued together, but if they are clamped tight they can distort when released.

Re: Slipping Cap Iron On Wooden Jointer

#13

Re: A finer try plane

Derek Cohen (in Perth, Australia)

Hi Wiley

I do occasionally match plane mating edges, however this has become less necessary since completing the new bench nearly a year ago. My old bench was far from flat, and the only way to ensure that long edges (say, 3 feet or more) would mate along their length was to match plane. With a flat and long bench I can use it as a reference to shoot square edges (running the plane along the bench top).

In other words, there may be other reasons why one method is chosen over another.

For reference, my wooden plane has a 2 1/4" wide tapered laminated vintage iron in a 28" long body.

Three planes: 36" cooper's jointer with 3" Berg iron, 28" jointer, 15" jack ....


Regards from Perth

Derek

Re: Slipping Cap Iron On Wooden Jointer

#14

Re: A finer try plane

TomD

Wiley. that would be great. Thanks for following up.

I do match plane quite a bit. I think one place where it makes a lot of sense is off the jointer or planer, one has semi finished boards, but I prefer my joints planed. Then one can plane the whole surface. There isn't really any lost time as far as repeating processes is concerned.

However, been doing this for decades, I have that plane! So i would like to make a lighter plane for the purposes I have in mind.

Re: Slipping Cap Iron On Wooden Jointer

#15

Re: A finer try plane

Wiley Horne--So. Calif.

Hi Tom,

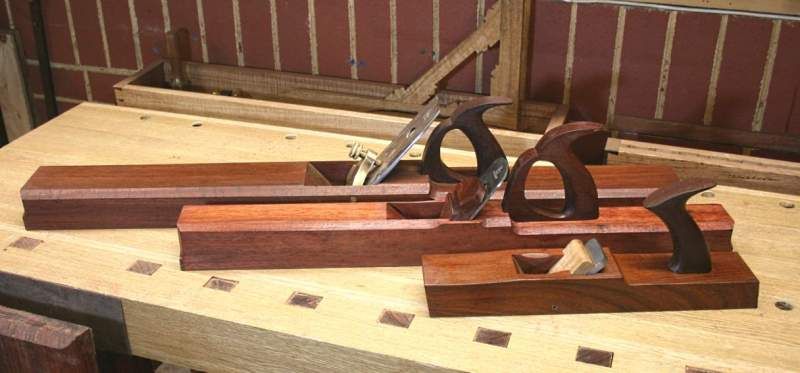
Here are two try planes. Both narrow, with tight mouths, bedded 50 degrees, tapered O1 irons. Both Clark & Williams. Quartered beech. This isn't clear in the photos, but the grain on each sweeps slightly upward from rear to front. The larger plane has a 2" iron and is 26" long; the smaller plane has a 1-3/4" iron and is 18" long. Some details......

The 2"/26" plane

Height: 2-3/4"

Width at base: 2-13/16"

Distance of mouth from front (leading edge of mouth)..... 8-3/4"

Photos:

http://www.flickr.com/photos/78661951@N07/8227073633/in/set-72157632126114344

http://www.flickr.com/photos/78661951@N07/8227073809/in/set-72157632126114344/

http://www.flickr.com/photos/78661951@N07/8228144242/in/set-72157632126114344/

The 1-3/4"/18" plane

Height: 2-3/4"

Width: 2-3/8"

Distance of mouth from front (leading edge of mouth).... 6-1/4"

Photos:

http://www.flickr.com/photos/78661951@N07/8227074101/in/set-72157632126114344/

http://www.flickr.com/photos/78661951@N07/8228144590/in/set-72157632126114344/

I can get better photos if needed, or supply more detail.

Wiley

Re: Slipping Cap Iron On Wooden Jointer

#16

Re: A finer try plane

Wiley Horne--So. Calif.

Hi Ron,

Would love to see the woodie jointer when you get a chance. And how it does!

Wiley

Re: Slipping Cap Iron On Wooden Jointer

#17

Re: A finer try plane

TomD

Wiley, thanks for all those great photos and dimensions. I like C&W because they sought out some pretty elegant versions of traditional planes, and that is different from the run of the mill.

I would like 4 other things if you can manage it:

1) distance of back of handle to back of plane.

2) overall height of handles (I have my own, but I am still curious, even if I don't use them)


3) Distance of striking plate from front, and material

4) This is the tricky one so don't put yourself out. I would like to see the wedge details. What interests me is the fit and design of the horns and the wedge, and the abutments. Where they terminate at the bottom and how they blend in. I see so many different approaches to that on planes I have bought or examined, I would love to see how the sophisticates have managed it. Many of the planes I have had access to, I was not even sure they were matched parts, so it is hard to learn from that. But that could be hard stuff to catch in pictures.

Re: Slipping Cap Iron On Wooden Jointer

#18

Clark & Williams Try Plane Details

Wiley Horne--So. Calif.

Hi Tom and all,

Think I have most of what you need, and can fill in more gaps as we go. To recap, there are two narrow try planes in discussion: a longer 2" blade/26" length one, and a 1-3/4" blade/18" length one. In the Flickr photos which follow, I have referred to them by the width/length numbers, to avoid confusion. You don't have to keep coming back to this page to go through photos--you can click through them at Flickr, once you get there. Continuing with the data......

The 2"/26" Try Plane

Back of tote to rear of plane.................. 6-1/8"

Height of handle at horn ...................... 4-5/8"

Distance of strike from front ................. 4" to nearest point of 'diamond'

Strike diameter.................................... 1-1/4" cocobolo

Photos:

Overview: http://www.flickr.com/photos/78661951@N07/8232189729/in/set-72157632126114344/

View down Throat [note: you can see the wedge horn in this picture--it is flush with side of throat]

http://www.flickr.com/photos/78661951@N07/8233254564/in/set-72157632126114344/

Wedge: Note curvature to 'nothing' at end of horn; this matches the termination of the abutment when wedge is 'set':

http://www.flickr.com/photos/78661951@N07/8232192973/in/set-72157632126114344/

Wedge: another view

http://www.flickr.com/photos/78661951@N07/8233257456/in/set-72157632126114344/

Looking down throat: slot curves to nothing; the wedge horns match this curve exactly when wedge is 'set'--have no idea how they make this happen. If you look at a set of Old Street (former C&W) hollows and rounds, all the wedge finials will be at exact same height:

http://www.flickr.com/photos/78661951@N07/8232196799/in/set-72157632126114344/

Another view of throat:

http://www.flickr.com/photos/78661951@N07/8233261520/in/set-72157632126114344/

The 1-3/4" x 18" Try Plane

Back of tote to rear of plane................... 2-1/4"

Height of handle at horn........................ 3-15/16"

Distance of strike from front................... 2-7/8" to nearest point of 'diamond'

Strike diameter..................................... 7/8" cocobolo

Photos:

Overview of plane: http://www.flickr.com/photos/78661951@N07/8232199941/in/set-72157632126114344/

Two views of throat--again, horns of wedge are visible in these photos-blended perfectly with wall of throat:

http://www.flickr.com/photos/78661951@N07/8232201219/in/set-72157632126114344/

http://www.flickr.com/photos/78661951@N07/8232202479/in/set-72157632126114344/

Wedge views: http://www.flickr.com/photos/78661951@N07/8233273202/in/set-72157632126114344/

http://www.flickr.com/photos/78661951@N07/8233267794/in/set-72157632126114344/

Detail--termination of chamfer in front: http://www.flickr.com/photos/78661951@N07/8232210861/in/set-72157632126114344/

Detail--the cocobolo strike, depth is approx. equal to side dimension:

http://www.flickr.com/photos/78661951@N07/8232206671/in/set-72157632126114344/

Detail--nail at toe of handle. Tote is fixed at back by half dovetail into body, and at front by cut nail:

http://www.flickr.com/photos/78661951@N07/8233268836/in/set-72157632126114344/

My eternal thanks to Larry Williams, Bill Clark, and Don McConnell for the magnificent quality and attention to detail in every feature and aspect of the planes they make. There is nothing finer under the sun, in my opinion.

Wiley
Re: Slipping Cap Iron On Wooden Jointer

#19

Re: Clark & Williams Try Plane Details

TomD

Thanks Wiley. That really handles it!

A few more things. Thickness of grip. Mine is about 1 1/16". My grip is also a lot higher. I had redrawn it to a smaller size already, but I have come to like the enormous grip, so I may well stick with it. Certainly most traditional planes are not accommodating to my hands, and the size of grip varies a lot on the antique planes I have.

Surprisingly, I think I have the same guts as the C&Ws. I have a few things I like to do, but the main thing that I see that is different is that they probably have that inset ramp more pulled back out of the mouth than I do. That would be worth trying.

The only other thing I can think of are the dimensions of their bevelling. Probably the same as with their molding planes, but you never know.