We value your privacy.
We use cookies to enhance your browsing experience, analyse site traffic, and personalise content.
By clicking “Accept all”, you consent to our use of cookies. You can also choose
“Essential only” or learn more.
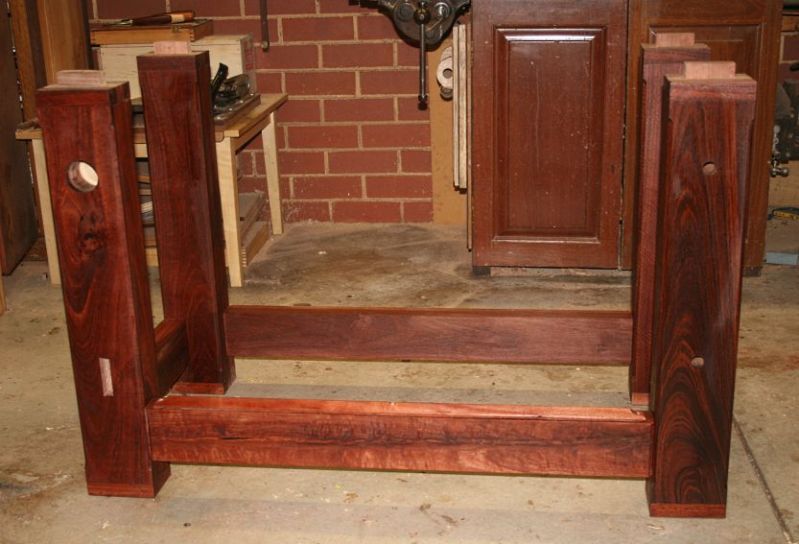
You have been very patient about my incessant stewing over my new bench build. Well the time to do it is at hand. As I have indicated, i plan to build a sturdy Roubo. It will dwell for a while in my basement shop. The only method of egress from said shop is up a flight of stairs. Do any of you float your benchtop on top of the legs? It has occurred to me that having an inch and a quarter oak dowel on each post going up into the top an inch and a half or so, should keep things pretty stable, and allow me to move my bench out of my basement without a chainsaw. I get to move into an area about 24 by 20. For a shop without a tablesaw that is a wonderful amount of space. I painted the basement walls bright white today.
Whether you float it on a couple of dowels (Tage Frid did this - there's a long tradition to it) or fasten the top to the legs with lag screws or the like, the legs and the top should be separable, and the design done in a way that permits the top to move as the seasons change.
If you just rest the bench top on the legs, you're depending on the design and construction of your legs - the framing, if you will - to resist horizontal movement. I've found that the horizontal pressure on a bench - sideways, particularly, as you plane, but also front to back - to be far greater than I'd have expected before I started using hand tools. If you've got a good sturdy understructure, floating your top is fine. If you find it's not enough, you can always add screws later that use the top as part of the structure.
"Floating"a bench top is common practice. All you need to do is to secure the top sufficiently to make sure it does not slip and slide around on the base. There are many ways to do that. Dowels, as you suggested, are fine. If it were my bench, I would use two dowels, not four. Put them in either the front or the back legs. This will allow your bench top to expand and contract without stressing the joints in the base. If you use four dowels, one in each leg top, your base will be in constant movement as the top expands and contracts with changes in humidity. This movement could eventually separate the joints in your base. Two dowels in the same line would secure the top but allow it to expand and contract without stressing the base. When you need to break your bench down to move it, all you have to do is lift the top off the base.
It won't be a Roubo if you do that, but it will work great. Both my classic benches, I guess all my benches, the top just sits on the base, so a plin would be the deluxe version.
Gravity and a few bumps will hold on a heavy top, but you then need to make sure the base is solid without the top, which means top stretchers. These introduce crossgrain expansion questions and limits on leg vise position that can be dealt with.
There is always a little question as to which features Roubo described make a bench a Roubo. One that seems important to me is that the top is a critical part of the structure: a Roubo has no top stretcher because the benchtop behaves as one.
I'm not saying dowels are insufficient for benchtop attachment, but I am suggesting that if you do this you look at other bench styles for the structure attached to the legs.
I never got around to ever fastening my top to the frame beneath. It never moves during wood working operations.
Painting the walls white is good. It will capture and reflect back significant light to the bench area which needs up to 200 ft candles to see well (outdoor shade is 500!). It took 14-4' tubes, white walls and a light bench top to get me to 200 ftcd.
I recall that you were using Douglas fir for the legs. I would use tenons on the ends of the legs. You may think your dowels are sufficiently strong, but they are only as strong as the surrounding tissue that supports them. Much better to have a larger tenon on the end of the leg like 2x2 or larger so that there is a broader area of tissue to support the joint. Also if the joint gets loose, it is easier to shim in a mortise than a round hole.
From a quick re read of several sources.....the strength of a Roubo comes from the joining of the legs to the top. The bench has to lose some integral strength if the top is just perched on the legs. Draw bored thru tenons it will be. If I move it, i can bore out the pins. Gotta remember to use no glue on the joints that I may want to knock own.
Have fun, sounds like a great project. I used to work in basements, and knock down is important to me and fun.
I think the current definition of a Roubo, is any bench that has appeared in Chris S's blog, or was infuenced by anything Chris S ever said or did. Or anyone that was was ever influenced by him.
Of course The Bench has the legs dovetailed to the top.
On my bench legs I used tenons (for the reasons Warren suggests here), and then pinned the top - I did not draw bore it. I draw bored the base for extra strength, however this would have made it difficult to drill out the pins if I needed to do so. Just pin the top - that will provide the extra connection you seek and be easier to drill out later.
The tenon cheeks ended about 1 1/4" x 3". I had planned on 2" high, but added a filet at the top of the shoulder to raise the bench height. This shorter tenon cheek has not been an issue (frankly, pinning was a precaution and did not add to the apparent rigidity). The legs are 5" x 3 1/2".
I don't know whose design you are looking at, but with André Roubo's design, there is no need to bore out any pins. The tenons in the top have no pins. The stretcher tenons are pinned with tapered pins. To remove them you take a dowel that is slightly smaller than the hole and knock them out from the back side. Because they are tapered they pop right out. It is best to put the same pins back in the same holes.
All the recent discussions of this named bench motivated me to look on Google Images for pictures to see what it was. There was so much variety I was unable to fathom what features distinguish this bench from others.
If someone is motivated to answer the question please add why has it recently become the bench to make.
Bill - you may get several replies to your question, but to start, look at the picture that Warren posted just above your post. This picture is from Andre Roubo's book "To Make as Perfectly as Possible". Note the way that the legs are connected to top with the double tenons. This is the most notable feature of a Roubo bench, in my opinion.
Recent popularity is likely due to Chris Schwarz building a Roubo bench several years ago, when he was still editor of PopWood, plus the forthcoming translation of Roubo's book - a project headed by Don Williams and being published by Lost Art Press.
A Roubo bench has a heavy, single slab top with the legs mortised into the top as part of the structure. The top is roughly 5"x22"x10' and is oriented with the bark side down. There are stretchers between the legs a few inches above the floor and usually a shelf there for tools.
This is the typical 18th century bench for joiners and cabinetmakers. Earlier benches tend to be similar but a bit lighter; later benches tend to not to have the top as part of the framework. There are other 18th century benches around and other illustrations, but Roubo's bench is well documented and well known.
I thought the style would have been determined by vises or some such. I was focusing on the wrong parts in the pictures I had studied.
My bench is built like a table. I typically fix stuff to the top with "F" style clamps. I had to have a huge overhang so the table framing didn't get in the way of the clamps. I like to sit at the bench and put my foot on my shelf and this style would accommodate that preference. My corded tools are on the shelf.
I have a 3" top so it would be a simple matter to do the legs in this style.
I would like to know more about this requirement. This configuration will cup the bench if the moisture content rises, or bow the top if it decreases. For a new bench from air dried material it is more likely to dry out and bow. At least if the lumber is all oriented the same way it will be a cup or bow and not a wash board. Having lived with a bowed bench I would rather have one that had a cupped top. But maybe it is easier to plane flat a bowed top.?. I do not doubt that this requirement makes sense if the reasons behind it are understood.
I first heard this bark down suggestion form Dan O'Hagan about 35 years ago. I don't know if Roubo was his source. Here is what I think. You have a single timber of wood that is part of the bench structure. I think this is evidence that the benches were made somewhat green and would be drying out over time. So if the top is a little green, and you put the bark side up, then the top surface will cup and the joints down below (stretcher to leg) will be in tension pulling on the pins. You would have to plane the top at the edges so you would have to plane across the ends of the tenons and maybe have to fool with a vise or crochet. On the other hand, if you put the bark side down, the joints will be in compression (better), and planing the center of the top will somewhat simpler.
Some guys who get a big slab wait for years before making a bench. I don't think I would.
The Roubo benches shown in Warren's original illustration use a crochet on the left end of the bench. Later benches described by Roubo use a leg vise instead of or in addition to the crochet.
A leg vise is totally incompatible with a floating top, or one attached with just dowels or lag screws, because the force of the leg vise puts a very large amount of lateral pressure on the top, and on the dowel. That is one reason for the unusual mortise and tenon joint.
Another critical feature of the Roubo is that the front face of the top and the front faces of the legs and front stretcher are coplanar, and vertical. This is important to allow boards to be clamped vertically to allow you to work the ends and edges. This is well documented by Chris Schwarz in Workbenches, From Design and Theory to Construction and Use.
When designing a bench, one must be very careful to not mix and match features from different bench designs without careful analysis of how those attributes work together (or don't). This book is the only reference I have encountered that does this critical analysis and presents it in an organized and logical manor. All the other "experts" out there just show you their bench and tell you to build yours the way they did.
If you buy the book directly from Lost Art Press, Chris gets a greater reward for his efforts.
I once dovetailed together a couple of 2-1/2" thick x 8" wide hard maple boards for a wrap-around bench apron. It took clamps to drive the two pieces together, no glue, and I don't know what it would take to knock them apart. But it would be a job.
Gonna be similar thing with 8 big leg tenons into a 4" (+ or -) top. Seating the top will be a non-trivial piece of work involving I would imagine big clamps on each leg, or else sequential use of a 4-lb sledge. But that's nothing. Getting that top back off again will be something else--an engineering challenge. Due both to the weight and the difficult-to-reverse join.
Not trying to be negative. I think Roubo benches are wonderful, and admire very much what you're doing. But it looks like a one-way trip to me. I don't believe it will be a "knockdown" bench in the way we usually think of taking stuff apart. Gonna be a big difficult monster once it's together, and I hate to think of you and your wife getting injured trying to undo it.
I'd agree that that's the best feature of Schwarz's book. To my knowledge, the aspect of the Roubo on which most attention was previously focused was the single slab top. Schwarz very effectively drew attention to other features of the bench by calling his laminated top bench a Roubo.
Functionally, it doesn't really matter how many pieces of wood you use for the top, because you can glue it up from smaller hunks.
OTOH, the Nicholson bench, and Bob Lang's 21st Century workbench need two separate slabs to work.
If you want to be a little more sophisticated, and still adhere to Roubo's principles, you could even use thinner wood for the center sections of the top. That would decrease the weight and the cost while not compromising the stiffness or the functionality, since the most stressful work is done near the front edge. But, you couldn't add a tool tray, because that would surely compromise its stiffness.
I think an under emphasized feature is that the legs, stretcher and the near edge of the top are co-planar. Makes for a much more useful clamping situation.