New WoodChat!
Home Articles Forums Gallery Marketplace Videos

WoodCentral Forums

Knowledge You Can Build On — Est. 1998

Good Hope Hardwoods - Walnut Slabs & Specialty Hardwood Lumber

Mortising question

Posts

Mortising question

#1

Mortising question

Bill Tindall

There was a recent discussion and some neat pictures on mortising. The emphasis was on what technique would be faster.

For the amateur woodworker the issue isn't speed but rather what technique is most accurate. I don't chop enough mortises that it makes any significant difference how long it takes. It follows that I am always out of practice when the need arises.

A well fit mortise has no more than 0.005" clearance between tenon and mortise. This slop allows some tiny adjustment to compensate for a mortise that is less than parallel to the face of the board(perpendicular to the edge).....but not much. Hence, the mortise must be chopped with the chisel parallel to the board face with great accuracy.

I don't find it trivial to hold a chisel parallel to the board face to +/- a degree, or what ever the tolerance is. When I assemble the frame I am overjoyed when it comes together without a rail cocked out of plane.

So, what technique of mortising is more reliable in this regard? Are there crutches that can be employed to make the process more reliable? While the technique in the video seems to be fastest, flipping the chisel around would seem to invite errors in keeping it parallel to the board face.

I happen to have some mortising needs to attend to tomorrow.

Re: Mortising question

#2

Re: Mortising question

Kees

You can now watch a video on Paul Seller's blog. He uses a different technique.

Re: Mortising question

#3

David Barnett

(Message Deleted by Poster)


Re: Mortising question

#4

Re: Fast and straight

Warren in Lancaster, PA

I laughed when I read Frank Klausz' method for making mortises in Fine Woodworking #18 (1979). It looks like he has since learned something here in America.

Re: Mortising question

#5

speed

Bill Tindall

Again the main metric was how fast with a minor comment that his method yielded a smoother side. No comment on how to ensure the mortise sides are parallel to the board face.

Re: Mortising question

#6

Re: Mortising question

CStan

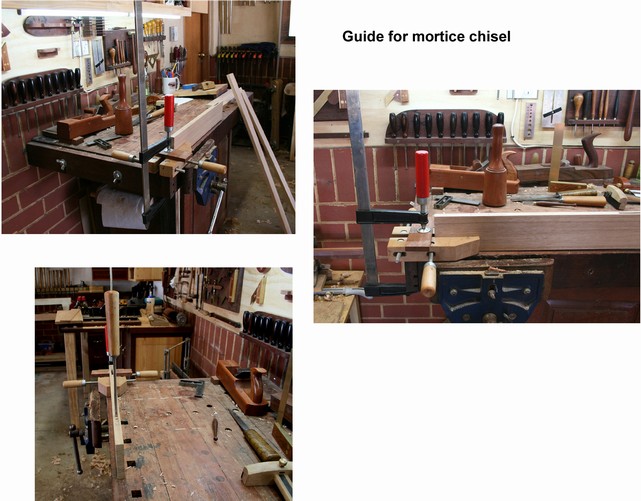
Clamp a square, flat, stable off-cut (about four to six inches long and three inches wide or so) just ahead of the joint and use it to site your chisel for vertical -- problem solved, no more cocked mortises.

When you clamp the board on, check it with your square to make sure it's square to the face of the board.

Site the chisel edge with the board edge for vertical and get a good start all the way the length of the mortise. Once you get it going, you may not need to site against the board but it's there if you need it.

Re: Mortising question

#7

Re: Mortising question

david weaver

Anything visual is fine, even if you just have walls and the mortar joints are square to the floor and the bench. At one point, I chalked a line on the wall in my line of sight before I realized my mortar joints are just as good to use.

I still will always do something, even if it's just to hold the chisel against a piece being mortised (on the face of it) and get an idea of what vertical to the piece actually is.

Re: Mortising question

#8

Ellis Walentine

Another method

Ellis Walentine

I used to drill overlapping holes with a Forstner bit on the drill press, using a square fence to keep the drill bit parallel to the faces of the stiles. Then, the sides of the holes provide a very accurate visual reference for paring the sides and ends of the mortise.

I know it's not authentic, nor entirely hand tool work, but it is fast and accurate.

Ellis

PS, we also had two horizontal mortisers in the shop for production jobs.

Re: Mortising question

#9

Jack Guzman from Maine

Re: Mortising question

Jack Guzman from Maine

Bill,

When I'm chopping a deep mortise and I have concerns about perpendicular I use a combination square. I set it against the side of the piece I'm mortising and sight my chisel with it. It's a little fiddly but it helps.---Jack

Re: Mortising question

#11

Re: Another method

CStan

I think the key to using this method is to leave a bare ghost of the holes when paring as visual proof the walls have not been pared into twist.

Re: Mortising question

#13

Re: Another method

CStan

... dowelling jig and hand brace work too....

Re: Mortising question

#14

Re: Another method

Paul M.

Hi Ellis,

I did exactly that last night. I have some 4x4 timber that I'm using as a workbench base. Mortises into the sled feet and establishing the end of the upper crossmember bridle joint were done with 1/2" brad point bit chucked into the drill press. The bit was setup to just kiss the two knifed lines for each corner of the mortise. This left an idiot proof guide to cutting the mortise with a chisel as the edges of the holes make a great guide. This may not be authentic, but it is accurate and easy.

Re: Mortising question

#15

using a bevel chisel and binding problems

Bill Tindall

The bevel chisel indeed provides some advantages. Because it is beveled it doesn't bind into the mortise and if it does bind a bit it can be rotated to loosen it. Surprisingly the walls were smoother with the bevel chisel just as was the case in the video.

Things went very well with a 1" deep mortise. But getting the last 1/4" in the 1 1/4" I needed was problematic. The tendency for either chisel to bind at 1 1/4" deep created problems controlling the chip. They were slow to do.

As far as drilling and then chiseling if I was going to do that I would add a mortise bit and be done with it in one operation.

Re: Mortising question

#16

David Barnett

(Message Deleted by Poster)


Re: Mortising question

#17

Re: I'm guessing your mortise chisels...

Bill Tindall

They are angled 5 degrees. I made them. CPM 3V.