Home Articles Forums Gallery Marketplace Videos

WoodCentral Forums

Knowledge You Can Build On — Est. 1998

Good Hope Hardwoods - Walnut Slabs & Specialty Hardwood Lumber

Getting closer to getting my workbench upright

Posts

Getting closer to getting my workbench upright

#1

Getting closer to getting my workbench upright

wilbur

With the help of my neighbor, I got my workbench off the sawhorses and onto its side. The legs on the front side of the bench are proud of the front side of the benchtop by 1/16"-3/32", so I put it on its side so it would be easy for me to plane it down.


I mentioned this before but it's really great to have a plane with a wide mouth and a decent amount of camber, so that it can take thick shavings. I took a jack plane and had the 3/32" of extra material pretty much removed in less than 10 swipes. You can get an idea of how few shavings I needed to make with the jack plane by what's on the floor. The reason there are so few shavings is that each shaving is pretty thick.

A little more smoothing tonight, and I'll be able to get my workbench up and on its feet! :D

Re: Getting closer to getting my workbench upright

#2

congrats on the progress

Bill Houghton, Sebastopol, CA

That picture makes the heft of your bench really clear. Why do I get the feeling that you've learned really, really well the lesson from your prior braced-to-the-wall-with-a-2x4 bench?

I am reminded a bit of the bumper stickers you see on Jeeps, "Keep shiny side up," except in the case of a bench, it's "keep flat side up." I'm sure you're looking forward to reaching that state.

And, yes, roughing settings for planes are a revelation. There was a period in American shop literature when the notion was that planes were just for smoothing, so the books all talked about how to do fine settings. I happened to read too many of those books in my formative years (20s and early 30s in the case of shopwork), and it took me some years to relearn the lesson that is now once again understod, that there are useful stages between the axe and the smoother.

Re: Getting closer to getting my workbench upright

#3

Oh Yea...

Scott Burr in Ben Lomond CA

Thanks for the new pics Wilbur. That thing is STOUT! I never had an idea of just how stout it was until I saw this pic. Keep up the good work and keep keeping us aware of your progress.

Thanks!

Re: Getting closer to getting my workbench upright

#4

Re: Getting closer to getting my workbench upright

Wiley Horne--So. Calif.

What fun, Wilbur!! It's about to happen. One great thing is, you never compromised as you went along. So it'll be born 100%.

Are you gonna plane against a stop, or what? You probably already told us, but I forgot.

Wiley

Re: Getting closer to getting my workbench upright

#5

IT LIVES!!!!! and a tale of four jointers

wilbur

So after work today I finished off the smoothing of the legs. Tonight we had a very nice dinner on our back patio, and just as we finished, I saw my back door neighbor who knows all things woodworking, and he came over to help me get my workbench on its feet. I decided to get a jump on flattening out the top. When I did my original glue up I kept what would eventually be the top faces of the 4x4's aligned, so this side of the 4x4's were pretty well aligned. They were out maybe 3/32" at most.

I used the same technique as I did way back when I flattened out the underside of the bench: I marked out two foot sections, and made liberal use of a straightedge to help identify the high spots and a crayon to help me locate what parts of that section I had and hadn't planed yet. Then I went to town using a jack plane with the pronounced camber, going across the grain. My wife decided to take an action shot of me doing this. You can see that I have the first two foot section done, and I'm getting ready to attack the next two foot section.


Again, this went more quickly than I would have thought. I had the major unevenness between the boards flattened out in about 1-1/2 hours. Then I set about to jointing the benchtop surface.

I've been looking forward to this part of building my workbench, because I had some toys I was saving up to play with during this part. Here are three of them:
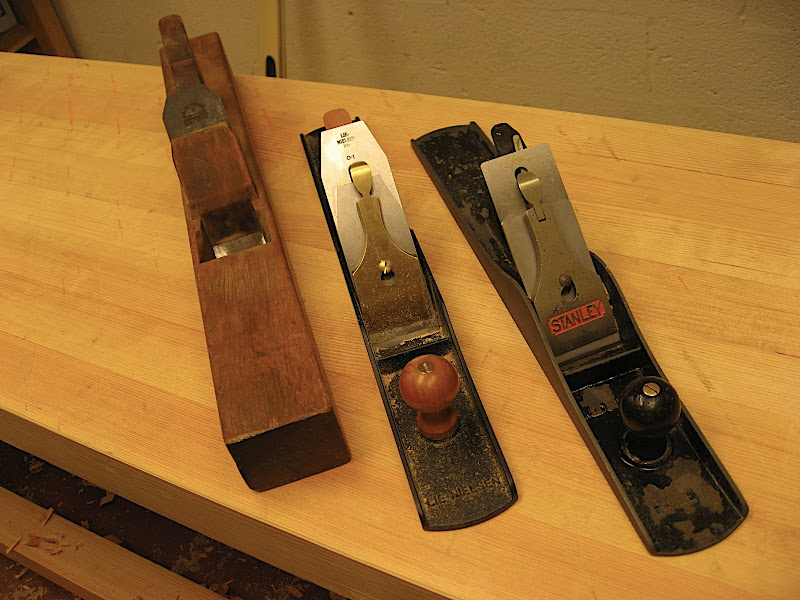

These jointers all have a story. The Stanley #7 was the second plane I ever bought, and the first plane where I tried a Hock blade and chipbreaker.

The wooden plane was one that I got for pretty cheap when a family called our woodworking club to get our help to figure out to do with their grandfather's woodworking equipment after he had passed away. In thanks for our help, I got that wooden jointer plane for a song. The blade says "W. Butcher Warranted Cast Steel", and appears to be laminated.

The Lie-Nielsen #7 I got when I had read an interview with Thomas Lie-Nielsen about their plans to offer O-1 steel blades for some of their planes. I emailed the company to tell them that their lack of O-1 steel plane blades was one of the reasons I had never bought a Lie-Nielsen plane, since I didn't really like using A-2 blades based on my trying out a Lie-Nielsen plane from my neighbor. To my surprise, Thomas Lie-Nielsen himself sent me a reply, and in an impressive feat of salesmanship, thanked me for my input, and then asked me, " Are there any particular planes you would like to order with O-1 blades? I'd be happy to get started with a tool you are interested in." After being asked that, I really had no choice but to buy a LN #7, right? ;) This is one of the first Lie-Nielsen planes with an O-1 blade.

But wait, there's more!
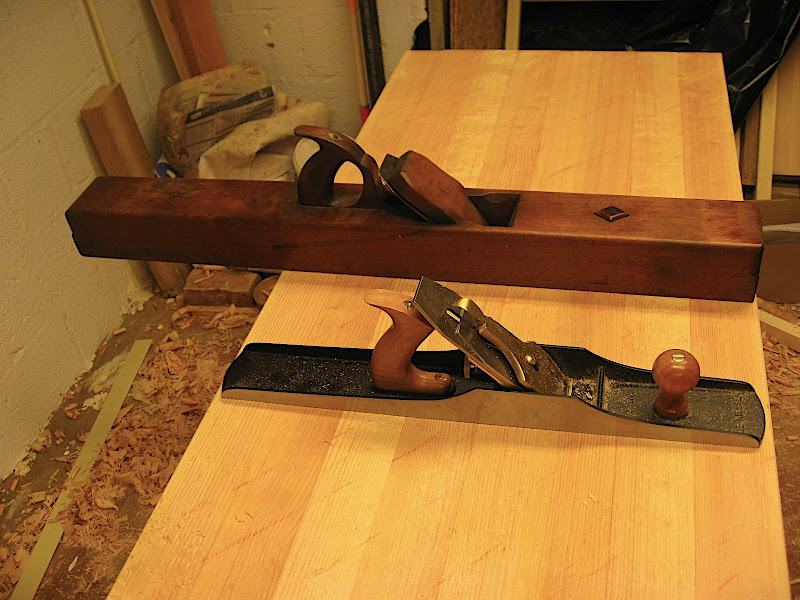

This is a HUGE 34" long (!) wooden jointer plane I got from Kevin Adams. That's the LN #7 it's sitting next to, for scale. The blade says "William Ash & Co. Warranted Cast Steel", and it also looks like it's laminated.

I gave all of these jointers a try. I was really surprised as to how light the 34" jointer was. Both of the wooden jointer plane blades sharpened up nicely, but my trying to use the two wooden jointers was a big flail. This wasn't a surprise, as I really have no experience with western wooden planes at all. Most of the problems I had were with the shavings choking the throat of the wooden planes.

Between the LN #7 and the Stanley #7 with the Hock blade, I think I liked the Stanley better. The LN #7 is a bit heavier than the Stanley #7, to the point where it was just a bit more difficult to push than I would like, especially for a surface this large.

In any case, I almost finished with the jointing tonight. Here's where I'm at.


There's a bit more tearout than I would like in spots from using the jack plane across the grain, but it's really shaping up to be a nice looking bench.

Re: Getting closer to getting my workbench upright

#6

Re: Getting closer to getting my workbench upright

wilbur

Hi Wiley,

I'm going to put in a 2"x2" planing stop towards the left side of the bench like the plans for the Roubo bench call for, and I'm going to put in a planing stop for using Japanese planes on the right side of the bench. This is the main reason why I decided to build a Roubo bench -- this style of workbench doesn't have a tail vise on this end to get in the way of a planing stop for Japanese planes. I suppose I could clamp a board between dogs using a tail vise for planing, but I was worried about planing into a vise with a Japanese plane, as opposed to planing into a dog in the bench if I was using a western plane, and what that would do to the vise over time.

Re: Getting closer to getting my workbench upright

#7

Re: IT LIVES!!!!! and a tale of four jointers

Bruce, a MN Galoot

Yowza, Wilbur! That bench bears a striking resemblance to the deck of an aircraft carrier. Bet it didn't walk across the floor as you were flattening the top.

Try waxing the sole of the 7, just a little bit. It makes a huge difference.

Re: Getting closer to getting my workbench upright

#8

Planing stops

Wiley Horne--So. Calif.

Wilbur,

Stops at either end should work well. I like planing stops a lot.

I have two benches now, each with an LV twin screw across one end. A typical use of that vise is to hold planing stops (as opposed to just using the dogs). I'll post a couple photos tomorrow. The most used are those with a V-notch to capture narrow (meaning 'not wide') sticks for edge planing, and ones designed to hold onto thin stock--these are held low in the vise and have a lateral notch planed into them.

I'll be interested to see what others use for planing stops!

Wiley

Re: Getting closer to getting my workbench upright

#9

planing stops

Warren in Lancaster, PA

You might want to start the mortise for the stop before you right the bench. Usually for a through mortise you want to go half way from either side. This brings back memories of my own bench years ago. I put the stop in right away and then used it with the bench top on saw horses to plane the legs and stretchers.

Re: Getting closer to getting my workbench upright

#10

Very impressive!

Marv

Wilbur,

Will you be finishing the ends of the bench with a cap or leave the end grain exposed?

How flat is the top now that you have it planed even? I recall a discussion on this forum, on the subject of bench top flatness as being withing .003 or less. That close a tolerance just seems crazy to me.

Marv

Re: Getting closer to getting my workbench upright

#11

Re: planing stops

wilbur

Hi Warren,

Too late. It's already on its feet. ;)

I could flip it back on its side again, but I'll have to beg my neighbor to help me put it back upright again. For the through mortise for the planing stop I was planning on drilling out the waste, and paring the sides. If I lose a bit of the mortise due to blowout, I figure that won't be the end of the world.

Re: Getting closer to getting my workbench upright

#12

Re: Very impressive!

wilbur

Hi Marv,

I'm going to leave the ends bare for now. I haven't measured the flatness of my benchtop yet. The only thing that I remember reading about benchtop flatness is that I recall Chris Schwarz saying that his benchtop was flat to a few thousandths of an inch after he redid the top to the point where he was happy with his planing results on a real board. This may seem like an extreme level of tolerance, but it might just represent how easy it is to get a work surface very flat with a good jointer plane, which can easily be set up to take a shaving of a few thousandths of an inch or so.

Also, 3/1000" may not seem like much, but if a surface is out of flat by 0.003", if that out of flatness accumulates every inch, a board that is 1-1/2 feet long will be out by 1/16".

Re: Getting closer to getting my workbench upright

#13

Re: planing stops

Marv

Wilbur,

With Douglas Fir, those "blowouts" can be really nasty and can splinter a good distance from the mortise. I would clamp a thick piece of backup wood on the underside to drill and chisel into.

Marv

Re: Getting closer to getting my workbench upright

#14

Re: Very impressive!

Marv

Wilbur...

I was thinking more in terms of .003 dip or hump would be over a fairly long distance, like maybe 2 feet for example. I wouldn't think of .003 per inch. Flatness as I think of it would be to lay a straight edge across the 2 foot span and measure .003 gap at the middle point.

Doesn't wood tend to expand and contract more than that amount?

If you set a micrometer at .003 and hold it up to the light, you can barely see it with 20/20 vision.

If flatness is that critical, I think I'd be concerned about the bench top twisting over time if it isn't setting exactly even on the floor once you have it inplace. It would be a shame to spend a lot of time getting the top perfectly flat only to discover a month later that it's twisted or lower in the middle.

What makes me think of this concern is because I've leveled metal cutting lathes with concerns about the main castiron bed warping and twisting over time if not leveled properly. Three thousands warp on a lathe bed is considered to be a lot. Am I wrong to think it isn't as important on a woodworking bench? :)

Marv

Re: Getting closer to getting my workbench upright

#15

Re: Very impressive!

Chris Friesen

"If you set a micrometer at .003 and hold it up to the light, you can barely see it with 20/20 vision.

If flatness is that critical, I think I'd be concerned about the bench top twisting over time if it isn't setting exactly even on the floor once you have it inplace. It would be a shame to spend a lot of time getting the top perfectly flat only to discover a month later that it's twisted or lower in the middle."

I think Chris Schwarz talked about his bench being out by about six thou when he was done flattening it. This implies that it was out by more than that when he started.

Three thou is roughly the thickness of a piece of paper, easily felt with the fingertips. If you have a flexible board and you plane it over a hump or dip, then your board thickness is going to vary by roughly the size of the hump/dip. Try fitting that to a dado sized to the thickest point and you're going to have visible gaps.

Re: Getting closer to getting my workbench upright

#16

Now that's a jointer!

Scott Burr in Ben Lomond CA

That's a monster jointer Wilbur. Too bad you couldn't get it working well to use it on the bench top. I have a bad case of jointer envy.

Re: Getting closer to getting my workbench upright

#17

Coupla examples 

Wiley Horne--So. Calif.

Hi Wilbur,

The built-in stops will be a great convenience. Very much looking forward to seeing them.

I asked about stops, because I find myself using them more and more, and am interested in what others do, as well. I clamp the stop in the end vise and forget about the dogs. These stops are made from project offcuts.

Planing thins. A typical stop is something for planing thins. Here's the offcut it starts from--this is an offcut from the back of a Krenov type wall cabinet:


Kerfed it with a saw to define the cut, and then planed a kinda half-dovetail in it to catch the work. This stop was then used to plane the thin sections of the case back, as well as all the parts of the drawer that you folks all helped me figure out. Here's the stop:


V-stop. Another typical stop is used to grab a narrow (meaning 'not wide') board for edge planing. Rather than clamp these narrow sticks, it seems natural to plane them into a V, or birds-mouth stop. The stop is clamped in the end vise, and the stick being planed is edge-up on the benchtop.

Here's the offcut used to make the V-stop. It's from the rough glueup of a vise jaw. One of the boards making up the jaw was longer than the other, so the offcut has a kind of rabbet in it, which is useful. Here's the offcut:


I sawed some V's in this block. One set of V's is sawed into a 4/4 edge, and another set of V's is into about a 2" edge. Here are the V's:


The 2" V's add support for sticks that are taller when placed on edge.

The deeper the V, the better it grabs, so I use the deeper V's when practical. The narrower V's get a better grip on thin sticks.

Very much looking forward to your planing stops!

Wiley

Re: Getting closer to getting my workbench upright

#18

The easy to make planing stop

wilbur

Tonight I did some more jointing and smoothing of the benchtop. I think it's pretty much where I want it in terms of flatness, especially in the area towards the front of the bench where most of the planing will take place.

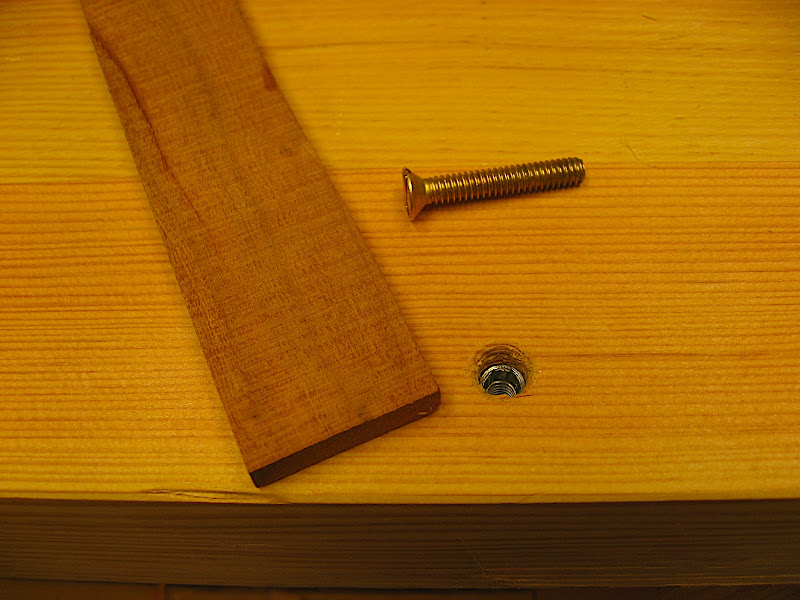
I worked on making the easy to make planing stop, which is the one for Japanese planes. These are the components of the planing stop.


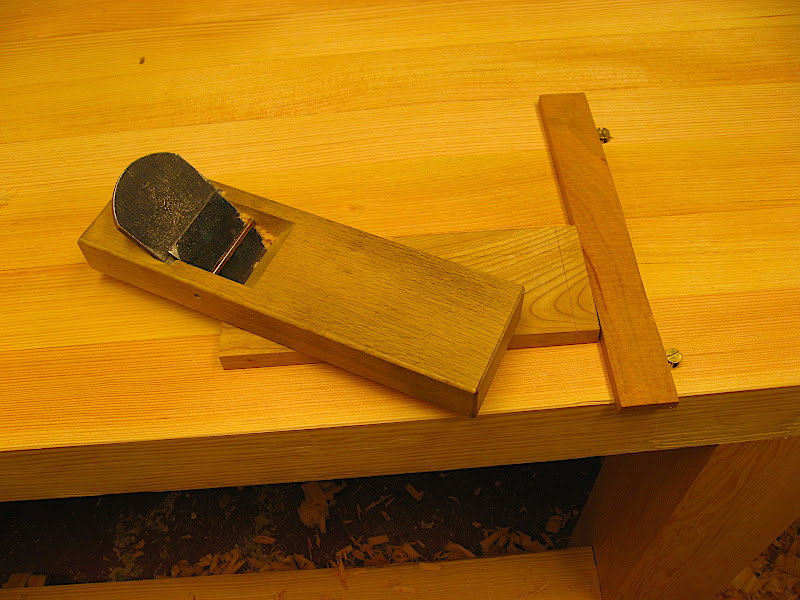
A flathead brass machine screw, a threaded insert, and a scrap piece of wood. This is what it looks like set up.


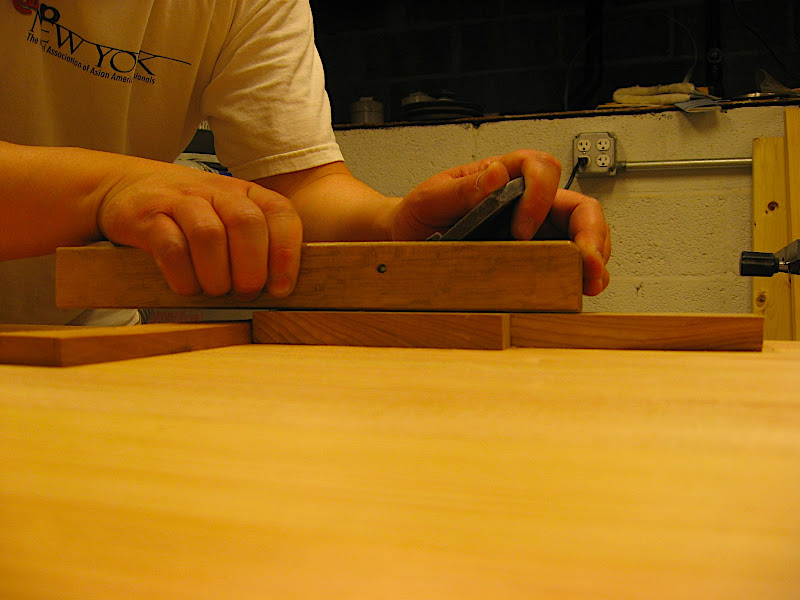
Nothing is clamped down here. The plane engages the workpiece, and pulls it into the scrap piece of wood, which pulls into the screws, locking everything in place.

Action shot:


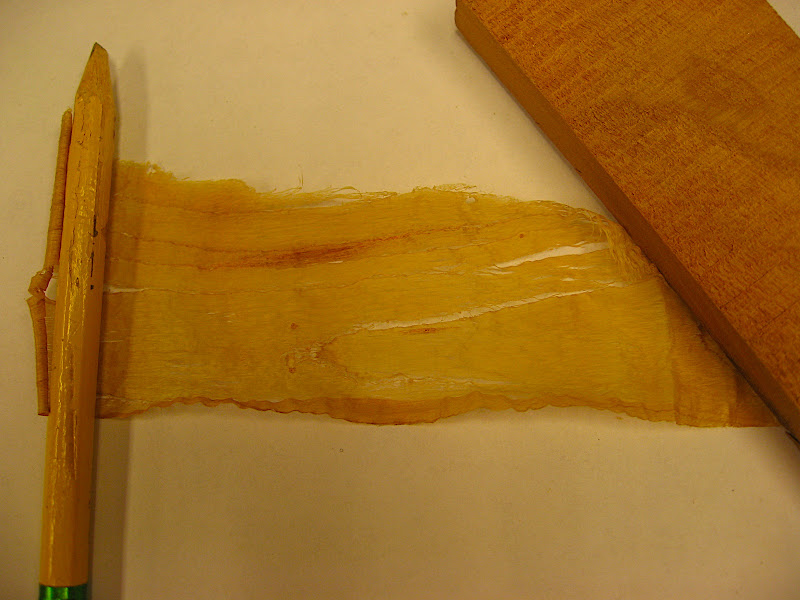
And the obligatory shaving photo:


Compared to a tail vise, this system is ridiculously quick to set up. There's no twirling of the tail vise screw handle, and no backlash to deal with. If I were to plane a thicker piece of wood, I'd raise the screws up a bit (they are 2" long) and use a thicker piece of scrap wood.

I'm also happy to say that with all the jointing and smoothing, my bench didn't move a bit. :D

Re: Getting closer to getting my workbench upright

#19

Re: Very impressive!

wilbur

Hi Marv,

I think that like most things, when we are talking about the flatness of a piece of wood and whether it's worth the effort to get it there, it's all about pros and cons.

As far as I can tell, the advantage of having a flat bench is that you need that flat reference surface to be able to plane your workpiece flat. As Chris mentioned, if there is a hump or dip, the board will vary by that hump or dip. Flat boards lead to square boards, and square boards lead to accurate joinery. So that's what I can come up with on the pro side of ultimate benchtop flatness. There may be other advantages, but that seems like a good enough one for me.

So what would be the disadvantage of making your benchtop as flat as you can? The only thing I can think of is the time and effort expended in getting your benchtop that way. But if we go by the 0.006" tolerance that Chris Schwarz once reported measuring on his bench, I think that the amount of effort needed to establish 0.006" tolerance is way overstated if you are halfway decent at using a plane. If you can set up a 22" long Stanley #7 jointer plane to take a shaving in the 0.003" range, you should easily be able to hit a 0.006" tolerance over a two foot span. So to me, there really isn't that much effort you need to take to hit that tolerance. It really isn't any more effort than what you would normally do to flatten and smooth any board with hand planes.

As a case in point, I did some final jointing and smoothing of my workbench top tonight. I used a LN #7 and my go-to Japanese plane for this purpose. I didn't do anything special -- just running the planes down the length of the benchtop covering a bit at a time. After I was done, I checked out a two foot area at the front edge of my workbench, just in front of the planing stop I made for Japanese planes. I was able to sneak a 0.001" feeler gauge under a Starrett 24" ruler at one spot, and that was all.

Now, I don't think that I am some sort of planing prodigy. In fact, I'd describe my experience level with hand tools as being in the average range. Certainly there are many more woodworkers that have more years of experience than I do. But if I can hit that tolerance without really trying, my feeling is that most people who have any sort of skill at using a hand plane can do the same. My conclusion, then, is that there really is no special effort needed to achieve a 0.006" tolerance if you have a moderate level of skill with hand planes. Therefore, there really isn't a disadvantage of wasted time and energy making your benchtop as flat as you can.

So, on the pro side, a flat benchtop leads to accurate joinery. On the con side, a theoretic overexpenditure of energy which I think is overstated, and not really an issue. So really, there isn't a downside to making your benchtop flat to a high degree of accuracy.

As far as the "wood moves more than 0.003", so why bother with such tolerances" line of reasoning goes, that aspect of wood movement is true. But if we take a small dovetailed box as an example, the wood in that box may easily move more than 0.003" with changes in humidity. But the box is going to move as a whole, so although the box may vary in size by more than 0.003", the joints should remain tight. A well made dovetailed box will have the joints fit with a tolerance that is in the few thousandths range, but it's not like a 0.003" gap is going to form between the tail and pin boards as you go from summer to winter. And, a well fit dovetail joint starts with square stock, and to make square stock you need a flat benchtop. So I guess I've become less convinced by that line of reasoning to explain why one should not worry about the flatness of a benchtop.

Hope that made sense!

Re: Getting closer to getting my workbench upright

#20

Stupid me

wilbur

Stupid me. I completely forgot about waxing the sole. Shows you how much I know about metal planes. ;) I put some wax on the LN #7, and, yes, it works much better now. I can still feel it being heavier than the Stanley #7, but the difference is much less now.

Re: Getting closer to getting my workbench upright

#21

Re: Stupid me

Bruce, a MN Galoot

Don't feel like the Lone Ranger. I got a #6 a few years ago, the one that is belittled in nearly all quarters. It felt substantially heavier than my #5's, so I waxed the sole. Never did that before, and it's so slick that now I have to be careful that it doesn't slip off whatever it's on. Steve Lamantia is the originator of the "where's it going to go if it slips" idea and it's constantly on my mind with that waxed up #6.

Re: Getting closer to getting my workbench upright

#22

Re: IT LIVES!!!!! and a tale of four jointers

bugbear

The LN #7 is a bit heavier than the Stanley #7, to the point where it was just a bit more difficult to push than I would like, especially for a surface this large.

You are waxing the sole of your metal planes, right?

Makes a COLOSSAL difference.

BugBear

Re: Getting closer to getting my workbench upright

#23

Flat benches

Warren in Lancaster, PA

It is helpful to have a flat bench and a flat plane sole. But consider this. If you are truing thin stuff, a less than perfect bench surface would only come into play if the under side of your board were perfect also. Otherwise you have to be able to compensate with your planing for the small distortions the additive irregularities of the bench and the other side of your board cause. Flat surfaces or no, skill is helpful also.

When people say their bench is flat to within a certain tolerance, you really have to wonder what they mean. Are they using an eight foot straightedge or what? A .001 hollow over two feet like you mention indicates an arc of radius 6000 feet, which would yield a hollow of .016 inches over eight feet.

Re: Getting closer to getting my workbench upright

#24

The bench top as reference surface.

Bob Hackett

Seems to me the bench top really only has 2 functions.The first would be to support and hold the work.When used for this function the size of the work determines the tolerance needed and the total area that tolerance needs to be held over.

The second function is as a reference surface.Here the bench top needs to serve as a flat and (hopefully) level plane that is used as a benchmark from which all other measurements are taken and indexed back to.Solid wood is a rather poor choice for this function as it moves as the humidity changes, we all know this.Metal is not subject humidity but is subject to move with changes in temperature,especially if there are built in stressors(why nomalized cast iron is better than cold rolled plate).Granite has long been the industry standard for holding high tolerances over time.

It just surprises me that it seems those most concerned with having a dead flat bench top are those who also want to build that top of thick solid wood.

Isn`t this setting yourself up for failure guys?

If you want a dead flat top that has a chance to stay that way then wouldn`t an engineered top in one form or another be a far better choice?Better yet,a metal bench?

Our ancestors pounded metal on rocks and stumps but I really much prefer my anvil. ;)

MB

Re: Getting closer to getting my workbench upright

#25

Re: Very impressive!

Marv

Wilbur,

Thank you for that extensive explanation.

Having worked with metal and tight tolerances I can relate to what you are saying. When talking tolerances, we must also include allowances as well. For example, A jewelry box drawer can be made using close tolerances so the drawer is dimensionally accurate. The case it slides into can also be made using the same tolerances. However, this is where allowances come into play. Allowances must be such that the drawer is not a tight fit or too loose a fit.

The tighter the tolerances used the less allowance is required. So if lets say, you decide you can build a drawer with all dimensions with plus or minus .003 or .006, or whatever you can do with the skills and tools you have. Or, if it is practical to make drawers with 1/64" tolerances, it only means that the allowed space it is to slip in and out of must be greater by that much plus a little more when the dimension of the drawer ends up on the plus side of the tolerance. Even more allowance must be added to compensate for expansion of the drawer. The drawer may not expand and contract as much or the same as what it slides into.

Applying this example to the flatness of the bench top, relates more to allowances than it does to tolerances, but tolerances are for sure a factor.

I guess the point I'm trying to make here is, making parts out of wood will never produce perfect, absolute, consistant sizes from part to part. There will always be differences. We use tolerances to attempt accuracy and we use allowances to compensate for inevitable inaccuracies. So, theoretically, the more accurate the bench top, the easier it will be to make parts that are more accurate.

You are sure doing a great job of planning your bench if you can get it flat within .001.

Marv