Home Articles Forums Gallery Marketplace Videos

WoodCentral Forums

Knowledge You Can Build On — Est. 1998

100+ Wood Species + Full-Shop Services: Lumber, Veneer, Tools & CNC. Everything in One Place.

What we do for love .. and dovetails

Posts

What we do for love .. and dovetails

#1

What we do for love .. and dovetails

Derek Cohen (in Perth, Australia)

>This is a just to add a little closure to an earlier post in which I showed the start of a coopered box.

This is a gift for my wife. I started the coopered top about a month ago, got back to it over the weekend (to round off the inside - with a hollow - and the outside) when I decided that it could become a feature in the review I am writing on the 20 tpi Veritas dovetail saw. The focus here was to cut dovetails in thin boards.

The 20 tpi is aimed at thinner boards. I have been assessing it (against its 14 tpi sibling) on different wood thicknesses. For a feature, I built two boxes, one with 1/8" thick sides, and this one with 1/4" thick sides.

The box is not quite completed. I have done enough for the article for now, and I have a priority (provided by Lynndy) to complete a wardrobe for a guest bedroom before her brother and family descend on us for Christmas. So the box gets put aside until later.

I must say that I am happy with the way it is turning out. I had a couple of hours after work today to fit the lid to the box, clean up the sides, and buff on a coat or two of oil.

The wood is Jarrah (very unforgiving when cutting dovetails). The inside base is She-oak. Dimensions: 6" long x 3 1/2" wide x 3" high (at the centre).

Dovetails (of course!)...


Regards from Perth

Derek
Re: What we do for love .. and dovetails

#3

Re: What we do for love .. and dovetails

charlie belden

>Ease all those sharp cornerson the sides and top - and especially on the inside edges. If she cuts herself on one of those sharp edges you're gonna need to make a larger box - for the jewelry THAT will cost you ; ).

Very nice little box, both in terms of the craftsmanship as well as the love that obviously went into it.

Re: What we do for love .. and dovetails

#4

Re: What we do for love .. and dovetails

Wiley Horne--So. Calif.

>Hi Derek,

Thanks for showing this most excellent little box. The wood is stunning!

The dovetail joinery is flawless. However, what I am impressed with is the coopered lid. And specifically the fit of the end caps under the lid. For those end caps to fit in a semicircle means either that the top of the lid is a circle (if the end caps are rabbeted in), or else that the bottom of the lid is a circle (if the end caps are butted and glued)--or both.

Plus I'm very impressed that the lid fits flush--no wind.

In short, the top especially looks like a difficult piece of work, done well. To get the lid into a circle once the mitered pieces were glued, did you simply mark an upper circle and lower circle on the end grain of the coopered lid, and plane both surfaces of the lid to the lines? Or what?

I seem to recall Bill Tindall, in connection with his coopered lid, discussing some geometry that allows one to pre-plane the lid pieces to some extent. But did he tell the secret? I don't recall that he did.

Wiley

Re: What we do for love .. and dovetails

#5

Re: What we do for love .. and dovetails

Pam Niedermayer, Austin, TX

>The dovetail joinery is flawless. However, what I am impressed with is the coopered lid. And specifically the fit of the end caps under the lid. For those end caps to fit in a semicircle means either that the top of the lid is a circle (if the end caps are rabbeted in), or else that the bottom of the lid is a circle (if the end caps are butted and glued)--or both.

Plus I'm very impressed that the lid fits flush--no wind.

I agree that the dovetails are flawless, but not their placement. I have to say I don't like how they muck up the front at all.

I also agree at the mastery of the lid; but don't quite understand your questions about the end caps (there's a lot I don't know about coopering, so let's consider this post a question of ignorance). Why are the end caps and/or lid necessarily circular? If I were doing this, I'd simply draw the shape on what will be an end cap using the lid as guide. I might draw it once and then use a compass to mark the wood with a full circle, then cut it in half for the two end caps.

Pam

Re: What we do for love .. and dovetails

#6

Re: What we do for love .. and dovetails

Wiley Horne--So. Calif.

>Hi Pam,

"I also agree at the mastery of the lid; but don't quite understand your questions about the end caps (there's a lot I don't know about coopering, so let's consider this post a question of ignorance). Why are the end caps and/or lid necessarily circular? If I were doing this, I'd simply draw the shape on what will be an end cap using the lid as guide. I might draw it once and then use a compass to mark the wood with a full circle, then cut it in half for the two end caps."

Let me hurry to say I am trying to learn more about coopering myself. Having never done one. Why circle? If it's not a segment of a circle, then things get vastly more complicated--that's why I'm guessing circle. Plus it looks like a segment of a circle.

Cutting the end caps is not what I saw as the hard part. My questions assume that the end caps are cut, and they are sections of a circle. What I observe is that Derek has a flush fit of the coopered top down onto the end caps.

My question was how he got such a good fit, starting with several straight sticks mitered together. Their cross-section would be piecewise linear. Perhaps he took his compass, and swung curves through the end grain of the mitered lid--which in itself assumes the mitering was quite accurate--and planed both sides of the coopered top with hollows and rounds til he met his end-grain lines. Or perhaps there is a better way.....anyway, that's what I was asking about.

Wiley

Re: What we do for love .. and dovetails

#7

Shaping the lid and attaching end caps  *LINK*

Derek Cohen (in Perth, Australia)

> For those end caps to fit in a semicircle means either that the top of the lid is a circle (if the end caps are rabbeted in), or else that the bottom of the lid is a circle (if the end caps are butted and glued)--or both ...

In short, the top especially looks like a difficult piece of work, done well. To get the lid into a circle once the mitered pieces were glued, did you simply mark an upper circle and lower circle on the end grain of the coopered lid, and plane both surfaces of the lid to the lines? Or what?

Hi Wiley

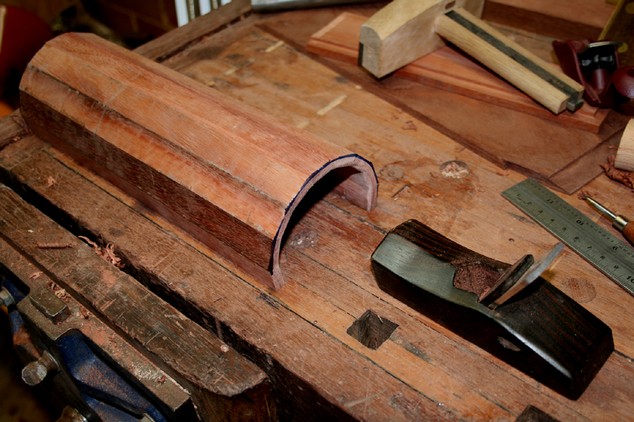
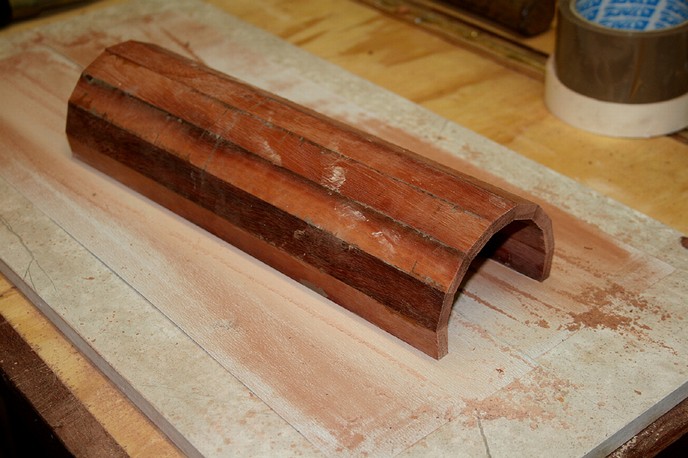
I didn't find this particularly tricky. What was more tricky was that I had made the basic shell for the top and had both sides to plane to shape.

Similar to this one ..


Planing the outside is easy - just mark off your outline (seen in black, below) and plane to this ...


The inside, however, is more difficult, and here I used a hollow (matched to the curvature) and sandpaper around a form. Still, it is less easy to be perfect.

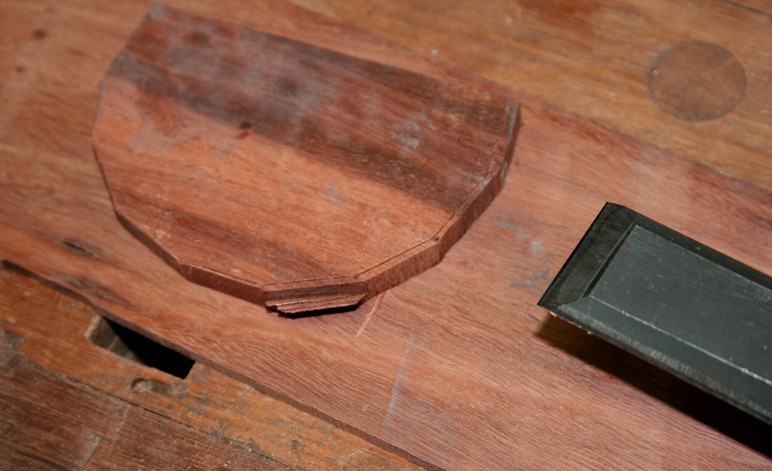
The end caps are simply scribed from the inside of the lid, and then shaped to the line. I rasped and filed. In the picture below the curvature was too extreme to use a hollow plane, so I simply chiselled to the scribed lines ...


Keep in mind that I wanted the line of the lid to flow into the dovetails on the box, and so the dimensions needed to be the same (nominal 1/4" thickness). This was one of the difficult areas.

The other difficult area was sizing the box to fit the lid. I had a few offcuts from making the first coopered lid (link below), which I posted here back in April (some may recall that it contained a marking knife as a gift for my brother). I glued these into a shallower arc for the box lid. The dimensions for the base came from the lid, and I was more impressed that I got it right to about .5mm. What I did at the end was to tape the top and bottom together, and lap the combined sided on sandpaper (120, 240, 800). I did the same for the intersection of the lid and base.

The intersection at the front of the box is not complete. I need to fare this so that there is an unbroken flow between the two halves.

Then the top needs to be joined with a set of hinges. At this time I am considering glueing the lot together, then slicing it off through the top dovetail. This will then provide the lid with a vertical section into which I can mortice a pair of small butt hinges. I value input in this area.

I'll probably get backtoit in about 6 weeks, once the prioritized wardrobe is complete.

Regards from Perth

Derek


Coopering a box lid

Re: What we do for love .. and dovetails

#8

Re: What we do for love .. and dovetails

Derek Cohen (in Perth, Australia)

>I agree that the dovetails are flawless, but not their placement. I have to say I don't like how they muck up the front at all.

Hi Pam

When I started out to make this box - the idea was back in April - the plan was to simply mitre the corners (or secret mitre - I was becoming a little hypermanic!). However I needed another feature for the review I am writing on the LV dovetail saw (you know how I go overboard and add a demonstration of something pertinent to the tool in question). So I decided to kill two birds with one stone and build the box with dovetails. I had considered using mitred dovetails, but discarded this as then the line of the lid would not flow into the dovetails of the box. So simple through dovetails it became. Not everyone's choice, I agree.

Regards from Perth

Derek

Re: What we do for love .. and dovetails

#9

type in the linked page

paul womack

>rests in the same plain

"plane"

BugBear

Re: What we do for love .. and dovetails

#10

Re: What we do for love .. and dovetails

Pam Niedermayer, Austin, TX

>OK, but the line of the top runs into/lines up with the side end grain of the pins; so you could have done half blind, thus cleaning up the front while demonstrating the line up. In fact, the fact that there's no line on the front of the top makes the tails that much more jarring.

Pam

Re: What we do for love .. and dovetails

#11

Another look at the design

Derek Cohen (in Perth, Australia)

>OK, but the line of the top runs into/lines up with the side end grain of the pins; so you could have done half blind, thus cleaning up the front while demonstrating the line up. In fact, the fact that there's no line on the front of the top makes the tails that much more jarring.

Hi Pam

I did consider a half-blind dovetail. However, while this would have presented a "clean" front, the side would not have lined up with regards dovetail width and box endgrain width. Look here at these half-blind dovetails ..


Still, you good a good argument, and I could live with it your way just as easily. Here's another view of the (unfinished) front ...


Regards from Perth

Derek

Re: What we do for love .. and dovetails

#12

precisely executed!

Bill Tindall, E.TN

>I find these small things with precise fits are way more difficult than a large piece. The tolerances get proportionally smaller to gook good, and yours looks very good.

There is a "trick" on making the staves that makes shaping much easier. I'll get around to describing it some time but right now deer hunting is taking priority.

Re: What we do for love .. and dovetails

#13

Re: Another look at the design

Pam Niedermayer, Austin, TX

>Oh, yes, my bad forgetful mind, of course there'd be the sliver running the height of the side. Still I'd go for a clean front, if for no other reason, it would look like more of a continuation of the top.

Pam

Re: What we do for love .. and dovetails

#14

Re: What we do for love .. and dovetails------WebK

Glenn Madsen, near San Francisco------WebKitFormBo

>Beautiful work, and beautiful woods, too!

Thank you for sharing this.

------WebKitFormBoundary+f720+dHVSRYdk1q