We value your privacy.
We use cookies to enhance your browsing experience, analyse site traffic, and personalise content.
By clicking “Accept all”, you consent to our use of cookies. You can also choose
“Essential only” or learn more.
>Greetings from Dayton, Ohio, resort capital of the midwest.
I'm struggling to get the Stanley #46 I bought from the auction site in the sky up and running, but, alas, I have issues. Well, I guess I'd have to say new issues, eh? The blades all appear to have been sharpened with a dull axe.
First of all, I think that the bevel angle on the blades should be 25 degrees and the skew angle 22 degrees. Can anyone verify those angles?
Second, I have a Veritas Mark II honing jig and the skew adaptor. I guess I'm pretty thick, but I can't figure out how to set up the skew registration jig using the angles listed above, assuming they are correct. I set the blade carrier at the standard (yellow)angle configuration to achieve the 25 degree bevel. I then set the bevel angle on the skew registration jig to 22 degrees. But when I attach the jig to the honing guide, the registration pin prevents me from getting the blade in at 22 degrees. I simply cannot get the jig to allow me to set the angle I need since the blade pivots around the registration pin.
I'm not even sure my explanation makes sense, but I sure could use any insight/wisdom any of you might have to offer. I keep hearing what a great plane the 46 is and now I've got one I can't use.
Thanks in advance. This website is just about the best.
>I'm struggling to get the Stanley #46 I bought from the auction site in the sky up and running ... The blades all appear to have been sharpened with a dull axe.
First of all, I think that the bevel angle on the blades should be 25 degrees and the skew angle 22 degrees. Can anyone verify those angles?
Second, I have a Veritas Mark II honing jig and the skew adaptor. ...I can't figure out how to set up the skew registration jig using the angles listed above ..
Hi Joe
I recall when I measured the skew angle of my Stanley #140 and #46 blades that this came out at 69 degrees. I always wondered why it was not 70 degrees? The bevels were factory ground at 25 degrees, which is what I continue to use.
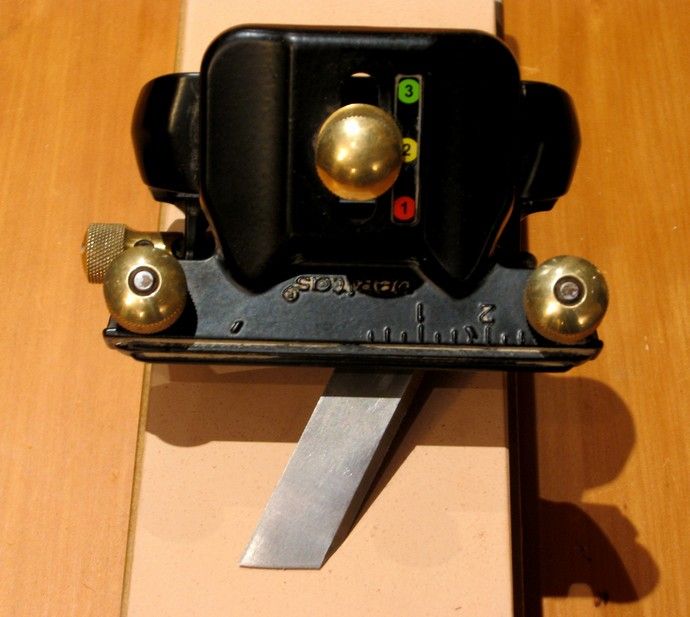
I developed a strategy for grinding and honing these blades on the Veritas Honing Guide Mk2 before the skew jig attachment came out (there is an article - link below - from early 2005, but I never did include this on my website). This strategy is essentially reverse engineering, and is still helpful, especially when you have a blade with a out-of-square bevel, or when the blade is too short to fit in the jig at the desired angle using prescribed markings.
It helps to have a blade with a 25 degree bevel. If not, just fit the blade to the Mk2 and approximate 25 degrees (we won't tell anyone if it is not exact). Do, however, lightly scribe a line on the bevel face that squares the blade at 69 degrees.
Note here that I have centred the blade and rested the bevel on a flat surface (this is one way of setting up all honing guides when you don't want to go through the process of determining exact bevel angles).
If the bevel is out-of-square to the scribed line, run it back-and-forth on 80 grit wet&dry until the bevel meets the line.
Now slide on the skew attachment, ignoring the depth stop/fence. Once the blade is on, only then add the depth stop, thus ..
If the fence does not match your depth, then just get it close and regrind the bevel so that it matches.
Once this is done, make a note of the settings for future reference.
>To expand on what Derek said, slid the skew angle jig on the bevel jig to the best position for the blade to fit. The skew angle jig does not have to be in any given position on the bevel jig.
>I sharpen mine freehand and fit them into the plane for testing. Put the blade into the plane but do not tighten the nut. Hold the plane upside down and use a square if necessary. The blade edge should be at a right angle to the outside of the skate. You can hold your square over the blade edge and look for light.
When your blade is honed and ready for use, use this same trick with a twist. Force the blade cutting edge to align perfectly with your straight edge and then clamp it into place. You can also set the plane on your workbench and do this with some practice.
#46 cutters can be tricky to install as they much be square and must be installed to the proper cutting depth. This is one reason that I change them as INFREQUENTLY as possible. For example, a 3/8 cutter is handy for a 3/8 dado, a 1/2 dado, and even a 5/8 dado. It is quicker to use what you have.
>Thanks to everyone for the great advice. I haven't had time to get back in the shop since I posted my question but hope to tonight. I think I can get it together based on your suggestions. And, Derek, thanks for the photos. They're very helpful.