Home Articles Forums Gallery Marketplace Videos

WoodCentral Forums

Knowledge You Can Build On — Est. 1998

VPS-Level Performance. Fully Managed. No Hassle.

More benchtop progress - pics

Posts

More benchtop progress - pics

#1

More benchtop progress - pics

wilbur

>Last night I got a leg up on flattening the bottom of my benchtop. When I was gluing up the beams, I tried to align the tops of the beams as best as I could. The top side looks pretty good, but what this means is that all the misalignments show up on the bottom side of the bench. Since I'm using a Roubo design, the legs are going to be mortised directly into the bottom, so if the bottom surface isn't flat, the shoulders of the leg tenons won't be in the same plane, and the legs and lower stretchers won't be square.

I forgot to take a better "before" picture, but you can get an idea of how much unevenness there is between the bottom surfaces of the beams here. In many places, there were 1/8" discrepancies between the beams.
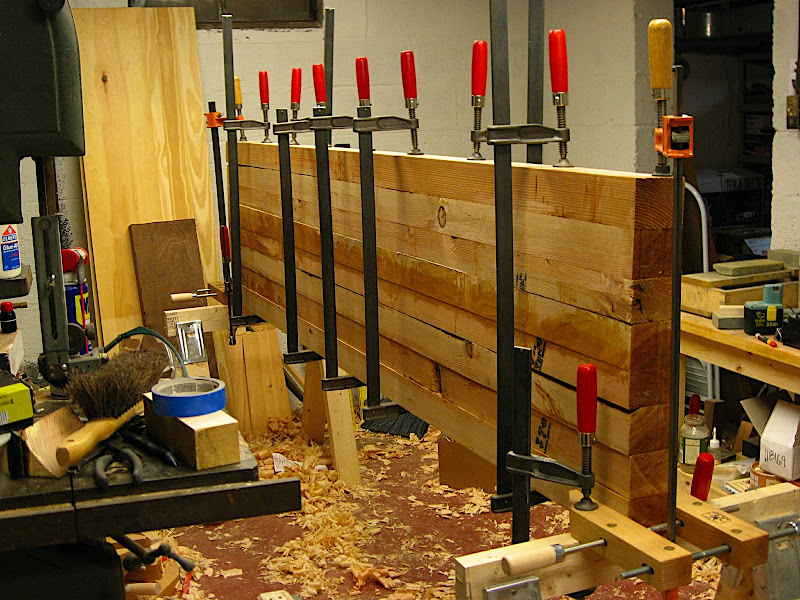

I put an even more aggressive camber on my jack plane than I had been using -- about equivalent to a 10" radius. This allowed me to take off really thick shavings, close to 1/64". This meant that theoretically, 8 swipes of the plane would level a 1/8" discrepancy. Being able to take down this much wood, the majority of the unevenness was gone after only 30 minutes.
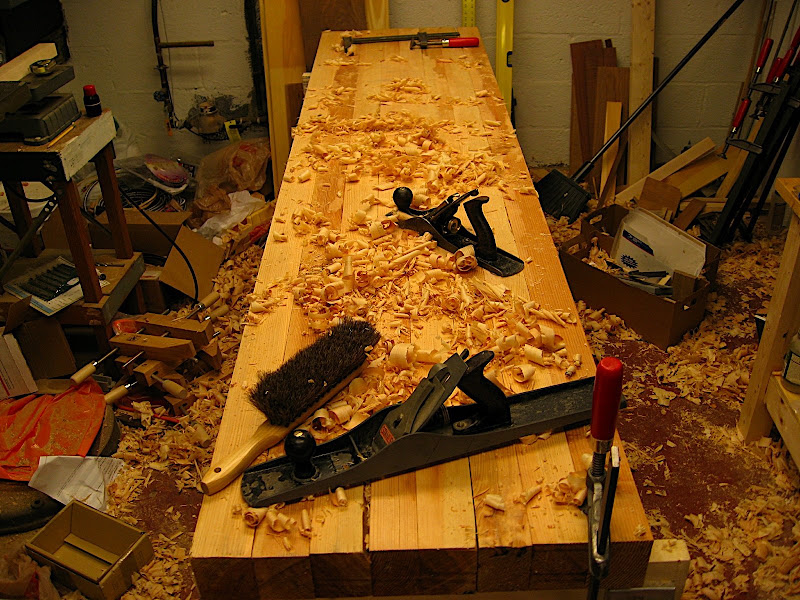

Look at the mess I made! Not bad for just 30 minutes of planing, I think. I was pretty surprised as to how quickly this went. You can get an idea of how thick the shavings from the jack plane were at the front by the jointer plane. The jointer plane is just there to give a sense of scale for the size of the benchtop. I didn't use it last night, but I'm sure it will be put to use pretty soon.

At this point I realized that I hadn't made winding sticks yet to check for twist, so I called it a night.

Re: More benchtop progress - pics

#2

Re: More benchtop progress - pics

wilbur

>One last thing: in preparation for making my benchtop I knew that I didn't have the ideal number of clamps, so I ordered a few more Wetzlers a little while ago. They seemed to be a little slow in coming, and I wanted to get going on my bench, so I wound up borrowing some clamps from my neighbor to complete the glue up. Now that I'm done, guess what arrived in the mail? :@)

Re: More benchtop progress - pics

#3

bench bottom?

Adam Cherubini

>200 years ago, guys made floors like this. They planed the top, but not the bottom. They used an adz cross grain to rough flatten the areas where the joists sat. Not sure how your legs are going to attach, but you might consider this.

I'll lend you Grandpop's ship adz if you'd like to borrow it.

Those look like fir 4x4's. I'm working on a douglass fir bench at present and I like it more than I thought I would. It holds boards well. Ditto, I'm using a fir 2x8 for a vise jaw and it bends like a banana, but it's gentle on my workpieces.

I think making a bench out of 4x4's is a good idea. Looks like your are having a lot of fun. Hope to see you on the 31st.

Adam

Re: More benchtop progress - pics

#4

Re: More benchtop progress - pics

Brent Smith, Montreal

>Wilbur,looking good, you're really moving along there !!! Get those winding sticks in use now, before you cause yourself extra work.

Re: More benchtop progress - pics

#5

Re: More benchtop progress - pics

steve mackay

>Sure looks like a LOT of dedicated work ! And SURE WILL be nice !

Re: More benchtop progress - pics

#6

Re: bench bottom?

Chris Friesen

>I did something similar, but with a plane instead of an adze. I built a benchtop from maple strips salvaged from a bowling alley. I wanted to keep as much thickness as possible, so I left the uneven bottom alone other than smoothing it out where it sits on the base and where the vice hardware is mounted.

Re: More benchtop progress - pics

#7

Re: More benchtop progress - pics

Adam Cherubini

>Actually, I think it might be a good idea to stop planing now for the exact reason Brent mentions. I think I'd be inclined to cross cut the ends and seal them up. Start on the legs then finish planing the top later.

Wilbur, I'm assuming you used PVA glue,is that right? Lord knows what's happening inside that top. That glue is 40% water or so. That probably doesn't just dry inside those joints. The wood probably absorbs a good bit of it. I'd also monitor/control the humidity of the shop.

Also, I'm not sure if shellac is the best sealer. I think when folks talk about sealers they are thinking of chemical barriers. A moisture sealer may be different. I don't know. Anchorseal might be a good idea. I've even heated parafin wax (old candle stubs)and applied that to end grain. I think I'd do this even if you are planning to bolt on an end cap.

Regardless, I think gluing and planing is going to change things inside those boards. And that may bring you out of flat sooner or later. Unless you have a super heavy base (several hundred pounds) you may have difficulty "pulling down" the top should it move on you. I'd had benches lift one of their feet when the top moved. I kept thinking I had done a bad job of leveling the feet when I made them. I also recall blaming my uneven floor. Turns out the top was causing the problem.

Adam

Re: More benchtop progress - pics

#8

Re: bench bottom?

Joe Rogers, Northern Virginia

>You're a brave man. I spent 5 or 6 hours trying to split off enough strips to reglue into a bench. Got 15 or 20 strips(not all full length either) and exhausted. Good wood but not worth it IMHO...the nails...the nails...ugh. Got a Bally Block second for $70 delivered. Problem solved.

Joe

Re: More benchtop progress - pics

#9

Re: More benchtop progress - pics

Joe Rogers, Northern Virginia

>Heads up advice Adam!

Joe

Re: More benchtop progress - pics

#10

Re: More benchtop progress - pics

wilbur

>Hi Adam,

I did use PVA glue. I was going to try hide glue, but this would have been my first attempt at using hide glue, and I thought I should not make this project my hide glue test case.

I do have some reasons for wanting to flatten the bottom of this bench. For one, it's a good trial run for flattening the top. I've never planed a surface this large before, and doing so helped me figure out a good strategy for the top. Second, I'm not sure just yet exactly where the legs will be. Right now the benchtop is 8 feet long. Depending on where I ultimately put this bench I might cut it down as short as 6 feet. I do want to maintain some overhang on the ends. So just flattening the areas where the legs attach won't work at this point because I don't know exactly where those areas will be.

But my main reason for flattening the bottom is that I don't think it's been very hard to do. Like I said, it only took me 30 minutes to get rid of 1/8" discrepancies across the bottom.

As far as the ongoing twist issue goes, this is a Roubo design, so the legs will be made from 4x4s and I'm going to use drawbored mortise and tenon joints to directly mortise the legs into the top. There are also going to be 4x4 lower stretchers, also with drawbored mortise and tenon joints. I think that between the legs, the stretchers, and the drawbored mortise and tenon joints, that might go a long way towards stabilizing the top. We'll see.

One of the nicest things about my basement shop is that the temperature and humidity is pretty stable. I have a clock in my shop that also shows the temperature and humidity, and I've been tracking it since the end of last spring.

See you on the 31st!

Re: More benchtop progress - pics

#11

Re: More benchtop progress - pics

Chicago Bob

>Thanks for sharing the process with us - pics are great. After learning from your experience as you design and complete your bench, I may be brave enough to start one late summer.

Thanks very much for continuing to share the experience. I find your approach very valuble in training others with less skill such as myself. The comments and suggestions from other skilled woodworkers on Wood Central are also very helpful.

It also appears that you are having a lot of fun building this bench and that is what it is really all about!

good luck

Bob Haines

Re: More benchtop progress - pics

#12

In order to maintain balance...

Stephen Shepherd in the State of Deseret

>You should flip it over and flatten out the bottom. That way when the top gets beat up you can just flip it over. And as fast as you did the top, the bottom shouldn't take that much longer.

You have opened up the grain on both sides where the glue is as well as the top, so the bottom should receive some attention, to maintain the balance.

Stephen

Re: More benchtop progress - pics

#13

Re: More benchtop progress

Adam Cherubini, NJ

>I wouldn't recommend hot hide glue for this application. I think you've got the right glue. That's what I have used for this application. I really prefer PVA for all long joints because I can pull up the joint.

I don't think the Roubo-esque joinery will help you stabilize the top. A 4" deep bearer under the top might. You could try to pull cup out if you had it. And to remove twist, you need the mass of teh base. But you know all this.

I read about your concerns shoe-horning your bench into your shop and I read the suggestions. I realize its a tough situation for you. All I can tell you is as soon as you cut that bench down to 6', you'll limit yourself. You maught be able to deal with that limitation as others before you have. The situation is, you buy an 8 or 9' board and you can't practically plane it. If the bench is free standing, you may be able to rotate the board and work it from the other side. But this requires over hang on both ends. And if you have the psace for the board, you have the space for more bench under, so why not just do that? If my lumber yard only sold 6' lumber, I guess I'd be good with a 6' bench. But my lumber yard sells 8 and 9' lumber.

Let me know if you need to see anything of mine and I'll be sure to bring it to Alan's.

Adam

Re: More benchtop progress - pics

#14

flattness requirment

paul womack

>If I was feeling lazy, I'd have flattened ONLY where the legs go :-)

In older times, floorboards were only flattened on their under surface where they sat on the joists. This makes stronger flooboards and less work.

BugBear

Re: More benchtop progress - pics

#16

Dominic in Bucks County PA

What a GREAT thread!

Dominic in Bucks County PA

>Wilbur,

Thanks for posting these progress shots. I enjoy reading up and see how you're making out with your bench. I alsoenjoy some of the discussion this has generated. This thread has lots of good info all through it.

Dominic

Re: More benchtop progress - pics

#17

Looking great Wilbur.

Victor Parisian

>Are you going to do a leg vice? If you are, take pains with that particular leg to get a nice smooth transition where the leg meets the top. I'm debating having to flip my bench on it's side to take the leg down about +/- 1/64th to get rid of an irritating alignment issue at the leg/top intersection. Also was hasty in selecting my vice hardware. get a quick release setup if you can find one.

I enjoy your posts, keep it up.

Victor in Houston

Re: More benchtop progress - pics

#18

Figures Eh!?!

Scott Burr in Ben Lomond, CA

>It always happens that way...

Glad to see your making great progress and glad that was a pic of the bottom in your last post8^)