Whew! - pics
wilbur
>Got the last glue up done for my workbench top!
Whew! Glad that's done with. Now all I have to do is flatten it.
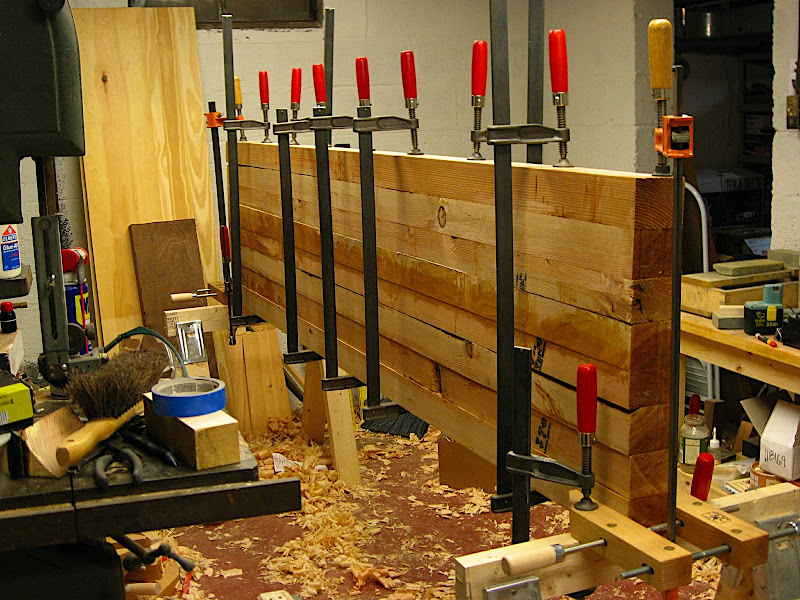
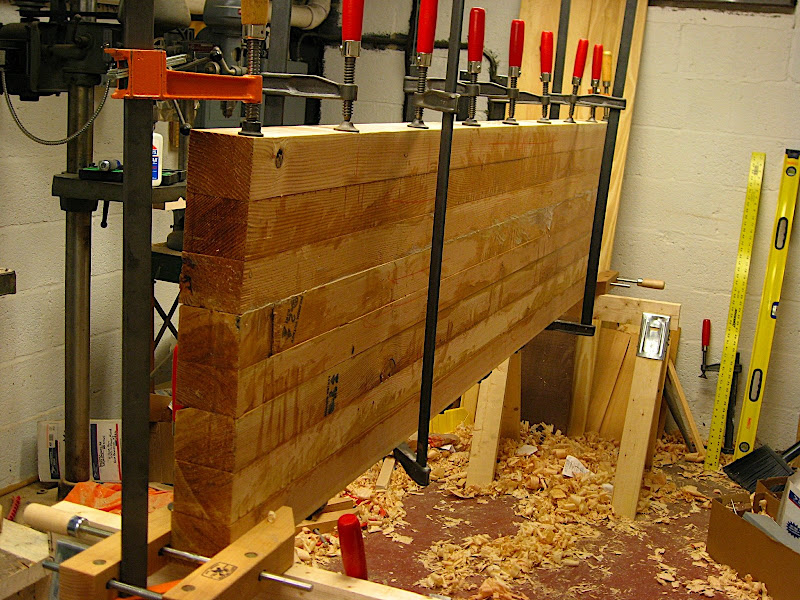
The last photo shows what will be the top side. It wound up being 22 1/2" wide. Final length and thickness TBD.
Knowledge You Can Build On — Est. 1998
Whew! - pics
wilbur
>Got the last glue up done for my workbench top!
Whew! Glad that's done with. Now all I have to do is flatten it.
The last photo shows what will be the top side. It wound up being 22 1/2" wide. Final length and thickness TBD.
Congratulations Wilbur!!
Wiley Horne--So. Calif.
>Got fore plane?
Wiley
Congrats!?!
Scott Burr in Ben Lomond, CA
>Boy oh boy I hope the first pic is the bottom...8^)
I'll insert a cheat code here (cabinet shop, wide belt sander).
Have fun with it Wilbur!
Re: Whew! - pics
Pam Niedermayer, Austin, TX
>When do you have the time to do doctoring these days? :)
Congrats. Did you know you can get some work done on an uneven bench?
Pam
Re: Whew! - pics
Frank Mutchler
>Boy, Wilbur, I'm exhausted just looking at that! As you plane that top, you'll find your heating bill will go waaaaay down ;>)!
Re: Whew! - pics
Brent Smith, Montreal
>Looking good Wilbur, but I don't envy the work you still have to do flattening that beast LOL.
Well Done!
Michael Holden
>Well Done Wilbur!
Well Done!
Mike
Re: Whew! - pics
Victor Parisian
>Planing that top doesn't have to happen in one session. I did mine in about three sessions. It really isn't that bad a job.
Nice job so far.
Victor - in warm and sunny Houston
Re: Whew! - pics
Marv....... Northern California Lake Co.
>Hi Wilbur,
You do know, you must get that surface within .002 flat.
Marv
Re: Whew! - pics
joel
>Looks great - and I think with a top that thick there is NO chance of any flexing and it will be a great top for mortising and other heavy operations. But how come you didn't make it wider? 4" seems a little narrow to me.
Re: Whew! - pics
Frank Mutchler
>You're talking about rough work, right Marv? I believe Wilbur works for a more demanding clientele, (SWMBO??), and therefore we would expect a top flat to +.0001 -.0000 as the minimum requirement for such production.
LOL
Marv....... Northern California Lake Co.
>
Re: Congrats!?!
wilbur
>Hi Scott,
I think that whatever time and energy I save using a belt sander in a cabinet shop will be lost just getting this thing to and from that shop. :@)
Re: Whew! - pics
wilbur
>Hi Pam,
I was able to sneak in 1 to 1-1/2 hours after the boys were sent to bed, which allowed me to do a glue up a night. With the week I've had, I need the stress relief.
Regarding benches with uneven tops -- after my experience working on a "benchtop" made with these 4x4s just clamped together, I think that I could do decent work on a workbench in the Joker's hideout. :@)
Workbench design - Greene and Green Extreme
wilbur
>Hi Joel,
I'm glad to see that you picked up on the rationale for the design of this bench. I'm exploring what I call "Greene and Greene Extreme" -- a logical extension of the Greene and Greene aesthetic applied to frame and panel construction, which, of course, means kitchen cabinet doors. The illustration will help you understand where I'm going with this.
Mixing traditional G&G design elements with a sense of scale suited to our post-industrial age, the overbuilt rails and stiles are meant to match the weight of the visual cues provided by such modern necessities as the eight burner Viking range and oven, and the floor-to-ceiling doors of the Sub-Zero refrigerator unit.
What this means, of course, is that I'm going to be chopping a lot of 6-7" deep through mortises in a lot of rails and stiles. Hence the design of my workbench. :@)
P.S. I was really glad that I wasn't drinking milk when I read your post. It definitely would have exited my nose.
So true! I on the other hand...
Scott Burr in Ben Lomond, CA
>All I'm saying is a cabinet shop with a wide belt sander sometimes is better that rockin' a hand plane. Especially when time is what you don't have a lot of...
The RAF... Kingshott doesn't do props anymore..
Scott Burr in Ben Lomond, CA
>A flashlight and a .002 feeler gauge. Try to top it...
Re: Whew! - pics
Todd O. Cronkhite Maine Native Presently Away
>Wilbur, you done a good job keeping those pretty close to level with each other. How'd you do that? got rods going thu them? When I layed mine up using 2x4's I tried to keep them lined up, but wasn't nowhere near as successful as you. Surprisingly it didn't take long to level the top with a scrub plane, then a #7, then a #4. Really didn't take very long.
You gonna put a wagon vise in it?
T.O.
Re: Whew! - pics
Stuart Hough
>Beautiful so far Wilbur! I can't wait to see pics of the compleetd workbench. you've got me calling all around to find where I can get sme NON=PT 4x4's in doug fir!
my workshop
paul womack
>I hope (for your sake) you checked the preferred planing direction for each component, and tried to make 'em match in the glue up.
BugBear
Re: Whew! - pics
wilbur
>Hi Todd,
When I was preparing the beams for the glue up, I only milled the sides. I knew which face was going to be the top, and then planed the sides to be square with the top. Then when I did the glue up, I aligned the top surfaces. Gluing up the beams vertically, like in my picture, made it easy to align the tops.
At this point, I don't have any plans for a wagon vise, or a tail vise.
Re: my workshop
wilbur
>Hi Paul,
I picked these beams so that they are pretty much quartersawn. I tried to find a "preferred planing direction", but the problem is that if you look at the grain on the sides of the beams, they all have gentle rises and falls over the length of the beam, which translates into grain reversal over the length of the top, no matter which beam I was looking at.
I've been making do with a lot of cross grain planing. I'd be happy to take any suggestions.
Re: Workbench design - Greene and Green Extreme
ThomD
>"Mixing traditional G&G design elements with a sense of scale suited to our post-industrial age, the overbuilt rails and stiles are meant to match the weight of the visual cues provided by such modern necessities as the eight burner Viking range and oven, and the floor-to-ceiling doors of the Sub-Zero refrigerator unit."
Visually I like that pattern, can't wait to see it installed. It does bother me a little as a comment on wood expansion, and traditional details of that sort.
I've done a few deep mortises and I use a dowelling jig to attached to the piece and drill relief holes. Probably starting from both sides, most of my experience is with stretchers on trestle tables. Then I do the rest with long mortising chisels, I think I used some cheap record ones. Goes pretty fast. I suppose a hollow chisel mortiser would be faster. With my work the stretchers are a little long to hang off the side of a small HCM, but your stuff is perfect. Not hand tool, but then I thought we were talking post-industrial updating.
I find I get the most work done when I am busy. These days I am not busy and nothing much is getting done. When I had big executive pressures I built yachts in my spare time. Motivation is key and the small amount of time one has when under pressure is very motivating. Also when there is a choice between more time and less money, and the reverse, I seem to get more done when I had more income. Not a real issue since I have more than enough to do projects at either time, but the feeling of easy money isn't there. Also, I have to confess, I got a lot more done before the internet was invented.


