Stanley #51/52 re-japanned
Derek Cohen (in Perth, Australia)
>Although I have still to finish the holddown to officially complete this rebuild, I thought that I would post these pictures now as they link with the previous post (Wenzloff halfback saw).
I'm not going to go into a long explanation of what took place - there is a lengthy diary that has followed the trials and tribulations of this restoration on my web page.
This #51 was a "bargain" purchase owing to it having a bust frog (that had been re-welded). Anyway, I found a fix for this. The other area was its general worn condition - minimal japanning, rust, etc. So now it has been cleaned up and yesterday and today I spent re-japanning everything (using the recipe of Stephen Shepherd - half asphaltum and half marine varnish). I heated and baked this in the sun out in the garden. It was hot and the cast iron warmed up nicely to part-cure the japanning. It will likely be a few weeks before it is fully hardened (Stephen, can you say?)
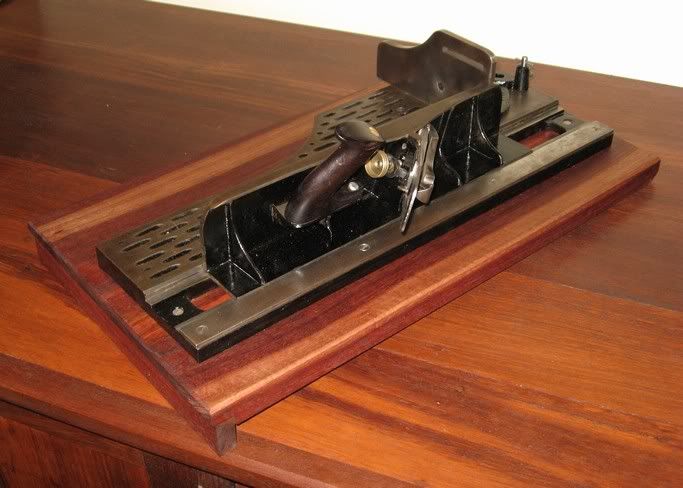


Now just the holddown to complete machining. I have a rough casting in the works.
Oh, and recognise the Jarrah base? That's what I was crosscutting with the halfback saw.
Regards from Perth
Derek
Re: Stanley #51/52 re-japanned
#2Re: Stanley #51/52 re-japanned
Stephen Shepherd in the State of Deseret
>Derek,
Good job on the restoration, which this one counts as one being as you don't powder coat or spray epoxy which of course is not a restoration.
Depending on temperature and humidity, the spar varnish will dry in 8 to 24 hours and will continue to cure for a few weeks. The asphaltum element adds some time to the drying process and hardens up as it cures.
It will take more time, but you get the right look by using the right materials.
Stephen
Re: Stanley #51/52 re-japanned
#3Time well spent . . .
steve mackay
>putting on authentic finnishes. MAN ! , that sure looks good ! And NOTHING looks like the real thing.
Re: Stanley #51/52 re-japanned
#4Re: Jealousy inducing -- nice job!!
Dave Mount
>But where are the shavings? Doesn't count without shavings. . .
Best,
Dave
Re: Stanley #51/52 re-japanned
#5Re: Jealousy inducing -- nice job!!
Todd O. Cronkhite Maine Native, Presently Away
>Not so fast Dave, let the finish dry first. However, shaving will be required before this restoration is officially complete. ;~)
Dang nice resto on this Derek, I'll have to look at your web pages to see what ya' done to the frog. I know that this has been a work in progress for several years now,but it looks like the Time and Patience have really paid off.
T.O.
Re: Stanley #51/52 re-japanned
#6Go ahead, keep kicking my rear!
Alan DuBoff
>Derek,
Not just mine, but you're kicking all of our tukases...these tools are coming out rapid fire, like flying toasters...
Very nice tool, nice indeed...
In the meantime I'm strugglin' to get *one* completed...:-/
I did get one of my vises lined with leather, which I'm going to put to some use today...coincidentally to work on a tool handle...*grin*
Re: Stanley #51/52 re-japanned
#7

Very nice
Jim in Burlington On
>I'm sure your glad to cross that project off your list and get on with using it. Sweet find.
Re: Stanley #51/52 re-japanned
#8Well done Derek, a question or 2 for you...
Scott Burr in Ben Lomond CA
>If you don't mind. I picked up a 51 in the same condition as yours. Busted and re-welded frog it has a rusted Union blade in it and a broken tote.
Could you post a pic of the repaired frog for me? I could use it for a comparison.
Also what type of blade did you put in it?
Very nice rebuild.
Scott, hoping one day I can scrounge up the 52 part of the set...
Re: Stanley #51/52 re-japanned
#9Re: Well done Derek, a question or 2 for you... *LINK*
Derek Cohen (in Perth, Australia)
>Hi Scott
The full description is easier to access at the link below.
What I discovered was that I needed to shim the mouth rather than modify the frog.
The mouth had been opened:

The frog-mouth relationship is shown by this picture. Note the poor alignment:

From the outside it was possible to see the lack of support as well:

To fix this I added a shim (a plate to support the mouth). This duplicated the existing mouth but lifted the blade in line with the frog.
Original mouth:

Rebuilt mouth:


Re: Stanley #51/52 re-japanned
#10Oh, and the iron ...
Derek Cohen (in Perth, Australia)
>The iron is a laminated Japanese "Smoothcut". This is the same thickness as a Stanley. I have used this iron for several years in a #7 and #4 1/2. It has proved to be capable of taking and holding a good edge. The cap iron is a Clifton - probably the thickest and heaviest cap iron around. It was a two piece .. until I epoxied the sucker together (no more will the toe piece drop off and land on my foot!).
Regards from Perth
Derek
Re: Stanley #51/52 re-japanned
#11Thanks! Hope mine turns out as well as yours.
Scott Burr in Ben Lomond CA
>


