Home Articles Forums Gallery Marketplace Videos

WoodCentral Forums

Knowledge You Can Build On — Est. 1998

A55 Smoothing Plane

Dovetail layout tricks?

Posts

Dovetail layout tricks?

#1

Dovetail layout tricks?

Tony - Memphis

>I've been cutting my first dovetails recently. I'm building a lowboy and I decided to try and cut the half blinds by hand. The instructor that taught the lowboy class (Phil Lowe) was smart enough to use pine as the secondary wood. It is forgiving enough to be smashed into shape without splitting!

Anyway, couple of things I'm wondering. Any tricks to laying out the pins/tails? I did it via measuring and that's fine, but I know there are some tricks like what Rob Cossman does with dividers out there.

Also, When I am cutting the tails and the waste side is on the other side of the blade, I have a hard time following the line cause I can't see it. Any thoughts there?

My dovetails are looking decent for a rookie I think. Better than I thought they would. I feel like half blinds are more work, but also more forgiving since less joining surfaces are visible. My sawing is getting better. I can cut reasonably close to the line and tweak it for a decent fit. Still a few gaps here and there, but not terrible. I've only cut a couple of through dovetails and those came out ok. Hey, a few thousand more and I'll be a good beginner!

I'll try and take some pics.

Thanks,

Tony
Re: Dovetail layout tricks?

#2

Re: Dovetail layout tricks?

Dean J in MN

>Anyway, couple of things I'm wondering. Any tricks to laying out the pins/tails? I did it via measuring and that's fine, but I know there are some tricks like what Rob Cossman does with dividers out there.


I'd suggest you just lay the dovetails out by eye, taking into consideration what chisel(s) you will be using to chop the waste. Make your layout sympathetic to those tools. This will make chopping the waste on both the tail and pin board much quicker.


Also, When I am cutting the tails and the waste side is on the other side of the blade, I have a hard time following the line cause I can't see it. Any thoughts there?

If I understand your question, you must have your head over to one side while sawing. Move your head over so you are looking over the top of the saw, rather than from the side. You should be able to see both sides of the kerf as you saw.

Cheers!

-Dean

Re: Dovetail layout tricks?

#3

Re: Dovetail layout tricks?

Denis Ch�nard, Orl�ans, Ont.

>If I do utilitarian DTs I just eyeball the tails, just a few pencil squiggles to give me a rough idea of where to cut. Sometimes I don't even bother. For fancier DTs I use the divider approach, works great.

As to not seeing the other side of the line, I'm in the same boat. I'm right handed and right eye dominant, so I see easily when the line is on the right of the saw. When the line lies on the left, my thumb hides part of it, and I have to put myself in a somewhat uncomfortable position to see properly. And when using a saw with a spine it's difficult to see both sides of the saw.

What you can do is make all the cuts on the side that you see easily, then flip the board around in the vise and do the second set of cuts. This way the line will always be on the same side of the saw. I have yet to try it but I will.

DC

Re: Dovetail layout tricks?

#4

Reinforcing Dean's second point

Wiley Horne -- So. Calif.

>Keep both eyes open as you look right down on the spine of the saw. You'll get a stereo view of the whole scene, including the saw back, both sides of the cut with the work spreading out in a plane on all sides. Don't know why it is, but when you see the whole scene, it makes the saw go straighter--maybe because you can focus on where you want the saw to end up.

This is my experience with a rip dozuki, but it should be the same with a western backsaw. It occurs to me that the above is one reason why that fellow's two-handed back saw would work well: it forces you to take a good viewing position.

Tony, at least for the drawer dovetails, have you thought about using a typical period pattern?

Wiley

Re: Dovetail layout tricks?

#5

Re: Dovetail layout tricks?

John Pappas

>Tony, I have posted an article in the Articles section about my scheme for laying out dovetails. Regretfully, I don't think it is a well written article. One of the keys to my scheme is to look at a dovetail joint as a series of tail/pin sets rather than to look at tails or pins separately. Look at the first part of the article with that in mind. Then, ignore the rest of the article and use a metric ruler to do the divisions.

Note: I do pins first, but the scheme still works well if you want to layout the tails first....you are just marking the face of the piece rather than marking on the end as shown in the article. Look carefully at one of your completed joints and you can see what I mean.

Re: Dovetail layout tricks?

#6

Re: Dovetail layout tricks?

Mick

>I use a mirror behind the board to keep an eye on the other side...

Re: Dovetail layout tricks?

#7

Re: Dovetail layout tricks?

Derek Cohen (in Perth, Australia)

>Anyway, couple of things I'm wondering. Any tricks to laying out the pins/tails? I did it via measuring and that's fine, but I know there are some tricks like what Rob Cossman does with dividers out there.

Also, When I am cutting the tails and the waste side is on the other side of the blade, I have a hard time following the line cause I can't see it. Any thoughts there?


Hi Tony

There are many "tricks" one can use to create perfect looking dovetails. I will mention just one or two for now.

As you become more experienced in this area, what you will come to realise is that cutting dovetails is about accurate sawing. Once you get this down (hence the "practice"), then it is quite easy to do without guides.

I use a slightly modified version of Rob Cosman's dividers. In the hardwoods I work, the points do not penetrate easily (and are thus difficult to see), and when I push hard on them, they can leave a (round) hole that is wider than the kerf of the saw. So I filed them flat, like a chisel. When I push on them, they now leave a thin, 2mm long line.

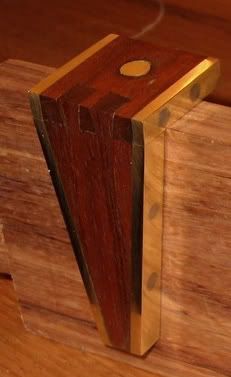
Marking the dovetails with a template should really just be seen to be a guide. I made a really fancy-shmancy (1:7) one because it was fun ... a dovetailed dovetail marker!


... the fact is that it does not matter if you cut away from the down lines as the only sawcut that is important is the square cut across the top. This is the sawcut to practice, practice ...

In the beginning, however, what you can do is knife the lines across the edge and use these to guide the saw cut. Muscle memory will start to develop.

It is important that you saw with the outside face towards you. This makes it easier to stop sawing when you get to the baseline. If you go slightly over the baseline on the other side (the inside), it will not be evident once the drawer/box is glued together.

The most important marking is done when transfering meaurements. In my case I cut the tails first, so this means transfering the lines to the pin board. These are best done with a sharp knife. For skinny pins, you will want a knife with a skinny blade to fit inside the saw kerf. Make you own, or buy one from Dave Anderson (Chester Toolworks) or Dave Jeske (Blue Spruce). I make my own ...


The second lot of cuts must be against this line. The trouble with knifed lines is that the saw can fall into them, so be careful here. One trick is to undercut (with a chisel) the line on the waste side and use this as a fence for the saw blade. This will allow you to go saw cut to saw cut.

Regards from Perth

Derek

Re: Dovetail layout tricks?

#8

Nice use of brass on that marker!;-)

Alan DuBoff

>

Re: Dovetail layout tricks?

#9

Re: Dovetail layout tricks?

ThomD

>One of the most important things is to make sure you stock is true before you start. Dovetails are very difficult to cut if the boards are not perfect, since parts are laid out from the boards themselves, it takes some creativity to get that right if the ends aren't nice to start with.

While there are lots of ways of laying out joints, structurally, aesthetically, and technically, you are probably best off just having a good peak at how the particular joint you are reproducing was done in the original, or similar pieces.

Learning to cut joints well is a lot like golf: Practice tee, and golf course. Start by breaking the technique down into parts, saw some parallel lines in the ends of a board, practice you choping out technique. Work on flowing, well ballance technique form the floor up. Don't rely execesively on layout because it takes up so much time and tends to interfere with accuraccy. For instance, trying to stear to close to a line can actually make the cut rougher than heading for the end of the line and just letter the saw fall down it.

Then take it to the course. Execution isn't practice, play the best game you have on that day. Do a little warming up and make your best joint.

At the end of the day it isn't fancy tools that make the joints. A good woodworker can make nice joints with improbable saws and blister pack chisels. Just as Tiger Woods could beat any of us around the golf course with just a seven iron.

Re: Dovetail layout tricks?

#10

Re: Dovetail layout tricks?

David Charlesworth

>Tony,

The divider method is fully described in my third book of articles, "Handtools & Methods". Cheap on Amazon, expensive and signed if bought from me ~:-(#

Amongst many other topics are; a method for getting crisp corners using a release cut, chisel preparation, sharpening, use of honing guides, grinding for rapid re-sharpening, use of waterstones to avoid the dreaded hollow surface etc etc.

best wishes,

David

Re: Dovetail layout tricks?

#11

Dovetail template that works

Stephen Shepherd in the State of Deseret

>I have seen most of the templates for laying out dovetails and most of them slope the wrong way. I have tried to use one a friend had and it is a nightmare, keeping the angles right, having to mark on the off side, very confusing.

And another thing most, no all of them, do nothing to lay out the straight lines along the endgrain which is Far More Important than the angle 1:7, 1:8 &c. It is the layout lines on the endgrain that matters.

The modern templates or guides do not deal with that and you are required to get a square to transfer the lines square on endgrain.

Why not use a tool that does both. I wish I could say that this is the 'Shepherd's New and Improved Dovetail Template' but someone came up with this at least 150 years ago and probably earlier.

The original was a piece of sheet iron cut and filed to shape. I made mine out of the same stuff, a thick piece of sheet metal. You can get fancy and make one of brass, but it needs to be thin so as not to interfere with layout.

With the tail the appropriate size in the first place, it makes for a quick layout and it is easy to transfer the angles on the off side (where the mirror will be). All done fast with One tool.

Not as pretty as others but it works, is not confusing and markes out the all important straight lines on endgrain.

Try it it works great.

Stephen


img

Re: Dovetail layout tricks?

#12

Re: Dovetail template that works

Derek Cohen (in Perth, Australia)

>Hi Stephen

Nice idea. I'm not clear if you mark around the template, or whether (as I imagine would be easier) that you cut it out of a solid pece of iron and trace it from there?

I must point out that there are several templates on the market that work with the same principal (of marking both the dovetail and the end grain).

Here are pictured the LN template (which appears to be a upmarket version of Rob Cosman's. This one was a present from Thomas Lie-Nielsen), the Woodjoy template (like the LN, it is reversable and provides two dovetail angles), and then two that I made (one OTT and the other simple in Jarrah). In addition, Lee Valley also make one based on their saddle square.


I do agree that marking the endgrain at the same time as the dovetail is far more efficient and, at the end of the day, more accurate.

The other point I wanted to raise was the use of a mirror to view the rear as you cut. I have never done this. As I mentioned in an earlier post, I make sure I have the outside of the board facing me as I cut. Then any mis-cuts over the line at the rear (which, if I do, are by no more than a 1/32"), are going to lie on the inside of the box/drawer where they will not be seen. I struggle enough with spatial difficulties and the idea of working with a reversed image would just finish me off!

Regards from Perth

Derek

Re: Dovetail layout tricks?

#13

Re: Dovetail template that works

Stephen Shepherd in the State of Deseret

>I don't understand your question about marking with this template?

However the ones on the market will not mark 4 boards ganged together which is how I saw dovetails, boxes or drawers. And the angles on those are going the wrong direction, very confusing especially for me I have dislexia.

As for the mirror, it doesn't turn the image upside down, the mirror is used to indicate when you have cut down to the layout line without having to stop and look at the back side.

Stephen

Re: Dovetail layout tricks?

#14

Jack Guzman from Maine

Third book?

Jack Guzman from Maine

>Hello David,

How expensive? Also,how do I purchase one if I'm interested? I enjoyed your other two books I'd like to see this one.---jack

Re: Dovetail layout tricks?

#15

Thanks!

Tony - Memphis

>

Re: Dovetail layout tricks?

#16

Guide to Hand Tools & Methods *LINK*

Pam Niedermayer - Austin, TX

>David, I just finished a first read through of this book. It is truly marvelous. Lots of tool and surface prep, to say nothing of all the attributions, which is highly unusual. I highly recommend this, especially for beginners, but also for intermediate woodworkers.

Pam


Guide to Hand Tools & Methods
