Method for string inlay needed.
Peter H
>I am building a table and wanted to add string inlay to the legs and skirt. Any ideas on the tools required to make the groove. Naturally, I will need to do some cross grain work as well.
Thanks, Pete
Est. 1998 — 27 years of woodworking knowledge
Method for string inlay needed.
Peter H
>I am building a table and wanted to add string inlay to the legs and skirt. Any ideas on the tools required to make the groove. Naturally, I will need to do some cross grain work as well.
Thanks, Pete
Re: Method for string inlay needed.
Scott Burr in Ben Lomond CA
>
Hey where my text go?!?
Scott Burr in Ben Lomond CA
>I don't know where my text disapered to in the above thread but, The pic above is a quirk or stringing router. You could your a beading tool like the Stanley 66 or LN equlivant. The humble home made scratch stock will work too.
Re: Method for string inlay needed. *LINK*
Wiley Horne--So. Cal.
>Hello Peter,
Here is what I have used:
First, you need a cutting gauge to cut the stringing from a sheet or slice of veneer. I would try to find holly. I have used maple and the color really varies a lot, and the working properties of soft maple are not the greatest, yet the hard maple is more yellowish. Bottom line: find holly. I suggest cut the sheet of veneer on a bandsaw, or buy it. You can handsaw and thickness the veneer, but that's a long story--ask if interested. For a cutting gauge, Colen Clenton makes a fantastic one for a coupla hundred bucks. Or find a vintage English one (called a 'cutting gauge' or 'slitting gauge')--Marples is a well-known maker of these. The value proposition is a Japanese cutting gauge--not the mortise gauge, the cutting gauge. The cutting gauge has a single cutter.
Second, you need a stringing tool. Scott's photo shows two different Preston routers--the top one is the 'stringing router', and I recommend that one. The lower one is the 'quirk router', and it's tougher to use, especially for stopped cuts, and the cutters are wider than you may want (I think the most narrow cutter for it is 3/32" or so). I recommend the stringing router. I found one at Tony Murland's online venue in the UK, and he sent a half-dozen blank cutters, which you definitely will need. Now a stringing tool can be very simple. I've included a link to a drawing of one you can make in your shop, if you can find a small piece of hardened steel, such as a piece of saw steel or stiff card scraper. Lee Valley sells a beading tool, which would make a good stringing router as well (you would make the cutter from the blank cutter they include):
http://www.leevalley.com/wood/page.aspx?c=2&p=32679&cat=1,41182
This brings up a point: You're going to have to make your own cutter, whichever tool you decide to buy or make. So you need a grinder to rough out the shape, and then files to refine it, and then detail the cutter on your sharpening stones. It is vital that the cutter be square in cross-section, very slightly tapered in the length, and given a nice finish on all 5 sides (the bottom counts).
Third, you will need a very narrow chisel or shallow gouge to clean up the corners of the groove that you plough. So like if the groove is 1/16" width, you need a chisel or shallow gouge that is a bit narrower and can get into the corners of that groove. With a grinder, you can make this tool from a sabre saw blade or a hardened nail or similar, and set it into a stick for a handle; or alternatively, Three Cherries makes a little tiny shallow gouge that'll set you back $40 or $50; or you can buy one of these sets of tiny carving tools (Lee Valley is a vendor which carries them), these work although I find the little tiny sets to be danged near toys. But you need something like this for the corners, where the vertical and horizontal strings meet.
You mentioned the need to work cross grain. The grain will need to be pre-scored. There are two cases: One, an apron where you can register off the end of the board. In this case, you can use a cutting gauge to score the sides of the groove--there is probably a way to make a tool which scores both sides of the channel at once, but I just made two passes with a cutting gauge. The second case is like the horizontal cuts on the legs. I'm not sure the very best way to dig those short horizontal grooves, but I scored the sides with the right width chisel (hollow grind to an acute angle like 20 degrees works best), and then dug out the groove with a narrow gouge--either from the set of 'smalls' or else the Three Cherries one.
I'll leave the gluing detail to your preference, but I have a strong preference for hide glue because it cleans up without a trace and does not affect your finish. I used hot hide glue, and when I do it again, I may try Patrick Edward's Old Brown Glue. The advantage of hot is that, a half hour later you can scrape and then plane the surface. But then the Old Brown Glue would probably be easier to apply and gives you a more leisurely work time.
Miscellany......I used a light hammer to progressively tap the string into the grooves. It's extremely useful to have a variety of card scrapers on hand, to detail the string thickness as you pretest the fit. SWMBO calls...I'll be back...j
Re: cue!
paul womack
>The humble home made scratch stock will work too.
The Not So Humble Scratch Stock
BugBear
Re: Method for string inlay needed.
ThomD
>There is a great 2 part series on the woodwright shop on that subject, it re-aired up here over the last few weeks. Steve Latta (was the instructor, and he cuts up scraper blades of the correct thickness and files the ends so they look like either 2 o 3 crosscut saw teeth. The finished blade reminded me of a feeler guage with the end filed. He used the 2 tooth ones for curves and the 3 teeth ones for the straightaways. He seemed to have one cutter per diameter, and some tools like marking gages for the straight runs. The curve tools were just like fixed tramel beams, a sharp point, and a cutter a set distance from it.
He has a bunch of mome made tools for dimensioning and cuttin that are elegant and simple. The whole thing looked ridiculously easy, even Roy could do it (just kidding he has skills too).
I'm not sure I saw it, but he did the gateleg table in FWW180:
http://www.taunton.com/finewoodworking/ProjectsAndDesign/ProjectsAndDesignPDF.aspx?id=24965
Here is a Latta Slideshow with pictures of the tools:
http://www.mauiguild.com/Latta%20slideshow/index.htm.
The box at the bottom of the title page is in part one of the WWS show.
Certainly one of those cases where if it's difficult, you aren't doing it right.
Re: Method for string inlay needed.
ThomD
>Two good (better?) ways of reducing veneer/stock to thickness are a spring loaded "plane blade" with adjustible fence. The blade is used as a scraper, and the spring adjust allows the fat piece to be introduced while a stop holds the stock to a final dimension. The advantage to this type is that one can do faily wide stock, which is occasionally useful also. Occasionally a rolls royce version shows up in lutherie catalogs.
Steve's version was a tapered slot (to match one of his cutters. One side of the slot is flat the other is a scraper shape. You just pull it through the slot from wide top to parallel bottom and it's perfectly sized.
Re: Method for string inlay needed.
Wiley Horne--So. Cal.
>Hey Thom,
Great post! That one photo in there showing a brass-faced gauge--is that a scalpel blade he's got mounted as a slitter?
Wiley
Re: Method for string inlay needed.
Wiley Horne--So. Cal.
>Thanks Thom,
That's very ingenious and would provide a reproducible string without any fiddling. Very much worth investing the time to do. I think I will check luthier's sites also. I wonder if basket makers have a simple, effective thicknesser. Do basket makers exist any more? Gotta check google.
Wiley
Maui woodworkers
Pam Niedermayer - Austin, TX
>Thanks for that link. Do you know what Steve uses the Roper Whitney hole punch for?
Pam
Never mind....
Pam Niedermayer - Austin, TX
>I bet he uses it to punch the screw holes for mounting the blades to the little wooden cutters.
Pam
Tools for string inlay needed.
Derek Cohen (in Perth, Australia)
>I made these a while ago but have only now had the opportunity to do a little stringing, so I lack the experience to say they are great for this particular task (but they do work very well in their own right).
Firstly, a cutting gauge I made modelled on a Woodjoy version:
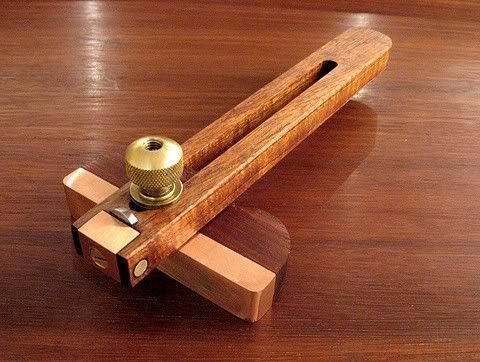
and another, which I didn't make but have used for a few years, and is available from Lee Valley, by Mujingfang:

Finally, a stringing cutter I made for a router plane out of a hex key. I have made a few in 1/16", 1/8" and 3/16". They are shaped like a mini mortice chisel and act like a scraper. Cut well.


Run the router on its fence. Knife the lines first if going across the grain.
Hope this helps.
Regards from Perth
Derek
Re: Method for string inlay needed.
Wendell @ Murphy, TX
>Yes, Steve uses an x-acto blade in his slicing gauge. There were plans for his slicing gauge in one of the issues of FWW after the Federal Table article but I can't for the life of me get the search at FWW to find it.
Here's a link to someones version of the stringing trimming tool
http://mysite.verizon.net/resr8ap9/woodworking/index.html
There is also a thread on SAPFM's forum archive about Steve Latta's tools. Unfortunately, the attachments seemed to have gotten lost when they archived the thread.
Wendell
Re: Tools for string inlay needed.
Peter H
>Derek,
No pics?
Thanks for your input.
Peter H
Re: Tools for string inlay needed.
Derek Cohen (in Perth, Australia)
>Hi Peter
I did post pictures, four in all. I assume that you cannot "see" them. Anyone else have this problem? They are linked to Photobucket. I have not had problems before (as far as I am aware).
I will email them to you.
Regards from Perth
Derek
I see them
Scott Burr in Ben Lomond CA
>
Re: Method for string inlay needed.
ThomD
>Steve favoured a special jig for cutting veneer: A flat board on which he placed his veneer, that had a small raised fence along one edge, hardly visible. Starting with a piece of veneer with a straight edge he would align it to his fence. The cutting gage would then align on the edge of the jig, span the fence and a portion of the venneer. In this way he could repetedly cut the same width of veneer without any measurement or fine alignment skill. Once he had that piece, he ran it through his thicknesser. A piece would then emerge that was a perfect fit for his string cutting tool.
Here is a picture of a purfling scraper built by Geza Burghardt of Vancouver.
http://www.frets.com/FretsPages/Museum/SpecialItems/GezaBurghardt/GezaViews/geza01.jpg
Based on performance I would have to say Steve's works just as well, at least for manerly holy.
quirk routers
dave brown
>Do quirk router cutters work well cutting for inlays?
Re: quirk routers
jim reed @ tallahassee
>I have never used one, but that is supposed to be one of their jobs. The only problem I see is tearout along the edge. The degree would depend on the wood and the tool. I guess light cuts could minimize tearout. You could also score the edges with a box cutter, but that seems like alot of work.
Re: quirk routers
Wiley Horne--So. Cal.
>Dave,
Derek did not show a quirk router; he showed a variety of stringing router--a plough type cutter, held securely and fenced. In my bit of experience, this type cutter works well for stringing. The main considerations in using the plough type cutter were (1) it benefits from careful preparation (e.g., very sharp and square) so it can be used in either direction; (2) go with the grain and not against, in fact, be careful selecting your leg stock for straight grain.
Also, the router base Derek showed is the exact tool for levelling the bottom of recesses cut for larger pictorial inlays.
You asked specifically about quirk router cutters, which is a complicated affair with nickers leading ahead of the cutter. In my experience, the stringing cutter was more practical for narrow (1/16" width) strings. The quirk router cutters I was able to obtain (set of 3) were all wider than 1/16". If further interested in quirk routers, Preston made one (see Scott Burr's photo at top of thread), and also Don McConnell published photos of how to make one a few years ago, and Don's design works great.
Wiley
Re: quirk routers--P.S.
Wiley Horne--So. Cal.
>Dave,
As a postscript, in Derek's router the base is fixed, and so the cutter will have to be lowered by degrees into the cut, using the adjuster.
In the Preston type stringing router, or a scratch stock type, I have found it works well to start the cut by inclining the tool, so that the cutter begins by scoring the grain. Once you get the surface well scored, make your passes more upright, lowering the cutter into the groove you're making.
Wiley
Re: quirk routers--P.S.
dave brown
>Thanks Wiley. I've always been intrigued by Preston's quirk routers -- just not intrigued enough to plunk down the $100 to purchase a nice one w/ cutters & fence. The design really nice with the scoring cutters ahead of the cutting edge. I'm sure they're a bear to sharpen but I can't imagine you'd have to sharpen them too often.
thanks for the info!
Dave
Quirks won't tear out if used properly...
Scott Burr in Ben Lomond CA
>The "C" shaped cutter has nickers on one side and the flat blade on the other. It's used in a rocking motion, scoring first then routing the groove second. Hopefully you can see the blades in the pic.