WoodCentral Forums

Est. 1998 — 27 years of woodworking knowledge

another wood homemade jointer

Posts

another wood homemade jointer

#1

another wood homemade jointer

Andrew F in Australia

>Hi All,

Following on from Crocodile Dundee, "That's not a knife, **this** is a knife," I thought I'd put together a few images of a plane I've had to cobble together to get a job done.

Note that it's meant to be a working plane, not a showpiece, so I haven't worried too much about cleaning up the chisel marks.

This is the plane, up against a No4 for comparison
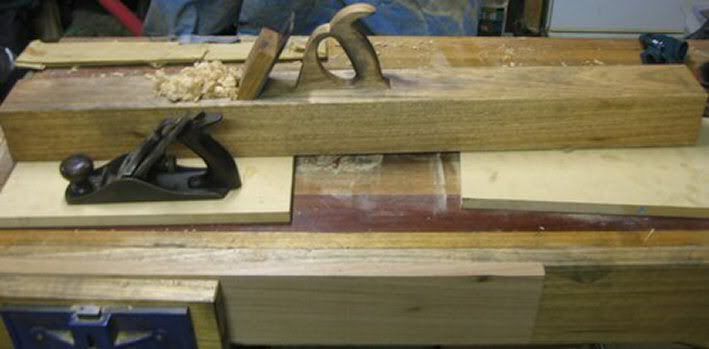
Photo Sharing and Video Hosting at Photobucket


I modelled it against a 30" Sandusky jointer that I have, but this thing needs to have a 60 degree pitch

Photo Sharing and Video Hosting at Photobucket


Photo Sharing and Video Hosting at Photobucket


It needs this pitch for a job where the client supplied their timber - fiddleback Australian Red Cedar (all air dried by a hobbyist, who had a sticker out of place, allowing both ends to be 1/2" lower than the middle. The job needs to be done by hand as setting up a wood wizz or similar will cause a significant loss in thickness.)
Photo Sharing and Video Hosting at Photobucket
It does plane the fiddleback very well without tearout (see photos) and will allow me to flatten the thing.


The escapement's a little narrow (it's a 3" blade) and might need a bit of rework. I nicked the mouth on this one while I was cutting in the relief angles at the bottom of the abutments, so it may need a replacement mouth to be cut in at a later date.

Photo Sharing and Video Hosting at Photobucket

All that was needed to build this thing were a few old chisels, a plane and machinery as required.

Photo Sharing and Video Hosting at Photobucket

Due to my haste to get this thing built (about 7 hours go to whoa) I didn't take a lot of photos, but here's some escapement details (copied off the Sandusky plane) and the actual layout marks used to set the mortised escapement, showing angles of wedge, etc... (once again, pilfered from the Sandusky.)


Photo Sharing and Video Hosting at Photobucket


Photo Sharing and Video Hosting at Photobucket


Photo Sharing and Video Hosting at Photobucket


Photo Sharing and Video Hosting at Photobucket


Note the staining from perspiration. This is why some eucalypts are called 'oak' I think this one's blackbutt, but the colour this turns is the same as Oak, and the grain pattern is slightly similar, leading the early settlers to call these timbers 'oak', most commonly, tassie oak.


Photo Sharing and Video Hosting at Photobucket


Photo Sharing and Video Hosting at Photobucket


As a final photo, notice how a correctly sized drill bit takes a lot of the grunt work out of cutting shapes.
Photo Sharing and Video Hosting at Photobucket

THe handle was pared/carved to final shape with a chisel. This handle took about 15 minute to get to the final state, far quicker and neater than setting up a trimmer to do the job

Trust that you may find something useful in this post.

Cheers,

Andrew


Re: another wood homemade jointer

#2

Re: another wood homemade jointer

Tim Caley - North Little Rock

>Seems to be making real nice shavings. Nice job, even if it was a "quickie".

Re: another wood homemade jointer

#3

Well done. Love those shavings.

vlparisian in Houston

>

Re: another wood homemade jointer

#4

Re: another wood homemade jointer

Paul in NJ

>That is super Andrew! With its size and weight, it has the momentum to get you through those tough woods you work with in your part of the world. Good show!

Paul Dzioba

Re: another wood homemade jointer

#5

Re: another wood homemade jointer

Derek Cohen (in Perth, Australia)

>Yo ho ho Andrew! That is a big one!! What length did you get? It is considerably longer than the 30" Sandusky. Do we have a length war here :) (Not fair - I cannot fit a larger jointer into my existing storage! :) )


It certainly appears to work very well, and the finish is far better than you described to me yesterday. I'm impressed what you can do to shape a tote with just a chisel. I used a rasp and a couple of files. Great stuff!

Regards from Perth

Derek

Re: another wood homemade jointer

#6

Re: another wood homemade jointer

Andrew F in Australia

>Hi All,

thanks for the comments.

Derek,

Re: length, I haven't measured it, but it came from a length about 4' - I had to knock a few inches off one end, so it's probably 40-44" long. Don't know where I'm going to store it, but I'll find a place.

To put the round onto the handle, it's essentially just running a bevel with a chisel, and then knocking off the corners of the bevel the same way, making a sixteen-sided figure (pretty close to a circle.) I'll get the scanner out later and post a pic for you.

Then, just rip a 1/2" wide strip of sandpaper off the side of a sheet and pull it side-to-side over the bevels as though you're flossing teeth - makes it round. Final part is to sand and knock the cross-grain scratches off.

(I needed to use a small rat's-tail file to get into the tight corners of the handle)

Cheers,

Andrew

Re: another wood homemade jointer

#7

Re: another wood homemade jointer

Wiley Horne--So. Cal.

>Really a magnificent looking plane, Andrew!! What I especially like is how the tote is placed to balance the weight fore and aft of the hand.

Thanks for sharing!

Wiley

Re: another wood homemade jointer

#8

Re: another wood homemade jointer

Jeff Schmidt

>Nice work Andrew. Glad to see the handle in the proper location. :-)

Re: another wood homemade jointer

#9

Re: another wood homemade jointer

Andrew Lunn

>Man, you weren't kidding. That thing is a monster! Nice plane. I noticed you pointed out perspiration stains on the wood--seems like I went through a streak there where on every project I got a drop of blood on it somehow. Your plane is so big, I hate to think of how many drops I might have gotten on it! Fine work.

Andrew

Re: another wood homemade jointer

#10

Where do you mount the whistle?

Bill Houghton, Sebastopol, CA

>That beast looks like it should be whistling before level crossings (don't know if that's an idiom in OZ: where the road crosses the railroad tracks). Lovely.

Re: another wood homemade jointer

#11

It needs one, Bill

Andrew F in Australia

>Hi Bill,

I reckon it needs one. (on a slightly serious note, it works well - gave it a workout yesterday.)

Cheers,

Andrew

(who's imagining his 5 year old turning the thing into a character from Thomas the Tank engine.)

Re: another wood homemade jointer

#12

Re: It needs one, Bill

Dan Donaldson

>After you get through using it for the job you built it for, just put some wheels on it and give it to the kids for a toy. ;-)

Re: another wood homemade jointer

#13

Aah, but I've still got to store it then, Dan.

Andrew F in Australia

>

Re: another wood homemade jointer

#14

Re: wow!

paul womack

>The jointer is magnificent - I admire your ability to make anything in 7 hours, and the handle is a tour de force.

But I don't understand WHY you made it; the workpiece doesn't need to be *that* flat (it's not a jointing surface), and I'd have though the bulk of the warp removal could be more easily done with a suitable (high angle) jack-ish plane, followed by a panel-ish plane.

A little checking with a straight edge at intervals would "keep you honest" in the process.

That being said - if you wanted to build a big jointer, be my guest; I continue to admire the result!!

BugBear

Re: another wood homemade jointer

#15

Re: wow!

Andrew F in Australia

>Thanks Paul,

The table's going to be french polished with a window on one side and the entry door on the other, so reflection is a critical issue. The 5' (6'?) straight edge that I have is also in the photo of the slab.

Any surface undulation will show and could be a cause for a 're-do'

As well, it will make the clean-up off the jointer easier from here-on in when I am edge jointing.

It's an easy matter to trace the original handle onto a bit of graph paper - do you want a copy for your collection of links/resources?

Cheers,

Andrew

Re: another wood homemade jointer

#16

Re: wow!

Andrew F in Australia

>Sorry Paul,

Forgot to add that the smaller plane on the photo in the slab is a HNT Gordon 18" jointer. It worked well, but I needed things flatter.

The blade in the thing I built is 3" wide.

Cheers,

Andrew

Re: another wood homemade jointer

#17

Re: another wood homemade jointer

Pam Niedermayer - Austin, TX

>Very nice plane, Andrew; but I don't understand why or how using a 4' hand plane solves the missing sticker/thickness problem better than a wood wizz (don't really know what this is, but assume it's some sort of powered planer/jointer).

Pam

Re: another wood homemade jointer

#18

Re: another wood homemade jointer

Andrew F in Australia

>Hi Pam,

It's a router on a swivelling arm that keeps a flat plane

If I was to give it to someone to flatten, they'd take 1/2" off the lot - I need a better level of control than that as the client wants a 'chunky' look. Take 1 inch (half an inch off either side) and the board becomes not-so-chunky.

That and the thing costs about $70/hr dry hire

It'll be a tradeoff between flat and client wishes. I'm going to skim down the easy section and then get them out to decide. If I was to sub-contract it out, I'm out of pocket by god-knows-what as this is the only slab (an old tree from their property (US farm) that has sentimental value.

CHeers,

Andrew

👍 This page answered my questions

Your vote helps other woodworkers quickly find the answers and techniques that actually work in the shop.