A Galoot's Infill Smoother
Derek Cohen (in Perth, Australia)
>
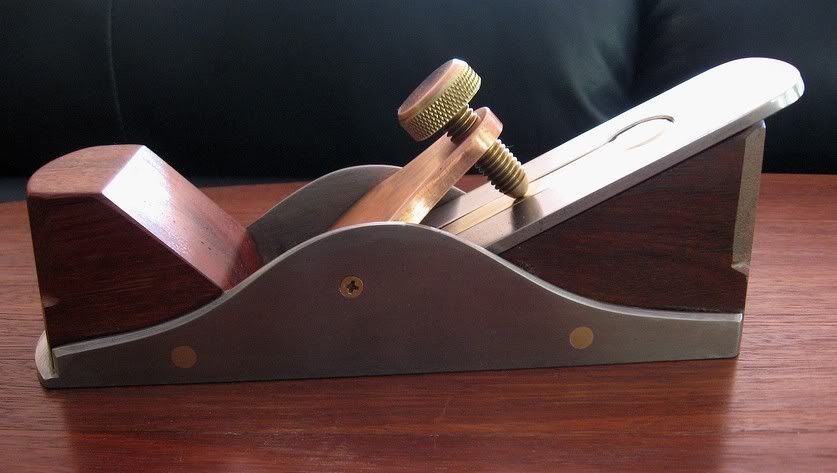
It is several years since I last built a �Stanley infill�, my previous effort based on a #4. This time I decided to use the shell of a derelict #3 Stanley to create a small smoother � the final length is just 7 ��. I also wanted to incorporate a few ideas. So what we have here is a bevel up configuration with a 25 degree bed.
The reason for the high bed (the standard at present � from LN and LV � is 12 degrees, while Karl Holtey�s #98 is 22 � degrees) is to reduce the primary/secondary bevel angle. The bevel here comprises a 30 degree primary with a 35 degree micro, creating a 60 degree cutting angle.
The blade is 1 �� wide and 5/32� (about 4mm) thick. It came out of a Danish Langeskov woodie. No cap iron is needed. Since a solid surface was needed, I filledthe blade slot with a piece of brass. This was filed fractionally too large, then left in the freezer to shrink, before force-fitting it (a big hammer!). After it thawed the brass expanded and the whole piece became one solid affair.
The lever cap was carved (!) from a block of phosphor bronze (as I was informed) since I had nothing else to hand that was the desired thickness. This stuff is incredibly hard (I believe that it is used for bearings). It has a warm pink tone. I have used a combination of this and yellow brass throughout.
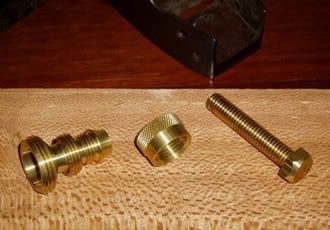
I lack metal machining tools, unless you include a drill press and an angle grinder. So the task of building a lever cap screw would be well beyond me � if I did not cheat a little. What I do is raid the local Borg�s gardening section for solid brass hose fittings and weld these together. The cap cover was a copper (Australian) 2c piece, so as to match the colour of the lever cap.
The infill is just scrap Jarrah, well seasoned but I did not have the desired thickness and had to laminate two pieces. This was shaped, then epoxied into place. For additional strength and a �a look�, brass screws were added, then filed flush.
I must admit to having ambivalent feelings about the final shape. I much prefer round to straight sides, and the result here seemed to evolve as if it had a life of its own.

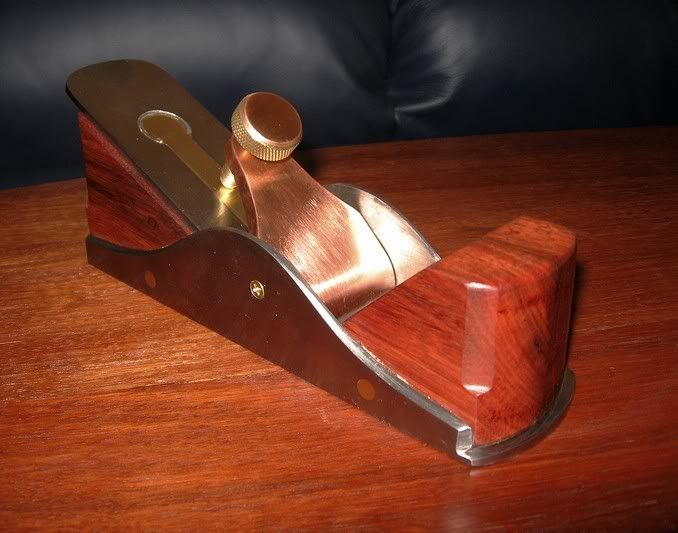
The mouth was completed last of all, deliberately made too small, and opened up gradually with files. The end result is a very fine mouth.
How well does it work?

I hope this effort might inspire a few more Stanley infills!
Regards from Perth
Derek
December 2006
Re: A Galoot's Infill Smoother
#2Re: A Galoot's Infill Smoother
Norman (Metcalfe, Ont.)
>Nice work Derek!!
Sometimes we can find all we need right at home or in the local
hardware store.
Keep us updated on the performance with the higher angle bed.
Thx,
Norman
Re: A Galoot's Infill Smoother
#3Re: A Galoot's Infill Smoother
steve knight
>looking good. how much effort does it take to use?
Re: A Galoot's Infill Smoother
#4Re: Nice Lever cap Screw
Barryvabeach
>Derek, great plane and a really nice lever cap screw. you said you did not have the tools to make one, though I have read that many people with metal lathes don't bother turning the thread on the lathe ( unless it is unusual) instead they just buy the thread ( as all thread or an extra long bolt ) and loctite it onto the thumbscrew and file the end flush so what you did is about what someone with more tooling would have done. Again it looks great. Barry
Re: A Galoot's Infill Smoother
#5Re: Sweeeet!
Glenn Madsen near San Francisco
>
Re: A Galoot's Infill Smoother
#6Nice Job!
Scott Burr in windy/raining Ben Lomond, CA
>Doesn't look like like an old #3 at all. Neat trick for filling the slot on the blade too!
Re: A Galoot's Infill Smoother
#7Re: A Galoot's Infill Smoother
Dean Lapinel
>Derek,
What size mouth did you finally end up with (if you measured this)?
Dean
Re: A Galoot's Infill Smoother
#8Nice one Derek!
HC Sakman
>I always wanted to convert an old Stanley into an infill, but never got around it. I am still working on one for the past 8 years or so. (mostly parts are just being stored in a drawer)
Looking good. Sounds like an interesting geometry going on there.
Keep up the good work.
Chico...
Re: A Galoot's Infill Smoother
#9Re: Nice one Derek!
Todd O. Cronkhite Maine Native, Presently Away
>Very nice transformation you've done Derek! Got a few questions too.
What's up with those phillip head screws? My guess is that they are to hold the lever cap in place, but they really detract from the otherwise smmoth, sleek sides. Could you of instead put in a solid pin as with the infill pins and filed them smooth? Perhaps I'm missing the reason behind them.
How much does this plane weigh now?
From what you said about the mouth I'm assuming that the new blade exceeded the capacity of the mouth, and you merely crept up to a working size. Right?
The sides of this #3 look pretty thick, what Type # is it?
Did you grind off any of the orginal frog seat, etc, etc?
All in all a very very nice job, and is truly an inspiration!
Todd O.
Re: A Galoot's Infill Smoother
#10Re: A Galoot's Infill Smoother
Derek Cohen (in Perth, Australia)
>Hi Dean
I did not bother to measure it at the time, but have done so now. Using feelers, it measures .10mm (.004").
Regards from Perth
Derek
Re: A Galoot's Infill Smoother
#11Re: second the more mouth details (please)
Mike Hamilton
>
Re: A Galoot's Infill Smoother
#12Some answers
Derek Cohen (in Perth, Australia)
>Hi Todd
Thanks for the comments. In reply to your questions ..
What's up with those phillip head screws? My guess is that they are to hold the lever cap in place, but they really detract from the otherwise smmoth, sleek sides. Could you of instead put in a solid pin as with the infill pins and filed them smooth? Perhaps I'm missing the reason behind them.
I, too, dislike the phillips head screws. These are machine screws (parallel sided) and it is impossible these days to find slotted versions (thinks to self - I recall using slotted ones on the #4 infill. If so, perhaps I will swap them around?). They are important if you want to be able to remove the lever cap, such as to make adjustments. On the Spier infill I renovated (earlier this year) I just used a solid brass bar and peined the ends. The trouble is that I will have to drill this out and redo it as, having swapped to a new blade, a minor adjustment to the bed is now needed.
The sides of the plane were drilled and tapped for the machine screw. The lever cap was drilled one size larger, thus allowing it to pivot on the machine screws.
How much does this plane weigh now?
The original plane (using the one I have at hand, the only plane I ever inherited, my late FILs) is/was 1.44 kg (50.8 oz). That's over a total length (including tote extension) of 240mm (approx 9 1/2"). The infill conversion is 1.05 kg (49.4 oz) at 192mm (approx 7 1/2"). In the hand, the infill "feels" as if it were heavier than the original #3.
From what you said about the mouth I'm assuming that the new blade exceeded the capacity of the mouth, and you merely crept up to a working size. Right?
No, I was referring to sizing the mouth to obtain the smallest "practical" size - the smallest mouth to allow only the finest of shavings and also permiting enough clearance for shavings - too tight and it just clogs up. The blade itself was chosen for having the correct width and because it was thick. I already new (from using it) that the steel was good.
To do the mouth I ground out the entire frog, which made it easier to slide the bed back-and-forth. To close up the mouth, slide the bed forward until the blade edge is just below the surface of the sole. Make sure it is parallel (I did this by eye), then epoxy. Later, when all is done, file open the mouth by approx 1 mm.
The sides of this #3 look pretty thick, what Type # is it?
The #3 was an old UK-made model. This are not numbered the same way as are USA-made versions. Probably equivalent to a Type 19. From what I have gleaned, the UK versions have slightly thicker castings than the USA versions.
Regards from Perth
Derek
Re: A Galoot's Infill Smoother
#13One more point
Derek Cohen (in Perth, Australia)
>Todd
The other reason why the casting may look so much thicker is that I chamfered the front and rear ends. I assumed (before) that you realised this.
Regards from Perth
Derek
Re: A Galoot's Infill Smoother
#14I love it. Very nice indeed.
vlparisian - in Rainy - Cold & Rainy Houston
>
Re: A Galoot's Infill Smoother
#15Derek, do you practice alchemy?
Tom Colligan
>That is, in your second picture, you show three pieces of brass from the garden center. Do I understand that with a little welding you made those three pieces become the knurled lever cap screw? This is an issue I'm baffled with so I look forward to your reply.
Great work as always and your input here makes the Pond what it is.
Tom
Re: A Galoot's Infill Smoother
#16Re: Derek, do you practice alchemy?
Derek Cohen (in Perth, Australia)
>Hi Tom
That's me - Merlin Derek! :>)
Not all three pieces, just the two on the right. Plus a copper coin (not in the picture) that was epoxied on, then filed flat and chamfered. Actually looks better in person.
Here is another, from the Spier I renovated. It needed a new cap screw. This is what I ended with. It was very close to the original.In this case I used a (Aussie) $2 coin which matched the brass screw very well.

Regards from Perth
Derek
Re: A Galoot's Infill Smoother
#17Re: A Galoot's Infill Smoother
Derek Cohen (in Perth, Australia)
>Hi Steve
This smoother is surprisingly comfortable to hold. The extra area at the rear (created by the 25 degree bed) permits sufficient room to grip and push with the palm. If I had needed to hold it from the top I would have made a wooden "cap iron" with in-built grip.
I have not used it on anything but Jarrah as yet. Since it is a (small) finish smoother the blade extension is minimal, so the cutting angle (60 degrees) is not an issue. To be fair, I hardly notice this issue any more since most of my smoothers have very high cutting angles to manage Australian woods.
Regards from Perth
Derek
Re: A Galoot's Infill Smoother
#18Re: Some answers
Todd O. Cronkhite Maine Native, Presently Away
>thanks for the add'l info Derek. I do hope that one day you find a good supply of slotted screws for your "transformations", as those phillips style ones are just not nice enough to compliment your work, but than again it is a moinor detail and I don't think the wood is aware of them. ;~)
I was surprised to see that the plane weighs just a wee bit less than the orginal. I thought sure it would be heavier.
I had read somewhere that alot of what we know as "heavies" where sent to your neck of the world to help with the transition from Spiers/Norris type planes. Seems you UK'ers like 'em heavier. Probably due to your different woods. I keep looking for a #3 (H)eavy for my #3 collection, but have had no luck. :~(
Thanks again, T.O.
Re: A Galoot's Infill Smoother
#19Similar approach but no welding involved *LINK*
Bill Houghton, Sebastopol, CA
>I use a slightly different approach that doesn't require welding or the destruction of coins. I don't know whether these sorts of parts are freely available outside the U.S., but Derek has taught me to look in a whole new aisle of the hardware store next time I'm fabricating something and want brass.
For smaller tightening screws