WoodCentral Forums

Est. 1998 — 27 years of woodworking knowledge

Finished bench (lotsa pix)

Posts

Finished bench (lotsa pix)

#1

Finished bench (lotsa pix)

Tony Sade (Charleston, WV)

>At long last, my first bench is finished (I hope). As you might be able to guess, it's based on the Lon Schleining bench in his book and the 2003 FWW "Tools & Shops Annual Issue", with some obvious modifications. This is the original version:

Image hosted by Photobucket.com

Here's a shot with the deadman installed (thanks Chris S. for the magazine issue). Quite frankly, I'm not sure I'll keep it, given the row of holes installed across the front apron which should be pretty useful with the LV adjustable holdfast. (Although, well waxed, it moves quite easily-a gentle one-fingered push and it slides all the way across the rails.)
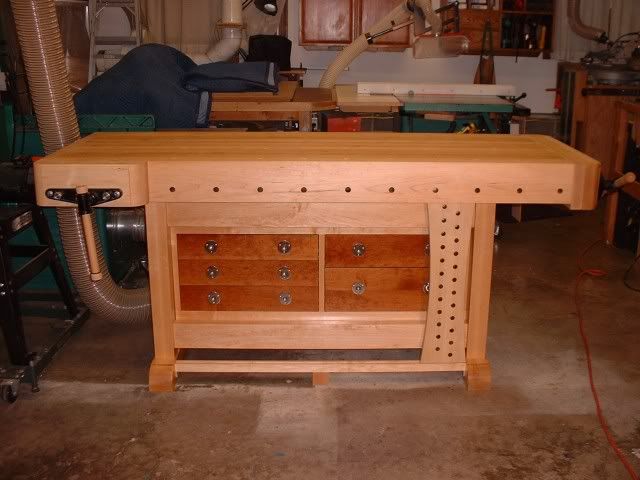
Image hosted by Photobucket.com

Here's a shot of the top (sorry about the dust):

Image hosted by Photobucket.com

The box of drawers was finished just a couple of days before the recent FWW issue was released (really!) in which LS showed his drawer addition to the bench. The scale is different because I originally planned to add the deadman between the aprons, and thus needed to make the faceframes tall enough to ensure that the rails for the deadman wouldn't interfere with the drawers. (That turned out to have been a bad idea-too small to be useful, and too far back from the plane of the apron/front vise.) That planned placement of the deadman also necessitated the recessed pulls, which were a real PITA to install. I started with the pulls, but didn't have a forstner bit to fit so I had to use a router template set up and gradually sneak up on the size of the opening.

I also decided against the type of boxes LS shows because I wanted to enclose the entire space contained in each trestle end, to be used for storage-hanging measuring tools and the like, maybe even building some kind of door to keep out the dust.

Image hosted by Photobucket.com

Here are shots of the various drawers (no gloats intended )

Image hosted by Photobucket.com

(The barely visible tote on the right belongs to the LV BUS.)

Image hosted by Photobucket.com

Image hosted by Photobucket.com

Image hosted by Photobucket.com

Image hosted by Photobucket.com

Both chisel drawers have an extra box that slides across the top to allow for some additional storage. The drawers are all the same hard maple as the rest of the bench-leftovers. Same with the dividers, which are dry fit in place to allow for reconfiguration as necessary. Drawer fronts are some cherry left over from construction of a hand tool cabinet-which contains the balance of my "collection".

I used a Veritas Twin Screw on the end of course, and the face vise is a Woodcraft quick release, the same one LS mentions in his writeup.

Image hosted by Photobucket.com

I find both very useful. In fact, as a relative newcomer to the electron free side, I am daily astonished at how useful a tool this bench is. No more Rube Goldberg multi-clamp efforts to figure out how to hold something down firmly enough to work on it without screwing things up or hurting myself.

Construction is pretty straightforward-top is hard maple on edge just a hair under 2.5". Vise jaws were made to match the thumbnail detail on the trestle feet. I wish I could say that I flattened the top with planes, but I found a guy with a huge (bigger than my bathroom) Italian wide belt sander which made pretty quick precise work of the job. Drawer boxes are from some maple ply from the Borg.

I chickened out on dovetailing the end caps into the front apron as shown by LS, but I'm not that secure with my dovetails just yet and I had no extra piece to use in the event of a screwup and no easy way to get another.

The finish is about 3 coats of the blo/terps/beeswax blend mentioned in Chris' article in Woodworking Magazine. As he suggested (IIRC), it offers a nice mix of protection without being too slippery.

In hindsight, I think I wish I'd gone with round dog holes, primarily because I suspect they're just more versatile (holdfasts, battens, etc.) Nothing to stop me from drilling a few more round holes if I need to, I guess. (Gulp!)

My wife asked about using it for a new dining room table, but I think I'd die (literally) if I tried to move this thing up two flights of stairs. Thanks for looking, and Happy Holidays.

--------------------

Tony
Re: Finished bench (lotsa pix)

#2

Re: Finished bench (lotsa pix)

Jim Shaver - Oakville, Ontario

>Hi Tony,

In a word ...beautiful, inspiring, classic, ...opps that was more than one word.....

:-)

Take care,

Jim

Re: Finished bench (lotsa pix)

#3

Re: Finished bench (lotsa pix)

Hub in Ontario

>WOW - truly a work of art and a nice tool collection as well.

Congratulations.

Hub

Re: Finished bench (lotsa pix)

#4

Lifetime bench

john jesseph

>Hey sorry you have to work with such small kit of cheap hand tools. Maybe we can take up a collection here to help you out... ;)

Beautiful work!! Must be a great feeling to use it...

John J.

Re: Finished bench (lotsa pix)

#6

Re: Finished bench (lotsa pix)

Alan Bierbaum, near Denver, CO

>Nice looking bench ! Now you get to experience actually using a good bench.

Alan

Re: Finished bench (lotsa pix)

#7

Re: Finished bench (lotsa pix)

GolfSteve in Calgary

>Beautiful bench. You'll like those recessed pulls - non-recessed knobs have some magical ability to tangle extension cords into Gordian knots. I really like the look of the drawers.

Re: Finished bench (lotsa pix)

#8

Paul Kramer

Just Beeauutiful, Tony --Very nice work

Paul Kramer

>

Re: Finished bench (lotsa pix)

#9

Re: Finished bench (lotsa pix)

Brent Smith

>Tony

That's a masterpiece!!!! And a great stealth gloat.

Brent

Re: Finished bench (lotsa pix)

#10

SWMBO needs an island in the kitchen this nice. :)

Victor Parisian

>

Re: Finished bench (lotsa pix)

#12

Re: Finished bench (lotsa pix)

Dave Thompson - Champaign IL

>Beautiful bench. The design incorporates features I use all of the time and one or two I wish I had built into mine, e.g. holes running along the front of the apron.

I used the same finish, BLO and beeswax when I built mine 6 years ago. I would use the same again. It looks great, is easily renewable and is very practical for keeping dried glue from sticking. I like your choice of contrasting cherry and no-profile hardware. I also store chisels and planes in my bench drawers... very handy place.

Nice job.

Dave

Re: Finished bench (lotsa pix)

#13

Beautiful bench BUT

Kelby

>those look suspiciously like machine-made dovetails . . . . ;)

Really beautiful work, Tony.

Re: Finished bench (lotsa pix)

#14

Re: Finished bench (lotsa pix)

Terry Quiram

>Tony

What an opportunity. How many wives would be willing to use a work bench as a dinning table? Outstanding bench, well done.

Terry

Re: Finished bench (lotsa pix)

#16

So Tony when are you...

Christopher Fitch@Memphis

>moving it into the living room?

I'm sure your wife would love to show off such a nice piece of work. Besides that bench is WAY too nice to actually USE!!!

:)

It's a great one...nice work!

Re: Finished bench (lotsa pix)

#18

Re: Finished bench (lotsa pix)

Raymond in Trenton, NJ

>Tony,

That's a great looking bench! I like the way your drawer units fill the base, it'll add a lot to the stability. I've always thought, as you're finding out, that a bench (and a good one even more so) is the most versital and vital of tools. I consider mine my number one tool. Thanks for sharing yours.

Now go get shavings and sawdust all over it!!

Raymond

Re: Finished bench (lotsa pix)

#19

Hardware

Mike Hopkins (Devon, PA)

>Cool hardware! Where did you select the drawer pulls from?

👍 This page answered my questions

Your vote helps other woodworkers quickly find the answers and techniques that actually work in the shop.