WoodCentral Forums

Est. 1998 — 27 years of woodworking knowledge

Tuning a Stanley #140 Skew Block Plane (part 1)

Posts

Tuning a Stanley #140 Skew Block Plane (part 1)

#1

Tuning a Stanley #140 Skew Block Plane (part 1)

Derek Cohen (in Perth, Australia)

>I use a vintage Stanley #140 skew block plane to tune tenon faces (see Picture 1). For those unfamiliar with it, it has a skewed blade and a removable side The modern version of this is made by LN, which is different in a few important areas, such as a lower bed angle (the Stanley is 20 degrees while the LN is 12 degrees), and a much tighter mouth (the Stanley, by comparison, positively gapes). One could also mention the better construction of the LN (bronze) against the Stanley (cast iron), as well as the better blade (1/8� A2 steel) verses the 1/16�. Not only that, Garrett Hack remarked in The Handplane Book that �this should be an incredible tool, but mine has always fallen well short of expectations � it cuts poorly�.

After all these negative factors one would have to question just who wants a Stanley #140 anyway! Well I did some time ago, and I know that these are many others who own and use one as well. And probably with the same mixed feelings I have had. But no more � we Stanley #140-ers are going to rise up and take our places on the podium. With a few tweaks, this can become a mean fighting machine!

I began tuning the #140 about a year ago. This involved:

(1) Levelling and raising the frog � unless the frog is level, the blade will end up cantered to one side. The usual method of fixing this is to carefully file the high spots on the frog. Here, however, this will not work since, if you do this, it will lower the frog, effectively raise the bed angle, and widen the mouth even more. What we want to do instead is to raise this area, since then the blade will close the mouth nice and tightly. You can test this out by adding a little packing under the blade at the mouth. To do this I used a little 5-minute epoxy. Place this on the frog (see Picture 2) and then seat the blade directly over this (making sure that you cover the contact areas with a little oil as a release agent first). Press down carefully, and adjust from both sides until the blade is perfectly aligned with the mouth. This will close the mouth up as tightly as you desire.

(2) The original Stanley blade was replaced by a LN Stanley Replacement blade, which was thicker and better steel. Actually, the main reason for replacing it was that the original blade was out of skew and I just could not fathom how to get the mouth-blade area right. The LN blade arrived and turned out to be slightly out-of-alignment as well! I have been living with this until now. It worked OK, not great, certainly not as well as I expected it to do so.

(End of Part 1)


img

Re: Tuning a Stanley #140 Skew Block Plane (part 1)

#2

Re: Tuning a Stanley #140 Skew Block Plane (part )

Derek Cohen (in Perth, Australia)

>(Part 2)

So now we turn to the latest mods.

(1) I had built a (powered) jig to grind blades and this made it possible to awaken my plan to regrind the blade to the precise angle of the #140s mouth. I measured it with a Starrett protractor at 69 degrees (see Picture 3) and transferred this to the blade (see Picture 4). This was then ground to a precise fit.

(2) Since the LN has a cutting angle of 37 degrees (12 degrees bed plus 25 degree bevel), I planned to reduce the Stanley�s bevel to 20 degrees which, along with its 20 degree bed, would create a cutting angle of 40 degrees, not so far off that of the LN. But what happened is that I used a jig that I measure 20 degrees on a straight blade, and this ended up grinding the skewed bevel at 15 degrees! My first thought was to add a 5 degree micro bevel, but then I decided to try it out first and determine whether it would hold up planing hardwood. And it has (!), so the cutting angle of this #140 has dropped from 45 degrees to about 33 degrees (20 for the bed plus 15 for the bevel minus a couple for raising the mouth) (see Picture 5).

All this was to be carried out initially on the original Stanley blade before modifying the LN blade. As it turned out, the LN had not (yet) been touched.

(End of Part 2)


img

Re: Tuning a Stanley #140 Skew Block Plane (part 1)

#3

Re: Tuning a Stanley #140 Skew Block Plane (3)

Derek Cohen (in Perth, Australia)

>Part 3

Was it worth the effort? How does this modified Stanley #140 perform?

The mouth is now tight and square. But the proof of the pudding is in the eating, as is said. I cut a tenon with my trusty Disston #5 (12� tenon saw), cleaned up the shoulder a little with my Stanley #93 shoulder plane, then set to work with the #140 (with side removed). The result was effortless curlies. See Picture 6. Does the LN do it as well as this?

Regards from Perth

Derek


img

Re: Tuning a Stanley #140 Skew Block Plane (part 1)

#4

Re: Tuning a Stanley #140 Skew Block Plane (3)

Don Thompson - Cutler Ridge, Florida

>Good work and nice presentation, Derek. I am sure that will be of help to discouraged Stanley 140 owners.

Yes, that is what the shavings from the LN140 look like. ;-)

Re: Tuning a Stanley #140 Skew Block Plane (part 1)

#5

Re: Tuning a Stanley #140 Skew Block Plane (3)

Todd Stock

>Those heartless bastards at LN, LV, etc., have forever denied an entire class of woodworkers the joy of those carefree hours spent tuning, tweaking, and cursing...

But seriously...good on you to return a cherished tool to use.

Re: Tuning a Stanley #140 Skew Block Plane (part 1)

#6

determing the skew angle

Ian in Sydney

>Of course the other way of working out the skew angle is to mount the blade and then use the mouth as a guide for the marker pen.

well done

Re: Tuning a Stanley #140 Skew Block Plane (part 1)

#7

Re: determing the skew angle

Derek Cohen (in Perth, Australia)

>Hi Ian

Using the mouth as a guide is not as easy as it sounds. Not only can you introduce errors when scribing (you can only scribe from the outside of the sole), but you have to assume that the blade is in straight and has not moved (even a fraction). Therefore I chose to transfer the mouth angle onto the blade using a protractor.

Regards from Perth

Derek

Re: Tuning a Stanley #140 Skew Block Plane (part 1)

#8

Re: Tuning a Stanley #140 Skew Block Plane (3)

Peter Huisman

>Hello Derek, Nice work. Your picture shows the #140 sitting on the work with the tennon's shoulder to the right of the plane. It occurred to me that if the timber were flipped over right to left, the skewed blade's cutting action would tend to push the plane away from the shoulder risking a "tapered" tennon. Any views on this?

Regards

Peter in Perth

Re: Tuning a Stanley #140 Skew Block Plane (part 1)

#9

Re: Tuning a Stanley #140 Skew Block Plane (3)

Todd Stock

>The 140 seems designed for lefties, as the removable plate is on the right side only; however, LN makes both a left and right-handed version for just this reason.

Re: Tuning a Stanley #140 Skew Block Plane (part 1)

#10

Re: Tuning a Stanley #140 Skew Block Plane (3)

William Duffield, on the Cohansey

>Todd is right, for trimming tenon cheeks with a push stroke, it is designed to be used left handed. If you turn the board around, so the tenon is to your right, you could cut with a pull stroke, but the plane is shaped to fit your hand better when pushed. If you use your right hand and push, the left wall of the plane body keeps the blade away from the shoulder by about 3/16", which would surely result in a beveled tenon.

A pair of Lie-Nielsens with nickers would also come in handy for raising panels on highly figured wood, just the stuff you would want to use for panels, anyhow. Two planes would allow you to come at the difficult figure from the best direction, but you would still have to learn to use them with eigher hand, or at least with either a push or pull stroke.

The #140 does allow some lateral adjustment, manually, so if you are tapering your tenons, you can correct it by skewing the blade a little more or a little less.

Note that if you use the Veritas sharpening jig, the angle that Derek shows in his photograph is NOT the angle at which you should set the blade in the jig. Derek is measuring the angle normal to the sole of the plane, but the blade has to be set in the jig normal to the plane of the frog, which is different. The difference is greater on the Stanley than on the L-N because the Stanley bedding angle is higher. Instead of trying to measure it precisely, I fiddle with it by eye and use the Magic Marker trick to get it right. After you've got it right the first time, make sure you build a jig that you can use to set it the same way in the L-V jig in the future.

Re: Tuning a Stanley #140 Skew Block Plane (part 1)

#11

Nice article...

Scott Burr in Ben Lomond CA

>Looks like you made yourself a nice user plane. Also yes the shaving comming out of the LN look like that (I have the right handed one). Scott who will probably sell his Stanley 140 to get a left handed LN one because of everything you said and had to do.

Re: Tuning a Stanley #140 Skew Block Plane (part 1)

#12

Re: determing the skew angle

Brian Buckner

>Derek,

Great posting on your rehab of a #140. Lots of great tips that also transfer to tuning planes in general.

I read through the postings that followed and saw the mention of an alternate method of finding the correct skew/angle to grind your blade. While I agree with you that using an ink marker to transfer the mouth skew is clumsy I would like to offer a variation of that method that works quite well for me (I traveled down this same "tuning a #140" path a few years back).

In order to find the exact skew angle of the blade (to then grind your cutting angle to) simply lap (lightly) the sole of plane with the blade in and extended for a light cut. (I do this on a piece of 220 Sic paper on a flat surface). No need to lap very much as the first few strokes will knock the leading edge of the iron down in line with the leading edge of the frog and in plane with the sole. Remove the iron and look at the edge. You should see a flat that has appeared where your cutting edge should be. I then grind my bevel such that the cutting edge removes this flat (or just up to it - not beyond!). Finish in the normal manner at the stone and bring the edge up fine. It will be perfectly aligned with the leading edge of the frog (rear portion of the mouth).

Once you have the blade correctly sharpened set it up in the plane to take a light cut such that the edge is cutting evenly all the way across it's leading edge. At this point you can then adjust the leading edge of the mouth with a file to make the opening in front of the cutting edge even. Obviously you must be judicious here since you don't want to go crazy and open the mouth too much.

I use the above method when doing the final tuning after building my planes - skew mouth as well as straight. It works perfectly every time and it is not subject to any error that can "creep in" when transferring angles with a measuring device. While skewed mouth planes present this particular challenge so do bevel up planes with very tight mouths. If the iron is not ground just right it's impossible to get an even cut.

Hope this helps.

Best regards,

Brian Buckner (in Tallahassee)

See my Tools page at http://www.sydnassloot.com/bbuckner/tools.htm

Re: Tuning a Stanley #140 Skew Block Plane (part 1)

#14

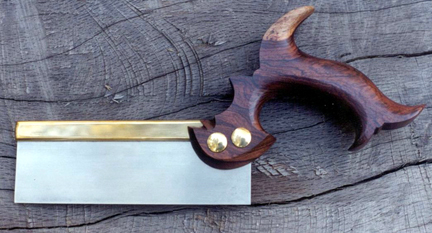
HIJACK: Brian Buckner Backsaw

Don Thompson - Cutler Ridge, Florida

>Hello Brian,

That looks to be a great technique for aligning the grind of a plane iron.

I was looking over your web site (haven't cruised there in a while), and I spotted this great-looking saw:


There is a thread upstream here in which it is alleged that the handle of a saw should be aligned such that a line drawn orthagonal to the grip will intersect the middle (more or less) of the cutting edge of the saw.

I see that you have the handle of the saw severely raised up. Does this work well for you? Is it for a special application?

Thanks,

Don

Re: Tuning a Stanley #140 Skew Block Plane (part 1)

#15

Re: HIJACK: Brian Buckner Backsaw

Brian Buckner

>Hey Don,

I can't really comment on the idea that you stated regarding "the handle of a saw should be aligned such that a line drawn orthagonal to the grip will intersect the middle (more or less) of the cutting edge of the saw". While I've made many hand saws and have looked at hundreds of images and inspected many examples I'm not sure if the "old saw makers" really had a formula that they applied. There may have been certain factors at play that lead them to *generally* apply certain designs to certain applications.

Take for instance the picture of the three Groves saws (the small one was the one I used as the model for my saw). You may notice that as the saw gets bigger (longer) the handles tends to come down. I've noticed this seems to be a trend but it is not absolute (I can show you many images of small backsaws that have their handles turned down). Somewhere along the line I recall a discussion that the upturned handle was better suited for sawing very thin material (perhaps like the thin sides to a small drawer) where one would use a small (short) saw.

I use this saw primarily for such tasks and have never felt that it was uncomfortable or awkward to use. At the same time I have other small saws that have handles turned down (more so) and I'm equally comfortable using them in the same application. They are just different to me - not necessarily better or worse.

My take on this whole subject is that I think it was more of a matter of personal preference (as well as getting used to what you purchased from the saw maker as I don't think it was all too common that craftsman would make their own saws).

And if they did they probably did like I did: they found a saw that they thought they liked and used it as a model.

Best regards,

Brian Buckner

Tallahassee, Fl. (who grew up just north of you in Miami Springs).


img

Re: Tuning a Stanley #140 Skew Block Plane (part 1)

#16

Re: HIJACK: Brian Buckner Backsaw *LINK*

Don Thompson - Cutler Ridge, Florida

>Thanks for your thoughts on the matter. I found the original saw handle angle thread, and have included a link below.

Miami Springs, eh? I lived near the Springs, on the other side of the rail yard (and the expressway) for about ten years, next to the Doral.


Backsaw Handle Angle Thread

Re: Tuning a Stanley #140 Skew Block Plane (part 1)

#17

Re: HIJACK: Brian Buckner Backsaw

William Duffield, on the Cohansey

>It seems to me that the smallest saw in your photo is optimized for cutting half blind sockets, with the stock flat on the bench top. In this operation, the front of the saw is held high, so the hang is intended to avoid an uncomfortable, and potentially damaging wrist position, or the need to squat in front of the bench to finish the cut, or unsightly long kerfs in the back face of the drawer front.

The larger saw would be most useful for cutting tenons, where for most of the cut, the saw is held with the back horizontal.

The middle saw is a compromise, useful for all dovetail cuts, but not optimum for tails or for through pins, since you need to finish these cuts with the blade horizontal.

Thanks for the photos. They help to clarify some problems that have kept me from finishing a saw construction project. But now, I think I need to remill the slot in the handle that will receive the back, because I would like to have a saw like the smallest one in your picture.


One of these days, I'm going to finish this.

Hmmm....Maybe that's why people like a Gent's saw. Since for half blind tails you are cutting a compound angle, in which the blade is not held vertically, the turned handle would also be an advantage.

Re: Tuning a Stanley #140 Skew Block Plane (part 1)

#18

Re: HIJACK: Brian Buckner Backsaw

Don Thompson - Cutler Ridge, Florida

>Hello William,

What kind of bit is that, and where would one get one like it? It look a little different from the usual HoDepot stock.

Re: Tuning a Stanley #140 Skew Block Plane (part 1)

#19

Sir William unmasked

Dave Anderson Chester, NH

>It looks to me like a power carvers burr Don. They fit in the chuck of a flexible shaft carving tool or a Dremel type tool. Sir William never claimed he was a prist, he's pretty inventive.

Re: Tuning a Stanley #140 Skew Block Plane (part 1)

#20

Re: HIJACK: Brian Buckner Backsaw

William Duffield, on the Cohansey

>It's 1/4" diameter solid carbide rotary file bit. I picked it up at a woodworking show (last year at Chantilly, IIRC), from one of thse dealers in bargain miscellaneous small tools. Basically, I was using it like an end mill, which is NOT recommended mode of operation for a drill press, since the Morse Taper tends to work loose when subjected to a lot of side pressure. I bought the files intending to make burnishers out of them, which I eventually did. While the carbide isn't as hard as the carbide Andy Lincoln sells, and they don't work as well as a burnisher, the price was right. To make a burnisher, the cutting end is just epoxied into the handle.

Re: Tuning a Stanley #140 Skew Block Plane (part 1)

#21

Re: HIJACK: Brian Buckner Backsaw

L. Hanson

>Brian's statements fall pretty much in line with what I've found concerning handle angles. It often comes down to their final use - a miter box saw has a different purpose than a saw for cutting half blind dovetails... but not everybody could (can) afford a single saw for each purpose, so a compromise is struck.

Mostly, I just wanted to post so I could say thanks to Brian for posting pictures of your work! I've found it highly inpiring! Thank you!

Leif

NorseWoodsmith.com

👍 This page answered my questions

Your vote helps other woodworkers quickly find the answers and techniques that actually work in the shop.