WoodCentral Forums

Est. 1998 — 27 years of woodworking knowledge

Work Bench Design *LINK*

Posts

Work Bench Design *LINK*

#1

Work Bench Design *LINK*

Nemo Tools

>Hi,

I am designing a workbench, modeled loosely after Bob's pretty good bench (see attached site). However, it looks to me that the tool tray will be too shallow to do much good. What do you think? Keep the tool tray or do without?

I can also adjust the width. What do you think? 16", 18", 24", what?

I'm planning to build it out of SYP, but SYP is hard to come by here. White Pine rules the local L@w#s here in southwestern Ohio. They have some SYP in 2x8 and 2x10, but I don't want to rip it down to 2x4's for the top, especially being true to galootish rules and not using any fork tailed demons. I hope I don't have to drive south to find some SYP.


Bob's Pretty Good Bench

Re: Work Bench Design *LINK*

#2

Re: Work Bench Design *LINK*

Eric Hedberg

>Chris went with "Lowes" brand Southern Yellow Pine with his bench. You might check there or the Home Depot. If you haven't looked at his bench for Popular Woodworking, I'd take a look also. Makes me wish I had to build a new one.


http://www.popularwoodworking.com/features/fea.asp?id=1069

Re: Work Bench Design *LINK*

#3

SYP *LINK*

Christopher Schwarz

>I live in Northern Kentucky and buy all my SYP in Lowe's and Home Depot in Cincinnati and Northern Kentucky. In fact, I haven't been in a Lowe's or Home Depot in Cincinnati (which for those who don't know is in southwest Ohio) that *didn't* have SYP.

If you need specifics, drop me a line!

Or check out this product locator below from your friendly friends at the friendly Southern Pine Council.

Also, 2 x 4s in SYP are mostly junk for bench-building � warp, wane, knots. The 2 x 8s and 2 x 10s are the cat's pajamas. Galootish purity ain't worth the frustration of cruddy wood.

Just my opinion.

Chris


Find Me Some Pine

Re: Work Bench Design *LINK*

#4

Re: Work Bench Design

Greg Sloop, Portland Oregon

>Perhaps this will be considered heresy from the purists, but have you considered MDF? Say, 2-3 laminations?

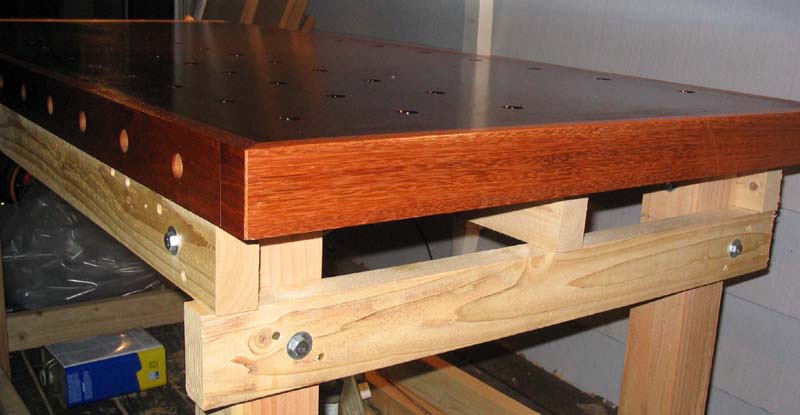
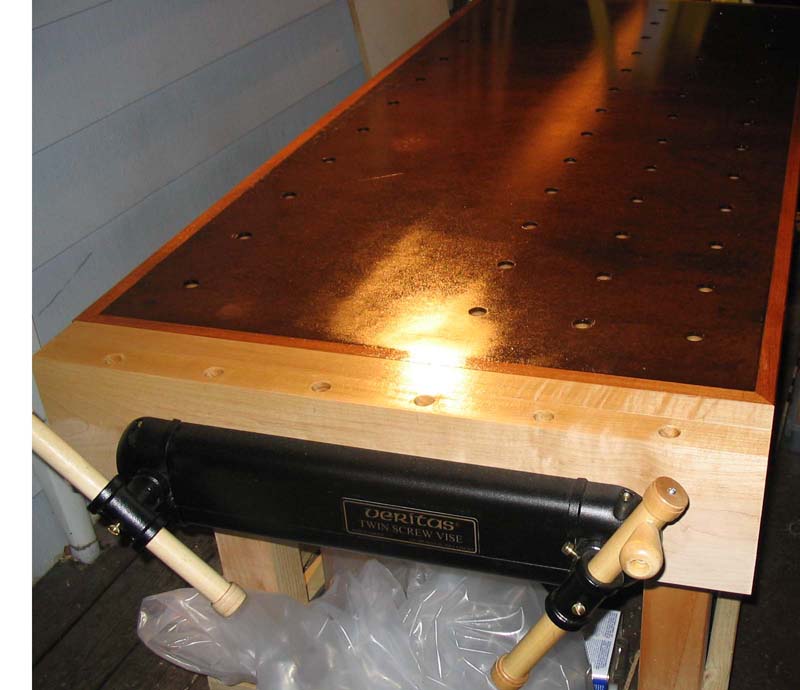
I just did this, and edged it with Jatoba, cause I had it hanging about. A twin screw vice from LV and I did just this for certainly less than $300 total, including the dogs and vice.

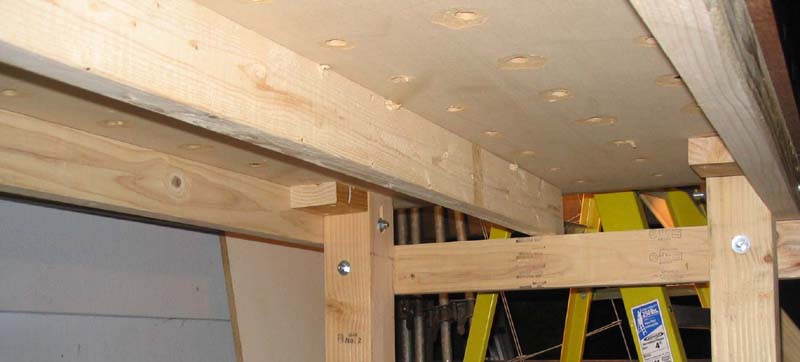
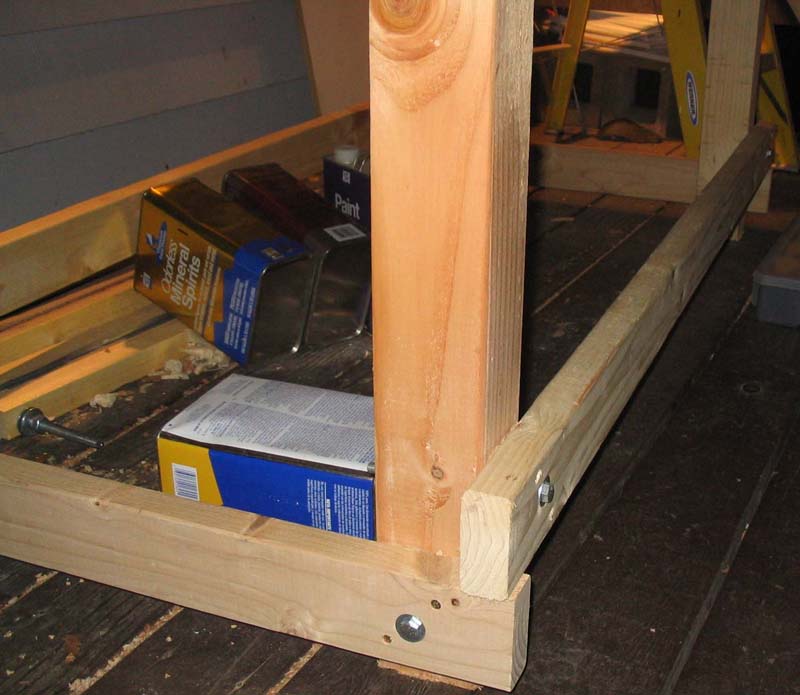
No MT joinery on the legs - I just put 3/8" bolts through the top and bottom strechers etc. It doesn't rack at all. 2X4's for strechers, 4X4 post legs.

Mine is 60" long and 32" wide. Narrower would be fine, but I stash tools on the far edge - no tool tray. 3 rows of dog holes on one side, and one on the other - a friend says it looks like a massive down-draft table...

If I were doing a full maple top, and walnut inlays and gold plating the vice handles, I might be a bit more worried about asthetics, but it's just a quick and dirty bench.

Oh, I put tempered hard-board on the top, and I flattened it some where it needed it. Overall, I think it was a lot less work than doing a bunch of laminations on construction grade lumber.

Cheers,

Greg

Re: Work Bench Design *LINK*

#5

Another alternative

Andy Halterman: White stuff changed to water

>Have you thought about using some wood flooring for the top? Standard oak flooring glued on the faces and then flattened. You'll have to plane off the grooves on the bottom so that will leave you about 11/16 for thickness per board. With standard plain sawn oak, you'll have a rift or quartered face showing on the top. I had a bunch of maple I was going to use for that but I ended up using it for a border area in a fancy foyer we did. I still have bunches of 4" birch flooring that I will laminate up that way. I'll probably only get 1 3/4 thickness but the stuff was free so I can't complain.

Just another morsel to think about.

Andy Halterman

Already got my legs milled (3 from a heart pine beam cutoff and one white oak from a pallet) for my bench project in Hendersonville, NC�

Re: Work Bench Design *LINK*

#6

That's the first bench...

Christopher Fitch @ Memphis

>I ever built.

Of course I have only built two.

:)

I went the 2x4 route and picked up some knotty crap. The bench was not that hard to build...and it was cheap. It worked fine but it's a bit light.

One nice thing is that the space for the slats perfectly hold a 4' x 2' piece of MDF or plywood to act as a shelf.

My two problems were the warping of SYP and the lightness. I grew tired of that so I built another one of Chris' benches, the one in the magazine link.

Popular Woodworking December 2003 (Issue 138)

If I were you, I'd build that one instead.

It's heavier, and will pretty much never warp since it's made out of laminated half sheets of Baltic Birch plywood.

I did some things a bit different in that I used white oak for the edging and white oak for the base.

And I made the drawer box referred to in the article.

I attached a picture of it...

Building a bench is loads of fun...!


img

Re: Work Bench Design *LINK*

#7

So Not Fair

Christopher Schwarz

>Christopher,

Grumble. I hate it when you post that picture of your bench. I think it might be better than mine.

Of course, I have a couple of very not new ideas for a workbench design (or designs) that might prove interesting to the assembled Galooterati. More soon.

Chris

Re: Work Bench Design *LINK*

#8

Not true...

Christopher Fitch @ Memphis

>I could point out the mistakes...like where I messed up the draw bores by putting them on the same sides of the legs. Or I could point out that I misread your plans and built the drawer box way too large.

Or I could point out the hidden flaw of non-square edges on the plywood laminations that I created by cutting incorrectly with my circular saw. Fortunately I have planes so I corrected them somewhat and then made up for it by biscuiting the skirts to the plywood top.

In other words, I could point out all the mistakes an amateur like me made that someone like you would not have made.

I think we discussed this too since your bench only took you 24 hours and mine took like two to three months and cost ALOT more. Besides you have a deadline and parameters defining what you are doing. I don't so there is no point in feeling bad about it.

In fact I think you should be proud since your plan was flexible and solid enough to go from something quick and effective to something you find to be attractive.

;)

Re: Work Bench Design *LINK*

#9

Re: Work Bench Design

paul womack

>However, it looks to me that the tool tray will be too shallow to do much good.

Few tool trays are deep enough to put a mallet or plane below the main work surface.

Virtually any tool tray is deep enough for marking and measuring tools, and most chisels and gouges.

BugBear

Re: Work Bench Design *LINK*

#10

Re: Work Bench Design

deanp

>Hey Greg....do you got a picture?

Re: Work Bench Design *LINK*

#11

Tool tray depth

Roger Nixon

>Yep. I thought I wanted a tool tray deep enough to keep a plane tote below the main surface. I mocked one up and it is too deep to be practical. The one I settled on is 4" deep and keeps any tool except upright planes below the main surface. If I need the surface unobstructed, I place the planes on a shelf underneath the top where they normally stay.

Re: Work Bench Design *LINK*

#12

tooltray troubles

Peter Berglund in Denver

>I have a real problem keeping my tool tray clean. Fills up with shavings and chips prettly quickly. I kind of wish I hadn't included it.

my bench

Re: Work Bench Design *LINK*

#13

Re: tooltray troubles

Joel

>Fully agree - I have 2 benches my big one has no tool tray I get to use all the top surface and it's easy to clean. My small one has a tool tray - always loaded with crap (or the wrong tools) and is a pain to clean and I lost 10" of surface space I could use.

Re: Work Bench Design *LINK*

#14

Re: tooltray troubles

Pam Niedermayer - Austin, TX

>That's fairly easy to correct, just make a hinged end so you can open it and brush it out.

Pam

Re: Work Bench Design *LINK*

#15

Re: Work Bench Design

Greg Sloop, Portland Oregon

>Ugh, you would ask huh? Next you'll be wanting pictures of the shop which show such mess and disorgization that I'll likely be committed to an institution...

Sigh...Ok, let me see what I can do...

[A few minutes later...]

The three "runners" in the first two pictures are "jointed" flat and the top slab sits on them. They can be shimmed underneath if needed to flatten the slab platform.

The are also screwed initially to hold them in place, then drilled and bolted.


The runner system is replicated on the bottom, even though it's not really required. It was just less thinking and easy to basically mirror the top strecher/runner system to the bottom.

Cheers,

Greg

Re: Work Bench Design *LINK*

#16

Re: tooltray troubles

Greg Sloop, Portland Oregon

>Along with your marking gague that got buried in the shavings...clonk, as it hits the concrete floor. Ah, well it wasn't a delicate tool anyway, was it?

*grin*

Cheers,

Greg

Re: Work Bench Design *LINK*

#17

Re: Cover It

Todd Stock

>Cover the tray with a birch ply plug - there when you want the bench space, and gone after that first $50 chisel visits the concrete floor after departing the back edge.

I have also thought about a very shallow tray - about 1/2" deep, or just enough to provide some security, while still preventing the build-up of junk that occurs during any project. That said, the new bench has a 2.5" x 8" x full length tray - I'm a creature of habit.

Finally - seems like it should not be too big a deal to add width to a bench if the vises are traditional and you can still pull the end caps and replace the tray with wood. An alternative is to do what Dunbar did and rabbet a sheet of ply into the end caps and main bench slab. Might even be able to claim it's a design feature - say, "warp-resistant box beam construction."

Re: Work Bench Design *LINK*

#18

Re: tooltray troubles

Pam Niedermayer - Austin, TX

>Anyone too stupid to remove tools before brushing out the tray should not have a hinged end. Or to allow shavings to swallow everything in the tray.... :)

Also, good idea to have a wood floor,

Pam

Re: Work Bench Design *LINK*

#19

Jack Guzman from Maine

Re: tooltray troubles

Jack Guzman from Maine

>Nice bench.

I just removed my tool tray last week. I tried real hard to make it work but every time I got around to noticing ,it was so full of accumulated "stuff"it was unuseable.Luckily my tray was just bolted on the end.All I had to do was remove 3 bolts.BTW-I gave it 2 years before I gave up on it.Could you build a filler piece for yours from solid wood?---Jack

Re: Work Bench Design *LINK*

#20

Re: tooltray troubles

Greg Sloop, Portland Oregon

>Right! Exactly why I'll never have one!

*grin*

Cheers,

Greg

Re: Work Bench Design *LINK*

#21

Re: tooltray troubles

Peter Berglund in Denver

>Yes, I could. As previously suggested, all I have to do is pop off the end caps and the back rail, pull out the tooltray bottom, run a jointer over the back edge of the existing top, and laminate on some more boards. Hmmm....

Peter, who never has enough to do in the shop...

👍 This page answered my questions

Your vote helps other woodworkers quickly find the answers and techniques that actually work in the shop.