WoodCentral Forums

Est. 1998 — 27 years of woodworking knowledge

Re: Half blind waste removal

Posts

Re: Half blind waste removal

#1

Re: Half blind waste removal

Since I've only done handcut dovetails a few times I can't speak as an expert, but in other situations where I want to remove waste in a controlled way I use a flat-bottomed bit on the drill press. A fence will help position the workpiece and the depth stop will avoid overcutting. The choice of bit diameter requires some trial and error, and of course there will still be waste in the corners.


Re: Re: Half blind waste removal

#2

Re: Half blind waste removal

I was thinking along these lines.  Waste out a lot with drill, finish up with router. 


Re: Re: Half blind waste removal

#3

My current preferred method.

It is all about “release cuts”, as David Charlesworth has written in his articles over the years. Create a release cut, and waste will fall away without a fight. The deepened kerfs mean that there is no further paring needed at the sides of the sockets. Clearing the waste is a matter of splitting it out.


An optional release cut is facilitated by using the kerfing chisel. Bill, I know you have rejected this in the past, and probably never used the tool I sent you, but you need to try this ..

After sawing, deepen the kerfs ..


Undercut the baselines to create a chisel wall for each socket ...


Chisel in the chisel wall and three moderately firm hammer blows. The chisel wall prevents the chisel moving backwards and over the baseline. This means that chiselling can start at the baseline, itself, and reduces later extra paring ...


Split out the waste ...


With hard Jarrah and a decent Japanese chisel, it takes me three rows to get within 3mm (1/8”) of the web line. I stop at this point ...


Back to the Moxon Vise: the sockets are cleared by paring the remainder in 1mm slices …


Cleaning out the socket was facilitated by earlier extending the kerfs, and now with a corner chisel ...


The full article is on my website: http://www.inthewoodshop.com/Furniture/UnderbenchCabinet14.html


Regards from Perth

Derek


Re: Re: Half blind waste removal

#4

Re: My current preferred method.


Re: Re: Half blind waste removal

#5

A correction to your post.........

You sent me a useful marking gauge which will make an appearance in a future post on this build, not a kerfing chisel. 


You have advocated routing out this waste in the past.  I intend to try routing today with what I expect to be faster long grain orientation.   There are valid reasons that I do not prefer this orientation of the operation for smaller easier to rout dovetail sockets  on a drawer. 

Also, I intend to just try whacking it out with a chisel as you describe .  The wood is cherry and the lack of snarly grain makes chiseling reliable.  I have enough miles to do to experiment with what goes fastest for me.  Worth exploring for future needs. 


I do not use a kerfing chisel or its card scraper equivalent.  The compelling reason is that it saves nothing in time when I route the waste with the board flat on the bench.  And there are additional reasons.  Driving the metal into the keft is going to leave damaged wood fibers that will become the glued surface of the dovetail.  More subtle and hard to describe unless one has tried what I usually do, there is an obvious visual demarcation between the saw kerf and the waste being chiseled away.  I know from experience that when I have shaved the side of the socket to smooth this transition the joint will fit perfect.  It takes me but seconds to do these paring cuts on the socket side wall and the chisel is already in hand for the necessary clean up of the socket. 


Re: Re: Half blind waste removal

#6

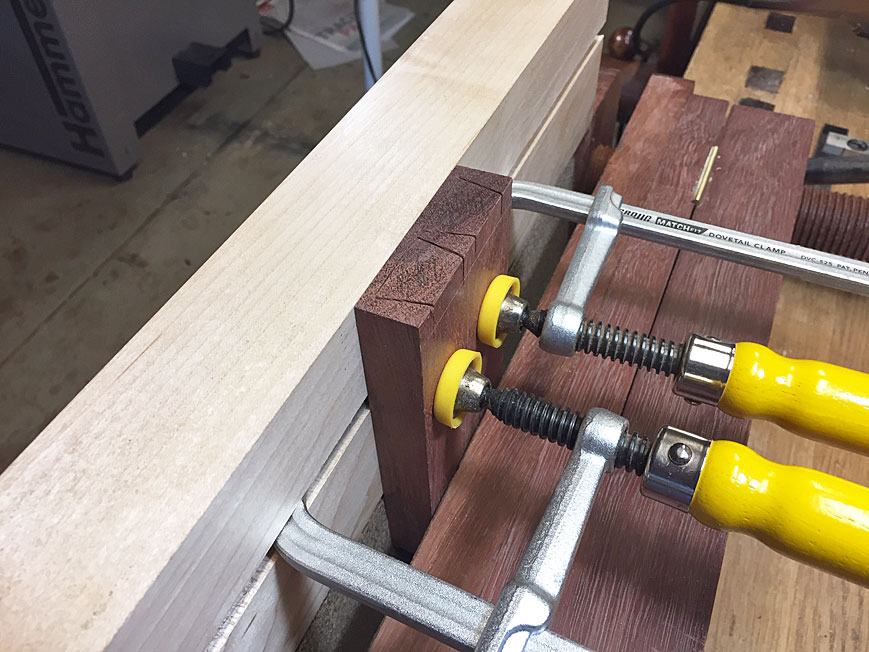
Pictures illustrating..


My son in law installed a LED under the router.  I am now able to route away more of the waste than what is shown in this picture.  In fact I route right up to the saw kerf.  The sliver that is left can be pared away with about three thrusts of the chisel, which is why the kerfing chisel, or more common card scraper, approach is not faster.  Not insignificant, this is  satisfying chiseling. 


Re: Re: Half blind waste removal

#7

Re: A correction to your post.........

Bill, you asked, "Does anyone have a quick way of excavating large half blinds?  (It may be quickest to just chisel them) ". This is my preferred method.


I have indeed excavated waste with a router. I came up with a really simple "jig" ... more of a way to hold and provide registration for the router ...


Easy enough to nibble away the waste ...


However, the issue I have with this method is that mistakes can occur just as quickly. It does not take much longer to chop out the waste, and it gets done with less sweat (and, possibly, tears).


I know I sent you the marking gauge. I thought I had also sent you a kerfing chisel. Now I recall that you did not want one. Still happy to send you one.


Regards from Perth

Derek


Re: Re: Half blind waste removal

#8

Re: Pictures illustrating..

Bill, we had this discussion in 2019. Roger was also a party. It is on my website: 

http://www.inthewoodshop.com/Furniture/PowerRemovingWaste.html


The issue I have with the orientation of the board in your photo is that there is a substantial amount of waste left to remove. 


Compare this with the photo I posted earlier. 


Regards from Perth

Derek


Re: Re: Half blind waste removal

#9

no disagreement here

"However, the issue I have with this method is that mistakes can occur just as quickly. It does not take much longer to chop out the waste, and it gets done with less sweat (and, possibly, tears)."   Aided by excellent lighting from the router base mounted LED, I do a lot of routing to near kiss a base line.  I have no fear of the routing.  But I am curious to see if just chiseling is not significantly different.  Will report on the experiment.  I like experiments.


Re: Re: Half blind waste removal

#10

Incorrect conclusion

"The issue I have with the orientation of the board in your photo is that there is a substantial amount of waste left to remove. " 

Correct in parts of this picture, but not correct for current practice.


First, an explanation of my pictures.  My pictures are taken typically to document construction, not to provide tutorials.  A CD of the pictures goes with the piece of furniture to where ever the furniture goes.  If I need to explain something on WC with a picture I try to find something that will do from one of these photo records.  It will often not be the best one could have done with a picture to illustrate the point. I rely on the reader to use the picture to get the point being made and not get distracted by details. 


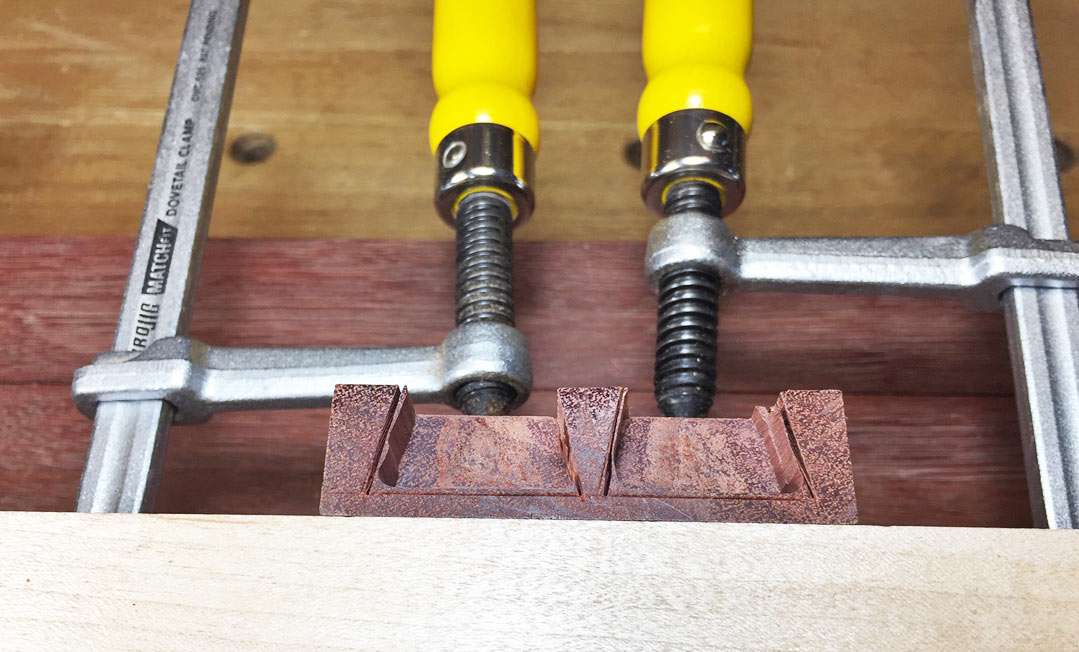
From the date, what I illustrated could be the first dovetail I ever made this way.  Currently, with my base LED light, I route to the saw kerf.  As explained, is takes but a few seconds to remove the wedge of waste, often as few as two chisel thrusts, one to thin the wedge and a second in the saw kerf to remove the rest.   Then it is a matter of paring the side wall to remove the remaining step.  This whole part of the operation is a matter of seconds. 


Re: Re: Half blind waste removal

#12

Re: Pictures illustrating..

My son in law installed a LED under the router. 

How about a pic of the LED? 


Re: Re: Half blind waste removal

#13

Re: Pictures illustrating..

Yes, and how he did it,too


Re: Re: Half blind waste removal

#14

Picture of current typical waste to be removed by chseling

Getting this close to lines requires good lighting to be discussed elsewhere.


👍 This page answered my questions

Your vote helps other woodworkers quickly find the answers and techniques that actually work in the shop.