WoodCentral Forums

Est. 1998 — 27 years of woodworking knowledge

Entry hall table for a niece: Part 3

Posts

Entry hall table for a niece: Part 3

Edited #1

Entry hall table for a niece: Part 3

Derek Cohen (in Perth, Australia)

I've been away from the workshop for a month, travelling around a few cities in Austria and Germany, as well as Prague. It was a good trip, but it's great to be home.

The current build was on hold. This is the entry hall table my niece asked me to build ...


... and this is where we left off last time - ready to fit the first corner ...


Past builds:

Part 1: http://www.inthewoodshop.com/Furniture/EntryHallTableForANiece1.html

Part 2: http://www.inthewoodshop.com/Furniture/EntryHallTableForANiece2.html

Today we shall put the complete case together. What I wish to focus on is the dovetailing. Not just any dovetailing, but mitred through dovetailing in unforgiving hardwood (here, Fiddleback Jarrah).

Of all the commonly used dovetails, I consider the through dovetail more difficult than the half-blind dovetail. Why ... because two sides are exposed against the single face of the half-blind.

In my opinion, by mitering the ends, the level of complexity is tripled .. at least. Not only are there three faces now, but each needs to be dimensioned perfectly, otherwise each is affected in turn.

This is more difficult than a secret mitred dovetail, where mistakes may be hidden.

I have posted before on building the mitred though dovetail, and it is not my intention to do this again. Instead, what I wish to show are the tuning tricks to get it right.

This is the model of the tail- and pin boards …
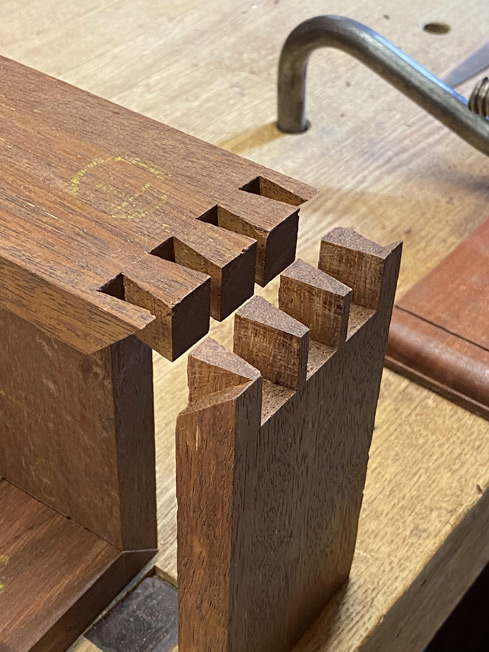

In a wide case, such as this, it is critical that the parts go together ideally off the saw or, at least, require minimal adjustment. The more adjustments one makes, the more the dovetails will look ragged.

Tail boards are straightforward. Let’s consider this done. Once the transfer of tails to pins is completed, the vital area is sawing the vertical lines … well, perfectly vertical.

I use blue tape in transferring the marks. The first saw cut is flat against the tape. Note that the harder the wood, the less compression there will be, and so the tail-pin fit needs to be spot on. Where you saw offers an opportunity for ensuring a good fit: if you hug the line (edge of the tape), you get a tight fit. If you encroach a smidgeon over the line, you loosen the fit slightly.
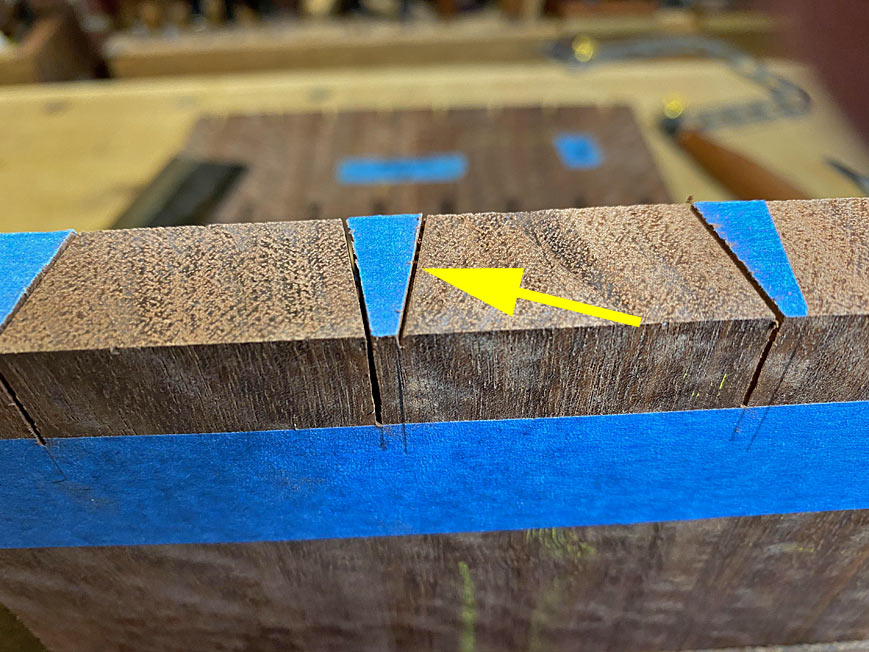

Saw diagionally, using the vertical line as your target …
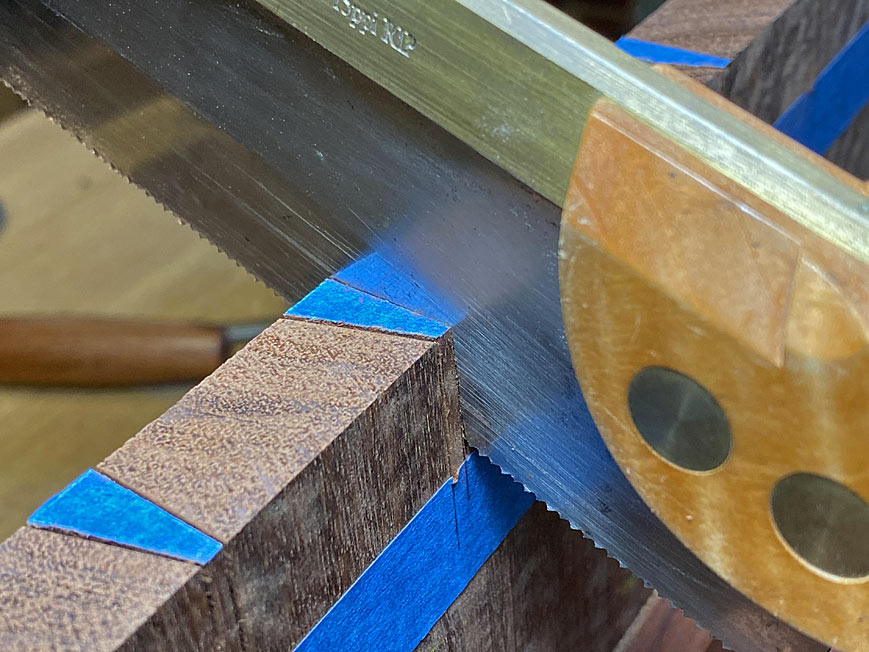

Only then level the saw and complete the cut …


I do not plan to discuss removing the waste. That was demonstrated in Part 2.

So, the next important area is the mitre. These are scribed, and then I use a crosscut saw to remove the waste about 1mm above the line on both the tail- and pin boards …
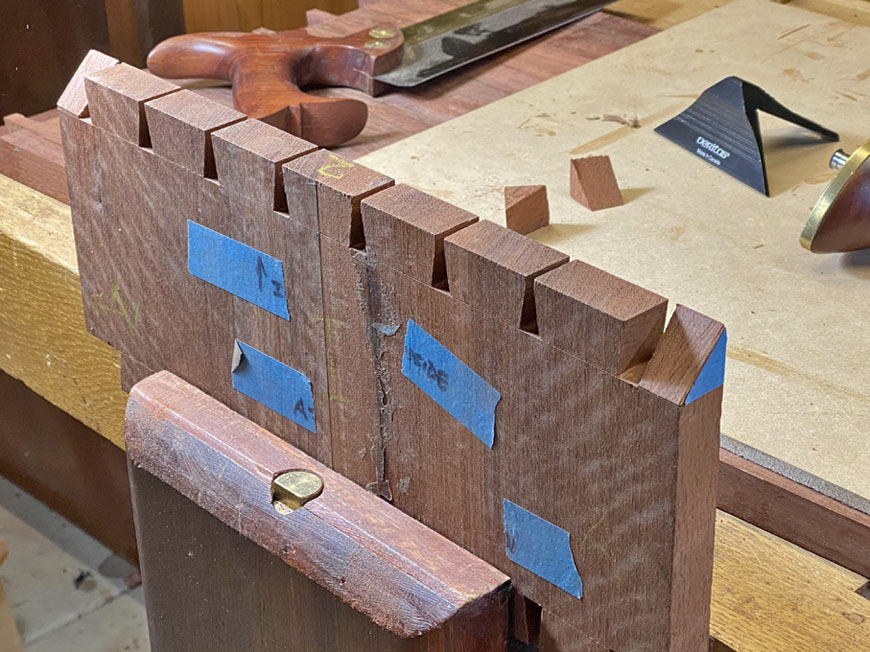

Now we are ready to test-fit the boards …


Mmmm …. not a great fit …


… even though the mitres at the sides are tight …
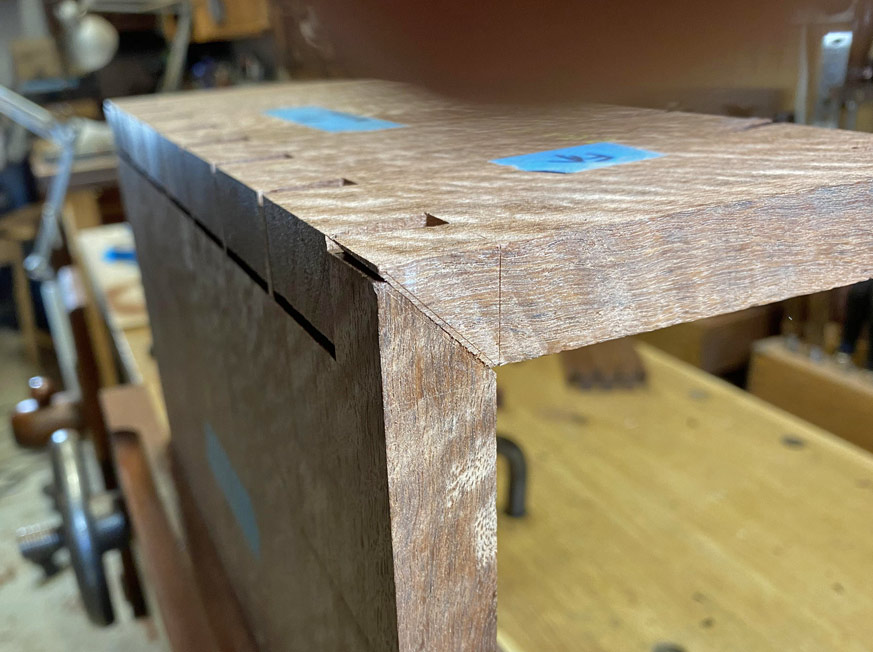

The problem is that the mitres are fat, and the extra thickness is holding the boards apart …
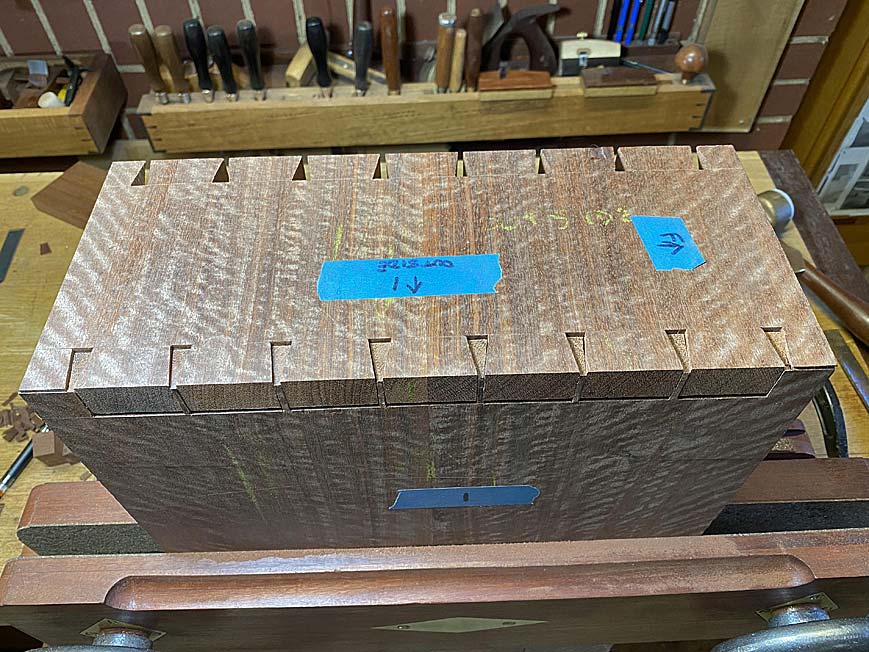

Even sawing to the lines here is likely to leave some fat, which is why it is a waste of energy to try and saw to the line in this instance. It needs to be pared away with a chisel, using a 45-degree fixture.
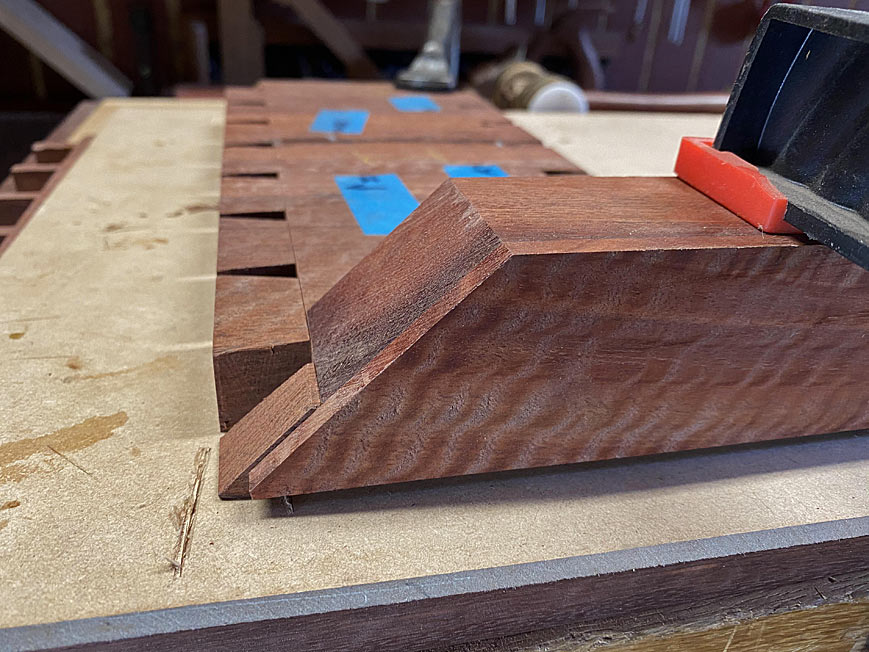

As tempting and logical as it seems to pare straight down the guide …
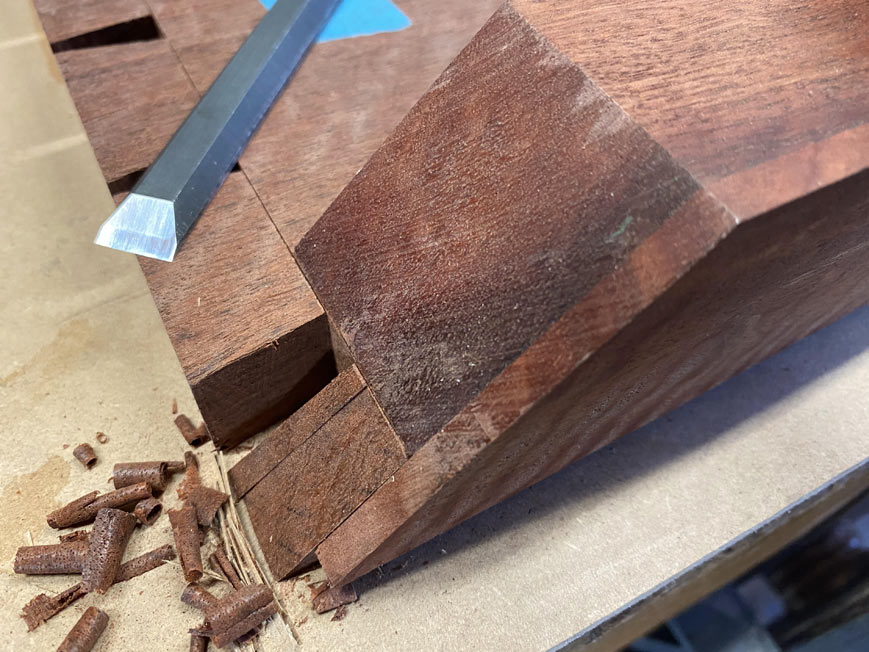

… what I experience is that the chisel will skip over the surface of the hard wood rather than digging in and cutting it away. What is more successful is to pare at an angle, and let the corner of the bevel catch the wood …
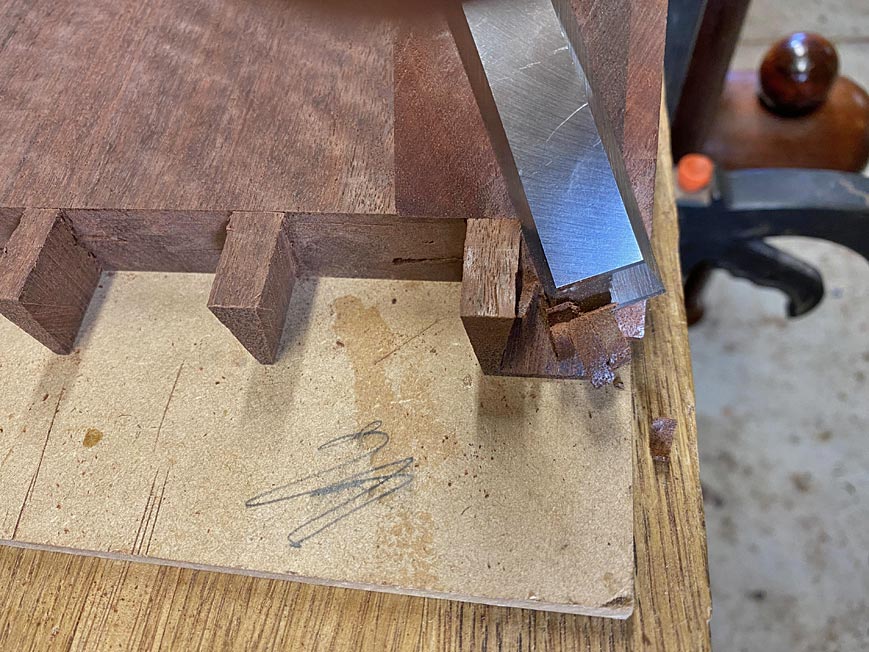
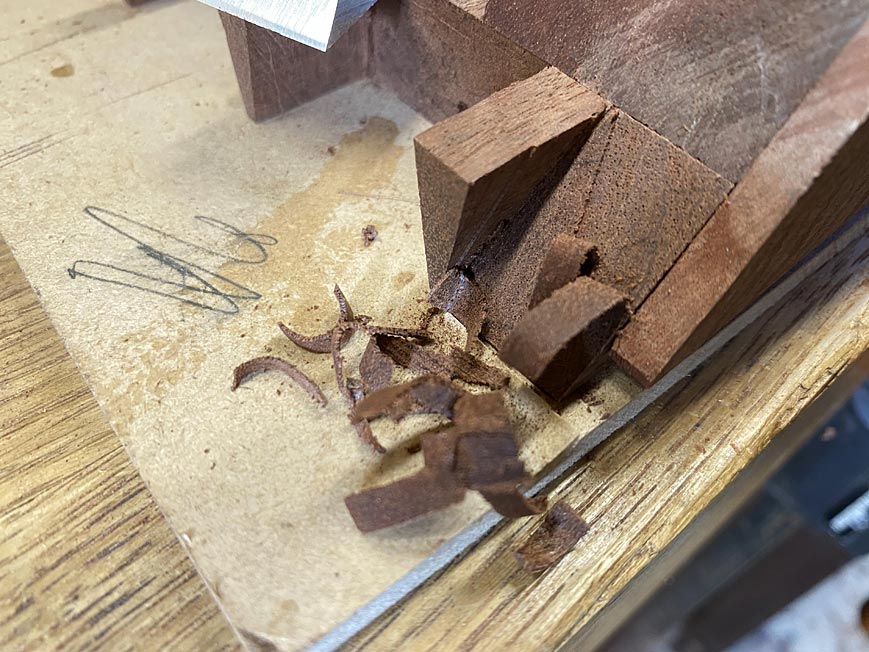

This is what you are aiming for …
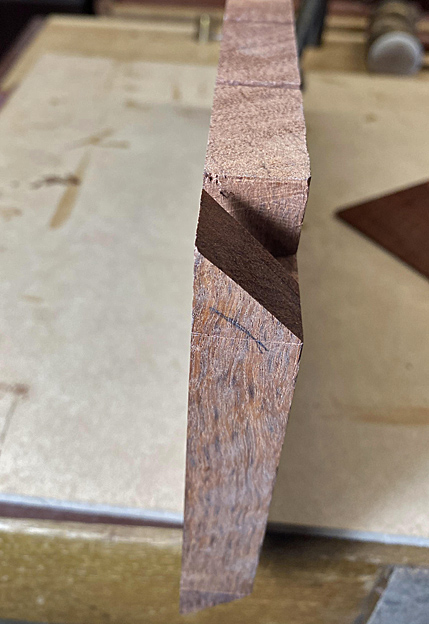


Okay, we do this. And this is the result …
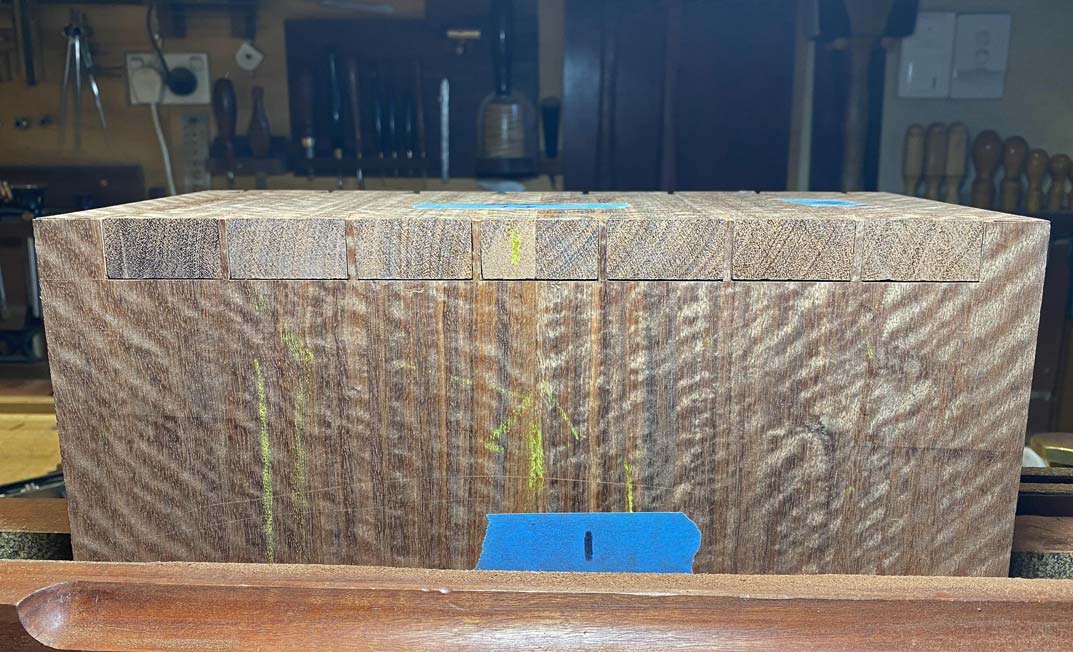


Not bad. But not good enough. There is a slight gap at each side, quite fine, but evident close up.

The source is traced to the mitre not being clean enough. It is like sharpening a blade – look for the light on the edge. If it is there, the blade is not sharp. If there is a slight amount of waste on the mitre, the case will not close up.
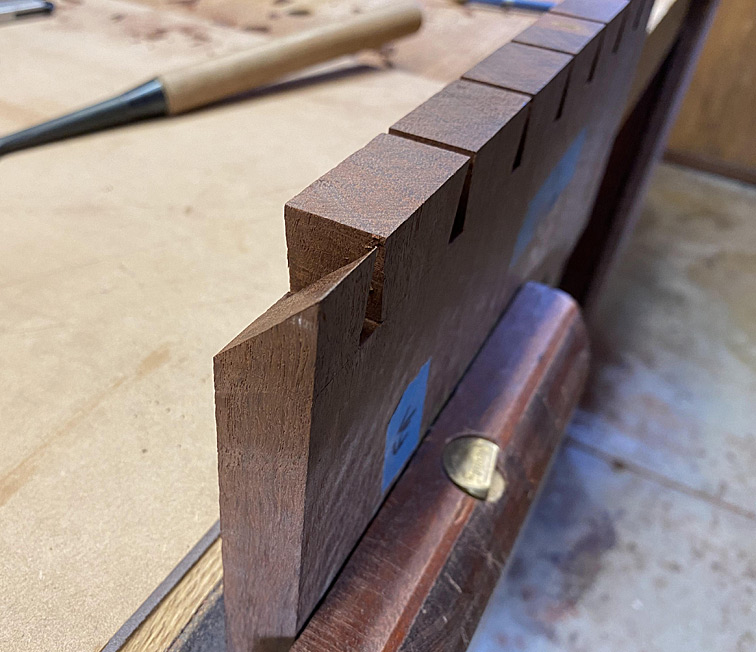

To clear this, instead of a chisel – which is tricky to use for such a small amount – I choose to use a file. This file has the teeth on the sides ground off to create “safe” sides.
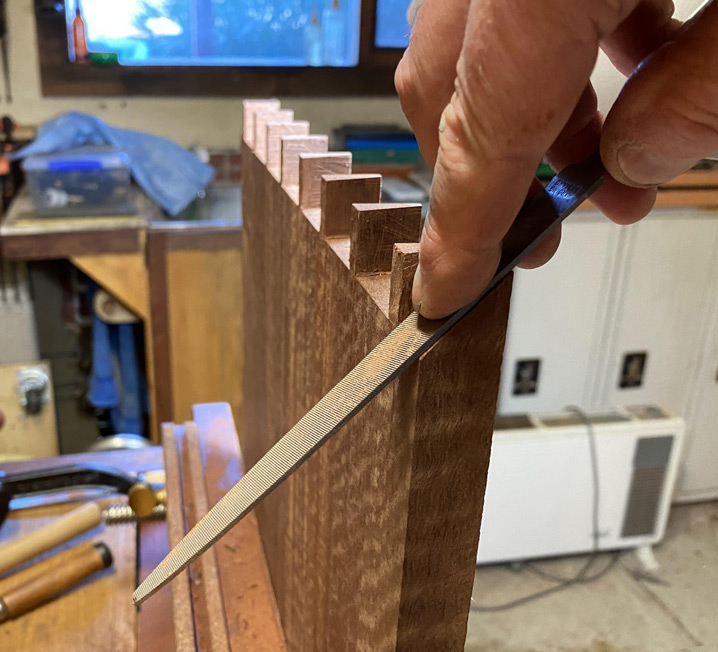

Try again. The fit is now very good. I will stop there.
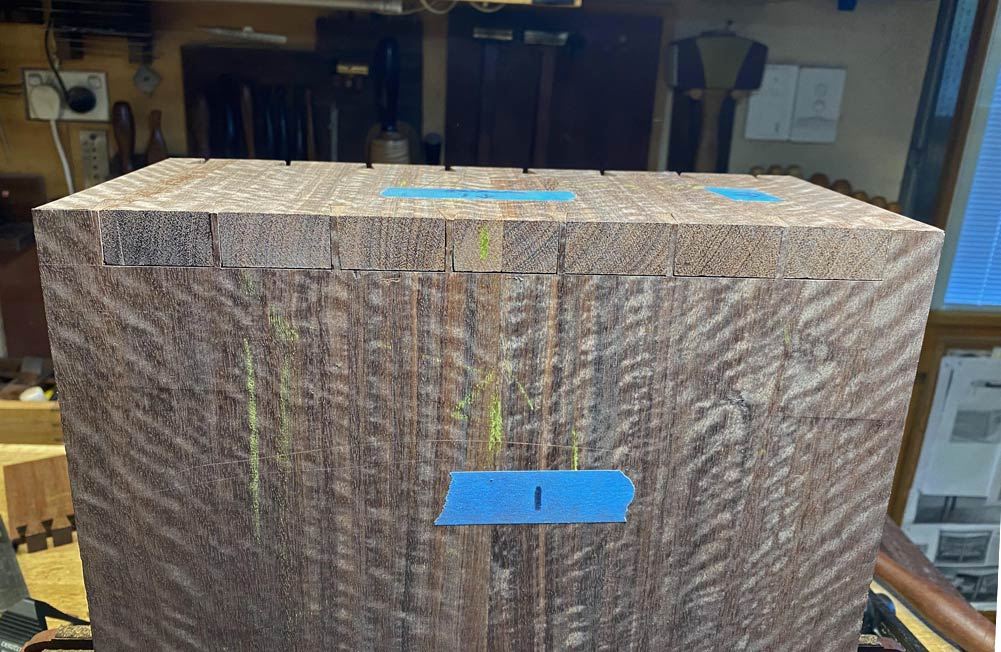


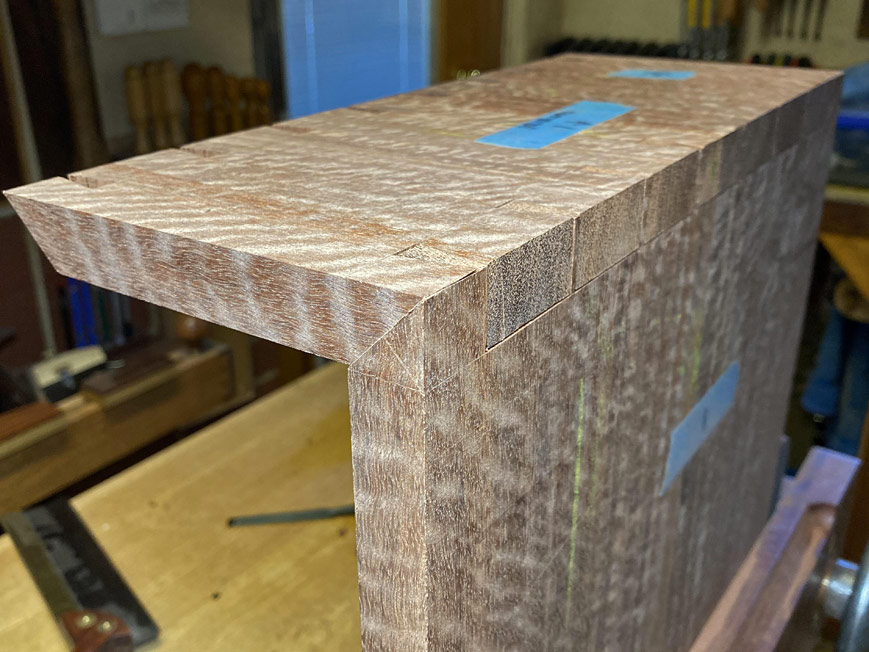
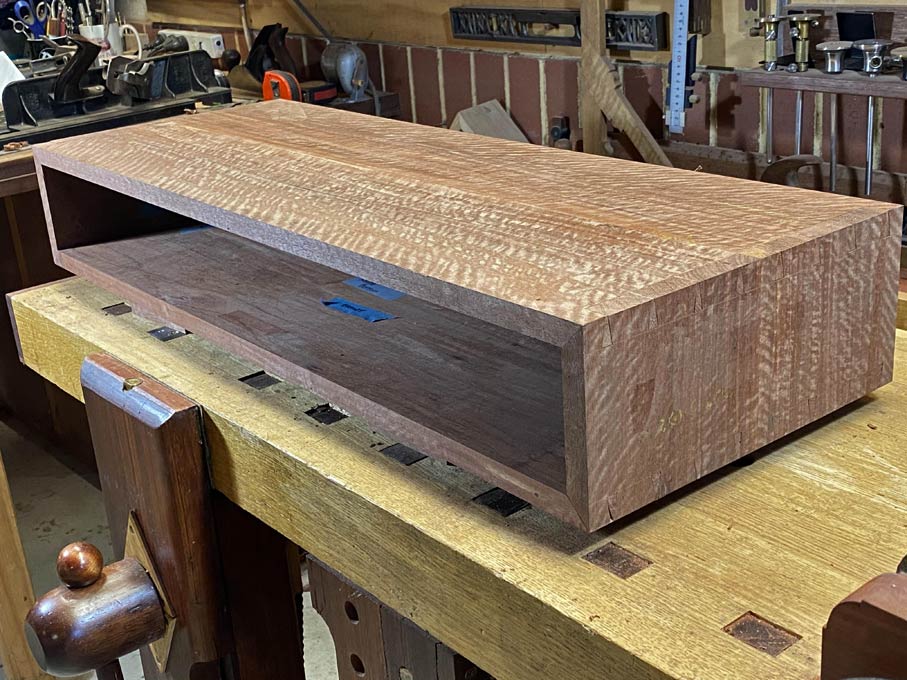
So, this is the stage of the project: the case is completed. This is a dry fit …
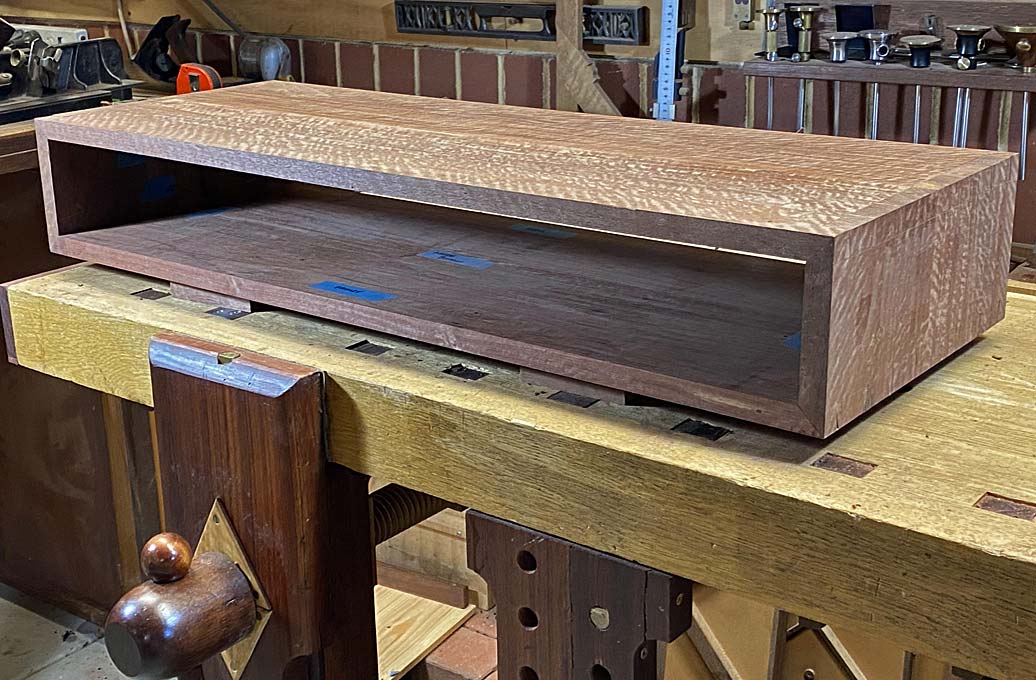

One end …
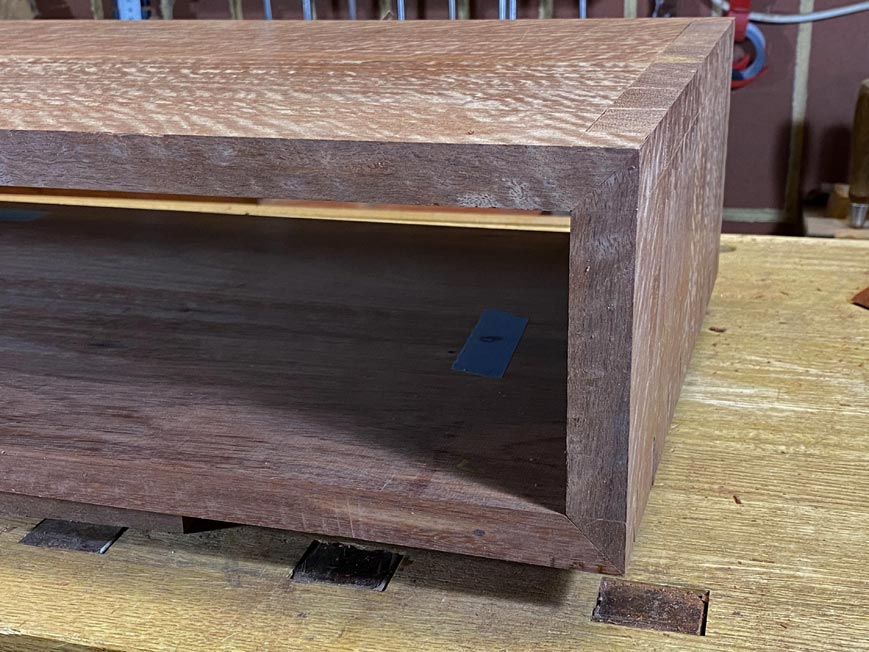


The other …
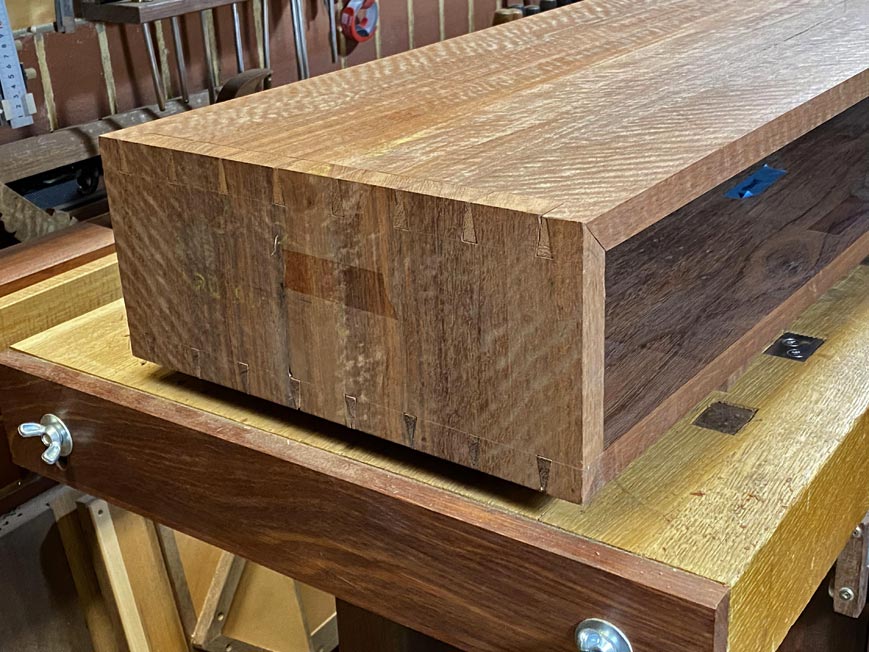

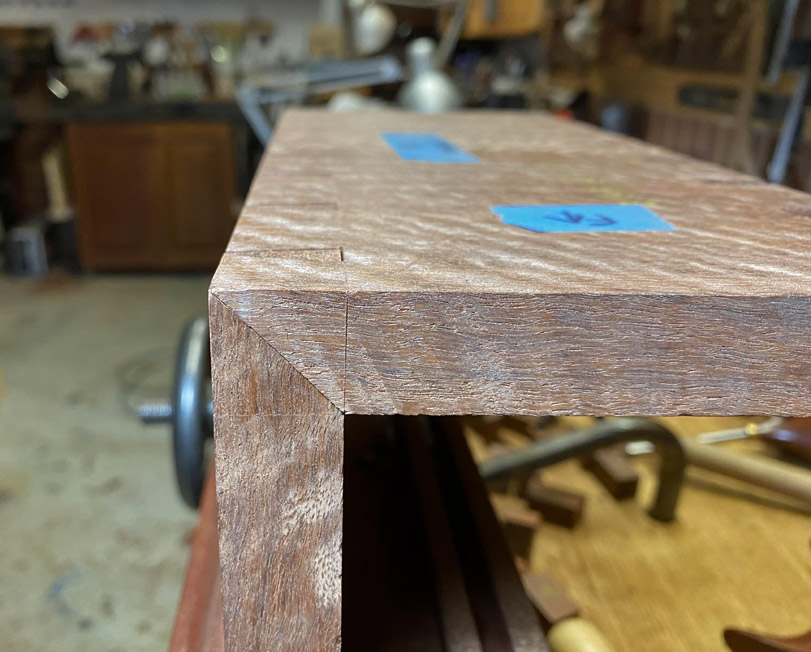
The waterfall can be seen, even without being smoothed and finished …

Regards from Perth

Derek

#EntryHallTable

Re: Entry hall table for a niece: Part 3

#2

Re: Entry hall table for a niece: Part 3

Brian from monument colorado

Derek,

I really appreciate your pix of your work. You are indeed a skilled craftsman.

Keep up the great work. And please keep the pix of your projects coming.

Re: Entry hall table for a niece: Part 3

#3

Clint Searl

Re: Entry hall table for a niece: Part 3

Clint Searl

Is there a structural or esthetic rule to dictate the number of dovetails to use for a join? It seems to me that half the number usually shown on this forum would serve the purpose. Does it count how skinny the pins are?

Re: Entry hall table for a niece: Part 3

#4

Re: Entry hall table for a niece: Part 3

John Jardin

Thank you, thank you, thank you!!

Re: Entry hall table for a niece: Part 3

#5

Re: Entry hall table for a niece: Part 3

Derek Cohen (in Perth, Australia)

Is there a structural or esthetic rule to dictate the number of dovetails to use for a join? It seems to me that half the number usually shown on this forum would serve the purpose. Does it count how skinny the pins are?

Clint, the choice of the number and shape of the dovetails for the case is essentially aesthetic, as they are for drawers. There are other factors that need to be weighed in to determine strength, such as the type of wood, its thickness, and the glue used.

In regard to strength of dovetails, I do not believe that the ratio angle makes much, if any, difference. The ratio here 1:6, chosen because it looks better to my eye. The strongest joint is a finger joint, particularly one with many fingers. This increases the glue area .. which is where the strength comes from. A dovetailed joint does not need as many “fingers” as it is also a mechanical joint, which the finger joint is not.

Regards from Perth

Derek

Re: Entry hall table for a niece: Part 3

#8

Ellis Walentine

Great post, Derek

Ellis Walentine

Your advice about tuning the miter was spot on. This is the last step in fitting this joint, and your choice of a file was excellent. Good rasp and file techniques are sorely lacking in the literature but they can be very precise and should be part of everyone's arsenal.

Amazing wood you're working with. Keeping the grain moving around the case is another masterful touch.

Thanks for posting.

Ellis

Re: Entry hall table for a niece: Part 3

#9

Rasps and files

Derek Cohen (in Perth, Australia)

Good rasp and file techniques are sorely lacking in the literature but they can be very precise and should be part of everyone's arsenal.

Thanks Ellis and agree about rasps and files. These can be a tremendous aid in fine tuning pins (when necessary, I always tune a pin and never the tail).

The provisor with these tools is that they have safe sides, otherwise you cannot use them into a corner.

Files are easy to make safe - just grind away the teeth on the edges. You cannot do this with rasps as a good rasp will be destroyed - they are typically round on one side and flat the other, meeting at a point. However, the Japanese Iwasaki rasps come with safe edges.


Regards from Perth

Derek

Re: Entry hall table for a niece: Part 3

#10

size shape and number of dovetails

Bill Tindall, E.Tn.

Is there a structural or esthetic rule to dictate the number of dovetails

Your question is two part, but there is a 3rd historically most important part.

Esthetics: If one studies dovetails over the ages and regions you will find everything imaginable- big blocky ones, slender ones, this angle and that. Now days where dovetails are considered a design element in much furniture anything is fair game that pleases the customer, who could also be the maker. Hence, the shape, number and size is largely determined by fashion. I can imagine a customer in a gallery buying or rejecting a piece because of their preference in dovetail design, which would not have been the case in 1780.

Structural: This consideration rarely is important. The dovetail joint is typically over engineered. You are correct that what you see is usually more than enough to hold something together.

Economic: While a dovetail is often the best way to hold a joint together it is also an expensive joint to make. Size, shape and number will affect the cost of making this joint. Maybe not relevant for the hobby woodworker or even the studio furniture maker, but the most important element for the historical cabinet maker or factory.

For example, take the slender dovetails common in 19th&20 century English furniture. According to Alan Batty who worked in an English furniture factory this style enabled him to meet his quota of 6 drawers per day. The tails could be cut in difficult to work white oak drawer sides with three saw kerfs and one paring cut with the chisel. The corresponding large sockets in the pin board where then excavated in soft easily worked mahogany. In the "colonies" easily worked poplar and pine were used for drawer sides and this version of dovetail was not an economic advantage and it was not commonly used. Dovetails size was balanced between harder to work drawer fronts and nearly as easily worked sides.

In American Period furniture dovetails were not considered a design element and one can detect many ways that the number, shape and size were optimized to achieve sufficient strength and efficiency. For example, there will be fewer and larger dovetails on the back of a drawer where structural stress is minimal.

Bottom line, if cost is not object do what pleases the customer which will be some version of current fashion. If cost is important there are many ways to optimized strength and cost by adjusting size, shape and number.

Re: Entry hall table for a niece: Part 3

#11

For example

Bill Tindall, E.Tn.


Shown are the dovetails on the front of a drawer on a piece of family furniture from mid 1800's. Can't argue that the drawer is under engineered. This piece has been in use for 150 years. But the joint shows every effort was made to take labor out of making it. Every saw kerf is over sawn to aid waste removal. The size of the pin is such that the makers chisel size could remove the tail waste with one cut. One can see the chisel nick where the sides were stacked for chopping out waste and the chisel broke through and nicked the board underneath.

As an American antique this piece would readily sell in a shop and nobody would even notice the dovetail. As a reproduction it would never get in a gallery shop for it would be rejected because of its "sloppy" dovetails which have become a measure of furniture quality. As a reproduction built to modern standards it would have to sell for about $4000. Made to the standards of 1850 it could sell for substantially less.

Re: Entry hall table for a niece: Part 3

#12

Re: Rasps and files

Buckaroo

I have a good flat noes/end scraper i ground down from/using old rasp.

Use it with flat side on TOOL REST!!!

Re: Entry hall table for a niece: Part 3

#13

Re: Rasps and files

William Duffield

I wasn't paying close attention when I posted the following response on the Hand Tool Forum. Derek's post over there looked just like this one, but there are probably more people watching this forum, so I'm posting it here, too. There are several interesting responses to Derek over there, and a response to me from Bill T. on unsafe files, that some of you might want to check out.

otherwise you cannot use them into a corner

But, you can use unsafe files and rasps "out of the corner." I use this method for final finessing only, because it is slow and I have to pay very close attention. I lay the file down right in the corner, stopped. Then I apply pressure to the top, and push forward and away from the corner. This removes a small amount of material from the bottom of the corner without removing any appreciable material from the side of the corner. I repeat as many times as necessary. The only reasons to do this technique instead of using a safe file or rasp, is if you don't have one that is safe and the appropriate profile, or you are trying to fit while shaping and find yourself wasting time repeatedly swapping tools (Not applicable to your dovetails with all faces flat).

Re: Entry hall table for a niece: Part 3

#14

Re: Rasps and files

Derek Cohen (in Perth, Australia)

Thanks William. I replied on the Hand Tool forum, and will cross post here ....

My statement: otherwise you cannot use them into a corner

William's comment: But, you can use unsafe files and rasps "out of the corner.


William, I agree with you that an unsafe file or rasp can be used in the way you describe. My warning was not to use an unsafe file into a corner. No matter how careful you are, it is likely you will do damage to the adjacent side. DAMHIK! :)

Regards from Perth

Derek

👍 This page answered my questions

Your vote helps other woodworkers quickly find the answers and techniques that actually work in the shop.