WoodCentral Forums

Est. 1998 — 27 years of woodworking knowledge

Interesting rope bed joinery - PICS

Posts

Interesting rope bed joinery - PICS

#1

Interesting rope bed joinery - PICS

Joe in a Cleveland suburb

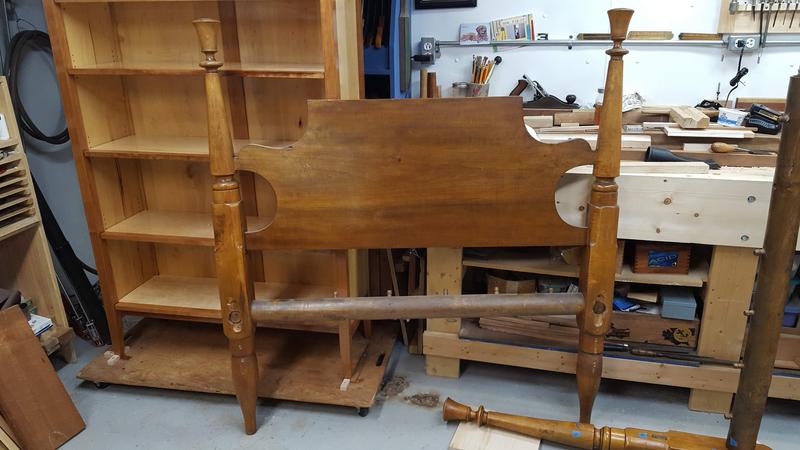
The bed pictured here was my parents. They used as long as long as I can remember.

I'm in the processes of fixing it up and trying to do the least amount of damage to it.

It will be set up in a spare room and rarely used.

The headboard is pretty solid with fairly tight joints. I don't plan on trying to take it apart as I likely would break something. :b

The footboard literally fell apart. I didn't have to bang anything for it to come apart.

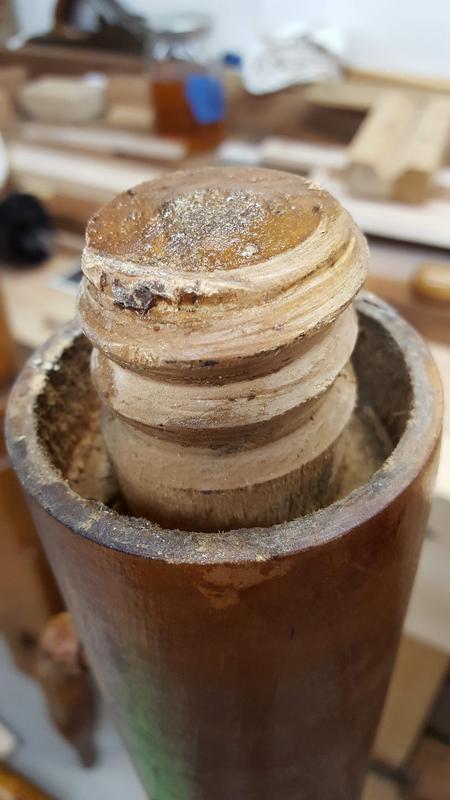
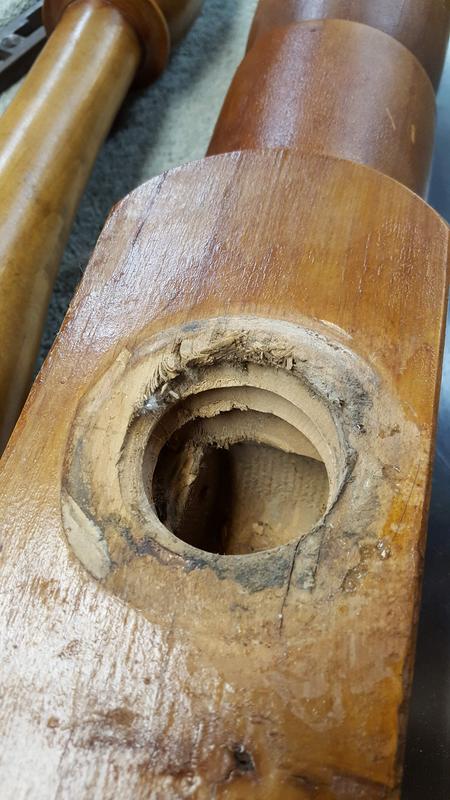
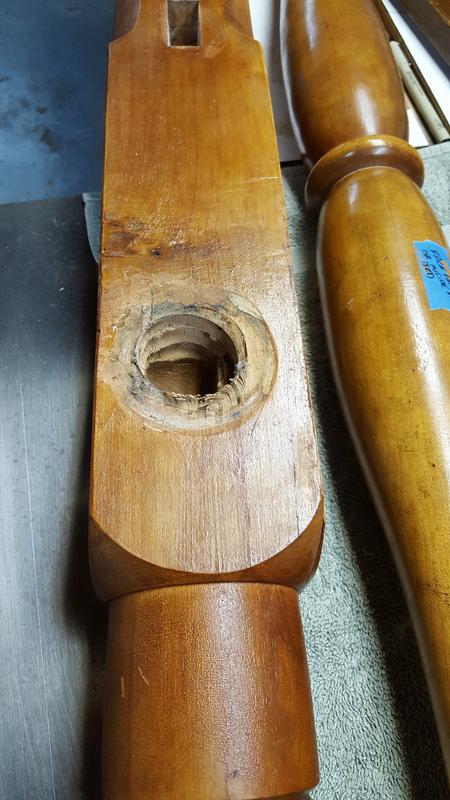
Take a look at the way the bottom rail on the footboard (and I presume headboard) attaches to the posts. It's threaded.

I've never seen this. Was this common? How would this have been assembled I wounder if it's threaded?

The threaded bits just fall out of the threaded socket. I know it's been like that for years. No idea how they slept in it.

Question for you all, without pouring a bunch of epoxy into the socket and sticking all back together, any suggestions on how I could assemble this back together AND make it repairable in the future?

Another question, anybody have a clue or guess on the age of this bed?

Thanks!

Headboard

Treaded rail

Threaded socket in post 1

Threaded socket in post 2

Rope peg
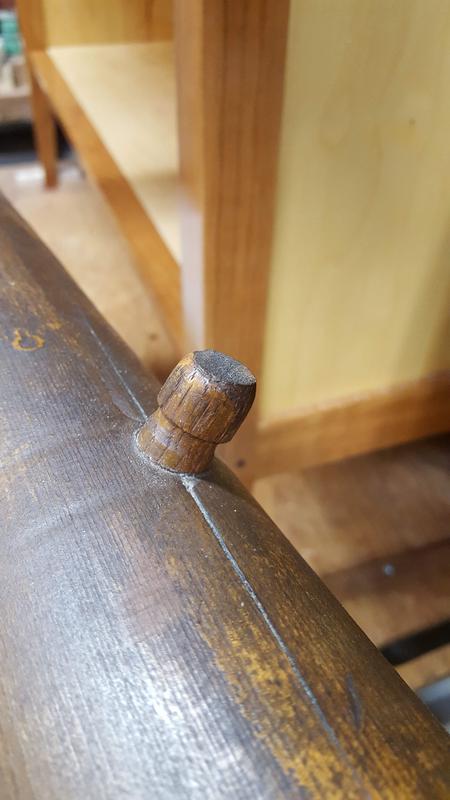

Added hardware sometime in its life
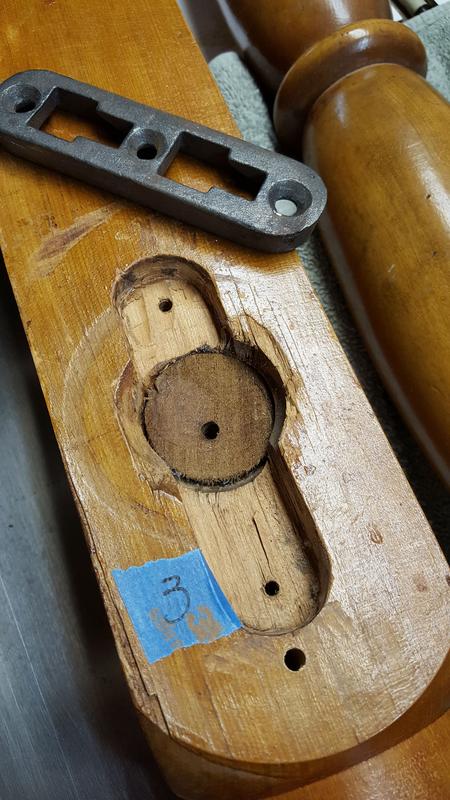

Socket and hardware
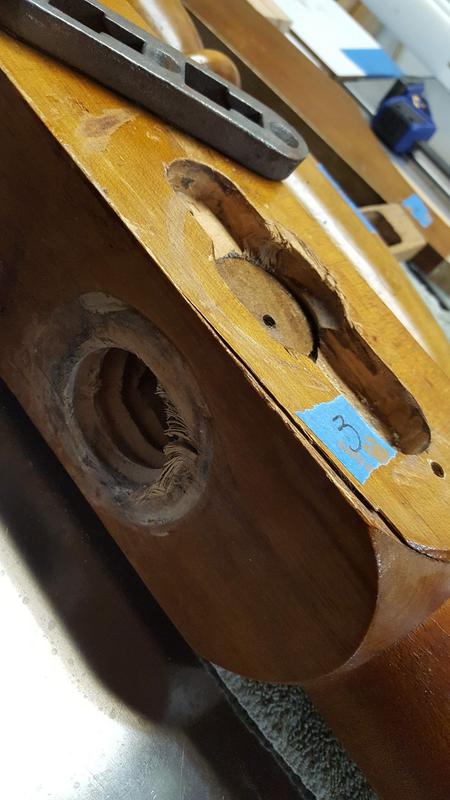

Re: Interesting rope bed joinery - PICS

#2

Re: Interesting rope bed joinery - PICS

Mike in Zuni VA

Do you plan on using the rope? If so, do nothing, A lot of rope beds used no glue on any of the joints. The tension on the ropes kept the bed together. There was a "key" for getting the rope taught. Sort of like a ladder back chair with a tightly woven seat. If you do not plan on using the rope I would suggest using an epoxy repair. Seal the male threads with a shellac finish and apply a suitable release agent to those threads. Apply a liberal amount of epoxy to the female threads and assemble. After it cures disassemble. I would also apply painter tape on any areas you don't want squeeze out on.

Mike in Zuni VA

Re: Interesting rope bed joinery - PICS

#3

Re: Interesting rope bed joinery - PICS

John K Jordan

>>>...Take a look at the way the bottom rail on the footboard (and I presume headboard) attaches to the posts. It's threaded.

I've never seen this. Was this common? How would this have been assembled ...

It's hard to tell from the photo but does the last picture show a left-hand thread? A left-hand thread on one end and a right-hand on the other would make it easy to assemble.

I visited a furniture and cabinet maker in a far northern part of Italy who showed me stacks of photos of 30 years of making furniture.

From the pictures he apparently uses threaded connections a lot. (we shared no common language so communication was by gestures) I saw some joints with a tenon turned on the lathe and extended though a hole and fastened with threaded nut turned like a knob. I also saw photos of bed frames that looked similar to what you showed. He had a variety of sizes of thread cutting tools hanging on the wall.

BTW, much of the fine and utility furniture and cabinetry in that area, in homes as well as offices, is made with from white pine. He gave me an incredibly nice piece of decades-old olive wood he would probably never use.

JKJ

Re: Interesting rope bed joinery - PICS

#4

Re: Interesting rope bed joinery

Gary Smyth

http://www.bealltool.com/products/threading/threader.php

You might wish to contact the Beall tool company (1-800-331-4718) they make wood threading tools. They are/may be too pricey, but may be just what you need. Identify the pitch of your existing thread and see if they match, but if not the existing hole could, perhaps, be coated with epoxy and rethreaded. Show them what you showed us.

Together with the inserted existing metal bed plate (male and female) and the tightened ropes the bed should work fine even without the rethread. Still, it is probably worth a phone call.

Re: Interesting rope bed joinery - PICS

#5

Re: Interesting rope bed joinery - PICS

William Duffield

You're going to need a bed wrench if you want to "sleep tight."

http://www.colonialsense.com/How-To_Guides/Interior/Bed_Roping.php

It looks like someone, who had no concept of how one of these beds works, screwed one end in and couldn't figure out why they had to turn the whole foot of the bed instead of the side rail, and eventually gave up and "fixed" it with a hammer. :D The suggestion to rebuild the female threads with epoxy is probably a good one. Otherwise, you will need to get a threaded vise screw and nut from Lake Erie Toolworks or Acer-Ferrous, and do major surgery to both the rail and the end post with the shattered threads. If you can't find ones with the same number of threads per inch as the originals, you will need to do some math to figure out when to start the threads from each end.

Re: Interesting rope bed joinery - PICS

#6

Re: Interesting rope bed joinery - PICS

Joe in a Cleveland suburb

I don't plan on using ropes. The original rails are long gone and it's been converted to normal rails with the hardware shown in the pictures.

I don't know if one end is right hand thread and the other left. The other side won't come apart. So even if I could repair the threads I don't know how I could screw it together.

I guess my only option will be to use epoxy. Fill the void and clamp it together.

I looked at West Systems epoxy. Wow. That stuff isn't cheap.

Thanks for the ideas.

👍 This page answered my questions

Your vote helps other woodworkers quickly find the answers and techniques that actually work in the shop.