WoodCentral Forums

Est. 1998 — 27 years of woodworking knowledge

Gappy dovetail repair

Posts

Gappy dovetail repair

#1

Gappy dovetail repair

Bill Tindall, E.Tn.

Attended a demo by the Master cabinet maker, Brian Coe, from Old Salem, NC. He demonstrated tools and joinery techniques used by Moravian Immigrants, which are some different from British/American Period techniques. More on these techniques in later posts, including their way to make the housed/sliding dovetails commonly used in their furniture.


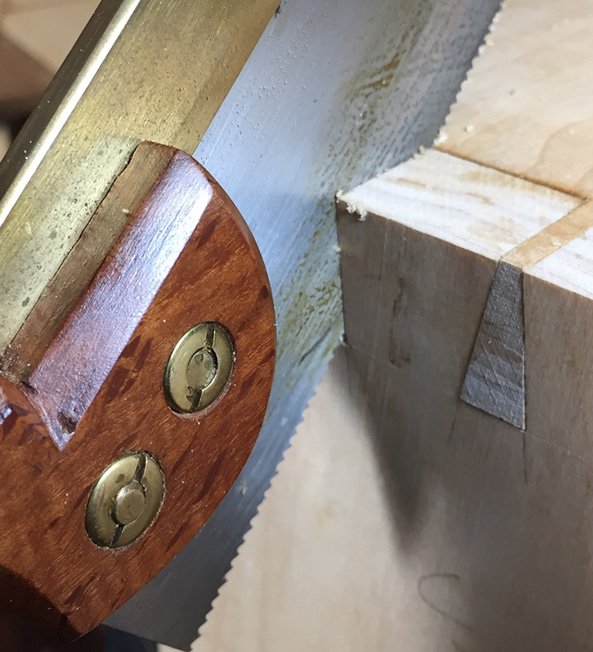
One of the through dovetails in the picture was purposely cut on the wrong side of the line, resulting in a saw kerf wide gap along this edge of the assembled dovetail. (BTW,I can do this without trying >( ) Brian then fixed it and I took a picture of the result. I will practice this repair and post steps later.

The dovetail is propped up on the English mortise chisel I snagged for $20 at the tool sale.

Re: Gappy dovetail repair

#2

Re: Gappy dovetail repair

Derek Cohen (in Perth, Australia)

Bill, saw the gap and extend it the full length both sides of the joint. Cut a shim the thickness of the saw kerf, and hammer that if end grain first. Trim the waste. Done.

Regards from Perth

Derek

Re: Gappy dovetail repair

#3

So very English......

Bill Tindall, E.Tn.

.......not what the German Moravians do.

BTW, how is it you know all about dovetail fixing ;)

Re: Gappy dovetail repair

#4

Re: Gappy dovetail repair

Don Stephan

Derek beat me to the same method I found once in a book or article, can't remember the source, but the thin slice of wood was called a "feather." When sawing off a "feather" orient the grain so that end grain of either tail or pin matches up with end grain at one end of the "feather." If memory serves, after sawing off a "feather" it is trimmed to a 45-45-90 triangle? I was trying to find some of the feathers I used in a blanket chest to show a visitor last week and couldn't find any. But I know there are several.

Re: Gappy dovetail repair

#5

Re: Gappy dovetail repair

Bruce, a MN Galoot

I have had occasion to use that method. I think I read about it in one of Tage Frid’s books.

Re: Gappy dovetail repair

#6

Re: Gappy dovetail repair

Warren in Lancaster, PA

It looks like he made a kerf and placed a wedge down the middle of the pin to spread it out. We see this method in old Pennsylvania Dutch furniture, both as a repair and apparently sometimes as a routine construction method. It is a little annoying to take it apart for repair.

The Moravians settled in Bethlehem, Pennsylvania in the early 18th century and made another settlement in Lititz, Pennsylvania before buying a large chunk of land in North Carolina a generation or two later. We consider them Pennsylvania Dutch.

Re: Gappy dovetail repair

#7

Warren's got it

Bill Tindall, E.Tn.

"It looks like he made a kerf and placed a wedge down the middle of the pin to spread it out. We see this method in old Pennsylvania Dutch furniture, both as a repair and apparently sometimes as a routine construction method."

The Salem shop sees it enough in large dovetailed pieces to suggest it was purposely done either to make assembly of dovetail expanses easier or to aid the glue in wedging the joint.

The clue is the tiny split from over wedging in the demonstration and the gap at the center of the tail from not accurately installing the wedge. When done well the wedge becomes invisible and the joint tight.

Re: Gappy dovetail repair

#8

Re: Warren's got it

John in NM

There was an article in the 2017 issue of American Period Furniture covering a similar (or the same) method. If I remember correctly the author concluded that in the pieces he studied the wedge looked intentional rather than fixing an error - large chests would have this done to every pin.

Re: Gappy dovetail repair

#9

Re: Gappy dovetail repair

Don Stephan

Believe you are correct in attributing to Tage Frid. Thanks for completing my thought!

Re: Gappy dovetail repair

#10

Re: Gappy dovetail repair

Tom Stockton

The only problem with this technique shows up in the right hand inside corner of the joint which is starting to split. You have to be careful wedging with the grain it is really easy to split things.

Tom

Re: Gappy dovetail repair

#11

So much better than wedges ... the fix

Derek Cohen (in Perth, Australia)

.......not what the German Moravians do.

BTW, how is it you know all about dovetail fixing ;)

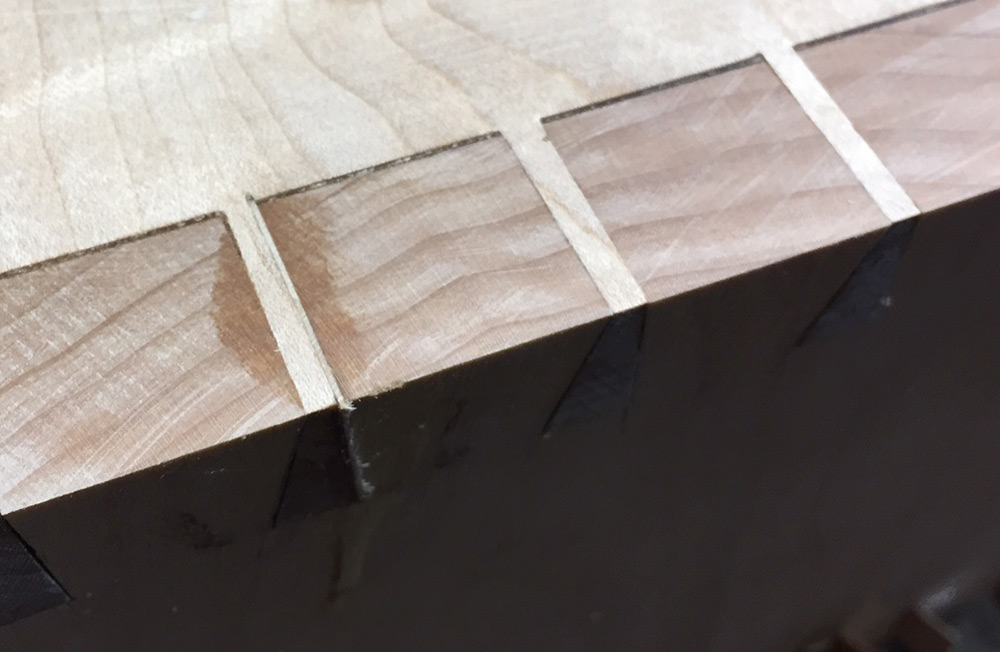
Bill, it is an amazing coincidence that I was planning on showing this very tip, where I needed to fill a dovetail on my current work. Shown is the underside of the case. However, the gap extended to the side, and the dovetails are rounded off, which meant that I could not simply fill the facing end.

The issue with using a wedge in the centre of the dovetail is that it can split the board. Also, generally there is a gap on one side of the dovetail, and it tapers (because the saw may have wandered with the grain - aside ... I wonder if dull saws, or too much downforce, tend to do this more?). You may struggle to fill a taper with a wedge as it is not applying a spreading action where it may need to do so.

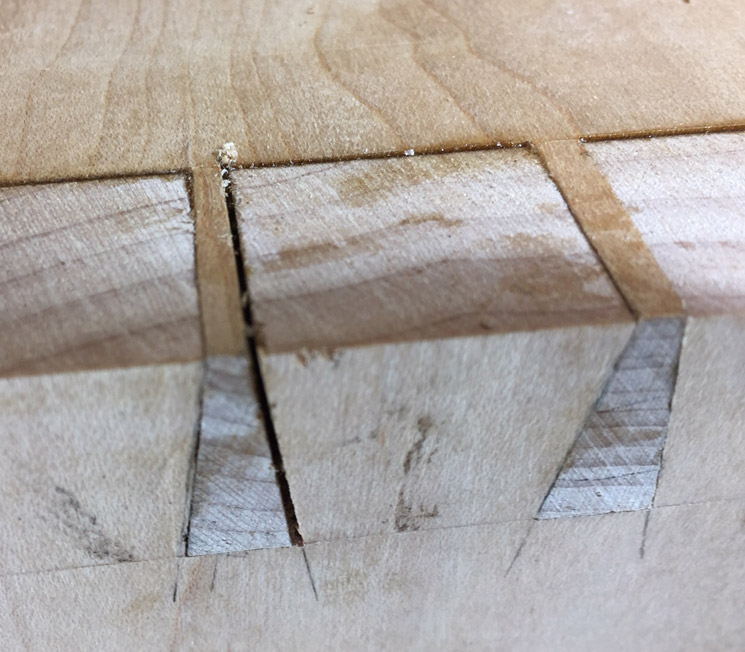
The better solution, in my opinion, is to make things a little worse (at first) to make them better: Saw along the gappy side of the dovetail to make the gap even ..


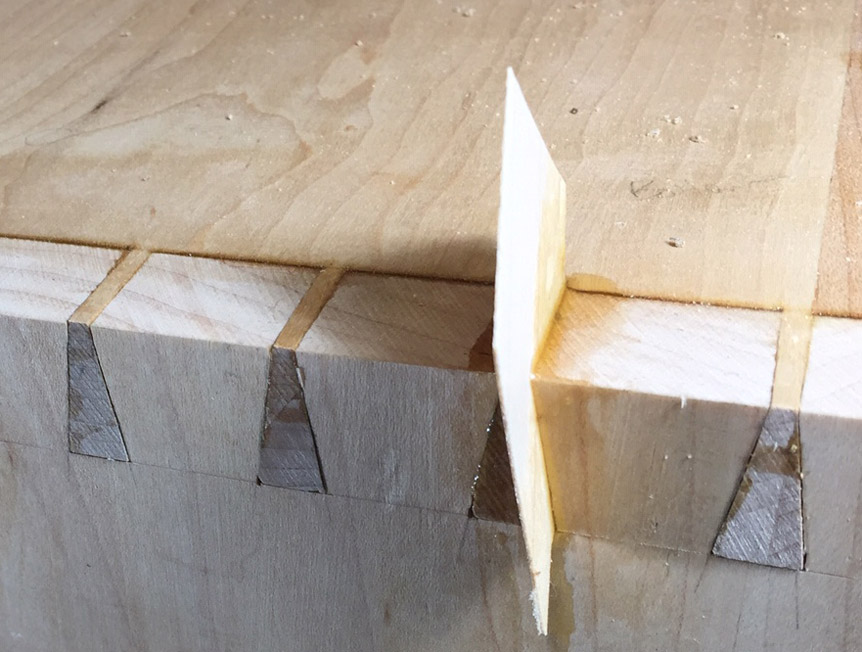
Now add in a (parallel) shim that is the thickness of the kerf. Push it in end grain first. End grain against end grain disappears. One can hammer in a lengthwise shim, that is to show the edge grain, but then the wood colour must be matched well.


Not yet planed down ...


Regards from Perth

Derek

Re: Gappy dovetail repair

#12

comparing methods

Bill Tindall, E.Tn.

"English" The only option for skinny pins. Is done, and must be done, after joint is assembled. Can be readily spotted by another woodworker but unlikely by a client.

"Moravian" Pin must be a few times the width of a saw kerf. Must be prepared before assembly. For better, or worse, the repair locks the joint even without the aid of glue. Takes some practice to cut the correct wedge to close joint without splitting. Can aid assembly of structures that have an expanse of dovetails by making some intentionally loose. Fix can be made invisible to all but intense scrutiny.

Those that have made exposed dovetails a signal of fine craftsmanship are faced with disguising where they fall short. I take great delight spotting dovetail repair in gallery furniture that displays dovetails as a design element. The mismatch of grain in the English technique is easy to spot.

The Moravian repair is nearly invisible at very close range. In the example in the picture, a repair done quickly to demonstrate the technique, I had to study the joint for some time to decide which tail had been repaired. I finally made a decision on the basis of which pin was slightly wider. It took magnification to see the micro crack and gap readily visible in the picture but not visible at a one foot range. Add finish and the wedge is even more invisible. For this reason the Moravian method should be considered in critical situations.

Re: Gappy dovetail repair

#13

from a practical standpoint...

david weaver

...it still looks a lot like sanding dust mixed with glue, though it's a more elegant method.

Not saying it isn't suitable - I've not made something with dovetails showing on the outside for quite some time.

Do they fix the gap and then leave the overcut, or is that just an artifact or making a test piece on the quick?

Re: Gappy dovetail repair

#14

Re: Gappy dovetail repair

Brian Holcombe

This fix doesn’t seem like a high quality repair to me. If the joint splits it is now considerably weaker than if it had not been ‘repaired’. Derek’s method, will not split the joint and provides long grain glue contact rather than bending the pin at an angle via wedging.

Re: Gappy dovetail repair

#15

Re: Gappy dovetail repair

Bill Tindall, E.Tn.

Ideally when actually making something instead of hurrying many demonstrations into an hour lecture one doesn't split the base of the socket. In the case at hand I never saw the tiny split until it was magnified in the picture. It is certainly less noticeable than the mismatch of grain that occurs with the other alternative.

"If the joint splits it is now considerably weaker than if it had not been ‘repaired’."

I don't understand this reasoning. Joint strength depends on friction and adhesion of the mating parts. I don't see that relieving stress below the socket does anything to decrease this friction and adhesion.

Had I known of this wedging technique when I did the hexagonal drawer I would have used it on the angled dovetails. The angled joint was impossible to assemble with tight joints. I would have loosened them up even more than I did and wedged them to strengthen and make rigid the assembly while the glue cured.

Re: Gappy dovetail repair

#16

Re: Gappy dovetail repair

Brian Holcombe

When wood splits at the joint it gives up considerable mechanical strength, so it not able to resist racking as well as it had without splits. simple reason being that the split opens when the joint is strained.

Glue requires a close fit between parts, wedging sets the pin at an angle so it will only regain glue surface at the top, rather than using the entire pin.

Re: Gappy dovetail repair

#17

Re: Gappy dovetail repair

Sgian Dubh

Oh, such talk of sophisticated fixes for gappy dovetails. Some reckon small gaps can be taken care of with a bit of 'bishoping'. Not too much fancy cutting and slivers of veneer required for that technique. Doesn't always work too well really in my experience, ha, ha. Slainte.

Re: Gappy dovetail repair

#18

Re:Half Blinds

Hank Knight

It appears that neither of these methods lend itself to repairing gappy half blinds. With Bill's Moravian method, it's impossible to saw a kerf the full depth of the pin without sawing through the case side. I suppose one could saw completely through the case and apply the wedge, but this would make the repair visible (to the extent it is visible) from two perspectives, the top and the side of the joint. One would hope the wedge would match an and be unobtrusive from the outside, but that seems improbable.

With Derek's method, it's impossible to get to the joint to saw the kerf for the veneer filler after the joint is assembled.

Anybody got a method fo fixing sloppy half blinds?

Re: Gappy dovetail repair

#19

Re:Half Blinds

Derek Cohen (in Perth, Australia)

Hank, half-blinds are the easiest to fix.

Just match to the end grain and it will be impossible to see. The trick is to shape the filler piece to fit the gap, so as to preserve straight lines.

Regards from Perth

Derek

Re: Gappy dovetail repair

#20

Re:Half Blinds

Hank Knight

Thanks, Derek. That's what I came up with and it works well. However I was a little too intent on getting a tight fit with the filler piece and split the case side slightly with my first try, as bill described. A little more shaping of the filler solved the problem. Only a close examination reveals a slight variation in the size (width) of the pins.

Re: Gappy dovetail repair

#21

Same options as before....

Bill Tindall, E.Tn.

Is the fix for cosmetic of structure? Has the joint been glued or not?

The dovetail joint is so over-engineered that fixing for structure would be an unlikely fix. If I made a joint structurally loose I would be practicing dovetail making , then starting over.

For cosmetics, I would suggest get over it for the home craftsman. Perfect dovetails have become the hallmark of an expert craftsman. And then when you are not, hide the fact. Seems deceptive. I honestly leave whatever result I wind up with. Nobody has complained so far and I'm passed being embarrassed by my work.

Antiques have all sorts of gaps in stuff that has lasted 200 years. And, it is not an accident that the ancients covered up their dovetails or used them in places seldom seen like drawers. Nobody could afford their furniture if they built to today's Galley standards. But if one must....

I have never resorted to either of these fixes so a guess follows.

The wedge fix can be used. Saw the slot in the tail, assemble the joint and drive in a wedge with long grain matching the tail before the glue cures.

The shim fix can be used too, just don't saw to widen the mistake. Assemble joint and drive in a shim/wedge against the edge of the gappy tail before the glue dries.

Re: Gappy dovetail repair

#22

Re-cut them

Brian Holcombe

Out of new material. :D

A veneer works there also, stand it upright.

Re: Gappy dovetail repair

#23

Wrong guess

Bill Tindall, E.Tn.

I thought Hank was taking about drawers for his desk. I don't fret dovetail flauntability in drawers. From Hank's response, the need could have been the top of the desk that will not be covered by a book case. That's a horse of another color and calls for fix, not replace, or ignore if it is bad. If the problem is at a half pin the fix is in risk of a split. In the past I have split a half pin just from a tight pin. Now days, I purposely cut the half pin joint loose.

At the top of a desk I would have driven a long grain thinly tapering wedge into whatever gap was there after joint assembly. The gap would disappear. Glue will hold it in place. No need to pound it in.

Re: Gappy dovetail repair

#24

The real English way

Mark Hennebury

Make the person that did "gappy" joints do them again, and again until they get it right.

Then put them in the finger stocks to reflect on their failings.

There were also Finger Stocks whereby just the finger was inserted, bent into the stocks, then the upper half was lowered making it impossible to remove your hand without snapping your finger into bits. They were a particular favorite form of punishment dished out by school teachers in Victorian England.


Re: Gappy dovetail repair

#25

Excellent....

david weaver

I've got a transplanted English friend over here in the states. He's about 65 and got me into woodworking, and I'd say his preferred method of encouragement is a combination of criticism and ridicule. I can't repeat most of what he says here - he left England before it became PC.

👍 This page answered my questions

Your vote helps other woodworkers quickly find the answers and techniques that actually work in the shop.