WoodCentral Forums

Est. 1998 — 27 years of woodworking knowledge

Attaching the legs: your input please

Posts

Attaching the legs: your input please

#1

Attaching the legs: your input please

Derek Cohen (in Perth, Australia)

The Harlequin side table will have round legs at each corner, which will be attached from the outside.
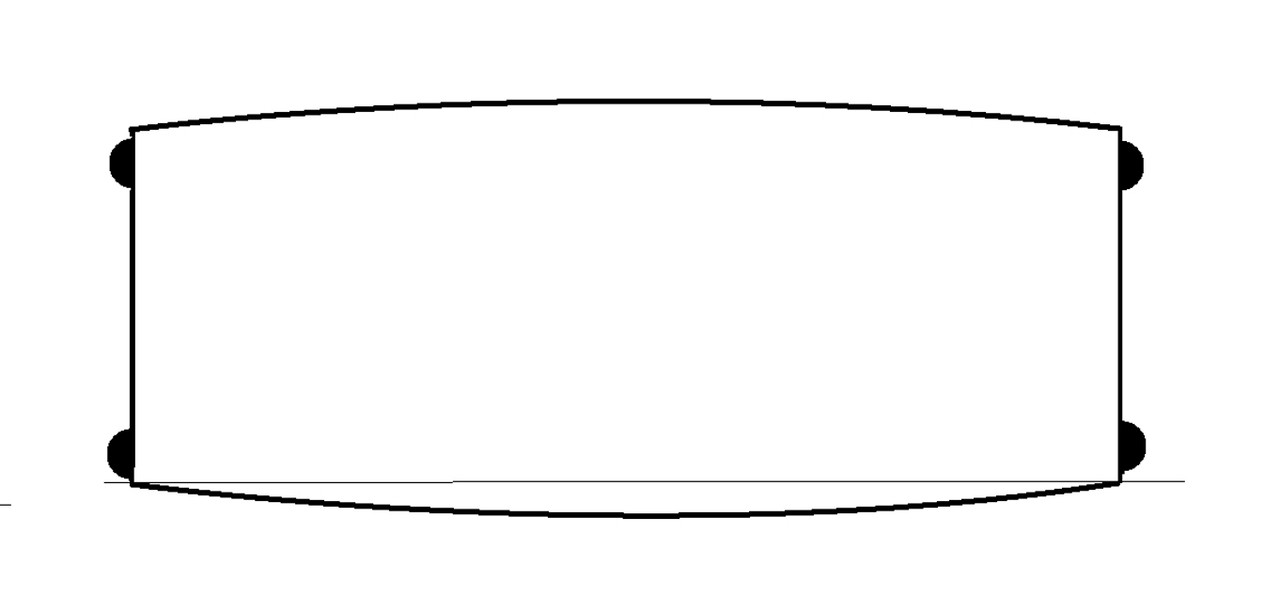
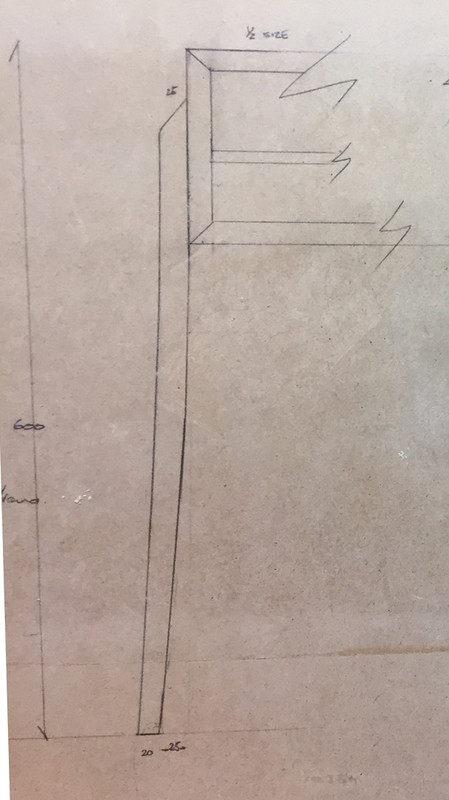

Ideally, the legs will be attached without any bracing. I would prefer to not even have a stretcher between the legs, however recognise that my intended connection of the legs to the case may not be enough to prevent flex in the legs.

The plan I have is the attach a wedged through loose tenon into the case (which is 20mm thick), and connect the legs to this with a pinned mortice-and-tenon.

This will need to be done before starting on the drawers (for access). The wedging should prevent the tenon from being pulled out, and the pinning with prevent the tenon separating from the legs.

The legs are likely to be 1-3/4” to 2” diameter (not exactly sure yet) at the top, so can be morticed 1-1/4” deep. If the tenon is 75mm long, will this be wide enough to prevent any twisting? Or do I still require a stretcher?

Any other ideas to attach legs? (No, I am not considering a frame below the case).

Regards from Perth

Derek

Re: Attaching the legs: your input please

#2

Ellis Walentine

Safety factors

Ellis Walentine

I'm having some trouble understanding your drawings, Derek. You said the legs will be round, but the plan view shows half-round legs aside the case and the elevation doesn't show a round leg notched at the case intersection to make a half-round overlay. So are they actually half round? A vertical elevation section of the joinery would help.

I think a well executed loose tenon between leg and case -- all long grain contacts -- would be strong enough with only glue; I wouldn't bother with pins and wedges, which, if the glue fails would only serve to split the leg or the case. That said, your question about stretchers reflects concern that the table will rack, perhaps to a breaking point, if Uncle Festus falls against one end or sits on it and moves around, which could strain the joint to the breaking point. It could be just accidentally dropping one end while moving it -- anything really -- that you want to guard against.

There's no doubt that well engineered stretchers (high profile, shoulders around) would add a measure of confidence that the table won't be destroyed if something untoward happens. This begs the question of safety factors and risks.

If you're confident that the table will have a sheltered life, you don't need to err as much on the side of safety.

Torpedo-type legs have survived nicely on Ruhlmann pieces and many contemporary designs, so they should be fine for your table, provided the wood species is strong enough to realize the full potential of the joinery and that you don't subject the piece to outrageous racking forces.

Ellis

Re: Attaching the legs: your input please

#3

Clarity

Derek Cohen (in Perth, Australia)

Hi Ellis

Thanks.

I did have in mind half round (well, 3/4 round) legs when I made that drawing of the leg placement. The insides where to be flat. I thought it would add a sculptured look. More recently I decided to go full round as I believe that this will be stiffer. Form follows function.

Edit: I think that I will make up both style legs and see how they look and work.

Regards from Perth

Derek

Re: Attaching the legs: your input please

#4

Ellis Walentine

Re: Clarity

Ellis Walentine

Thanks, Derek.

Regarding full-round legs, I would advise that you flatten enough of a land around your loose tenons to provide some shoulder support around the joint. Barefaced M&Ts don't have the mechanical integrity of shouldered joints.

Ellis

Re: Attaching the legs: your input please

#5

Clint Searl

Re: Attaching the legs: your input please

Clint Searl

I suggest that the wood legs be abandoned in favor of a geometric metal base. Here's one I did that's about the same height as your design. A local iron monger made it of hammered steel.


This one with wood legs; glued with double blind splines.


I also thing your design would benefit from a shelf.

Re: Attaching the legs: your input please

#6

Re: Attaching the legs: your input please

Sgian Dubh

2-3 mm deep groove the same width as the leg width with the groove running vertically (of course). 2-3 mm deep shoulder near the top of the leg so that the shoulder fits tight under the carcase bottom. Glue and screw from the inside of the carcase to fix the leg in place. In other words, work on the KISS principle. No need that I can see to make a mountain out of a molehill. Slainte.

Re: Attaching the legs: your input please

#7

Re: Attaching the legs: your input please

Bill Tindall, E.Tn.

I like the screw it on approach. Easy repair if something fails.

Re: Attaching the legs: your input please

#8

Re: Attaching the legs: your input please

Mark Mandell - Gone Round In New Jersey

Still need the mentioned shoulders to keep the round part from "wiggling".

Re: Attaching the legs: your input please

#9

Re: Attaching the legs: Popular WW June 2015

MartinMJ

There is a similar, not exactly the same, leg attachment shown in the sideboard article in the Popular Woodworking June 2015 issue.

Re: Attaching the legs: your input please

#11

Screws are out, as are legs under the case

Derek Cohen (in Perth, Australia)

At the start of the thread I mentioned that the case will have rounded dovetails, which means that there will not be an edge or ledge to use to support the legs, as suggested by some.

Screws are out (unless I can be convinced otherwise). The issue is that the case is 20mm (possibly 19mm). The head of the screw must sit flush with the inside (as the drawer runs along the inside), which means that it must be countersunk. This means that the thickness surrounding the screw is potentially thin. Movement will eventually cause this to crack or break away.

The only solution I can see is a morticed loose tenon. 12.7mm (1/2") wide x 75mm long and 20mm deep. The question is whether this needs to be wedged or not. There are pros and cons each way. The pro is the obvious one - a wedged tenon acts like a dovetail and will resist being pulled out. The con is whether the wedge will weaken the tenon, since it can only be 20mm in depth (angled saw kerfs terminating in a drill hole to prevent splitting). And at its simplest, the tenon may be strong enough with glue alone. Any particular glue (I have been using Titebond Liquid Hide)?

Regards from Perth

Derek

Re: Attaching the legs: your input please

#12

Re: Screws are out, as are legs under the case

Bill Tindall, E.Tn.

Agree with your screw assessment. The rest I don't know. Any way of mocking up the arrangement and testing rigidity? On the other hand, given the purpose and destination of this piece it could be built more for looks than robustness.

Personally I would explore a frame and legs beneath but I agree it would be more difficult to make this solution arty. Seems like several tenons to approach a spline is an obvious solution.

I am not convinced wedging adds much so I never do it. Whatever stress the wedge imparts will relax over time and in my untested opinion the result becomes equivalent to no wedge.

Re: Attaching the legs: your input please

#13

Calculating glue area

Derek Cohen (in Perth, Australia)

Bill, the discussion here has helped me.

It really comes down to how to mortice the case, and whether a wedged end is needed. I would rather not wedge the tenon - it is a complication I would happily live without.

It is about glue area. Is 20mm deep x 12.7mm wide x 75mm long (proposed here) the same as 35mm deep x 6mm wide x 75mm long (as in the last sofa table I built)?

Regards from Perth

Derek

Re: Attaching the legs: your input please

#14

Clint Searl

Re: Attaching the legs: Popular WW June 2015

Clint Searl

Nice design. It seems a simple matter to contour the ledge on the leg to conform to the radius of the case edge. IMO, the reverse bow legs are wrong for the piece.

Re: Attaching the legs: your input please

#15

data from Franklin on M&T

Bill Tindall, E.Tn.

To begin I don't understand where and how many of these tenons will be employed. As I understand the plan, they will stick into the side of the case, limited by case thickness. It would seem that three per leg would provide sufficient strength for a light service table. I have seen far worse at Studio Furniture exhibits.

Maybe the table from the Franklin glue technical manual will help

Re: Attaching the legs: your input please

#16

Re: Attaching the legs: your input please

Barry Irby

why not sue a sliding dovetail in the end of the case to slide the legs into and lock them in place. They could be very shallow, maybe 4 or 5mm deep and even tapered. Since the ends of the case are vertical, they would be long grain to long grain. They could be glued as well.

The leg could the shaped to provide a ledge for the case to sit on as the dovetail seats.

Re: Attaching the legs: your input please

#17

Re: Screws are out, as are legs under the case

Sgian Dubh

"Screws are out (unless I can be convinced otherwise). The issue is that the case is 20mm (possibly 19mm). The head of the screw must sit flush with the inside (as the drawer runs along the inside), which means that it must be countersunk. This means that the thickness surrounding the screw is potentially thin. Movement will eventually cause this to crack or break away."

I'd not appreciated your carcass corners were rounded Derek - your drawing in your first post in this thread show square corners. I had to look at your other postings elsewhere to confirm what you've just stated in this thread.

Still, no matter, with a slight variation I still say screw the leg on. The only change in my suggestion is to omit the shoulder near the top of the leg. Rout a groove into the carcass side as I described before, maybe a couple of mm deep. This groove, matching the leg's width, stops short of the carcase top because the leg also doesn't run all the way through. In other words, there's a stopped groove up to which the top of the leg can butt (or you can execute a small shoulder at the top of the leg if you prefer).

Then it's just a matter of gluing and screwing the leg on using countersunk screws set a little under the inside surface of the carcase where the drawer runs. I think you seriously underestimate how much strength there is in all the relevant parts, i.e., the screws, the glue, the legs, and the ~19 mm thick carcass sides.

To try and convince you, have you noticed how many dining type chair crown rails, front arm supports, and the arms themselves are simply glued and screwed to other framing elements? A chair is a furniture item that really does take abuse but, crucially, those screwed together bits also generally survive well for decades if executed well. All your table/cabinet is going to do is basically sit somewhere, and maybe get moved around a bit as needed. I'd say that's all relatively minor stress compared to a dining chair. Slainte.

Re: Attaching the legs: your input please

#18

OK, screws may be in

Derek Cohen (in Perth, Australia)

Thanks once again, Richard.

I am going to make a test leg tomorrow and then decide on the method of attachment. With the design I have in mind, glue-and-screw is looking a strong possibility.

Regards from Perth

Derek

Re: Attaching the legs: your input please

#19

Re: Attaching the legs: your input please

William Duffield

I agree, a sliding dovetail would work well, with the tail cut into the edge of the leg, and the slot vertically in the side of the table. To support the top of the leg, bore a shallow half hole in the side of the case, and up from the bottom the same diameter as the leg. To drill the hole, you would have to clamp a sacrificial wood scrap to the outside of the side of the case, to keep the drill from blowing out the side of the case. The bottom of the tail and the top of the leg's shoulder would be buried inside the hole, and you wouldn't need to worry about fitting the curve between the case side and bottom of the case to the transition between the half and full round sections of the leg. To make sure the tail didn't ever split off of the leg, after you machined and shaped it, you could reinforce it with short flat head screws (or dowels or loose tenons), not from the inside of the table, but just through the tail and into the bulk of the leg.

Re: Attaching the legs: your input please

#20

Re: Attaching the legs: your input please

William Duffield

Oops, forgot one important point: cut the tails and fit them to the slots before you turn the legs.

👍 This page answered my questions

Your vote helps other woodworkers quickly find the answers and techniques that actually work in the shop.