WoodCentral Forums

Est. 1998 — 27 years of woodworking knowledge

Attaching Top with Pocket Screws

Posts

Attaching Top with Pocket Screws

#1

Alan Young

Attaching Top with Pocket Screws

Alan Young

I would normaly find alternate methods to pocket screws to attach a top to a cabinet but I have a situation that may warrant this method-Sometime back Bill T posted some pics of this method-Bill if you are remembering this can you repost your technique?

-Thanks

-Alan

Re: Attaching Top with Pocket Screws

#2

Re: Attaching Top with Pocket Screws

Bill Tindall, E.Tn.

Just finished taxes. I think the software calculate to tax incorrectly. Could not find a solution. Brain frazzled. Will see if I can find PIC and if not will send a phone number and you can call....but it will be tomorrow

The method is what I learned in Mack Headley and Sons shop from Steve Hamilton. They use it to fasten any top.

Re: Attaching Top with Pocket Screws

#3

Alan Young

OK Thanks No Rush


Re: Attaching Top with Pocket Screws

#4

Re: Attaching Top with Pocket Screws

Sgian Dubh


Re: Attaching Top with Pocket Screws

#5

Steve Hamilton Method, Period Correct

Bill Tindall, E.Tn.

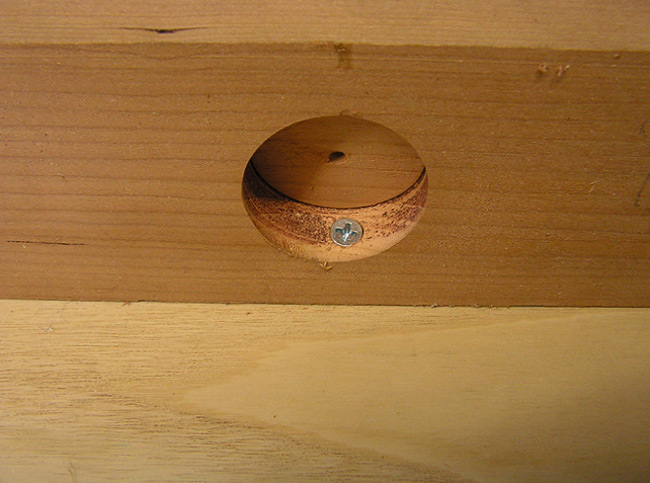
Method demonstrated by Steve Hamilton (this is Steve's demo hole).


1. Drill an oversized hole from edge of table skirt to exit about 2" below top edge.

2. Pick a screw and the length this screw will project into the table top.

3.Sribe a line where the screw head will bottom out in pocket hole.

4. Chisel straight into the skirt at this scribe line to establish the shoulder the screw will bottom out on.

5. With a gouge, gouge out clearance (pocket) for the screw head .

!!!!!When screwing in the pocket screw place finger about where the screw will exit the top if you screwed up the depth measurement. You can feel the screw tip getting close and stop safely.......or not. >( Square drives are a risk as they can be driven past the shoulder with alarming ease.

Picture worth a 1000 words

Re: Attaching Top with Pocket Screws

#6

Exactly what I do too...

John in NM

Only exception is that I use brass flat head screws rather than raised thread screws. Still keep the finger on the other side though :D

When driving those raised thread screws I actually find I have excellent speed control using an impact driver. At the lowest speed it just kind of slowly thunks the screw in, maybe 1-2 impacts per sec. Need a light touch on the trigger, but that's not hard to learn (I hang drywall with them too :D )

Re: Attaching Top with Pocket Screws

#7

Re: Steve Hamilton Method, Period Correct

Barry Irby

Steve Hamilton's Method as presented by Bill Tendall appears excellent with one exception. Instead of a flat head countersunk type screw use a round head screw or better yet a washer head screw such as a Kreg screw. These screws have a flat shoulder under the head that will bear firmly on the surface of the pocket and will be very difficult to drive through it. The counter sunk type will split the rail quite easily. I know Lowe's carries the Kreg screws and maybe Home Depot. Of course they are available on line as well. They are square drive, but are excellent in this application. They are available in course and fine threads for hard and softwood. I can never keep it straight which is which, but they are labeled in my shop. Available in many lengths. Drill a slightly oversized hole through the rail but they will self drill into the top.

Incidentally, the finger over the spot as you carefully drive the screw is a good idea.

Re: Attaching Top with Pocket Screws

#8

Re: Attaching Top with Pocket Screws

William Duffield

I use the same method as Richard uses, with the exception of the choice of screw. It was taught to me by a former Master of the Hay Cabinet Shop. The advantage over Bill's method is only that it is easier to control the distance between the pocket and the top of the apron, lessening the chance of penetrating the top surface of the top, or alternately not driving the screw deep enough to hold securely. When I want to be as close to period correct as possible, I use a flat head slotted non-galvanized steel screw.

For modern style tops, I prefer to use a Kreg washer head screw and a BorMax bit over any earlier bit design.

Re: Attaching Top with Pocket Screws

#9

I don't understand......

Bill Tindall, E.Tn.

"The advantage over Bill's method[lets call this method the "traditional method" because it is the method I see every time I peek under old furniture that has a top] is only that it is easier to control the distance between the pocket and the top of the apron"

In the traditional method this distance is defined by a scribe line which defines where to place the chisel tip. It is unclear how any alternative would better control this distance, or why any method isn't good enough.

One could argue that the traditional method requires using a gouge that some may not own. I must admit that it is satisfying to gouge out the pocket. Reminds me of childhood whittling.

Re: Attaching Top with Pocket Screws

#10

Agree

John in NM

Cut to the scribe line, simple and consistent. And the gouge work is a lot of fun too :D

When I first read about this method in an old FWW book and tried it (back then I lived near enough a Woodcraft to run out and buy a gouge that day), I was amazed at how fast it is. Maybe that was just because it was early in my acceptance of the fact that hand tool do not always equal slow.

Re: Attaching Top with Pocket Screws

#11

Alan Young

Thanks for the responses-

Alan Young

This may or may not work for my situation-If I want to employ this technique for this current project I think the enlarged hole and chiseled opening should have been done before my glue up-assembly.


I'm away from the shop and will reassess the situation later. Maybe end up with figure 8 connectors.

Re: Attaching Top with Pocket Screws

#12

Re: Attaching Top with Pocket Screws

Sgian Dubh

William, as far as I'm concerned, both the methods shown here, i.e., the traditional gouge formed pocket and the Forstner bit created pocket have validity. Both work, and choosing which one to use primarily depends upon the circumstances. The gouge formed pocket is perhaps better suited to traditional work, e.g., reproduction furniture, although it's certainly not out of place on any work. The Forstner formed pocket is perhaps better suited to contemporary work, and it is generally a little faster to execute. Aesthetically, I find the gouge formed pocket the more attractive, it being more 'elegant' in my opinion. Slainte.

Re: Attaching Top with Pocket Screws

#13

Re: Thanks for the responses-

Sgian Dubh

Neither form of pocket discussed in this thread appear to be suitable to attach that top to those rails.

One solution that's simplicity itself is to bore holes through the rails and screw the top down via those, although if the carcase is already assembled you might need a right angle drill to create a countersink for the screw on the front rail. Just make the screw clearance holes in one of either the front or rear rail extended a bit to allow for cross-grain movement of the top.

Which rail you put these extended clearance holes in depends on which edge of the top you wish to remain fixed, and making the slots extended can be as simple as just levering the drill bit backwards and forwards (or left and right) after it's bored the initial hole. These extended screw holes would better filled with a roundhead screw tightened onto a matching washer if possible, which suggests they'd work best on the rear rails because they're less likely to impede drawers as they slide in and out, all depending on your drawer configuration. Slainte.

Re: Attaching Top with Pocket Screws

#14

Problem is unclear

Bill Tindall, E.Tn.

I am unclear what the problem is in fastening this top to the case. The situation appears similar to many case pieces I have built including forgetting to predrill the holes through the top framing.

I fix the top to the front framing. Simple matter of drilling holes at each end and middle and then the trick......use square drive screws and a 1/4" ratchet and socket to drive the bit. This "screwdriver" is only 1 1/2" tall and it will drive a #8 square drive into poplar framing without need for a counter sink. Screws into the center and back framing are done with oversized holes as described by Sgian. The back of the drawer can be dropped a bit if needed to clear screw heads.

In the past I described some screws I like for this task. The are like Kreg screws but #10 and square drive (McFeeley). You do have to remember to drill a counter sink before assembly.

Re: Attaching Top with Pocket Screws

#15

Handy ratchet

John in NM

There are also thumb ratchets you can use, probably slightly taller but still a neat tool. Basically a regular ratchet with no handle and the outside of the head knurled for grip. Handy for tight spaces were you don't need a great deal of torque.


Tempting to tack weld the bit in the socket too, I get too used to magnetic holders.

Re: Attaching Top with Pocket Screws

#16

Alan Young

This is the exact method I first employed

Alan Young

and I thought would work just fine except that I paid no attention to the location of the slots I created. I placed them in the same plane as my drawer sides and the drawer sides are just high enough to interfere with the screws...I planed and sanded down the drawer sides and they can now function but in the future I will need to "think ahead" ...I bought a pack of figure 8 washer and screw this weekend and my just use these instead.

Re: Attaching Top with Pocket Screws

#17

Alan Young

Bill-see my response to Sgian


Re: Attaching Top with Pocket Screws

#18

Now I am more confused

Bill Tindall, E.Tn.

Slots? Where are slots involved? Our solution does not involve slots.

If I understand correctly your problem is one I have dealt with many times. Or maybe I don't understand.

You have three "false top" strips across the top of the case that provide an anchor to screw the show top to. Holes can be bored from above and a #8 square drive can be counter sunk from below, or a bigger screw if you want to excavate a counter sink hole. A #8 will sink itself. Screws do not interfere with drawer. A false top or partial false top is typical for Period Furniture and screwing show top to this top also typical, as we described.

On other occasions I have used "Z" shaped table top fasteners for tops. I usually forget to make the slots in the case side. Can be done after the fact with mortise chisel, Domino, or grooving router bit.

Re: Attaching Top with Pocket Screws

#19

Re: Now I am more confused

Sgian Dubh

"Slots? Where are slots involved?"

Bill, I think he's just using the word slot instead of saying 'extended clearance hole'.

Alan, sorry to hear your 'slot' placement was not optimal on this occasion - next time you'll surely get them 'just so'. Slainte.

Re: Attaching Top with Pocket Screws

#20

Alan Young

Re: Now I am more confused

Alan Young

The pictures I showed were taken before I made my slots/clearance holes. I am sure I over did the effort-regardless of the location- I drilled two holes @.75 inches apart then a third in the middle where I then levered the drill bit back and forth-essentially ending up with a "slot"..circumstances are keeping me from this project for a few days-I'll post more details later....

Re: Attaching Top with Pocket Screws

#21

slot

Bill Tindall, E.Tn.

no need to slot. The screw does not need to slide in a slot and indeed it probably can't. What is does is rotate about the center of the screw hole created by tilting the drill forward and back following the path of the drill bit.

👍 This page answered my questions

Your vote helps other woodworkers quickly find the answers and techniques that actually work in the shop.