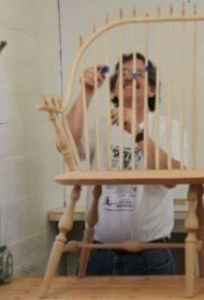
Hi JL. I made one of these a few years back. I forget the dimension, but about 5' long with legs at each end - there was no intermediate set of legs in the middle. The legs at each end are connected with a short stretcher to prevent splay.
I found the bench a bit unsettling to sit in because it is so light and flexible. Many people (especially heavier people) don't like to sit in it because they are worried they'll break it. I like sitting in it because the back is flexible and bends to a comfortable position and I'm not worried about breaking someone else's stuff.
I did, however, add gussets to the rear legs to reduce side-to-side flexing of the legs. I only added them to the back legs, but they are pretty unobtrusive and could be added to the front without major detriment to the appearance. They stiffened things up quite a bit and give me comfort when someone plops themselves onto the bench or when multiple people are sitting on it and they try to shuffle the bench sideways.
The gusset was easy to make and retrofit after the bench was finished, so you can see how your bench feels and decide if you want them. The ones I made are steam-bent laminations with a compound curve. The compound curve doesn't have to be perfect because you can plane a flat onto each end of the gusset to mate with the leg and seat. I also planed a flat onto the leg and then screwed the gusset to the leg and to the seat.
p.s. my seat was made of white pine, so perhaps there is more leg flex than you'll get with a maple seat. The legs are connected with wedged through-tenons, and there is no sign of joint failure after ~10 years. With a pine seat the bench is so light I can easily lift it up-and-over the kitchen table with one hand.
The legs are kiln dried oak (the original green ash legs shrank too much before assembly), the back spindles are green ash (they dried very quickly during turning and I could adjust the final tenon dimension before assembly), and my crest rail was kiln dried cherry.
The back spindles are glued into blind sockets in the seat and many of those glue joints show signs of movement, but due to the number of spindles there is no need to reglue them.
Never made something like this piece, but might some day. I presume it is critical to have the hole spacing perfect in the pieces joined by spindles. Is it sufficient to just mark and drill, or did you make a guide template for these holes?
I think you missed Bill's point. Is it important appearance wise that the spindles be vertical and parallel? If they lean left or right or are staggered they might look like crap.
I am in the process of building a bed for my son and DIL that will have about thirty vertical slats in the headboard and foot board. Giving a lot of thought as to how to make sure they are perfectly spaced. Any suggestion would be appreciated.
You can get really close with drill extensions that allow you to drill from the hole positions in the back to the seat. If you do have sufficiently stiff spindles, or one so flexible an offset will cause the back to assume a different position, then you can make a template of the holes from the top, and actually center the drill extension exactly with the upper hole while drilling the lower.
Under his earlier name, John Alexander has a very interesting video that details ladderback construction. One of the eye opening things about it is how he rigs his brace-and-bit with extensions to drill with more freedom and the same accuracy as a drill press. Very eye opening.
I built a set of bunk beds and a twin bed in the same style. They had slats at the headboards and footboards. Also a sofa table with slats.
The joinery was simple. In each case the slats were 1/2" thick. I milled 1/4" tongues on the ends of the slats. Then I milled 1/4" grooves in the rails of the bed ends and the table. Make sure everything fits nicely.
Next, plane a strip of wood in the same species to 1/4" wide, with the thickness corresponding to the depth of the groove. Work out the spacing between the slats and cut that strip into pieces which you'll place between the slats. Remember that you need a matching set for the upper and lower grooves, especially important if the gaps are not all the same length.
This essentially makes a series of mortice and tenon joints without all the fussy mortising. Leave some wiggle room for wood movement of the slats (not much, since each slat is probably just a couple of inches wide).