WoodCentral Forums

Est. 1998 — 27 years of woodworking knowledge

Workshop layout

Posts

Workshop layout

#1

Workshop layout

Svante Nilsson

Hi,

I am planning for a new workshop of 30-35 square meters. To get some inspiration I have been Googleling, but nearly all hits seems to be typical NA set up with separate units; saw, mite saw, planner, thicknesser, shaper, router table, belt sander, drill press and a half dozing more stationary tools.

I have only a Felder saw/shaper with router table, 410mm planner/thicknesser, bandsaw, 2 meter workbench and a tiny glue table and drillpress.

The typical NA set up is with the saw in the center. The Felder is far to big so I believe all machinery needs to be located close to the walls.

I have struggled with several layouts but have not find the optimal solution yet. Seems like I need help....

Regards,

Svante

Re: Workshop layout

#2

Re: Workshop layout

mark nowicki

30 meters by one meter is 30m²,

So is 6 by 5 meters.

Which one do you have?

Re: Workshop layout

#3

Re: Workshop layout

Mark

Search for Marius Hornberger on You tube. Young German WWer , small basement shop,very ingenius guy. Might give you layout ideas.

Re: Workshop layout

#4

Re: Workshop layout

Bill Tindall, E.Tn.

My saw is located about 3 feet from a wall and I have found this location suitable. I can rip lumber of any length because I have a door behind the saw and many feet in front of it. I don't have a panel saw nor a chop saw set up for cross cutting. I find that I need several feet of open space to the left of the blade for cross cutting lumber and plywood. Keep all the benches at or below table saw height if they are located near the saw.

Drill press and band saw can be near a wall. Each is easily moved if needed for some task where the wall is an obstruction.

I have worked in other's shops with different layout. They all work. I don't think shop layout is critical unless one frets more over optimization of the process than building stuff.

Re: Workshop layout

#5

Re: Workshop layout

Ralph Lipeles

When experimenting with layouts I find it helpful to use a piece of graph paper and cut out dollies of each item. That way I can see changes very quickly and easily.

Re: Workshop layout

#6

Re: Workshop layout

Svante Nilsson

Hi,

Its not built yet, but 6*5 is probably what I will go for....

Svante

Re: Workshop layout

#7

Re: Workshop layout

John McGaw

My shop is half of a typical NA two-car garage which I've walled off. It is 4m X 6.7m or about 27m square with a small awkward extension in one corner of perhaps 3m X 3m which is used primarily as storage. The shop works pretty well with a Robland combination machine (sliding-table saw, shaper, planer, jointer, mortiser). I also have a largish bandsaw and a small floor-standing drill press. Router table and miter saw are on roll-around cabinets. The Robland has their 'mobility kit' which means that it can just about be moved if I am determined enough but most of the time it sits right there in the middle of the shop with no problem. Pay no attention to the NA-centric layout guides, just think about what you need to do in your shop.

Re: Workshop layout

#8

Re: Workshop layout

Derek Cohen (in Perth, Australia)

I have only a Felder saw/shaper with router table, 410mm planner/thicknesser, bandsaw, 2 meter workbench and a tiny glue table and drillpress.

Hi Svante

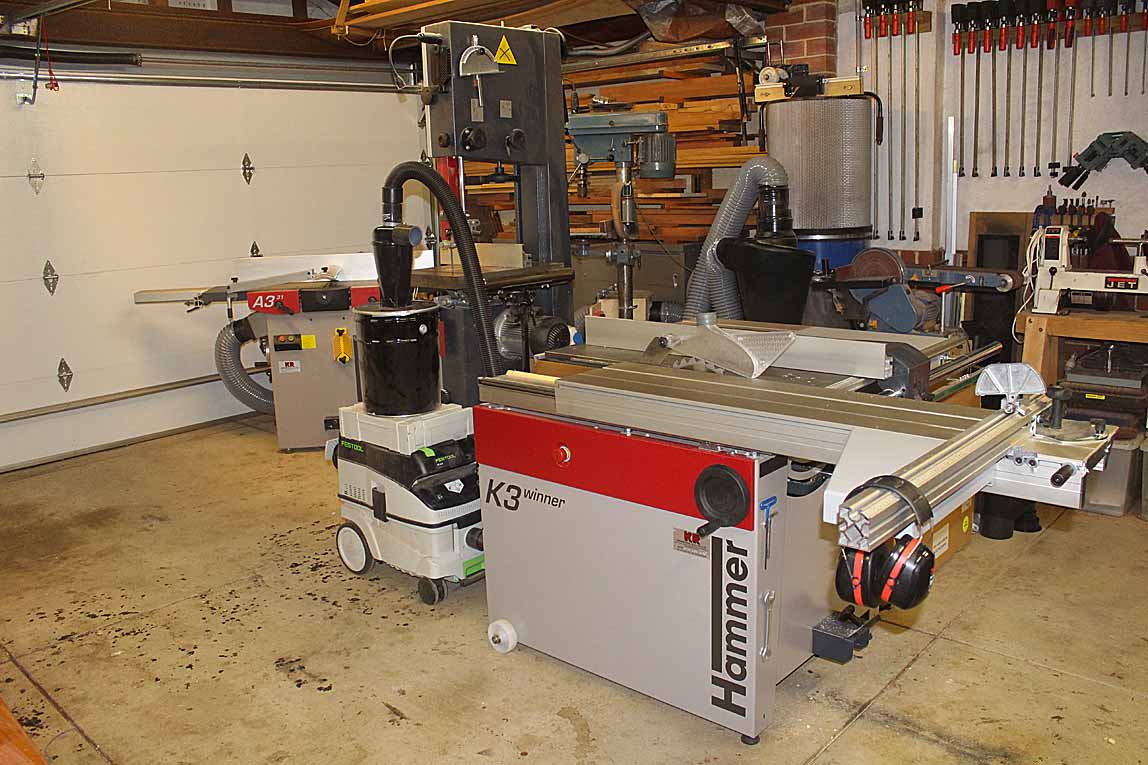
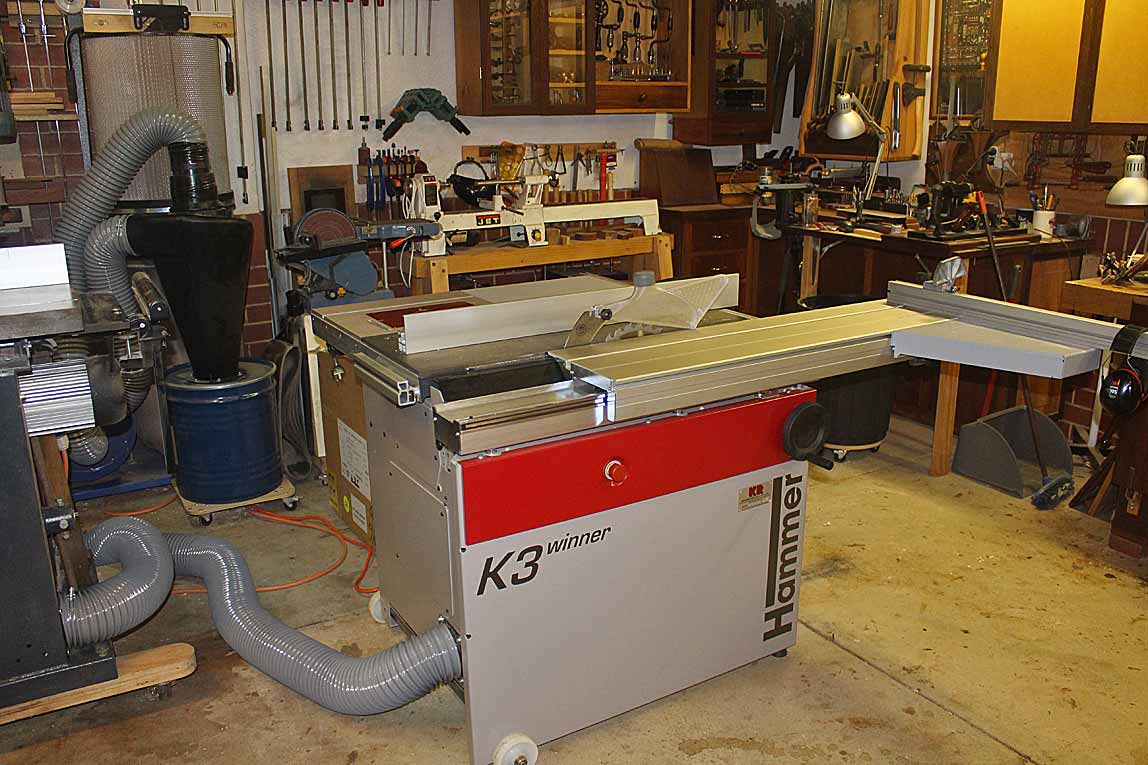
Layout generally is optimised for work flow, and this is personal. My equipment is similar to yours. If my layout can give you ideas, then good.

I have half of a double garage, with a work bench and hand tools at one end (and one car that is reversed out to make space for glue ups, etc) ...


.. and then machines along the side towards to garage door, beginning with the tablesaw, which has an integrated router table (these machines are upgrades in the past 8 years. The older machines took up much more space) ...


The machines are reasonably close together so as to reduce the run to the dust extractor. The jointer/thicknesser-planer and bandsaw work together, so are next to one another.


All the machines have mobility, and can be moved, if necessary. In practice they rarely need to be.

Hope this helps.

Regards from Perth

Derek

Re: Workshop layout

#9

What is irreversable?

Bill Tindall, E.Tn.

Can you rearrange power at the walls, (is it practical and can you do the work?). Is dust collection permanent? If you have flexibility for these and other factors stop planing and get to work. Maybe even work off extension cords for a while. Set stuff anywhere and it will soon become apparent what works for your situation.

I stuck my saw near a wall and it has never left this location. About everything else has moved one or more times over the years as needs and machinery changes.

Re: Workshop layout

#10

Re: What is irreversable?

Jesse Cloud

As others have said, its all about the specific work you wish to do.

I sometimes do small and close up inlay work which requires one configuration and other times I do medium size work such as end tables, while I sometimes make tall cabinets or long tables.

I have almost everything on wheels and I move things around often.

My tablesaw and miter saw setups are both near the garage door so that the workpieces can begin outside if needed.

Woodworking is a lot more fun when you have room to move around in.

Re: Workshop layout

#11

Question

Bill Tindall, E.Tn.


Will you explain this collection of pipes? I don't understand what feature of the dust collection I am looking at.

Re: Workshop layout

#12

Re: Workshop layout

John K Jordan

>>>When experimenting with layouts I find it helpful to use a piece of graph paper and cut out dollies of each item. That way I can see changes very quickly and easily.

That's exactly what I did and can highly recommend. Far better, IMO, even than doing a 2D or 3D computer layout.

The "wood" part of my 24'x62' shop is about 40' long with a couple of chunks removed for other shop stuff. Before I put up the first post or formed for the concrete I planned the space based on what I wanted to do in the shop. I made cutouts for every major tool, storage racks, benches, etc. and moved them around on a big piece of paper. I had cutouts of the infeed and outfeed spaces I wanted. Other cutouts were circles of the desired and minimum walking space between things.

This picture is of the planning process in progress:


I used little rolls of scotch tape to hold the cutouts in place. Once everything made sense to me I started on the design of the electrical wiring, the lighting, dust collection, windows/doors, etc. then made construction drawings.

My space is focused mostly on woodturning and support.


Since building the shop I have made minor adjustments but for the most part I've stuck to my original design.

This is the same method I used to layout the space in two houses we've lived in and for several home additions.

JKJ

Re: Workshop layout

#13

Re: Workshop layout

Mark Nowicki

Giving advice for laying out a non-existent workshop seem a bit premature.

GrizzlyTools, a purveyor of cheapish tools, has a pretty good shop layout tool, (something that Felder does not, despite their higher prices).

Grizzly does have a 12" sliding table saw, which might serve as a proxy for your combi machine.

Granted, the final result might not be accurate to the last mm, but unless you plan on circumcising mosquitoes, should do for now.

Re: Workshop layout

#14

Isn't the Felder on wheels?


Re: Workshop layout

#15

Re: Question

Derek Cohen (in Perth, Australia)

Hi Bill

Not complicated :)

What you are seeing is my attempt to centralise the dust collection. Three machines are hooked up to a dust collector/cyclone (tablesaw, J/P, bandsaw). I could not find a 3-into-1 fitting for 5" hose, and so designed and built my own.


.. and connected to the pillar of the drill press.


I would prefer to use larger (6") and smooth-walled piping, such as water pipes, for improved suction. However, this will wait until I upgrade the DC (it is only 2hp). I cannot vent directly it out doors as neighbours would likely complain about the noise, and the Hammer/Felder machines all have 5" outlets, which means that at some stage I need to modify them as well. This is the reason for the hosing. It is the best I can do at this time. The runs are kept as short as possible with the centralised ports. It works reasonably. The garage has a rear door, and I open both to flush out any dust. I am back to hand tools once the stock prep is done.

Regards from Perth

Derek

Re: Workshop layout

#16

Re: Workshop layout

DavidNECT

I have a somewhat similar array of stuff as you describe, most of which is in a 12' x 20' building with a 9' x 9' shed attached--so, about the same amount of space as you're talking. It is tight, but workable.

My biggest goals in laying out my shop were to ensure I could get through most projects without having to move the larger machinery around, in particular the saw, jointer and planer (even though the first two are on mobility bases), and having access to work on from four sides of my workbench. Achieving this in a small space is going to impose some pretty clear and immediate constraints, so if these goals appeal to you as well, I suggest this be where you start your planning.

For me, I wanted to able to rip something up to about 8' long, so the saw (meaning the blade) has to sit about halfway between the front and back wall on the long dimension of 20'. I have a small sliding table saw, with a detachable outrigger that I use a lot and so prefer to leave installed most of the time, and a 30 inch rip capacity. I find that around six feet of clear space to the left of the blade is the bare minimum practical, both in terms of being able to cross cut 95% of what I do and having sufficient room to maneuver around the saw and outrigger without being a contortionist.

Similarly, I wanted to be able to easily joint and thickness at least up to 6 or 7' or so, so. Since my shop is only 12 feet wide, reconciling these considerations effectively dictates that the saw be tight to one of the long walls, not somewhere in the middle, with the jointer (or planer, mine are separate) more or less opposite along the other long wall. My planer is in a wide doorway on the short wall between the main shop and shed, located such that the same clear space needed to handle the outfield from the saw also serves as infeed space to the planer. My workbench, which is around 5' x 2', occupies a corner of the main shop, off the outfield end of the jointer. Everything else is fitted around these main elements. The bandsaw is set up so its outfield goes into that same open area that serves the planer and saw. The drill press lives at the infeed end of the jointer. The router table is on wheels and scoots all over. Wood storage is in the shed, etc.

...It sounds like your shop will be a little wider than mine, at 5M, but I bet the basic principle of putting the saw tight to, and at the middle of, one of the long walls, with the joiner/planer opposite, determining a spot for the workbench, then figuring out the rest of the organization based on those anchor elements still holds.

Re: Workshop layout

#17

Re: Workshop layout

Svante Nilsson

Hi,

I have similar thoughts. The critical tasks are:

- Rip 2 meter slabs in the bandsaw. It should be possible to do where it is placed now, but it is relatively easy to move i neccesary.

- Mill planks of 2 meter and I do not want to mowe the J/T

- Saw/shaper is mainly used for cutting planks (almost never sheets). I have plenty of room to the left and about 1 meter to the right. It is on wheels but heavy to move.

Dust collection is placed in a small shelter outside and with fixed tubing to J/T and saw/shaper/router table/bandsaw.

So I also come to the conclution that the saw/shaper and the J/T has to be placed on either side of the opposing walls.

My planned workshop below is 6 by 6 meters.


Re: Workshop layout

#18

Re: Question

Brian Holcombe

A cyclone and metal piping would be really worthwhile. I put it all along the wall, but along the ceiling seems best if you have machines on both sides.

Re: Workshop layout

#19

pipe and hose sizing

Bill Tindall, E.Tn.

Oneida designed my collection system. It begins with 7" smooth metal pipe at the cyclone. After about 20' and two drops to machines it necks to 6" for the final 20'. All the hoses from the 6 or 7" metal header to machines are 5". My hoses seem to be the same kind as yours.

We had an engineer give a program to our club on dust collection design. It's complicated and not reliably guessed from intuition.

Re: Workshop layout

#21

Re: pipe and hose sizing

Derek Cohen (in Perth, Australia)

Bill, I am planning on the Oneida as well. Dust scares me. I have a woodworking friend, now retired, who headed up running the airconditioning and dust control at a major hospital. As a result, I know more about this area than I want to know.

Regards from Perth

Derek

Re: Workshop layout

#22

Re: Workshop layout

Larry Clinton At Frankfort, (Central) Indiana

I have a 30' X 30' shop. I have almost all my equipment on mobile bases with the exception of my 60 gal. air compressor, my dust collector (wall mounted with PVC piping), and a surface grinder. My 20" planer is the heaviest unit an is a little hard to move but my Unisaw with extension table, router table, Drill press etc. are very easy. I have 120V electrical outlets every 32" at 4' height and extras at corners and along a wall with benches. I also have several 240V outlets at various sites.

I made up several extension cords with proper sized wiring for all the equipment and have flex 4" pipe to connect to the dust collector drops. The ability to move the saw, planer, and 8" joiner allows me to feed material up to about 30' long using my garage door opening (not necessary but I have had to use it when I had large projects on the floor). This also allows me to plane long boards to determine the figure before selecting the parts I want to use.

When my son and I built his kitchen cabinets and all the oak trim in his home, I did have to move equipment around to find room to work!

Re: Workshop layout

#23

Perfect layout

Mark Hennebury

1. Put the equipment anywhere, it makes no difference;

2. Start working.

3. In a couple of years you will have moved it where it needs to be.

Re: Workshop layout

#24

Dust in the air

Mark Hennebury

Derek, you have a bigger chance of getting struck by lightning than getting sick from dusk.

Re: Workshop layout

#25

Spot on Advice

Bill Tindall, E.Tn.

That is the kind of advice one gets from someone that is mainly motivated to make stuff. I spent about 10 up-front minutes thinking about the layout of the two shops I have extensively used, followed by decades of modification. I modified a bench location and a light this week, for example. I realized I could benefit from grazing light when sawing dovetails and rearranged to achieve this result. Ten years ago I never sawed dovetails so this need was unrealized.

👍 This page answered my questions

Your vote helps other woodworkers quickly find the answers and techniques that actually work in the shop.