Home Articles Forums Gallery Marketplace Videos

WoodCentral Forums

Knowledge You Can Build On — Est. 1998

This is the most versatile work station you will ever use

Carved Coffee Table II-Part 3 Glue-up *LINK*

Posts

Carved Coffee Table II-Part 3 Glue-up *LINK*

#1

Alan Young

Carved Coffee Table II-Part 3 Glue-up *LINK*

Alan Young

Hi friends,

I made some more progress on the Carved Coffee Table. Last set of pictures (see link below) dealt with carving the aprons and the legs. Today I have a series of pics documenting the glue-up process and some profile refining of the top. Getting accurate cuts for the leg/apron joinery really becomes apparent in glue up process-I used loose tenon joinery..... here's a shot from the earlier stages:
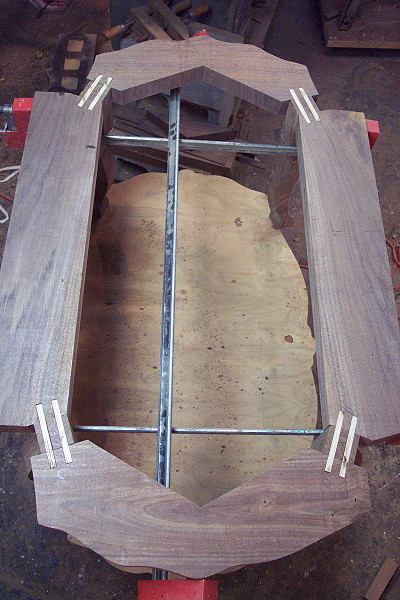

Now that the aprons and legs are shaped and carved it's time to glue them together. This task requires a fair amount of patience. I glued each joint separately and and only one joint per day. I used Titebond Liquid Hide glue because of the the open time and it's reversibility - although I'm sure I would not want to attempt "reversing" any of these joints...


Here is the first leg/apron joint.


The best way to clamp these pieces is to use some cleats-screwed to the opposing apron sections and parallel to each other.


This allows a set of clamps to pull the joint tight.


I'll do one leg at a time untill it's set.


The first leg is not too complicated to get clamped up but even with the cleats, getting the second leg clamped up was next to putting a cat in a tub of cold water. If you try something like this-it's helpful to get another set of hands.


After I managed to get the second leg clamped in position, I placed the other apron end and two legs loosely in place.


Getting close to the end of this operation-gluing the other two legs in place. I'll add the end apron section in the final assembly.


Here is the last glue-up- which was almost a screw up as I had the assembly set up on a couple of boards over a garbage can.


I got the last apron piece all in place and clamped up and began congratulating my self when I realized the apron was clamped up side down. Fortunately the liquid hide glue I used for this table has a long open time and re-setting the apron wasn't a catastrophe.

I'm moving back to work on the table top now. The first step is to finalize the profile. I want the top to mirror as close as possible, the curvature of the base. I used a long pattern bit for this job.


The bearing follows the top edge of the base while the cutter brings the top profile flush.


Here is one end apron section....


After the full profile is trimmed I change bits for the edge treatment. I'll use a three stepped ogee profile.


The bearing for this bit runs along the lower edge of the top. I cut this profile in two passes to avoid tearout.


I like this look. The resulting profile "pulls the top edge back." The routed profile will get a slight gilding in the finish and will act as a nice transition between the mahogany top and the walnut base. Later this week I'll have a set of pictures showing the inlay designs for the top.

Alan


Last set of pics...

Re: Carved Coffee Table II-Part 3 Glue-up *LINK*

#2

Where did you find.....

Thomas Skaggs, Foothills of Mount Level

....those amazing furniture clamping supports? They look like they could do double duty as paint buckets and a waste basket. I need some of those!!

Tom...envious of others at all times.

Re: Carved Coffee Table II-Part 3 Glue-up *LINK*

#3

Alan Young

You can search high and low through Lee Valley

Alan Young

and won't find them any where. But I'll trade you one bucket for a Low angle block plane...

Alan

Re: Carved Coffee Table II-Part 3 Glue-up *LINK*

#4

Re: You can search high and low through Lee Valley

Thomas Skaggs, Foothills of Mount Level

I think I'll pass. And by doing so I am assured that next week I'll find myself desperately needing a one bucket support...Murphy's Law.

Re: Carved Coffee Table II-Part 3 Glue-up *LINK*

#5

Re: Where did you find.....

Thomas S Stockton

Paint them with some bronze paint and slap on some homemade Lie- Nielson stickers and watch people go crazy over them on Ebay. As an added bonus you can try to get as many "can you believe what this guy is selling" postings on the various wood sites .

Tom

Re: Carved Coffee Table II-Part 3 Glue-up *LINK*

#6

Like A Rock

David Yoho

Alan, as usual, nice work and nice documentation of it.

What caught my attention is your work surface or "assembly bench"! I'm assuming you are using the floor of your shop either because it's flat and/or large enough for the assembled table or it's too large for your bench top. My first thought was if this method would yield a square assembly so it didn't "rock".

It must work but I can't help but think of how my knees would be feeling about now if I tried that! ;)

Looking forward to the next installment...

David

Re: Carved Coffee Table II-Part 3 Glue-up *LINK*

#7

Alan Young

Re: Like A Rock

Alan Young

I'm assuming you are using the floor of your shop either because it's flat and/or large enough for the assembled table or it's too large for your bench top. My first thought was if this method would yield a square assembly so it didn't "rock".


A bit of all of the above-sort of. I wouldn't call my floor "flat" but the bench was covered with carving tools and assorted stuff and I wasn't ready to clean it off. The important thing was to make sure the legs were all the same length at the beginning and then make sure they were glued together with their tops flush with the apron tops. The assembly was on my spiffy garbage can assembly bench all the way through clamping on the final end apron piece. As soon as those clamps were in place, I set it on the floor in this exact random spot.


The table sat rock solid on all four corners-That made me worry as this floor has numerous nicks and divots. I did set it on my table saw later just to check it out-a very slight (1/16" ?) rock which I'll file off....

It must work but I can't help but think of how my knees would be feeling about now if I tried that! ;)

I actually spend quite a bit of time crawling around on my knees-including the routing of the top profile and edge treatment. :)

Alan

Re: Carved Coffee Table II-Part 3 Glue-up *LINK*

#8

Re: Carved Coffee Table II-Part 3 Glue-up

Dave Tenney

Incredible work!

What are the basic carving tools that you use when you you do this type of work? What tools would be good to start out with?

Thanks,

Dave

Re: Carved Coffee Table II-Part 3 Glue-up *LINK*

#9

Alan Young

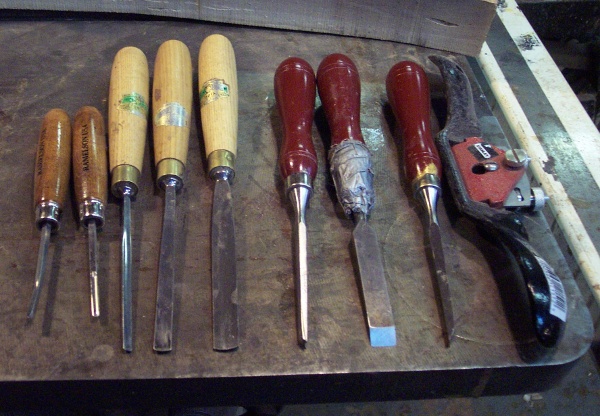
The Tools  I used for this table.....

Alan Young

What are the basic carving tools that you use when you you do this type of work? What tools would be good to start out with?

Dave,

Here are pics of the tools I used for this table. I have three sets of carving tools-represented by the choices seen here.The two smaller one on the left are a veining tool and a tight radius gouge-I used that for setting the smallest inside curves. The next three light handle gouges are 3/16 no3 5/16 no4 and 1/2no 3 Then a 1/4 no 5 followed by straight chisels and a spokeshave-used to shape the legs.


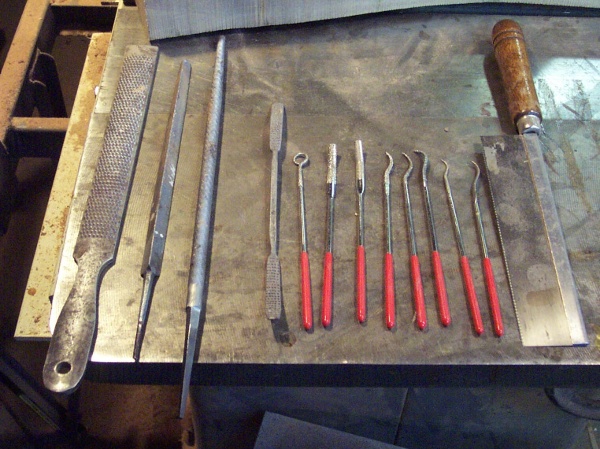
These files were used for grounding the background. The large rasp on the left was used with the spoke shave in shaping the legs. I used the back saw as needed for clarifying straight grooved sections. The single curved gray file is from a set that has a variety of curved shapes but with very course teeth for aggressive stock removal in confined areas. The small red handled files are diamond coated in various "grits" ..


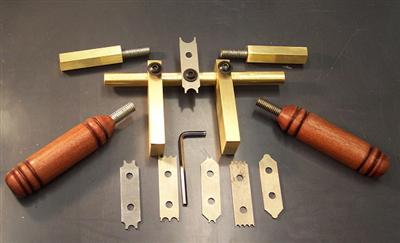
Finally I used this beading tool that I made to define the bead that runs along the apron edge.


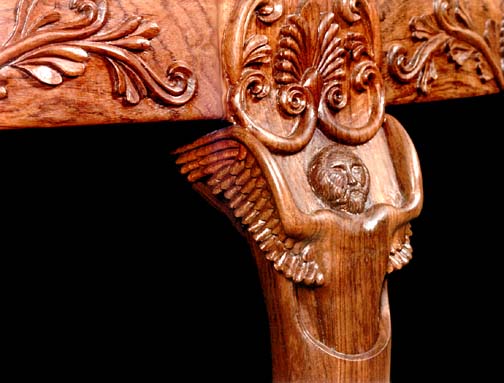
One of this forum's members-Lee Grindinger-is retired but built outstanding pieces marked by refined relief carving. This is from a large table he built.


Lee had a page devoted to carving and included a picture he called "Lee's Dirty Dozen".. basically a good starting point for carving tools. I thought I had that pictures saved in my files but I can't find it. Perhaps if Lee sees this he'll send the picture along....

Alan