Home Articles Forums Gallery Marketplace Videos

WoodCentral Forums

Knowledge You Can Build On — Est. 1998

Veritas - Innovation in Tools

Latest Project (w/ pics)--Long

Posts

Latest Project (w/ pics)--Long

#1

Latest Project (w/ pics)--Long

Joanne Adler in Pt. Pleasant, PA

>(Go get a nice �cuppa� or a snack�this is long!)

This is Part 4 of my mission to replace (what I consider to be) the ugly furniture in my parents� house. I�ve built an A&C side table for my Dad�s tv area, a huntboard/sideboard as a foyer cabinet, and a side table for the living room sofa. This time I set my sights on their hideous, 25+ year old, chipping, faux-butcher block Formica kitchen table. Over the years I�ve tried to get them to replace it, but they could not find a hexagonal or octagonal table to take its place�and they liked that shape, instead of square, rectangular, or oval. I got them to agree to �round� (I was NOT about to try to make perfect angles, even if you guys insisted it was easy) and said I�d make them a new table. I may be short or small, but my ambition is very BIG!

Some years ago they had their kitchen remodeled (you think they�d have included a new table!) and put in beautiful cherry cabinets. How convenient that cherry is one of my favorite woods and I have a local supply for it. Off I went to visit John at Bucks County Hardwoods. For a design, I knew I wanted a 48� round top and a pedestal base. But I was a little unsure of proportions for the base, in order to have a stable support for the big top. I did a little searching on the web and came across an article about a round walnut table with base that David Marks made. Perfect! Exactly what I had pictured in my head. Only I pictured it in cherry. Solid cherry. That�s a lot of cherry. Of course, my wallet would be happier if I would learn to be Veneer Girl. But what the heck�it was for my parents.

When I start a project, I always try to pick something that forces me to try/learn a new skill or technique. This table was no exception. I�ve never done quite such a large glue-up. I did it in stages, so I wouldn�t screw it up. The big 48� top used 6 pieces. I took a big sheet of cardboard I had from some shipping box and drew a big circle (pencil, string, and tack for a compass). I didn�t want to waste any cherry and knew the glue-up pieces didn�t all need to be over 48�. I used my cardboard circle to fit the boards as I would use them. I just had enough of the nicest cherry in clear boards to make the big top. In fact, there was a big knothole in one piece that I figured would add some character and I�d just leave it and fill a little with epoxy or something (more on this later). I didn�t have enough of the same cherry to replace that piece or cut out all of the light sapwood (which I happen to like and usually leave in on purpose). First I glued up pairs. Then I glued 2 pairs together. Finally, I glued the last pair to the group of 4. It took longer, but this way I only had one glue joint to deal with at a time.


Once my glue-up was all done and flattened moderately, I took my �fancy� large circle compass and drew a big circle on the piece. Good thing I�m used to �going around in circles� a lot! I used a jigsaw to cut out the circle. Then I took a little time to make a simple circle jig for the router. With the jig and a straight bit I cleaned up the jigsaw cut. The other trips around the table were with a sander to smooth the edge and with the router to put a chamfer on the bottom edge and a roundover on the top edge of the tabletop.


The base is made up of a center pedestal with cross supports as feet and arms for the tabletop. The pedestal is a glue-up of 3 pieces, with bridle joinery at the top and bottom. The supports are 40� long, tapered �arms� with half-lap joinery. Half-laps I�ve used before; the bridle joints were new for me. These could have been better or tighter; guess my handtool skills still need practice.


By far, the biggest challenge I had on this project (besides picking up and carrying around a 5/4� or more solid cherry 48� round tabletop�I�m only 62 �� tall myself) was what to do with the knotholes I left in the wood. There was one on the top as well as one on the side of one of the leg cross supports. I could have used patches or dutchmen. But I�ve seen turnings done with embellishments of crushed stone (turquoise, for example), and that gave me the idea to fill the holes like that. At first I was going to use turquoise (it looks so nice with cherry), but then realized that I could probably find some Malachite or Lapis Lazuli in my Dad�s basement (he used to work with semi-precious stones like that)�how cool to use his own stone in a table for his home! And indeed, I was able to find some small pieces of both at their home to try out.

The dead material in the knots had started to crumble out, after all the agitation from shop tools like jointers, planers, sanders. The holes were deep enough to first need some putty (Famowood to the rescue). Then it was on to experimentation for the stone. I posted my questions over on the Turning Board as to how to do this. I got a lot of great advice. I also spent some time reading online. I found that the Malachite was softer and easier to grind up than the Lapis. I made some holes on a scrap of cherry and first tried using CA glue with each of the stones, then epoxy. The epoxy worked better, but I didn�t like the look of the stones crushed like that. Malachite is a beautiful green and black swirly stone (kind of like green cherry!) and I didn�t want to lose that look. End decision: Dig out the knot holes enough to get some pre-cut cabechons to fit in there, whole. I did use some crushed stone or powder as filler in some places. Overall, I was pretty pleased with how this came out. In places it looks as if the wood is bleeding Malachite. I did wind up using epoxy and that helped to keep the integrity of the wood where there isn�t stone, and created a smooth surface. First here�s the table all cut and smoothed with the knotholes. Then closeups of the fills. I almost wished I had used the 'bottom' of the table for the top--there were 3 knotholes there. But I did not have enough Malachite to make patches.
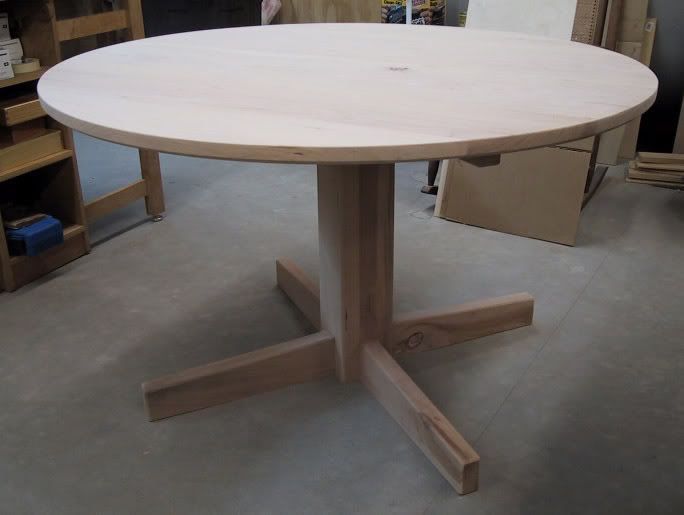
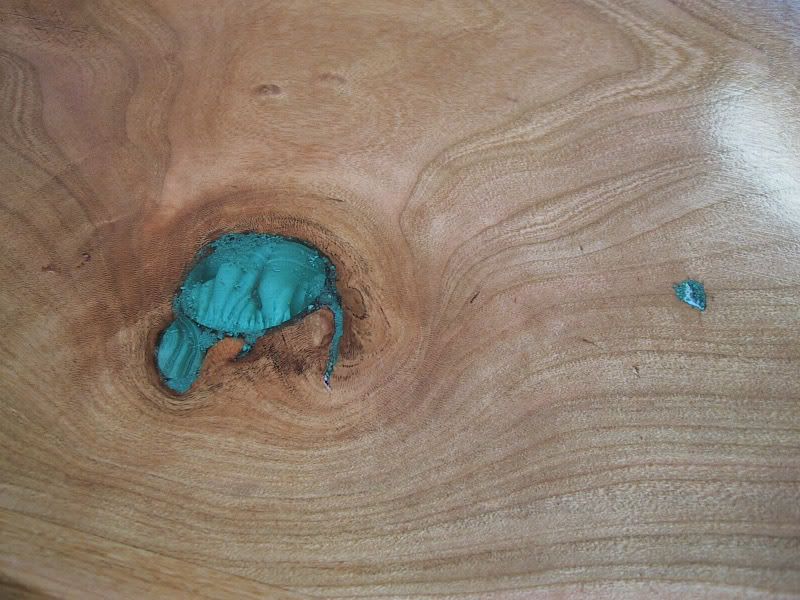
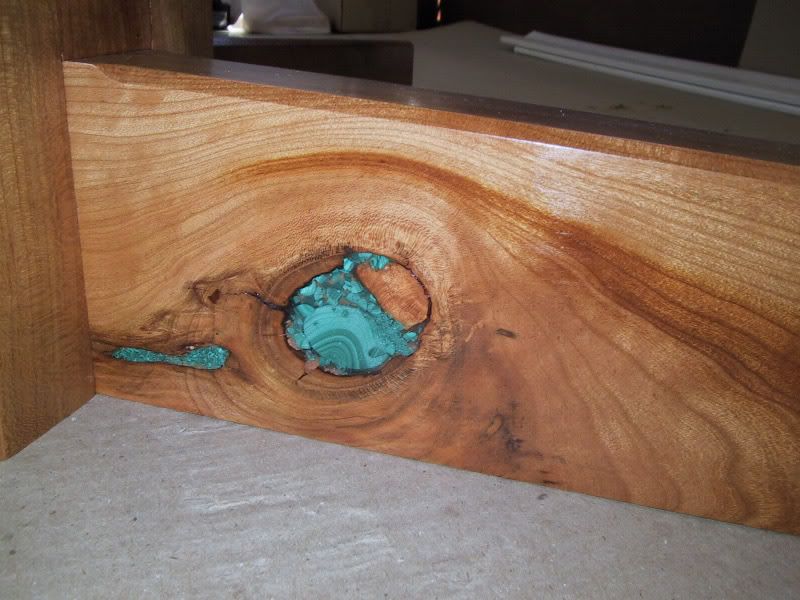

The finish is polyurethane for durability (this table will get a lot of abuse). Many hand-wiped coats of gloss. Light sanding in between coats with successively finer grits of paper. I tried a coat of satin, but thought it looked milky and dull, so I added another or so of the gloss and rubbed it out. Finishing (as opposed to �completing�) is my least favorite part of a project and I�m sure it shows. I�ll leave that skill on the list for improvement, too.

It looked pretty nice from up on a chair or ladder:


Figure 8�s hold the top to the upper support arms.


I did draw the line at building matching chairs with cushions, arms, and casters. My mother and sister were able to find some nice, comfortable ones with a stain that looks pretty close to the cherry. Here are a few shots of the delivered table in Mom�s kitchen (it actually fit inside my Forester!) with the new chairs. Needless to say--everyone loves it.


Thanks for viewing. Hope I�ve passed back some of the inspiration and ambition to try a big project that I always get from you all.
Re: Latest Project (w/ pics)--Long

#2

Fred Freaked Out!

George@Colonel's Workshop-Havertown PA

>When he saw that lovely cherry to joint.

Good Afternoon Joanne,

The sapwood absolutely belongs where you put it.

Combined with the imaginative "patch" it enhances the overall appreciation I have for the table without detracting from it in any way.

Its a beautiful job. I bet your parents love it. Now....for all those matching chairs. :<)

Regards to Fred

George

Re: Latest Project (w/ pics)--Long

#3

Well done!

Charles R. Smith

>Well done! The table is marvelous!! Your explanation nicely completes the story told by the pictures. And you are an inspiration to those of us who've been asked to build a table but are afraid to tackle such a large project.

Charles (whose kids have asked for a kitchen and a dining room table. And chairs.)

Re: Latest Project (w/ pics)--Long

#4

Bravo!

Jennifer@Indy.USA

>Joanne the table turned out fantastic! I can only imagine the reaction of your parents when you delivered it. I love the "patches". They really make the piece special. Your finish looks flawless too. Great write up and progress pictures. What a treat to see it all come together.

Bravo!

Jen

Re: Latest Project (w/ pics)--Long

#5

Re: Latest Project (w/ pics)--Long

Virgil Johnson, Versailles KY

>Nice work.

Re: Latest Project (w/ pics)--Long

#6

The pedistal design . . .

steve mackay

>very clever and interesting. But, I'll admit, the mark on the top is the coolest part. MANY stories told over THAT one !

Re: Latest Project (w/ pics)--Long

#7

Great Table

Bill Roland (Mt Juliet,TN)

>You should be very proud of that table. It is really nice.

Re: Latest Project (w/ pics)--Long

#8

JL

Re: Like the malachite, good accent!

JL

>Looks real good with the cherry.

Re: Latest Project (w/ pics)--Long

#9

Re: Latest Project (w/ pics)--Long

Stuart Hough

>Beautiful piece, Joanne! I LOVE the malachite...it really looks interesting! It just goes to show how the "little" things really make a piece special, and in this case, bring a sentimental joy to the work! Well done!

Re: Latest Project (w/ pics)--Long

#10

Ellis Walentine

Really nice, Joanne

Ellis Walentine

>I wish I had dropped by to see it before you delivered it to your parents. It's a beauty. The idea of fitting pieces of malachite in those knots is a much better solution than filling them with malachite dust. The grain of the stone is a real attention getter.

Thanks for posting. This looks like a shop shot if I ever saw one.

Ellis

Re: Latest Project (w/ pics)--Long

#11

Nice work!

Lee Schierer - McKean, PA

>Nice work, it looks great. I'm sure it will have many family gatherings around it.

You could tighten up your joints by gluing in a thin piece of similar colored wood. It would tighten up the joint and give the foot support along the sides but would not have been noticeable. But, since your table is done, tuck that idea away for next time.

Lee

Re: Latest Project (w/ pics)--Long

#12

Nicely done and a question

Mike Farinella

>By looking at the pics, I assume the legs are sitting on the floor. Any reason you didn't uses "pads" for levelling purposes? How do you like the Festool?

Thanks and always a pleasure looking at you work.

Re: Latest Project (w/ pics)--Long

#13

No Rest For The Weary

David Yoho

>Joanne, great job - nice table!

Ellis, I've got it. My schedule is still very tight, so it will be a while before I get to it. I've already got quite a pile that's been waiting on me for longer than normal. Sorry to keep folks waiting but it can't be helped.

David

Re: Latest Project (w/ pics)--Long

#14

Re: Latest Project (w/ pics)--Long

Jim Shaver Oakville, Ont.

>Hi Joanne,

You have chronicled a wonderful project, with all the balances and inspirations that make it a special and unique work for your folks. A cherry table in a cherry kitchen makes a wonderful setting. Knowing your dad's love for rocks and minerals makes the malachite a lasting comment for all to see.

The one thought I have is that I can not imagine how you moved that top around by yourself, it had to have been hard and also to avoid the potential shop dings along the way, no heart stopping moments I hope. Also I know it took up a lot of horizontal shop space, that must have also been a challenge.

I like that you didn't dye out the sap wood and that you chose to place it like a ribbon across the centre, cherry is always at the top of my list of choices and I think you have been inspired to continue to use it more by the outstanding result you have here. I enjoy the table, I enjoy your story, well done my friend!

Take care,

Jim

Re: Latest Project (w/ pics)--Long

#15

Re: Latest Project (w/ pics)--Long

Randy G

>Wonderful job, that's a great looking table

Re: Latest Project (w/ pics)--Long

#16

Re: Latest Project ...I'm impressed

Bob Persing

>Joanne,

WOW!

What an ambitious undertaking and what a splendid and creative outcome. I clearly recall one of your earlier projects that you brought to 5-Barns for show 'n tell, the open tray with angled dovetail joints (if I have the details correct). The angled dovetail joints were your challenge of the time (nicely done, as I recall), your recent table project is quite an escalation in the self imposed challenge.

Yes, your project is indeed an inspiration to take on some larger projects now that I am retired. I need some furniture having recently moved into a new house and can not bring myself to "purchase" pre-built furniture at the local stores. I think I'd rather go with some less embellished designs and build it myself.

Thanks for the inspiration.

BobP

(Now in Florida...NY)

Re: Latest Project (w/ pics)--Long

#17

Thanks Everybody!

Joanne Adler in Pt. Pleasant, PA

>Mike--I love the Festool router. It is pricey, but works like a dream and has a great adapter to hook up a shop vac for dust control. This works great and doesn't make the router lopsided and fall over, if left unattended. And the time it saves from cleaning up the dust a router spewes is priceless.

As far as using pads on the bottom of the table--I thought about it and even took some in case it didn't sit flat on the floor. But it sat perfectly in my parents' kitchen and I wasn't crazy about how the pads made the legs look anyway.

Bob--How kind of you to remember my "non-turner's bowl"! Those are angled box joints, done on the tablesaw. The 'bowl' still sits on my mother's dining room table. It is a wonderful, rich cherry color.

Jim--As my much taller bandmate Carol says, "she's small, but she's mighty!" I did worry a little about 'dings' and was sooooo careful.


img

Re: Latest Project (w/ pics)--Long

#18

p.s.

Joanne Adler in Pt. Pleasant, PA

>"dye out the sap wood"?????????!!!!!!! What is "dye"?! Must be a French Canadian word, eh? Not in my cherry vocabulary.

Re: Latest Project (w/ pics)--Long

#19

Re: Thanks Everybody!

Bob Persing

>Well, I was sorta close on the details.

It has been quite a few years since that picnic.

Angled dovetailed square bowl comming soon? ;>)

BobP

Re: Latest Project (w/ pics)--Long

#20

Re: Thanks Everybody!

David Adler

>Hi Folks. I probably don't belong on here since I, myself am not a woodworker, but since I AM Joanne's baby brother, I figure that gives me bragging rights. The pictures you've seen, while excellent pictures they may be, certainly don't do justice to the piece. It's even more impressive in person. And, while I'm not a woodworker, I used to work with silver and stone to make jewelry, so I have an excellent eye. This table is awesome!

Love ya Sis!!

David

Re: Latest Project (w/ pics)--Long

#21

Re: Latest Project (w/ pics)--Long

Audrey Adler

>I see my son beat me to the punch and I'm not a woodworker either, but as Joanne's mom and recipient of all her creative endeavors, I claim bragging rights. Each piece she has brought to replace one whe didn't like, has been more beautiful than the last and the technique continues to improve by leaps and bounds. The table for the front hall was eye-popping beautiful, but the new kitchen table is really jaw-dropping gorgeous. I almost hated to put meals on it and cover it up. (Of course I got over that in a hurry.) Anyway, Joanne, I'm proud you're my daughter ... even if you don't make a new entertainment center for the living room.

Re: Latest Project (w/ pics)--Long

#22

Re: Latest Project (w/ pics)--Long

Carol - now in NC Nebraska

>The most precious part of this entire project is your brother and your Mom coming on board and bragging on you in public.

The table is lovely. I envy you your skills and your family! Good job, girl.

Carry on. What's next?

Re: Latest Project (w/ pics)--Long

#23

Re: Latest Project (w/ pics)--Long

marji adler

>i know joanne's posted other pix of her amazing work, like the jewelry box and stand that take your breath away, and the corner table in her mom's house that is very fine indeed. (incidentally, joanne, where are the pix of the entertainment center you built your dad and the front hall table at your mom's?). those of you that work in wood may even experience a frisson of envy at such imaginative work. i used to, you know. having such a talented baby sister is awesome. however, i feel i should let all of you green-eyed monsters in waiting off the hook: i went out to her workshop and lo and behold, there on the ground, as i suspected: tiny elf shoe-prints. while joanne plays her guitar and works on her yard, THEY finish off these masterpieces! i knew it all along!!!

love ya, sis,

me

Re: Latest Project (w/ pics)--Long

#24

Re: Latest Project (w/ pics)--Long

George@Colonel's Workshop-Havertown PA

>Good Evening Carol,

You expressed my own thoughts..although Dave's post has me very confused. All of us who know Joanne feel she is much too young to have a baby brother. Good for you Joanne. And, regards to Fred.

George

'

Re: Latest Project (w/ pics)--Long

#25

And this is why

Joanne Adler in Pt. Pleasant, PA

>the George is MY FAVORITE! Even though he insists on calling Frank "Fred".