
Home Articles Forums Gallery Marketplace Videos

WoodCentral Forums

Knowledge You Can Build On — Est. 1998

ADVERTISE HERE - FREE TRIAL

Rough and Ready Version 2 *LINK*

Posts

Rough and Ready Version 2 *LINK*

#1

Alan Young

Rough and Ready Version 2 *LINK*

Alan Young

>Here is a Trestle Table and Four Benches that are destined for a cottage in Canada's beautiful Georgian Bay.
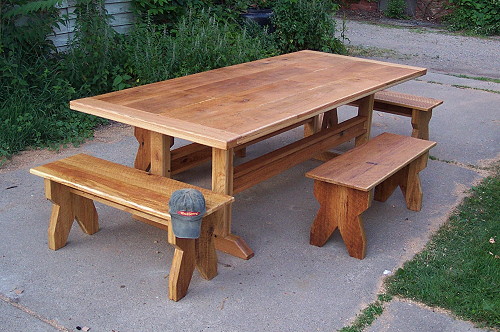

This is the second set of pieces commissioned by a family that wanted a rough cut look to the furniture. The first set can be seen here:

http://www.woodwardwoodworks.com/RusticOakTableandbenches.html

The oak came from a tree in the family's property and the objective was to leave as much "Buzz Saw" markings on the surface as possible. This required some non-standard woodworking techniques to get edges and surfaces to joined well and still leave the more natural looking surface.


An "I beam" is employed in the design of the benches and table. In the table the I beam and the vertical supports have pinned mortise and tenon joints .


The table top is a double layer with bread board ends. This top is very heavy- I haven't weighed it as I'm not sure my scale can adequately measure it!


These benches and table will accompany a Queen sized bunk bed to the Georgian Bay destination next week.


These pieces were fun to build. Some construction shots of the table can be seen in the link below. Thanks for looking.

Alan


Construction Phases

Re: Rough and Ready Version 2 *LINK*

#2

Re: Rough and Ready Version 2

Thomas Skaggs, Foothills of Mount Level

>Um, Alan....do you need to borrow my sander?...just say so. ;-)

Knowing their destination I think they will be great. They look like just what your client was hoping for. Nice job!

Tom

Re: Rough and Ready Version 2 *LINK*

#3

Very nice work!

Clint Searl, at the base of Haycock Mtn

>

Re: Rough and Ready Version 2 *LINK*

#4

Alan Young

Maybe-I'll be featured in "Brutal Woodworking"

Alan Young

>-the premier magazine for "Fine Furniture built with Buzz Saws and Axes"

I want to de a feature called

"Edge joining with a Belt Sander 50 or 60 grit?"

This will follow up my finishing article discussed last week-

"Driveway Grind" getting that perfect dipped Shellac Finish"

If you want a complimentary copy just let me know.

Alan

Re: Rough and Ready Version 2 *LINK*

#5

Re: Rough and Ready Version 2

George@Colonel's Workshop-Havertown PA

>Good Evening Allan.

The tables and benches look Great. They boot my mind to a mood of sawmills. They convey the illusion of rustic authenticity while displaying fine joinery and proportion. Well done.

Just for fun: what finish didl you use, and what is the best way to strip the furniture in the far, far future? :<)

George

Re: Rough and Ready Version 2 *LINK*

#6

Alan Young

Re: Rough and Ready Version 2

Alan Young

>Hi George,

I'm glad you like these pieces. They were fun to build but believe me I am ready for something more refined- not just because I am a snobby woodworker-although I probably am :^) but these were just plain ol beasts to produce...

As to the finish- I slopped on several coats of polyurethane via a brush. Even when the finish cures in a few weeks I will not be rubbing it out. If need be they can be lightly scuff sanded every few years and another layer or two of poly added...of course the finish could be striped with my favorite method- the "Drive Way Drag" all you need is a 20 foot nylon rope, a gravel driveway and a FORD 150. :^)

Alan