WoodCentral Forums

Est. 1998 — 27 years of woodworking knowledge

Playin' With A Laser - Session 2

Posts

Playin' With A Laser - Session 2

#1

Playin' With A Laser - Session 2

charlie belden

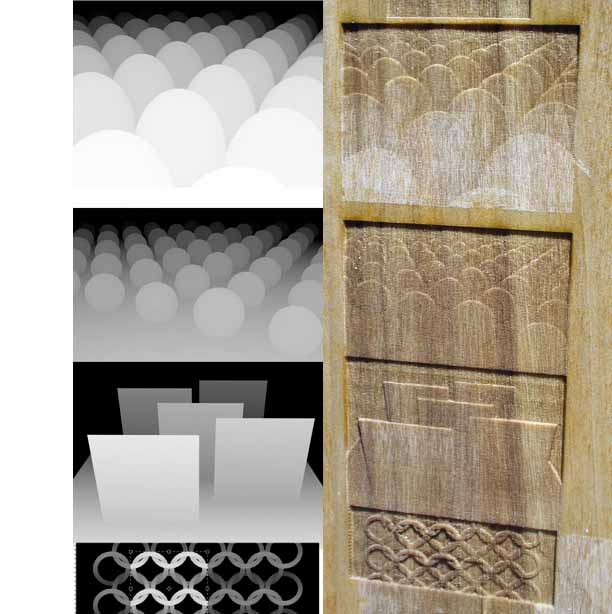
So last nite, and into early this morning, I DREW - on a computer - using PhotoShop - a basket weave pattern, basically like I would with a straight edge, chisel tip felt tip pen and a cone shaped tip Sharpe pen - basically a black on white drawn pattern.

Made a copy of the original, and "erased" some of the black - shading back from white at the middle of the weave's overlap back to black where one "cane" when under another to get a 3D look - pretty much like I would do if this were a pencil and paper drawing.

Added some hand placed dots in the space framed by the "cane" - again similar to making dots with a Sharpe pen. Included different dot sizes ala what you can get with a Sharpe by changing the pressure on the tip - and even did some "go back and try and fix" a few mistakes.

Made "negative" copies of what I'd drawn in black and white, put everything together in one image - just like cutting and pasting several drawings on to one piece of paper - and saved the results to a USB Flash drive.

Got the The Sawdust Shop where the laser engraver resides around 11 am, turned everything on, set up the image on their computer and set up the laser for my wood sample. Two hours later I had three "get to know the tool" samples - and notes on what I did to get them.

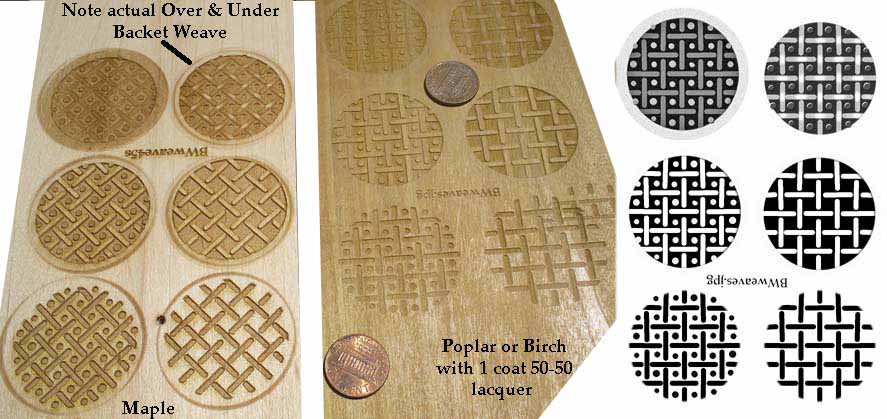
Here's picture of two of the three test samples. The gray scale 3D low relief carving in the lower left does have actual Over & Under - and a texture that looks sort of like a fabric weave.


Forgot to take individual pattern samples to try on a curved walnut sample turning I did. That will be the goal for Session 3. Got my digitizing/drawihng tablet and pen back so I'll be doing more sketched designs before next session.

Questions, comments, suggestions for designs etc.?

Re: Playin' With A Laser - Session 2

#2

Re: Playin' With A Laser - Session 2

George Guadiane

In looking at the pictures, I can see a lot of potential, for instance, use a photo of canvas or burlap, perhaps, some larger weave and maybe, on the canvas, something from a sail with a stitches hole. Use that to create a design around the opening of a hollow form. It would PROBABLY look fairly good, and could well replicate hand carving, because of the slightly irregular nature of the weave.

The problem I see is where/how to apply this idea. Focus is an issue. On the side, it could only be done in sections which would either have to line up or be isolated panels. From the top, you could use the stitched canvas idea on a low profile, nearly flat opening on a hollow form.

Under those conditions, it wouldn't take much to picture various textures and convert them for application, and it would probably look pretty good.

One could even do knitting, hand stitching (like needlepoint or petite point) then picture it.


IN FACT
, I have a friend with a laser setup, and my wife knits BEAUTIFULLY, I think I'll have her knit the top view thing and experiment with that on a small piece.

Re: Playin' With A Laser - Session 2

#3

(Message Deleted by Poster)

charlie belden

Re: Playin' With A Laser - Session 2

#4

Steven Antonucci

I'd love to see you play in the round...

steven antonucci

Flat is interesting, but that texture on a round, three dimensional surface would be really cool. Perhaps even using the rounded perspective to distort the picture unless viewed straight on?

Round 3... ding ding! Will Charlie answer the bell? :-)

Steve

Re: Playin' With A Laser - Session 2

#5

Re: I'd love to see you play in the round...

charlie belden

The longest journey - begins with - baby steps.

First I need to get a feel for how this thing works - and some of what it can do. I'm still not sure how you center the work at a desired location. Wouldn't do to put a turning in, set the laser going - and find HALF the desired design - on the edge of the turning.

I've got four 2 arc pieces and two or three parts of lidded boxes that didn't make it to experiment on - and a device to hold the chuck that holds the piece to be laser engraved - AND - I've got an older version of Corel DRAW they use for piercing.

Would that it were just - get the pattern - stick the wood in - hit GO and have the laser do all the rest. Alas, as I suspected, getting to using some of the possibilities involves - time, effort - and some practice, practice, practice - just like any other tool ; )

Re: Playin' With A Laser - Session 2

#6

I Know! I KNOW!!!

George Guadiane

On this one, I have the answer!

At least for the unit that my friend has. He can test without burning and by measuring, he can center the design on the work piece.

SO, with him, at least, he can secure the piece and measure the position to X and Y then test laser the piece to make sure the light goes where he wants it, then burn it on... It's really cool.

I found this out when he was helping me with some plastic marking tools for my upcoming multi-axis series (I just had a brain block removed and resolved a serious design issue).

Re: Playin' With A Laser - Session 2

#7

Re: I Know! I KNOW!!!

charlie belden

George:

I know you CAN center the laser to the center of the design. I just haven't learned HOW. I have learned that HOW I THOUGHT it SHOULD work - is different from how it DOES work. Just need to read, understand and follow the instructions in the manual.

Like any Indirect method - this one has a bit of Cognitive Friction - the relationship between effect and cause. Router based dovetail jigs are similar. You can see if a resulting dovetail joint is too tight or too loose - but figuring out what to do to correct the erroneous results takes some mental gymnastics (heighten to tighten, lower to loosen in the case of the amount of router bit cutting the dovetail pins and tails).

If you pursue the use of a laser engraver PLEASE takes notes - and share what you discover.

Re: Playin' With A Laser - Session 2

#8

Re: I Know! I KNOW!!!

George Guadiane

Due respect, I don't take notes for myself. Ask Gramme Priddle.

I'm sitting there next to him at a hands on when he tells everyone to be sure and take notes, and I'm still SITTING there... I'm sure I'm not his favorite!

I'll tell you what I remember, and respond to questions, but I RARELY take notes.

1 You need to know the dimensions of the piece to be worked on.

2 You need to know the dimensions of the art to be applied.

3 You need to know where on the piece you want the art.

All of this needs to go into the computer.

Using the "X" and "Y" axes you can find and plot center or any location you like.

Having said all that, I don't get to play with the machine, I just get to watch.

Re: Playin' With A Laser - Session 2

#9

Steven Antonucci

What I would do...

steven antonucci

Let's say that you have a 3 dimensional object like a hollowform. It has a foot that will most likely be round, but might be carved or whatever...

I would take a scan of the foot and create a pattern to burn onto a flat surface. it could be very quick and superficial- but it tells me where to place the object to be inscribed by the laser exactly.

If the laser moves, you are done. If the object moves, stick it down with some museum wax.

(i have more fun figuring stuff like this out than I do doing it...)

Steve

Re: Playin' With A Laser - Session 2

#10

That would also work!

George Guadiane

Re: Playin' With A Laser - Session 2

#11

The Ambiguity of "Origins:

charlie belden

As is often the case, what appears simple and straight forward - isn't that simple - especially when when it involves computers, computer software and a computer controlled device - and the "documentation" that comes with each.

With a traditional tool - directly interacting with the wood - and controlled by one's own hand or hands - this laser engraving thing involves multiple degrees of separation between effect and cause.

I WANT to laser engrave a pattern I created - using a computer, software and digitizing tablet and pen - at a specific location on a piece - I "handmade" on a lathe - using traditional tools - except for the captured hollowing system which includes a laser point.

The problem is figuring out how to "tell" the laser, via its "printer driver/control software", where I want the center of the design to be ON THE PIECE. But I can't "tell" the laser directly because it's the computer software - Corel DRAW - that I "import" my design image into. It's Corel that tells the "printer driver" what to do.

It's All About Origins


NOTHING is as simple as one would think. The computer controlled laser engraver WILL actually do the "engraving" - but telling it WHERE to do that - ain't as simple or easy as one initially might think.

Where'd I put the manualS (laser and Corel manuals)?

(I'm a guy. And unless I HAVE TO read the manual - I won't. And - in the meantime - I'll "misplace" those manuals ; )

Re: Playin' With A Laser - Session 2

#12

Subtle Nuanced Results I Missed

charlie belden

In this second laser session I did samples of a weave pattern on two different woods, the results posted earlier. But I also did a set of gray scale VERY low relief "carvings" from gray scale images I found on the web. I'd THOUGHT that the results on THAT sample was a failure since I was looking for an obvious low relief "carving" result. Should have looked a bit closer, under slanting light.

As I hope you can see in this image, there's a LOT more than initially met the eye. The "carved" patterns are easily missed when "flat lit". But in "slanting light" there's a lot of very subtle and nuanced stuff to see.


This laser thing just keeps getting interestinger and interestinger ; )

Questions, comments welcomed.

Re: Playin' With A Laser - Session 2

#13

Engraving Forum *LINK*

Barbara Gill

There is a forum at Sawmill Creek where laser engraving and use is discussed.


Laser Forum

👍 This page answered my questions

Your vote helps other woodworkers quickly find the answers and techniques that actually work in the shop.