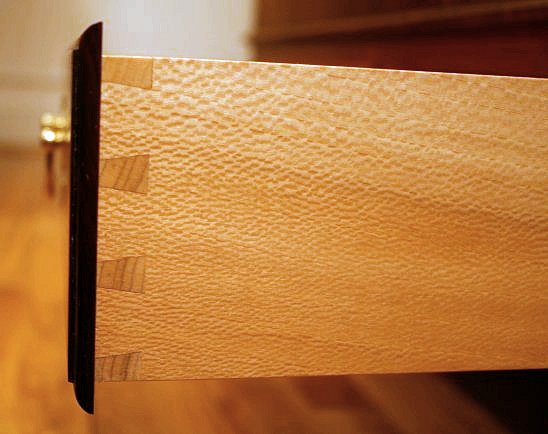
I posted the other day about cutting dovetails with the Leigh jig.
Got them done and glued and assembled. A couple of questions. Do you glue every surface? (I did). Do you coat them with a little brush, like a solder brush? (I did) Does anyone else notice that those brushes always lose one fiber that gets stuck in an inconvenient place?
Do you clamp the boxes/drawers to pull the joints tight. I used band clamps and put a vertical stick on both sides of each corner.
In spite of my vigilance I had one that did not pull up tight. It is about a 1/64" open. Would you try to fix it? How? they are glue with Titebond. Can I heat it and put a bar clamp on it? I have a heat gun.
. Do you glue every surface? not the end grain, useless to do so.
like a solder brush? No, a small lab spatula works better. Dip up some glue from a small dish and spread on the long grain surfaces. One swipe per surface generally suffices.
those brushes always lose one fiber ...not the one I use
Do you clamp the boxes/drawers to pull the joints tight..... I pull the joints tight with bar clamp, then install in the case and jam in tapered sticks to wedge the drawer centered in the opening. When dry the drawer is the shape of the opening, whatever it is.
1/64" open. Would you try to fix it? ....no, why bother.
Got them done and glued and assembled. A couple of questions. Do you glue every surface? (I did). Do you coat them with a little brush, like a solder brush? (I did) Does anyone else notice that those brushes always lose one fiber that gets stuck in an inconvenient place?
I use old tooth brushes and have never had a bristle come loose. They woek well to push the glue into the corners.
Do you clamp the boxes/drawers to pull the joints tight. I used band clamps and put a vertical stick on both sides of each corner.
Yes I clamp the drawer boxes with my pipe clamps and check for square and complete fit up before the glue sets up.
A thin piece of hardwood makes a good spatula, but I prefer the acid brush. Pretty sure a bristle of an acid brush won't make much difference on dovetails. The cheap acid brushes from Harbor Freight is no place to buy acid brushes, they do seem to shed more than most. I usually put some drops of glue right from the bottle to the dovetail, then spread it around with a glue wetted acid brush. For clamp up, I use a K-body or bar clamp for less than a minute. This squeezes out excess glue and bottoms out the dovetails. Check for square, then gently place it to the side to dry. I'd be nervous of putting a drawer with wet glue inside a case. To repair I would just make another drawer. Even if you get it knocked apart, the wood pores would still be filled with dried glue. Not good for a reglue.
i would leve it alone, it is on the side, not able to see it very well ? you would have to take both side's off ? or use wood filler and sand off to make it smooth , and be done, i done this and it will look ok, most people wont notice it, but you will remember the repair , Berry my 2 cent's
Even if you get it knocked apart, the wood pores would still be filled with dried glue. Not good for a re glue.
Well, unless you used hide glue. Then it doesn't matter because the joints would come apart easier and re-gluing would be a snap, since old and new hide glue sticks to itself so well. Hide glue also makes joinery slide together like it's been greased.
I, too, use an acid brush for spreading glue. A tip I learned from another professional for clamping through-dovetail joints to make sure the joint comes together works real nice. Weather gluing and clamping a large case like a blanket chest or a smaller one like drawers I use my K-bodies and some wooden strips cut to look like dental molding with blue painter's tape applied to the "teeth". I keep on hand a few different sizes I've made and used before but can make new ones to fit the spacing of any dovetail layout that's different. Just place the strips so the "teeth" are between the dovetails and clamp. The blue tape keeps the glue from sticking.
As for drawers, another method I got from this same fellow is only use through dovetails, illuminating the need to cut half-blinds. One can make a convincing look with this method and if you use a dovetail jig, you only have to set it up for one type of dovetail. The trick, if you're using a secondary wood for the box, is to use it for the two sides and back. Then use the same wood as the drawer front for the front of the drawer box. Assuming a 3/4" drawer front is desired and 1/2" drawer parts, cut the through-dovetails and assemble the box. Then attach a 1/4" drawer front to the box and no one is the wiser. It sure makes drawer construction quicker and easier.
David, From what I can see, that's a beautiful chest. I think you answered my next question. That is, Do you finish the drawers. Many older pieces did not have finish on the drawers. If you finish them what do you use?
One of the the things I like about Wood Central is I get ideas I would have never thought of, like using the same wood as the drawer front for actual front of the box. Never would have occurred to me. I like the idea. Does the difference in expansion and seasonal changed in the two types of wood ever create a problem? Suppose the drawer side was 8" wide.
I am thinking of finishing the drawers with shellac and the exterior of the chest with Lacquer. Good Idea? The drawer boxes are poplar and the chest is walnut.
Look into a very old piece of furniture with a typically unfinished drawer. If that is the eventual look you want, don't finish.
I shellac drawers, inside and out, to keep them bright looking and to repel eventual stains. Waxed shellac slides like skates on ice. Makes for a nice action on a drawer.
I slather it on with a foam brush (from Woodworkers Supply, their's don't disintegrate as fast) out of a Zinsser can. Two coats with sanding in between.
Like Bill said, shellac is the way to go if you feel you must use something.
Another reason I've found for shellac in drawers is if there's an anoying odor you want to get rid of in an older one.
As far as movement being a problem with the different woods, so far there hasn't been an issue. I usually use poplar for drawer box construction but have also used pine, maple, and birch on occasion.
I've fixed something similar, but it was a mortise/tenon, glued with titebond. If you get to the repair fairly quickly, when there's still some moisture hanging around, the repair is easier. You need a fair bit I'd heat, which should be easy to get into the relatively thin pieces in a drawer, and some clamps. I'd try the fix.
Did this piece of "shop furniture" for under the drill press to have a place for all the stuff that accumulates with a drill press. Started out as a quick and dirty ply cabinet and ended up a 7 drawer unit with half blind drawer fronts cut from one nice cherry board to get the grain on each row of drawers continuous. After dry fitting the drawers and testing their fit in the openings before glueing them up - I never got around to doing the glue up.
So far, 7 or 8 years later there' re still not glued - but have worked fine so far. Seems I have a fear of commitment ; ) But it'll be real easy to replace a drawer bottom should that be necessary sometime down the line.
Re: avoiding rather than dealing with glue squeeze out in the inside corners of drawers - WAXALIT. Glue won't stick to it and it cleans off with alcohol or lacquer thinner so it won't affect the inside finish. Lee Valley carries it and a little goes a LONG way.
A trick I use when gluing dovetailed drawer boxes or any other "box" is painter's tape. Since I use through dovetails exclusively, during dry fitting I apply blue painter's tape on the inside corners with the box clamped. Then I take it all apart, apply glue to the joints, and assemble and clamp. The glue squeeze-out is easily removed with the tape.
I put the tape on with the drawer disassembled. Just pressed it into place very close to the edges of the bottom of the joints. Worked well. Better to keep it about half a hundredth out of the joint rather than into the joint. Also, better to wait a while, thirty minutes or so to remove the tape, but not over night. The edge of the tape gets glued in place. Even then its easy to remove with a knife, just slice both side from under the tape.
Keeping the tape from getting into the joint is accomplished by clamping during dry fit and then laying down your tape. When it's assembled with glue, the joint won't go together any further than during dry fit and the tape will not get trapped "under or in" the joint.
If glue is only applied where it does any good, namely the long grain of dovetails, it can't squeeze out in the corners. The assembly of the drawer pushes any excess to the outside of the joint.
I'm with you, Charlie, regarding lack of long-term commitment to shop furniture. A warning, I'll be wandering a little off topic in a couple of cases.
Although I usually glue my dovetails, I've lately taken to using liquid hide glue and not bothering to clamp them while the glue dries. As someone else pointed out, cleanup of hide glue squeeze out is trivial. But I have one hopper sided dovetailed tool tote that has been held together for a few years with packing tape, while I decide what I want to do permanently with the bottom. It didn't go together quite square and the bottom doesn't fit as snugly as I'd like. I've put 60 to 70 lb. of tools in it, and sometimes fill it with fire wood, with no problems.
My workbench top is not glued or screwed or even mortised and tenoned to the base. I've been relying for about 15 years on gravity to hold it in place. I use it for hand planing and chopping mortises in addition to typical power tool woodworking tasks.
I recently built a router table, with locust posts and BB plywood sides and bottom. I joined it with Festool Dominos (loose tenons). I hammered it together for a dry fit, and decided I liked it well enough that I left it that way. The unglued joinery hasn't moved in a few years. The top is Jess-em phenolic, so that may have a little bit to do with its stability.
While I wouldn't use them on a piece of real furniture, I love euro hinges for shop cabinets. I can pop all the doors off the router table in about ten seconds, and it doesn't take a lot longer to snap them back on.
Dovetailed drawer sides and drawer backs? What sides and backs? I built a close fitting case for the router table drawers. The drawers consist of a front and bottom only, again joined with Dominos and no glue*, with grooves cut in the sides of the bottoms and matching tongues glued into the sides of the cases. There's no room for anything to fall out, unless I yank the drawer really hard, in which case stuff may just drop down onto the next drawer bottom. Even that's not a problem with the drawers holding router bits, since their shanks fit into holes in the drawer bottoms. I did glue the handles onto the drawer fronts, just in case a drawer gets stuck, and I have to pull the front off to empty it and get the drawer bottom out, but I've not had that problem so far.
* I'll have to go check, but I don't want to go out to the shop right now as the temp is still below 20°, I seem to recall that I may have pined the Dominoes to the drawer fronts with small FHWSs.