The Silicone Surprise: Why My Glue Turned to Stone
30 April 2026 at 13:25
In my last post the parts and pieces were completed for the seat frame and the backrest. Since that time the slats were finished (Osmo 3043 using Mirlon abrasive pads). The top and bottom rails were finished as well but their tenons were taped off. The final step was to form the sides of the backrest with spokeshaves then glue the entire piece together and finish it completely. Before assembling that though the through mortise and tenons for the arm rests had to be fitted.
The process for making the seat assembly was similar. It consists of two end pieces which are supported by the stretchers between the two legs. The front rail is attached with a haunched mortise and tenon joint and the back and center support use mortise and tenons as well. To accommodate the webbing from House2Home, a 1/8 slot is routed for the clips. Kind of tricky, it’s best to remove about 1/8 of material so the webbing lays flat. This was done on the tablesaw with a rip blade which requires dropping the wood onto the blade and then lifting it off — care required on this operation. The recess is then squared off before I assembled and finished the entire seat.
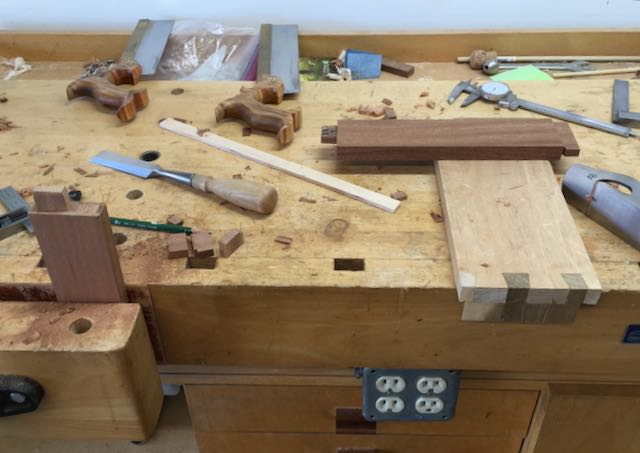
While designing this piece I looked at so many Danish Modern pieces on Pinterest it made my head spin! I wanted something graceful and not just a machined, routed piece. I had set aside a piece that had some interesting grain for the armrests so that determined how wide they could be. Even though they’re about 4′ apart it’s important to me that the grain matches. The bottom has a simple, long chamfer while the top has a slight radius. Sculpting began with my old Stanley 151 and finished up with a Bogg’s style Lie-Nielsen . The antique Stanley removes material quickly without clogging while the L-N does a beautiful job of finishing. After drawing in the “limit” lines of the bottom chamfer work began with the spokeshave, shaving to the lines. Once the cut was close a sliding bevel was set to make the chamfer uniform on the edges and the ends formed to match.


The armrests are attached with wedged, through mortise and tenon joints. The method that Mike Pekovich from Fine Woodworking Magazine uses is what I prefer too. Here’s a LINK to it but you may need to be a Fine Woodworking member. He utilizes a spacer to get the width just right, this way you only need to set your marking gauge one time. Only variation I did was to use a 3/8″ drill on the drill press to remove the bulk of the material. He uses a smaller bit and makes more holes; either way works. I could do this because my tenon is 7/16″ wide. I also used this method on the Japanese toolboxes for laying out both the mortise and the tenon. I’ve been presenting my work in a slide show format to simplify the blog — let me know if I succeeded!
At this point this project is almost ready for final assembly. The last thing that needs to be done is to apply the Osmo to the leg and armrest assemblies. We get our foam at Galaxy Foam and Upholstery Supply here in Las Vegas. They have foams of all densities and wrap batting around it which makes for a better cushion. Also bought the material there and unfortunately it’s too thick for Diane’s machine so they are currently being sewn at Oscars Upholstery. I’ll do a final blog on this when the cushions are done and the love seat is ready. I’ve been told my blogs can get long winded but appreciate any comments or questions you may have, thanks — John
![]()
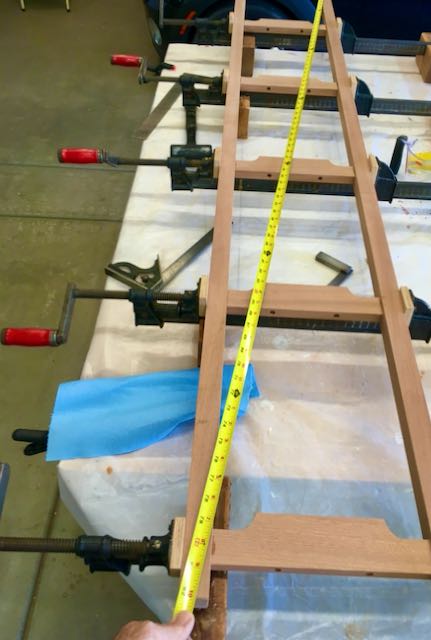
Now that the knockdown fittings are in place I’ll turn my attention to the seat and back assemblies. The seat assembly is made of 1″ x 2 5/8″ pieces of Birch and joined with mortise and tenons. The seat is 46″ wide so a brace was added at the center, it’s lowered so the webbing will lay across it. Webbing is installed with clips (from House2Home) and I learned that the “professional” way to do this is to remove a 1/8″ area so the clips and webbing lay flat in the frame. You can see better pictures of it in this my previous blog. It’s now ready to go and the next step on it will be to radius the edges, finish sand, and then rub in at least 2 coats of Osmo 3043. After that the webbing will be installed.
The seat back was built next. At this point the uprights for this are straight so that I have a reference point for the mortises. Once it’s complete they will be tapered and I plan to do some spokeshave work to sculpt them. The slats are 5/8″ x 1 1/2″ wide and will fit between the top and bottom pieces in 1/4″ x 3/4″ mortises. Figuring the spacing was first done on masking tape using dividers and a 1 1/2″ shim; took some time but much easier than trying to do the math required. One important consideration was that I needed at least 2″ of space at the ends to install the connecting hardware. There are 13 slats so that meant 26 mortises and 26 tenons — hollow chisel mortiser and dado head on the tablesaw made this go much quicker. For these, the slats won’t be glued in; matter of fact I think it’s better that there is some allowance so they can move freely with seasonal changes in humidity.
It’s been a hot summer so far in the desert so finishing is probably best done in the morning, by early afternoon it’s been as high as 104° in the shop! The Osmo should be fine at those temps but the Old Brown Glue I like to use may set up before I can get it clamped. Pre-finishing all of the slats makes sense, it’s always a hassle trying to dry the finish around all of those. I’ll tape off the tenons and wait to apply the finish to the sides of the backrest until it’s been assembled. It’s taken quite a bit of time to make all of these parts from 8/4 Birch but I’m sure it’ll be worth it when done.
![]()
I’m not so sure I like the term “loveseat” but that seems to be the proper name for a small couch/sofa built for two people so that’s what I’ll go with! If you’re a follower of my work you may recall my interpration of the famous Z-chair which I completed a year of so ago. Well, now it’s on to another project for the front bedroom of our home. The room currently has a queen size bed but is rarely used by overnight guests. We’ve decided to make that room a more useable space for us and use a blowup bed on those occasions where it may be needed. Making this smaller loveseat will leave plenty of room for that and allow us to use that room as part of the house. One problem with this room is the way the door opens and the configuration of the walls makes it impossible to get large furniture in the room. That means I get to challenge myself to use knockdown joints with threaded inserts, cross dowel nuts, and through bolts — hey, I love a challenge!
The only real furnishing in this room is the Birch cabinet I made previously. I decided to make this loveseat from Birch as well and who knows, maybe a table is in the future too. As the picture shows, I prefer to draw my plans out full size once the design has been worked out; and then cut pieces of Masonite to give me a true representation of the piece. There will be 6 pieces; the seat, right and left sides, front and rear stretchers, and the back. I plan to use brass inserts and black 1/4×20 hardware to assemble it.
After creating my cut list I purchased about 31 board feet of 8/4 Birch from Peterman Lumber here in Las Vegas. Since you have to buy whatever boards they have it’s challenging to get the right amount. The boards I bought were all 7″ or so in width and 8′ long. After cutting pieces to rough size I planed a working edge on them so they could be ripped and resawn as needed. The side frames are 1 1/8″ thick while the seat assembly and back are 1″ in thickness.


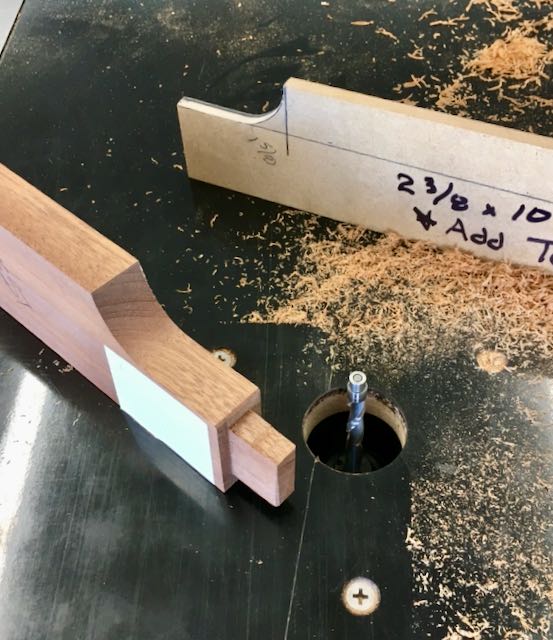
The stretcher between the legs has a single tenon at the front and a double at the rear. The stretcher was kept square so it lines up on the sliding arm and then tapered after the tenons were cut. The mortises are 3/8″ x 1 1/4″ deep and 90° to the leg. The tenons are angled at 15° and were cut using a flat top rip blade and my Sawstop sliding table. It was easy to set the opposite angle by adjusting the arm to the end of the board while keeping the fence set at the same location — much easier than using a wedge.
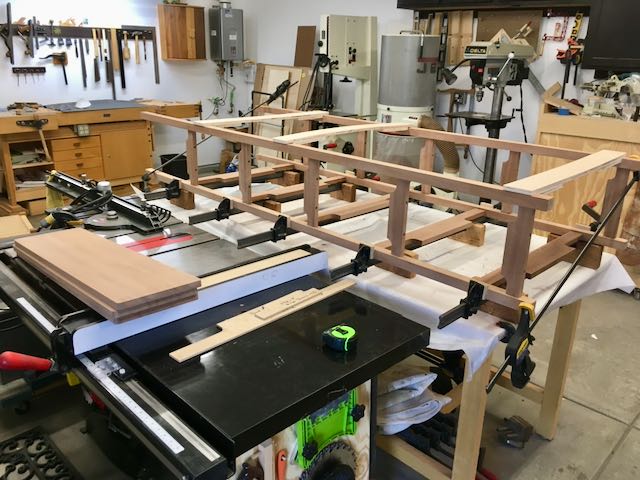
At this point, my main goal is to get the leg assemblies put together so they can be used to locate where the threaded brass inserts need to be installed the relationship of all of the pieces. The front and rear stretchers attach to the leg sections with connector bolts and cross dowel nuts — this was a challenge to drill a straight 1/4″ hole about three inches long! To add to the challenge the tops are angled to allow the seat to sit lower in the rear than in the front. The seat and back sections use threaded brass inserts and connector bolts and that too was a process. Started with 1/16″ pilot holes on the drill press to insure they are straight and then the loveseat was reassembled to line everything up. More complicated than I can write up so these pictures will help — if you want more details feel free to contact me.
To summarize the slide show basically the first hole drilled is 1/16″ and done on the drill press to get it as straight as possible. Then the parts were clamped in position so that I could use a hand drill through that hole to mark the location on the adjoining piece. Threaded insert holes were 3/8″ and connector holes were 1/4″ it all worked! In this picture you’re looking at the inside of the loveseat. Number 1 are the tenons for the eventual armrests; Number 2 is the seat frame, and Number 3 is the backrest. The piece of masonite represents the foam for the seat.
This is what the piece looks like at this point. No rush on this project, just taking my time and trying to avoid making mistakes which is easy to do — I’ll do separate blogs as work progresses.
![]()
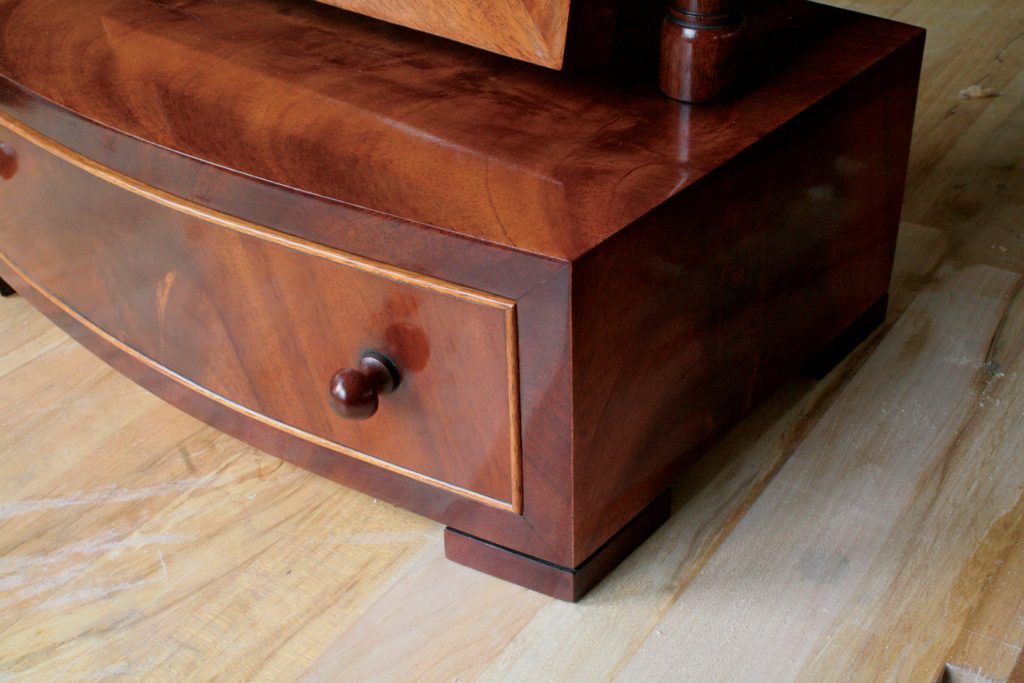
Recently, I received a phone call from a relative of neighbors I had in the home we moved from about 8 years ago! He remembered visiting my shop then and contacted me for a project he had in mind. They have a family tradition of wagering on the outcome of the horse racing at Del Mar. The winner is honored by having his name on the trophy and showing it off in their home. As you can see, they’ve run out of room and rather than start all over with a new plaque my challenge was to create a base that they’d be able to use for several generations. Here are the results:
The first logical step was to get the wood needed. I sent him some links from Woodworkers Source so he could see pictures of various woods which helped but in the end we met at Woodcraft here in Las Vegas so he could see the wood “up close and personal”. After checking what was available he chose this piece of Ebiara Gabon which I thought would be enough for the project based on my rough plans. It was just right, I had no usable piece left so had to plan my work carefully. It’s not like you can just go down to the big box store and buy more! This is a rare wood, one I’d never even heard of or used and it worked beautifully. After planing a square edge the rough layout began using chalk.
The size of the base was determined first by the size of the name plates and then by the amount of material I had available. As I was planning the work I realized that every side of the base would be visible at some time or another so it needed to be constructed in a way that end grain would be hidden. I chose mitered edges with full masonite splines for added strength. This was assembled with Old Brown Glue, my go to for any project where I don’t want any glue to show through the finish. It’s much easier to clean up than PVA glues.
The next consideration was attaching the horse from their original trophy to the new base. Two things to consider here is that depending on which side of the base is shown you may be looking at the horse’s face, side, or rear end! For that reason, I attached the horse from the bottom with a wing nut so that not only can it be rotated it is also removable which makes shipping the trophy from one winner to the other easier. Since the bolt on the horse was short a larger hole was needed to allow clearance for the wing nut. The top is rabbeted so only a 1/4″ of end grain is visible on two edges.
The top was glued and clamped to the base. Having never worked with this species of wood I have no idea as to how much it may move due to humidity changes so left some space. I used a simple glue rub joint on the end grain of the top allow the wood to expand with the grain if humidity affects it — I don’t think it will though.


Making the bottom from one piece of wood presented the same problem of the edge vs. end grain and there wasn’t enough wood to do that anyway. The solution was making the bottom from 4 pieces using the same technique I use for picture frames. This way no matter how the trophy faces, the edge of the base always presents a nice, profiled piece of edge grain. It was rabbeted to accept the base and attached with screws from the bottom. There are silicone feet embedded in each corner to help anchor and protect whatever it’s sitting on.


For the finish I went with what I’ve been using for many years, Osmo 3043 which is a hard wax finish. Two coats applied 24 hours apart using abrasive nylon pads followed by a coat of Liberon Black Bison wax results in a glass smooth finish. They were finished separately and joined together once dry. I couldn’t resist taking this one picture of the project assembled and finished with the horse in place and texting it to my client! All in all, this was a good challenging project — just what I enjoy taking on. Glad he remembered me and my shop — thanks!


![]()
I’ve been seeing these boxes on Pinterest, Instagram, and other places on the net so decided to make a pair of them for my grandsons Christmas present this year. They both are collectors of “things” so think they will like Opa’s interpretations of them for their “treasure chests”! I mail ordered some Ash from Woodworkers Source and they sent some beautiful pieces, one especially will be destined for the lids. With this blog I’ll break down the process to not only illustrate it for anyone else that may build one of these but also to remind me in case I make another! I hope that Connor and Rory will look at this and possibly be inspired to explore this world of woodworking that their Opa loves so much.
Working with the Ash has been an experience, it is very hard and the grain structure also makes it difficult to scribe clean, crisp lines to work to. Mike Pekovich from Fine Woodworking Magazine has a video series where he uses tape along with marking gauges and spacer blocks to accomplish this. You may need to be a member of the magazine to access it. For my project I could only mark the outside of the boards because the inside has a dado cut to accept the side pieces, this meant I really needed to be accurate on the layout and his technique really worked great, the Ash — well that’s a different story!
If the mortises had cut cleanly each on them should have been exactly the same size, however; not being able to obtain clean cuts meant that they were slightly different so couldn’t use all of the techniques Mike Pekovich showed in his project.
To add versatility each box will have a sliding tray made from 1/4″ thick Beech left over from another project. They’re about two thirds the length of the box and 1 3/4″ deep. No pictures but simple mitered construction using packing tape for assembly. The plywood bottom sits in a dado and the bottom of the box is covered with a heavy fabric on mat-board.
There’s not a lot of exact information that I could find about the battens and the wedge. I’ve read that traditionally the boxes didn’t have a locking wedge. Tradition also has them assembled with nails and the bottom is nailed on. I chose to set the bottom in a dado and also join the battens with glue, screws, and plugs. Some show the wedge without an angled cut but I choose angling it make it more secure. Since these are going to a much more humid location than Las Vegas left a good 1/16″ gap between the lid and the sides of the box. The first step was creating the pieces for the top of the box and lid battens.
Fitting the lid required some experimentation. One end of it has a fixed batten that I located 1/4″ from one end. A spot of glue at the center and screws at each end secured that. I used a piece of plywood to fine tune the length of the lid and I’d recommend doing that if you make one of these. Much easier to screw up a scrap of plywood than a beautifully figured piece of Ash! Basically, after that first batten is attached you insert the lid and slide it so that it’s against the box piece. Then place the other lid batten and wedge in position, draw a line to locate it. A trick I saw and used was to put blocks inside of the box that held the lid at the right height. Now I was able to drill the pilot holes for the screws directly into the lid and attach it in place.
One change I made was to drill a 3/8″ hole in the locking wedge piece and then glued in a short dowel. These boxes will probably not be stacked and with the higher humidity that wedge could become difficult to remove. I don’t want them tapping it with a hammer! My finish of choice is Osmo #3043, two coats applied with nylon scotch pads. This was a good, challenging process; here’s a slide show of the finished Japanese Toolboxes.
![]()
![]()
I spend a lot of time in the shop. A LOT of time. I get asked pretty often which products I recommend, whether it’s for beginner woodworkers looking to outfit a new shop or experienced makers who are looking for new tools. I’d like to go through of my favorite shop items that I’ve used this past year. Let’s get started.
I should point out that all of these products are available to buy online through our affiliate links. Following these links don’t cost you anything, but they do allow us to keep making free videos, so if you are interested in any of these and want to help us out be sure to follow the links below!
I found these Toyo steel toolboxes from Japan a while back on Instagram and really loved the look and colors. The only downside was expensive shipping at the time. Well now you can find them domestically under the Trusco brand. These are the same boxes, though some of the color availability differs from the originals. These are wonderfully simple lightweight toolboxes and I’ve really enjoyed having them around this year and organizing tool with them.
I have always used a cutting mat on one of my work surfaces because I’m always destroying surfaces with adhesives, paints, and knives. I used to use a smaller one but after building my large worktable I found that the smaller one just wasn’t cutting it (pun intended!). So I found this giant 40 x 60 two-sided cutting mat and it is fantastic for what I need. I highly recommend finding one that fits your size table if you can.
I’ve been carrying knives and tools for a really long time. I even made a secret bedside table for some of my favorite ones. These days I really don’t go anywhere without my Maker Knife. It is by far the best utility blade that I’ve used and it’s so easy (and fun) to slide in and out.
But if I need more than just a knife, I also highly recommend something like the Gerber Armbar Drive. It has a swappable phillips and flathead screwdriver, a full size blade, and a few other tools while being incredibly small (they even make a super slim version). If you’re looking for an in-between I also like the Gerber Crucial. I used to carry that one a lot.
If you happen to cut a lot of plexiglass or plastic sheets, a dedicated plexiglass cutting blade is amazing at cutting down on the large plastic chunks that fly off of the saw. It’s specially designed to shave the plastic down into small bits that are less painful and easier to manage. But you should always wear eye protection and a respirator when dealing with particles this fine.
I have gone through so many tape measures over the years. Cheap, expensive, fancy, simple, and I have found these two to be my absolute favorite for most jobs. I’ve settled on 12’ tape measures because I rarely need more than that for anything that I build, and the reduced size and weight is really handy for keeping around the shop.
I really like the Stanley 12’ Engineer’s Scale because it has both fractional and decimal measurements on it. It’s sturdy, lightweight, and exactly what I need 99% of the time.
I also really like the Komelon 12’ because it has both imperial and metric measurements on it. It’s pretty lightweight and also has an oddly nice matte finish on the tape which I appreciate.
I’ve talked about these retractable shelf brackets before and I really love them. The’ve appeared in several of my projects now and are great for adding very durable conditional shelving to any project. They are easy to lift and they can hold a lot of weight.
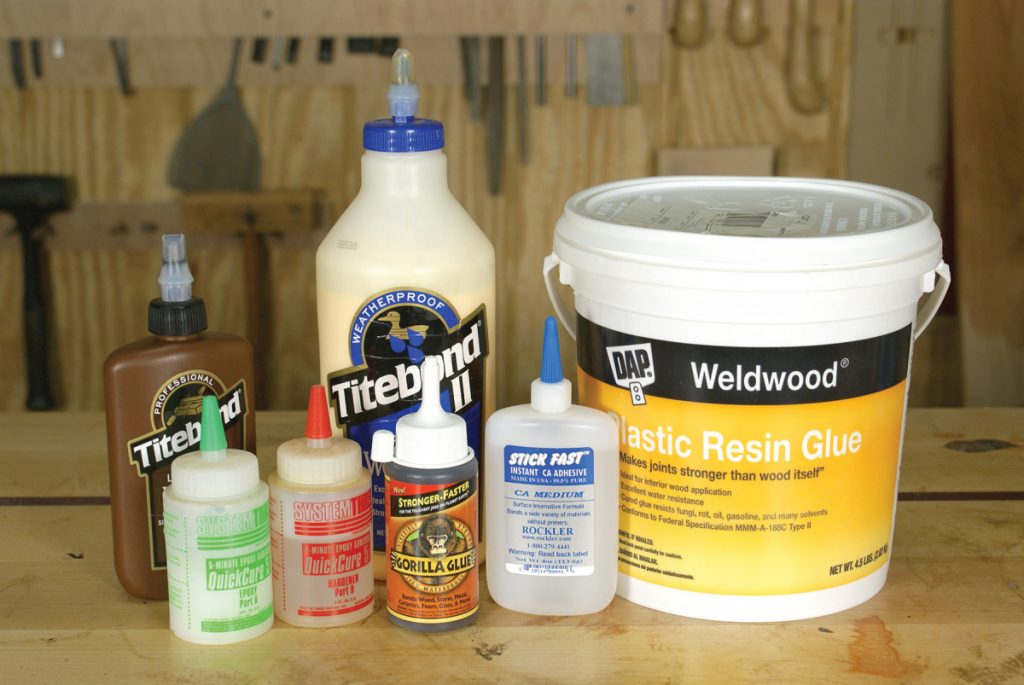
Sometimes it seems like my channel could also be called I Like To Glue Stuff because I sure use a lot of glue. There are many to choose from for each task and not every one is created equal. I often go to E6000 because it can pretty much attach ANYTHING to ANYTHING.
It’s incredibly strong, you can find it in several colors as well as clear, and it has a tiny bit of stretch to it after it has cured which is really forgiving depending on your application. It does take a bit of time to dry though.
I have made third hand holders for electronics projects before, and they are super handy to have around. But after I found these magnetic quad hands I dropped the old ones and never looked back. Being able to quickly but firmly place the base where you need it is so helpful. They work incredibly well and allow me to quickly get going when I need to solder wires or work with small objects.
I have a couple of glue guns but I have often come back to this mini glue gun from Arrow because it’s so handy when trying to add hot glue to hard-to-reach spaces. Also, because it’s rechargeable I can use it without being tethered by a power cord that gets in the way. I use the Arrow one all the time. And if you’re part of the Ryobi ecosystem, they also have a similar mini glue gun that charges off of their 18v system.
It’s always important to be ready for the unlikely event of a shop injury. The first line of defense is active safety protocol, but in the even that there is an incident, you should have medical supplies in an easily accessible place ready to go. This clotting sponge is easy to open and can quickly help to manage a wound before it gets too bad. Also this compression bandage is great for applying pressure until you can get further assistance. Whatever you do, it’s important to think about shop safety and be prepared for an emergency.
Clotting Gauze
I 3D print A LOT of stuff. After trying what feels like thousands of different types and brands, I keep coming back to the Overture brand of PETG. It consistently provides me with super clean results and the pricing is incredibly hard to beat. They’ve also updated their spools recently (as many have) to use recyclable materials. I highly recommend it!
These are just a small amount of things that I’ve used in the shop this year, but they’re definitely my favorite things that I use or need nearly every day, and I would highly recommend these as a gift to any fellow maker, even if that maker is you!
The post Top Ten Workshop Gift Ideas for 2023 appeared first on I Like To Make Stuff.
Now that all of the joinery has been cut and fitted it’s time to begin sculpting the pieces for this chair. Don’t want to use a router bit which would leave a uniform radius on every edge — boring!! I’ve had a Stanley 151 for probably 50 years and it’s seen some use but nothing like I knew this project would require. I also have a small bronze, curved bottom spokeshave from Lie-Nielsen. I sharpened the 151 to the best of my ability but the mouth is quite large and taking a fine shaving was difficult. Well, new projects are a good excuse to buy a new tool so bought the spokeshave that is a collaboration of Lie-Nielsen and Brian Boggs the chair maker and I love it!
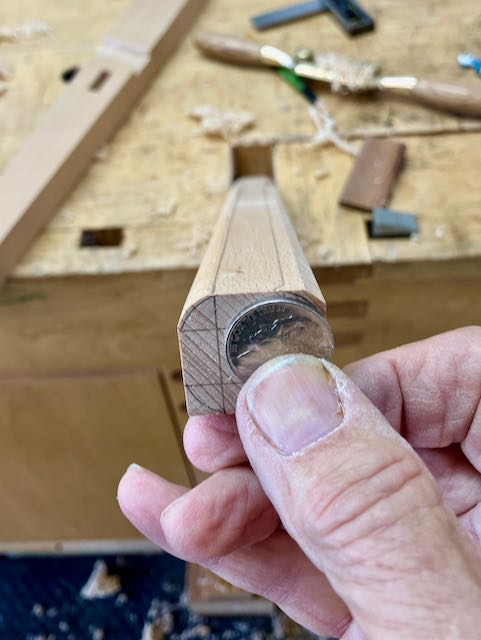


The first piece of the chair I tackled were the front legs. They have a taper from top to bottom that ends at the tenon so the entire surface is straight. Even though I used a nickle to draw in the radius that’s just a guide because the line I worked to was 1/4″ from the edge on the thickness (1″) and 3/8″ on the width which tapers — eye ball and fingers were used to “fair” the curve. I thought of this stage of the sculpting as one where I’m chasing the facet. Learned that you need to look at it while the light hits it at different angles. When I looked at a section from one direction it looked smooth but from the other direction I could see facets; your hands and fingers are a great way to feel them too. Before any assembly they were sanded with 220 sandpaper.
The areas that were a bit more challenging are those that had the flat areas for the mortise. Here I needed to taper the radius into the flat area. I used the same technique but instead of the block plane used the Stanley 151 to rough out that chamfer before using the Lie-Nielsen spokeshave to finalize the curves. The curvature that was created on the front leg and back rest was drawn onto the wood so I could remove the bulk of that material prior to glue up.
After the two sides had the front leg and backrest assembled I needed to cut a 1/4″ dado at the back of the chair to support the seat. Again those pesky angles! A piece of MDF had a slot cut into that’s the thickness of the seat. This was aligned with the slot in the front legs and clamped down in position. A 1/2″ pattern bit in the router was used and then the corners were squared to match the seat. The last step was to drill a hole for the screw and plug that will secure the seat to the side.
Assembly was next and I used the method I showed in a previous blog of using a parallel clamp attached tightly to the leg at the angle it meets mortised area. The goal is to put the clamping pressure on the center of the mortise. A scrap piece of MDF was taped to the bottom of the main leg to clamp it together. I use Old Brown Glue for all my furniture work.


Getting close to the finish line, dry fit the chair together and placed it in the house — happy day!! Measured for the foam which we get from Galaxy Foam here in Las Vegas. Diane has ordered this mid-century modern print fabric which will definitely make this chair a statement piece in out home.


The arm rests still need shaping, then final sanding, assembly, and finishing — sounds easy if you say it quickly!
![]()
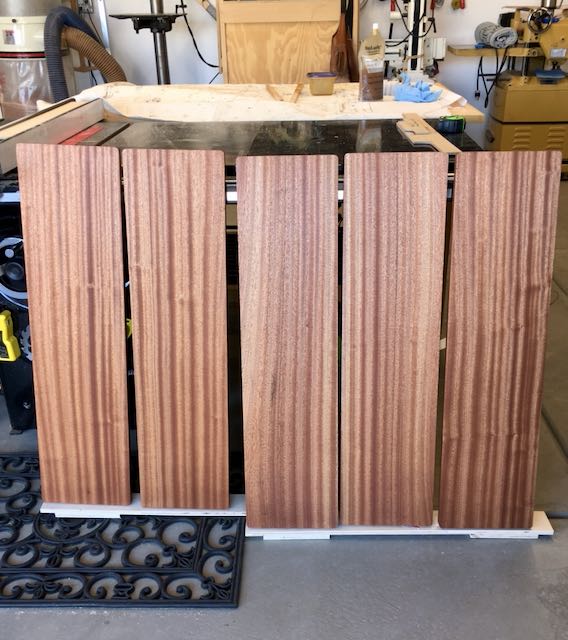
Those of you who follow my blog know I like to start with a before and after picture to introduce the project. Usually I’ll show the full size drawings I do but this goes before that — where I get the wood! For over 20 years I’ve been using Woodworkers Source in Phoenix and have never been disappointed. In years past I’d leave my home in Las Vegas at 3-4:00 am for the 5 hour ride there, get what I needed, and return home; nice day trip! When we lived in Phoenix (2016-2021) I was spoiled, less than 30 minutes on the road and I was there. Now with the price of gas I’ve been buying on-line and highly recommend their wood and service. I ordered what they call a UPS Pack of 7″ and wider Ribbon grain Sapele and the wood is beautiful.
The design evolved from inspiration off of the internet and what I had in my mind. I wanted something to anchor an area of the living room that was architectural without dominating the space. The cutouts in the shelf supports and the back piece make it appear as if the shelves are floating. I choose the Sapele to match a TV cabinet that’s on the same wall. I also like to incorporate processes I don’t use very often and in this case that was pattern routing. That was necessary to insure that each of the supports and back pieces were identical.
The first step was ripping the 6/4 Sapele to size for the uprights and locating all of the 3/8″ mortises required for the side pieces. This required a lot of measurement and you can bet the adage of “measure twice, cut once” was followed. I have a Jet hollow chisel mortiser which does a great job but the bottoms of the mortises do need to be cleaned up. I was careful to mark the bottom of each upright with their location to keep everything in order. Next up was to size the 10 shelf supports and cut their tenons. My technique is to first cut the tenons on the tablesaw using a tenoning jig and then fine tuning the fit with hand tools; chisels, dovetail saws, and a rabbet block plane to get a precision fit.
There are 3/8″ holes counter bored in the bottom of each shelf support to attach the shelves with, these were plugged after assembly. The rear supports were next so very careful measuring to locate those mortises on the inside of the back uprights. The goal was to have the bottom of them even with the bottom of the shelf so that they could be screwed in from the back. Before assembly those screw holes were located and countersunk. Now that all of the mortise and tenon joints were complete the side pieces were assembled with Old Brown Glue, checked for square, and allowed to dry overnight.

After the two sides were glued and assembled it was time to begin finishing the shelves. Planed, sanded, and a slight radius on each corner was done and then 3 coats of Osmo Polyx #3043 were applied. I use a white nylon scrubby for the application, check out the beautiful grain and finish in the photo! Between coats I also assembled the entire unit, again with Old Brown Glue which I really like because with a complicated glue up like this you need all the time you can get! In the pictures you may notice some white, plywood pieces on top, these are temporary spacers to keep the unit square since the back pieces are only attached to the back of each side. Holes were drilled and countersunk into the back piece before assembly to attach the shelves.

All that remained was to apply the Osmo to the entire unit which required lots of care. There are so many places that a small spot of finish could dry without being wiped off, I was very careful to check every side and intersection after applying each of the 3 coats — yep, found a few spots I needed to remove some build up but the results are well worth it. The shelves are attached with two screws on each side which had been counter bored for 3/8″ plugs. Since they were on the bottoms it was easy enough to first saw them with a zero clearance saw and then pare them flush. A bit of Osmo wiped onto the plug finished that step. I wanted to have the shelves appear to float between the supports so after locating the screw location on the back of each shelf a starter hole (about 1″+ deep) was drilled on the drill press to make sure it was square. I cut spacers from 1/4″ copper tubing to hide the screw, I think the copper gives a good accent to the Sapele.
Here’s a final picture of the display unit in its location. The TV cabinet is one I made a number of years ago also from Sapele. The sliding doors are Big Leaf Maple and it was finished with shellac.

![]()
After having our nightstands for quite some time and then seeing how the cabinet turned out for our guest room we decided that we too could use some new night stands! Previously I did a project using vertical grain Douglas Fir and even though it’s challenging to work with decided to go with that material. The first step for my work is to do some sketches and then make a full size drawing which helps me see proportions better. These night stands will have 3 drawers in each unit and be approximately the same size as our existing pieces.
My source for the wood is Peterman Lumber here in Las Vegas. The usual way lumber is purchased is random width and random length but the VG fir is stocked in 1×4, 1×6, 1×8, 2×4, and 2×6 and you are required to purchase the complete board! Most of the stock was 16′ in length so careful planning was needed on my part to not under or over purchase. After looking through it all and figuring where to cut it so I could transport it I brought it home to begin work. Unfortunately, one piece had some internal cracks that didn’t show until I began to process them so ….. ended up getting another 16 footer two drawer fronts, no problem, they can be used later.
The 1×8 stock only measures 7 1/4″ in width and has radiused corners, these need to be planed off and square to create each panel. Since I need a width of about 16″ a narrow piece is needed to get to that width. My first thought was putting the narrow strip in the center but that created a stripe which was acceptable for the bottom pieces but not the top. For the top and sides I created panels and tried to match the grain/color as closely as possible with two, full width and a narrow piece that will be on the back of the units. I use these old parallel clamps that work great and Gorilla Glue to do all of my panels. It’s one of few times I’ll wear gloves, that glue really sticks to my skin!
After glueing up 8 panels work began on the dovetail joinery. The panels came out nice and flat (thanks to those clamps) and the joints were flattened with my old Stanley #80. While glueing up I chose the pieces I wanted for the sides, tops, and bottoms. Some of the bottom pieces have a couple of knots and sap pockets but I don’t mind them there. The construction is through dovetails which I chose to highlight the grain, My design plan is to have the end grain of the pins make an artistic statement — the goal being to create a piece that is contemporary and functional with clean, straight forward lines.
I’ve been accused of getting too wordy so I’ll let the pictures do most of the talking. I use Lie-Nielsen dovetail saws and chisels for my work. I also cut a slight rabbet on the inside of the tail board to create a clean corner, this is referred to as the Stanley 140 trick. This time I also used a tried technique I saw in Fine Woodworking magazine by Michael Pekovich where he used blue painters tape to lay out dovetails. I diid that because the vertical grain of the wood is so pronounced it made it difficult to scribe straight and accurate lines — it worked great! For the first time too, I used a guide to clear the waste between pins. That space is about 1 3/4″ wide and I wanted it to be as straight as possible. I also deepen the scribe line before sawing out the bulk of the waste. My glue of choice is Old Brown Glue and it gave me ample time to get things together.


The last three pictures show the before and after of how the end grain of the pins look once they’re planed flush — I really like the contrast. I had to be creative to figure out how to hold the assembled cabinet but like they say: “where there’s a will, there’s a way”. I’ve continued work on the legs, stand, and backs of these night stands and plan to get most of it assembled before tackling the drawers.
![]()
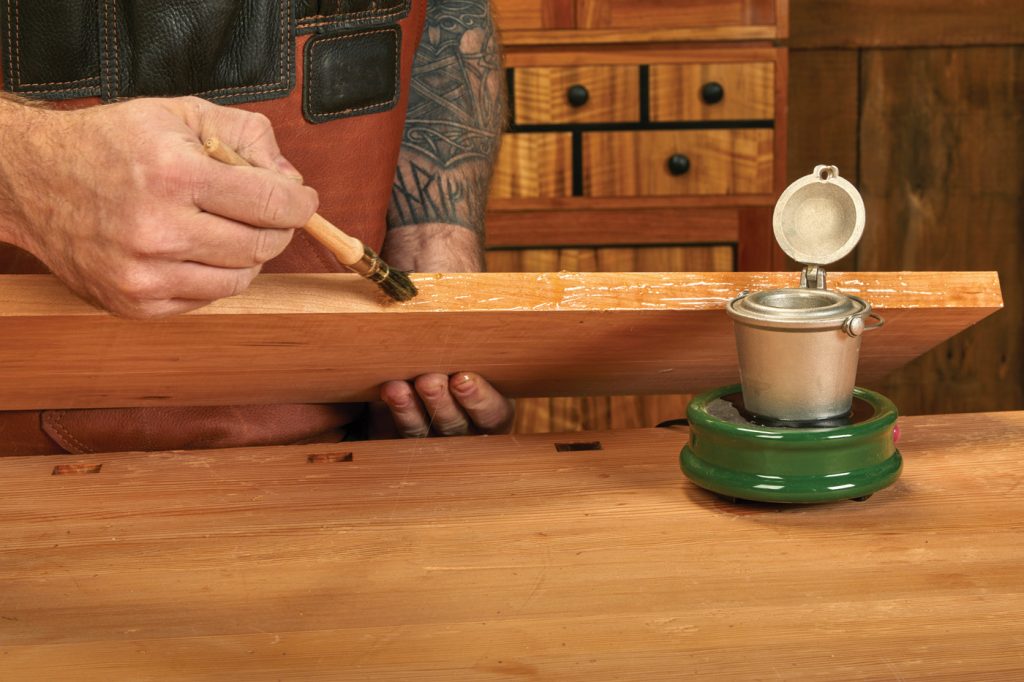
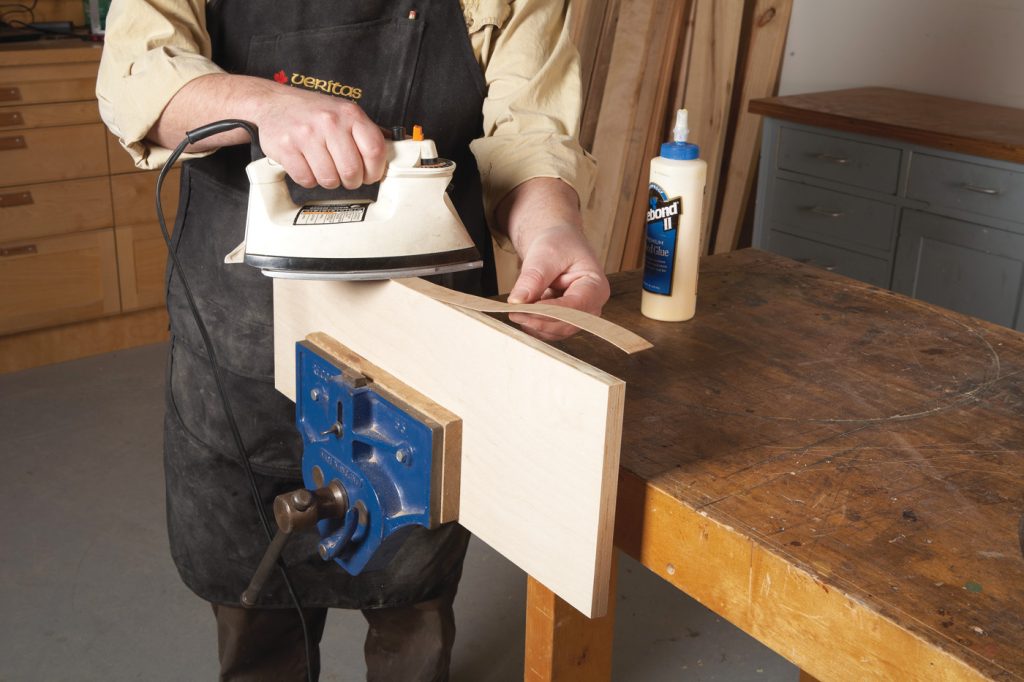
Animal protein glues (often referred to as “hide glues” or HHG for hot hide glue) have been used for thousands of years. In fact, these glues were the original “super glues,” offering historic people a valuable way of bonding materials. Today, these glues have mostly been replaced by synthetic glues, but for all of the world’s modern advances, there still remain many valuable uses for animal glues including antique restorations, furniture construction, marquetry, and luthierie (guitar, violin & other instrument making). Unlike many newer glues, protein glues are reversible, a characteristic that allows artisans to disassemble and repair parts more easily. Because it tacks fast as it cools, it is useful in clamp-less processes like hammer veneering. And there are other benefits too.
Some modern day artisans favor protein glues for virtually all their work. One of these devotees is California-based furniture conservator Patrick Edwards, an accomplished furniture maker, woodworking historian, and hand-tool expert. Patrick almost exclusively uses animal glues in his colorful urban shop, where a rusty old hot glue-pot is always at the ready. In this video, Patrick shares his 40-some years of experience working wood with animal glues. We learn why he uses animal glues; how he selects from the many types of hide, bone, fish, and rabbit skin glues currently available; and how he mixes and heats the product. Patrick explains the meaning of gram strength, why it matters, and how to purchase the right gram strength glue for your application (He says that for general woodworking, you should use a hide glue with a 192 gram strength). Frankly, it’s not hard to be amazed by the refined characteristics of this non- toxic glue. It’s all here in this lively tutorial. One of the most insightful discussions on selecting and cooking natural glues I’ve ever heard. (9.5 Minute Woodworking Video)
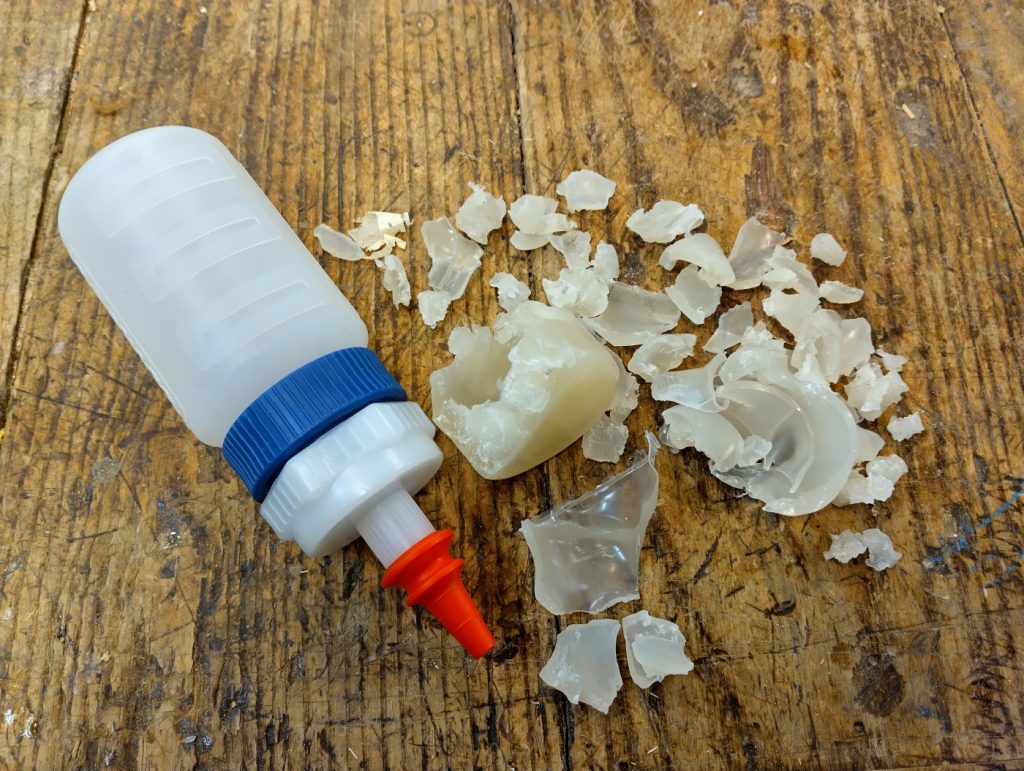
Patrick Edwards is President of Antique Refinishers, Inc. which offers restoration, conservation and reproduction of pre-industrial American and European furniture for dealers, private collectors, and institutions. Mr. Edward also owns and instructs at the American School of French Marquetry, Inc. Both business are based on San Diego, California. Mr. Edwards has also formulated a slow-set, ready-to-use liquid hide glue. which he produces and sells under the brand name “Old Brown Glue”.