Have you ever come across something that works unexpectedly well, or even perfectly? Like when packing a box and all the items fit in nicely with no rattling? Or when you finish building something with just a handful of scraps?
I come across these happy coincidences quite often. When I encounter them in daily life, they are a reminder that good design works. When I encounter them when making something, they are often encouraging as I take them as an indication that I’m on the right path. Good design works.
Take for example this happy coincidence that I came across today:
I needed to cut a series of hexagons with a 14 inch width. After laying out the shapes (read below to learn how I drew them), I first cut them into triangles with my track saw. (The hexagons were being cut from large, 2 inch thick slabs that were not flat, so the track saw made the most sense to me.)
Then, to make them hexagons, I needed to cut the other 3 corners. For this, I decided that my sliding table saw was the most efficient tool to do this with accuracy and repeatability. I set the crosscut fence to 30 degrees, then pondered how to ensure repeatable positioning.
The normal method of using a stop block wouldn’t work, since not all the corners of the triangles were intact (e.g. the corner extended past the edge of the material, as shown below).
My next idea was to use the diameter lines to align to a mark made on the crosscut fence. Although this would require manual alignment, this method would offer acceptable accuracy and be fairly quick to position each cut. Plus, the clear-anodized aluminum crosscut fence readily accepts pencil marks. I grabbed a pencil and combination square to make the mark and discovered…
Remarkably, in order to make the cut, the diameter lines would have to be located right at the end of the crosscut fence. No adjustments to the fence were required, and no marks needed to be made on the fence. How cool was that?
How I Laid Out The Hexagons
To lay out the 14 inch hexagons, I used a compass with pencil, pair of dividers, and a square. Below, I demonstrate drawing a smaller hexagon on a scrap.
First, I set the compass to 7 inches (half of 14) and drew a circle for each hexagon. I used a compass with a pencil, though I could have also used a pair of dividers to scratch the circle which would have been more accurate.
Next, I set the dividers to the same 7 inches by placing one point in the centre divot and the other point on the circumference.
Then I walked the dividers around the circle, leaving 6 equidistant divots around the circumference.
Finally, I connected the divots on opposite sides with a straight line, and drew a line square to that and tangent to the circle.
I extended the tangent line in the other direction, then repeated five times to complete the hexagon. Remember to leave enough room around the circle for the hexagon’s corners.
As a child, I loved journals. I bought many. Each had so many pages with so much potential. I still have them to this day. But aside from my name, they remain untouched. That’s because while I loved the idea of creating a record of my thoughts and ideas, the challenge of filling it with content worthy of the journal was too much for me.
What went wrong? I misunderstood the purpose. The journals were tools for me to record my thoughts and ideas that may or may not one day be realized into something larger. They were not meant to be great themselves.
The idea of creating something perfect was getting in my way of creating anything at all. My vision was preventing all productivity.
Now, when creating anything, I will start anywhere. Write a few words, draw a few lines, make a few cuts, swing an axe. Just make it bold and make it permanent.
No pencils here. No undo button. These allow for revisions and second guessing.
Once the first stroke has been done, I can assess my progress. Do I like it? Should I include or exclude it? This is how some of my best work is done.
Sometimes many revisions are necessary to arrive at the end result, but if the previous revisions don’t survive (e.g. were erased/undone), there is no way to study and learn from them and understand why the end result is as good as it is.
Right now, this is a blog post. Yesterday it was an idea (actually, it was a different idea). Tomorrow it could be a book, or a billboard, or a tattoo.
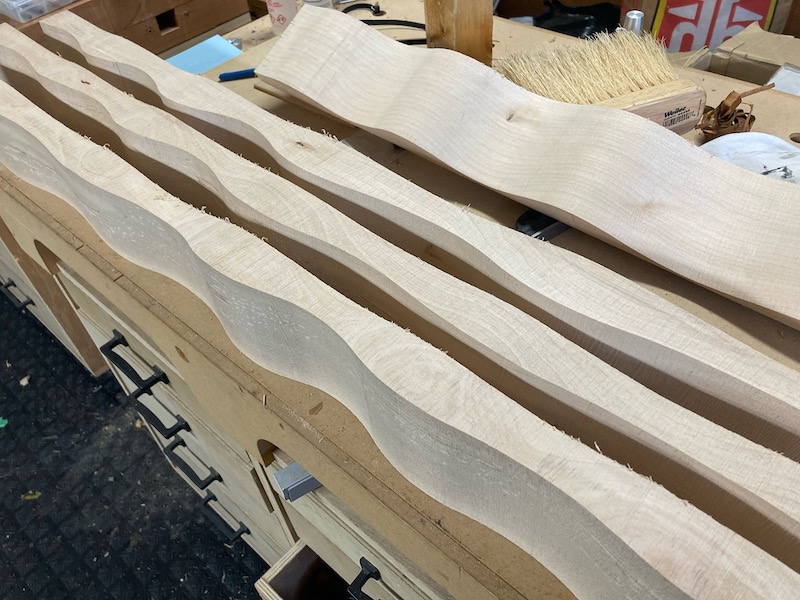
I recently needed to make some wall-shelves. I needed three, they needed to fit on a specific wall, and they had to be made of a light-coloured wood. I didn’t have any other criteria or requirements.
The piece of wood I chose to use was a yellow birch cant about 4 x 6 x 36 inches. My first thought was to run it through the bandsaw to resaw it into three shelves roughly 1.3 x 6 x 6 inches, then joint and plane them flat and parallel. It would have been a straightforward process, but I realized that there was a more efficient, and interesting way to make the shelves. It became obvious when I thought about how shelves are used:
Shelves are mostly decorative, with only one surface (the top) functional. Therefore, only that one surface needed to be flat and smooth to hold items and facilitate cleaning, as dust doesn’t tend to accumulate on the bottom of shelves. The other surfaces could be rough, so I could skip the step of planing that side. The bandsawn texture would be interesting and tactile. However, a bandsawn texture can only be created with a bandsaw, and any subsequent processing of the surface changes it. Attempting to adjust or correct the shape in any way would result in an irregular pattern of texture (e.g. a smooth spot). Therefore, the cut made by the bandsaw must be perfect.
Take the following for example. (A) is the desired outcome, where all sides are straight and parallel – a rectangle. However, if the bandsaw’s fence isn’t aligned properly, the blade wanders, or the line is not followed, a taper (B) is the result. Likewise, deviating from the line can result in a convex (C) or concave (D) surface. All of these conditions can be corrected, but would require additional work with the thickness planer (or similar tool) which, as mentioned before, would also remove the tactile surface left from the bandsaw.
With only a little more work, I could make the shelves more interesting by adding some curves. Plus, any irregularity in the cut would be imperceptible.
So, that’s what I did.
After sawing the curves, I used a foam sanding block to gently smooth the texture, ease the sharp corners, and remove the fuzzies. Then I used my best crosscut blade to cut them to length, applied three coats of semi-gloss polyurethane, and installed them on the wall with steel tapered connectors.
If you don’t incorporate curves into your work, I encourage you to try. Here are some of my favourite tools to work with curves:
Bandsaw, jigsaw, and coping saw
Coarse, hand-cut rasps, rotary and belt sanders with coarse sandpaper
Chisels, carving gouges, and drawknives
Arbortech power carving attachments for angle grinders
I don’t often lay out curves before shaping them, but when I do, these are the tools I may use:
Flexible battens (strips of wood)
French curve templates
Adjustable compass with pencil, and a trammel for large arcs
Pencil, used freehand
These are my top tips for working with curves:
When using saws to cut curves, making all your movements smooth will generally lead to smoother curves
Trust your eye and hands – when it looks good and feels good, it’s good
Cut joinery before adding curves, or at least make sure you save reference surfaces when shaping
Be aware where your joinery and fasteners are so you don’t expose them or hit your tools on them
Let me know if you have questions about adding curves to woodwork.
A lack of confidence in your woodworking abilities can have a serious impact on your health, relationships, and success in other areas of life. Stop with the blah! Present your products confidently with help from the latest product from Wong Tool Works – OK PASSED INSPECTION stickers! For a limited time, you can choose from fully-licensed certifications from all your favourite woodworkers including Steve Ramsey, Marc Spagnuolo, Megan Fitzpatrick, Shannon Rogers, Jay Bates, David Piccuito, and more!
How much is enough? What should you keep and what should you just get rid of? Whether tools, scrap wood, or spare parts, every woodworker (human?) can relate.
My shop is small, and it sees a wide variety of jobs through it from furniture making and repair to small production runs and custom tools. I suspect that if my shop were a production shop that specialized in making only one thing, deciding what to keep and get rid of would be eaiser because I would know exactly what is useful and what isn’t.
For example, about twenty years ago, I found a deal on project parts bought a gross of them for $2 each. I mean, I bought so many the store staff were making jokes about it. But I had big plans to turn them into finished products. I made a sample, but for whatever reason, didn’t continue.
Over the years I’ve looked at those parts and thought about the purchase, and each time, found myself less and less interested in the project. Then, finally, I decided to try to sell them to cover the costs from the inital purchase. I was surprised and delighted to find a buyer quickly who paid me $5 each – 150% more than what I had initially paid for the parts (20 years ago, mind you, so with inflation, etc…).
I never would have guessed that I would be missing those parts so badly now. They are nearly perfect for what I need, requiring only a slight alteration. Not only are those parts no longer available, there is nothing even remotely close to them, and the closest thing is about $30.
Right now, I am considering reaching out the the buyer to see if they have already used them, or if they would consider selling them back to me since they, as I once was, are just holding onto them waiting for the right moment.
Thanks for reading. If you have a similar story, would you care to share it in the comments section?
Now that Valentine’s Day has passed, I can share this fun little project.
After finding a suitable scrap of hardwood, I printed a template and glued it on with a thin coat of wood glue. I let it dry for about ten minutes, then used a small plunge router with a ball nose bit to remove most of the waste to a consistent depth, staying well back of the template line.
I switched to a small carving gouge to work right up to the line, leaving a nice, tactile edge that flows into the bottom.
I continued this process around the entire shape, then carefully textured the bottom the same way. Since all the carving was done from the perimeter towards the centre, some carving was inevitably against the grain. Therefore, light cuts, a super-sharp tool, and patient, careful hands were essential to prevent larger chips from being lifted.
Then, it was off to the bandsaw to cut out the profile, followed by sanding – first with a random orbital sander, then foam sanding blocks – to smooth the outside. I was going for a soft feel, so I welcomed the tendency for these tools to round over edges.
Once satisfied with the outside, I used the foam block to sand off the template and gently round over the top edges.
Then I applied a coat of paste wax and buffed it out after it dried.
Over the last couple years, I have been developing a product that controls the suction going to two ports. Though the working name has changed over the course of development, I am currently calling it “Suction Controller”.
Primary Purpose
The Suction Controller is designed to be used with a vacuum and two hoses, and its primary purpose is to allow a user to rapidly control suction between the two hoses. This is useful when a single operator is switching between two tools with two different hoses (e.g. saw and sander).
Secondary Purpose
The Suction Controller can also be set to split the suction between both ports in any ratio. This is useful to one user operating a tool with two dust ports (e.g. router with above and below dust shrouds), or two users operating two tools simultaneously that do not require the full force of suction (e.g. sanders). It can also be used to “bleed” excess suction away from the one hose being used if the suction produced by the vacuum is too strong.
Known Compatibility/Non-Compatibility
I have been testing it with my Festool CT 26 dust extractor, which uses 50 millimetre fittings.
Sampling has also indicated that it works with many 2-1/2 inch vacuum fittings, for example, Lee Valley’s 2-1/2 inch EVA Hose and Splice fit very well.
On the other hand, due to the size and shape of its body, the Suction Controller does not fit directly into the older style of Festool CT Midi with a port in the corner.
How to Become a Tester of the Suction Controller
If, after reviewing the above information, you feel that you would be a good tester, please send me an email and I will be in touch with the next steps. You can also write with any questions you have. My email is [email protected].
Things have been busy for me over the last few years and I’ve been very active in the shop with regular things like organization, maintenance, and tweaks to the shop layout. The focus has also shifted towards product development, although I’m approaching the testing phase (if you’re interested in being a tester, subscribe to my blog for updates).
Recently, I realized a simple and quick storage project that would provide some much-needed extra space and organization in the room that often suffers the most from clutter – the bathroom. All that was required was a few scraps of melamine, some edge banding, a handful of screws, and an hour or two.
The inspiration was a cluttered counter, and realization that there was a lot of wasted space in the cabinet below the sink since it had 21 inches of height, but the items inside were much shorter. Adding a shelf was the obvious solution, but a good solution wasn’t that simple. Here’s what I considered:
Adding a full shelf would restrict sight lines and physical access to the back of the lower level, not to mention the sink drain and water supply lines that were in the way. A large U-shaped notch in the back of the shelf could get around the plumbing. It would need to be removable to allow access for plumbing repairs;
A shallow shelf at the front, say, 8 inches deep, would allow improved sight lines. However, that still restricted physical access, and a ledge would be required at the back to keep things from falling off the back;
A removable tray instead of a shelf would allow convenient access to all the contents of the cabinet, but since the European hinges used for the doors don’t swing the doors clear of the cabinet, the tray would need to be either tilted to get the necessary clearance, or made narrower and a support would be required for the narrower tray;
A shelf mounted to drawer slides would improve visual access to the bottom and physical access to the top, but the shelf would still be in the way. Also, drawer slides are expensive;
A shelf in addition to a pull-out tray for the bottom shelf would be a good solution except for loss of usable height equal to the tray thickness plus clearance, loss of usable width due to the drawer slides (or height for under-mount slides), and cost; and
Narrow shelves on the left and right sides of the cabinet, away from the plumbing, would provide limited storage, but allow good line of site and physical access to all items.
I decided that the last option made the most sense for my situation, so set about to make the shelves.
Once I established the size, I cut the melamine shelves to size. Then I created a template to round over the protruding corner from a piece of 1/4 inch MDF. I drew the curve with a compass, cut close to the line with a jigsaw, then finished it with a sander.
I positioned the template on each shelf, aligning it with my fingertips before clamping the template and shelf to my bench. If I were making many, I would have taken the extra time to incorporate stops in the template to automatically align it with the shelves.
Then I installed a large diameter template bit in my router and machined the corners. (Larger diameter bits tend to produce smoother cuts, and allowed to waste away the entire corner saving me the step of removing most of the waste first). To keep from cutting into the bench, I used a pair of stand-offs.
Then I used an iron and roller to apply pre-glued iron-on melamine edgebanding. I found it helpful to start in the middle and work outwards, so a slight misalignment was less likely to result in the edge not being covered at the end. I could have also taped it loosely in place to ensure alignment and worked from end to end.
To trim the edgebanding, I used my flushing plane which has been such a useful addition to the shop. The skewed blade helped ensure I didn’t push the edgebanding off the substrate as I worked.
Finally, I used a foam abrasive block to ease the edgebanded edges.
With that, the shelves were ready for installation.
I used four pocket hole screws to install the shelves – three in the side, and one in the back. Then I loaded them up. The two shelves provided room for dozens of bottles and small containers, freeing up the bottom of the cabinet for larger items. It was very rewarding and satisfying to see the level of organization afforded by this small and simple upgrade.
A final note about tolerances: most saws produce a better quality cut on one side than the other. Since these shelves would be seen from the top only (with the possible exception of the plumber), I didn’t take any precautions to reduce or eliminate chipout and instead made the cuts on my table saw with my flat top ripping blade set about 2 inches above the material. This helped ensure a chip-free top surface at the cost of more chips on the bottom.
On the other hand, a router tends to produce clean edges top and bottom. The straight flutes of the router bit I used produced flawless results on the corners, but a spiral compression bit would be even more reliable.
Compare these two pictures showing the top and bottom of the same shelf. The straight sections were cut with the table saw, and rounded corners with the router.
If you’re looking for materials and inspiration for your next project, come by my first workshop in Port Moody to check out the inventory and discuss ideas.
Choose from live edge hardwood slabs custom milled and carefully air dried to yield the best quality wood at better prices than anywhere else.
Wood Sale Open House:
Thursday August 3: 12pm – 8pm Friday August 4: 12pm – 8pm Saturday August 5: 9am-3pm
1114 Barberry Place, Port Moody, BC
Make an Appointment July 24-28
Can’t attend the Wood Sale Open House? Call, text or email to set up an appointment the week before.
I built four Krenov-style sawhorses about ten years ago and they have served me well. I made them from softwood lumber (pine, I think) using through mortise and tenon joinery. I wedged the tenons of the stretcher, but elected not to reinforce the leg-to-foot joints.
Recently, on a couple of the horses, those leg-to-foot joints failed and as a result, the horses wobbled. Still, the large shoulder of the tenon provided enough support that they would bear weight fine, and the friction between the components was enough to keep the feet from falling off when lifted. However, if lateral forces were applied (e.g. planing), the sawhorse would rack.
To fix them, I first knocked off the feet with a mallet. Examining the joint, I could see that the glue had held and the wood failed. To reattach the foot, I decided to use more wood glue and a draw bored pin for reinforcement (this is a wooden pin right through the joint in slightly offset holes so that the parts are mechanically held tightly).
After marking a suitable location for the peg, ensuring that there was adequate material on all sides of both the mortise and tenon, I drilled right through the foot (which was mortised) with a 1/4 inch brad point drill bit.
To mark the location of the slightly-offset hole on the tenon, I installed the foot on the end of the leg and used a slightly-smaller (7/32 inch) transfer punch held tightly towards the top of the mortise and gave it a tap to mark the centre of the next hole.
I drilled a 1/4 inch hole on this mark and assembled the joint with more wood glue. For the drawbore peg, riven oak dowel is traditional, but I elected to use a simple, ready-made 1/4 inch fluted joiner dowel with pre-chamfered ends. I seated the dowel with a few swings from a steel hammer.
This repair was simple and quick, requiring only a handful of tools and about ten minutes to repair four joints. I used:
Mallet
Combination square
Pencil
Drill press
1/4 inch brad point bit
7/32 inch transfer punch
Wood glue
1/4 inch fluted joinery dowels
Steel hammer
I know many others like to over-build everything, and there are merits to that approach. However, by slightly under-building, we get the opportunity to learn the limits and failure points of the design and processes we use. How else can we learn these valuable insights?
I have a carefully-chosen group of manual hand tools that lives in a MFT Systainer toolbox that covers my particular needs for the majority of general tasks. It is always with me whether I’m working in the shop, on site, or around the house.
Every once in a while, I vacuum out all the wood chips and sawdust and review the contents of my Hand Tools kit, making adjustments to increase its utility. Over the holidays, I did just that. Here they are in storage.
Here are the same tools unpacked for examination. Many of the tools can be easily identified, but I will name each one and briefly describe its use to me.
Tug-N-Back pencil holder – for jobs involving walking around a lot, this ensures that a pencil is always within reach, saving a lot of time looking for it. There is a steel clip on the back that I usually clip to the front collar of my shirt under my chin. It works like a retractable power cord – pull and release to extend, pull and release to retract;
Awl – used mostly for marking hole locations and starting screws. Occasionally it’s used to scribe a line, mostly on non-wood surfaces;
Simple Scribe with pencil – this pencil holder with multiple offsets allows parallel lines to be drawn quickly and consistently. While it doesn’t get a ton of use, it doesn’t take up much space either;
Standard Sharpie permanent marker – great for labelling the backside or underside of components that will be installed, writing on plastic parts bags and more;
Church key – for opening cans of paint and occasionally as a slim, light-duty pry bar;
Pair of TSO DoubleGroove Small Bench Dogs – these fit into the holes in the lid of the MFT Systainer and help immobilize workpieces on the lid of the toolbox;
Four-inch brass caliper – this caliper is large and accurate enough for sizing parts and hardware, but small and rugged enough to toss it in the toolbox without a bulky case. This one is easier to read than the all-brass versions commonly available;
Ten-foot x 1/2 inch tape measure – this tape fits well in the toolbox and is long enough for most measuring tasks. My favourite 10 foot tape measure is a Stanley Leverlock, but I only have two of those that live in the shop at the bench and table saw where they are used constantly;
High-leverage flush-cut side cutters – useful for cutting staples, nails, plastic, and more;
Ten-inch Knipex Pliers Wrench – an amazing tool, its lower sliding jaw remains parallel to the fixed jaw, and the spring-loaded button allows the maximum tool opening to be set up to 2 inches. The tool is incredibly fast and easy to operate;
Eight-inch ViseGrip adjustable pliers – unlike some adjustable pliers, these adjust with a press of the spring loaded button, so they only adjust when you want. Unlike the Knipex Pliers Wrench, the lower jaw pivots and the jaws are serrated, so they don’t have as delicate of a touch;
Twelve-in-1 tool – a handy tool consisting of two 6 inch rules held together with a threaded fastener. The most useful functions are: rule, T-square, marking gauge, bevel gauge, angle transfer tool and depth gauge;
Eight-inch cat’s paw – a compact and sturdy pry bar with a thin, wide pry surface at one end that is great for lifting and prying. The other end features a nail puller and flat surface for driving nails;
Fine tip Sharpie permanent marker – useful for making layout lines and labelling parts on their backside for orientation or location;
HB pencil – useful for fine general marking;
Carpenter’s pencil – useful for coarse general marking with less risk of breaking the lead and less frequent need for sharpening than a regular pencil;
Carpenter’s pencil – a second one that lives in the Tug-N-Back pencil holder;
Spear point marking knife – this one was made from an old chisel. The long blade allows use in almost any situation. (Some may say that using a marking knife in renovations is unnecessary, but then so are air nailers.);
Snap-off utility knife – a cheap, lightweight plastic-handled knife for general cutting and scoring tasks, and sharpening carpenter’s pencils;
Pocket level – ideal for levelling tasks that don’t warrant a larger level and does the job way better than a smartphone. The metric scale is a useful bonus, too. The back is blank… I guess I should find something to make use of that real estate.
Pointed nail set – useful for setting finishing nails;
Concave nail set – useful for setting pins and brads, and starting removal of door hinge pins;
Irwin Blue Chip 3/4 inch chisel – handy for trimming, chopping, and other chisel work. Not ever used as a pry;
Ten ounce claw hammer – a recent addition on a trial basis, it may be used for driving and pulling nails, physical adjustments, and closing paint cans with a scrap of wood to distribute the force of the blow;
Compact ratcheting screwdriver – useful for applying loads of torque, but mostly for getting into tight spaces;
Autoloader multi-bit screwdriver – this multi-bit screwdriver uses standard 1/4 inch x 1 inch screwdriver bits that also work well with the other screwdriving accessories in this kit;
Veritas Screw Lifter – handy for applying steady upwards pressure when removing the odd screw from a stripped hole;
Pencil sharpener – useful for sharpening pencils and chamfering small dowels;
Stanley low angle block plane – indispensible for trimming and chamfering edges;
Silky Woodboy folding saw – ideal for making fast and clean crosscuts in wood, as well as plastics and other soft materials. The blade is taper ground, so clearance can be had without any set on the teeth, allowing it to be used flat against any surface without causing scratches;
Tilting bit holder – used in conjunction with the Autoloader screwdriver or a cordless drill, this accessory allows screws to be driven adjacent to an obstruction such as a wall; and
Slim saw – made from an old hacksaw blade with good working teeth at one end and the rest of the teeth removed, this slim saw gets into spaces no other saw can.
How many of these tools are in your toolkit? Are any of these on your wishlist?
An experiment to see how quickly a wooden cutting board is rendered unusable
I made this cutting board and designed it to fail, but it didn’t fail as I expected! Here are the “bad decisions” that I made in an attempt to accelerate the failure of the cutting board.
Low density wood
I used butternut, which is a hardwood on the softer end of the spectrum. Butternut has a specific gravity of 0.43 which is about 40% lighter than hardwoods typically used for cutting boards such as beech (0.72) and hard maple (0.71). Harder woods will surely stand up to knives better than softer woods, right?
Carved letters to trap food and make it hard to clean
Wooden objects don’t do well in the dishwasher, so can’t be sanitized with heat like other dishes. I routed letters into the working surface on each side at the top with a router. Would small bits of food get lodged in the letters, making cleaning difficult or impractical?
Include a split and broken section, and sapwood
As a bolder experiment, and part of my relentless push to fail, I elected to not cut off the end where some of the wood fibres has split off, and a crack was showing in the end grain. It was an obvious place for bacteria to collect and mould to grow, but I wanted to know how quickly that would happen. Sapwood is the typically lighter band of wood that is located at the outside of the tree is generally considered less durable and is usually less dense as well. In traditional woodworking, sapwood is considered a defect. In this cutting board, sapwood comprises the top quarter.
Used a piece of wood prone to warpage
For stability, quartersawn wood where the growth rings run near vertical when you look at the end grain is unquestionably the best. Quartersawn wood is less likely to cup, twist, or warp. Rift sawn wood is the next best with growth rings around 45 degrees, and flat sawn lumber with growth rings running more or less horizontally is generally the least stable and most likely to warp. I used a single piece of wood quartersawn at the top, rift sawn at the middle, and flat sawn at the bottom.
No special care instructions or treatment for this cutting board
I threw the cutting boards into the cutting board drawer of our kitchen right alongside the plastic and wood composite ones with no instructions to my wife or kids on how to use or not use them. (They have, however, been educated that wood never goes in the dishwasher.)
Time to conclude the experiment
Today, after two years of regular use, I decided to retire the cutting board. It was used for bread, produce, raw and cooked meat on a daily basis with straight and serrated knives. The actual cutting surfaces are in pretty good condition. There are obvious knife marks, but they look like scratches as if somebody took a pointed wooden stick and dragged it across the board. (All pictures here were taken today.) The cutting board is also remarkably flat. It doesn’t rock at all on my countertops.
The lettering looks quite good – food didn’t collect in there, escaping cleaning as I thought it might. We washed the cutting board with hot soapy water and a cloth, giving it no more of a scrub than a plate. I don’t recall ever using a dish brush to scrub food out of the letters. Looking closely, the letters look a bit fuzzy on the end grain walls which might be due to repeated wet/dry cycles during washes. Perhaps someday I will try a bolder experiment with lettering right through the middle section of the cutting board that gets the most use.
But the real surprise is that the broken grain and crack in the end grain appears fine – there is no darkening or discolouration visible! Ultimately, I chose to retire the cutting board because other areas of the end grain were showing discolouration. I could have, and perhaps should have, replaced them as soon as I noticed the discolouration, but it wasn’t until today that I got around to finishing the replacements.
The new cutting boards are made of black locust (0.77 specific gravity), and laminated from 6 pieces. Let’s see how these hold up! If my attempt at failure lasted for 2 years, I’m guessing these will last a lot longer!
There is a product for sale I am thinking about that seems rather expensive for what it is. However, I cannot knock the design or quality (although I do wish for one modification!) It is simple in design, and neither tight tolerances nor a high degree of precision are required. The basic process of making it seems quite simple too, not requiring a lot of steps.
Naturally, I began to wonder how I would go about making it myself. What materials would I use? What process would I use? What challenges might I face, and how could I overcome them?
I began to price out materials and put a bit of thought into how long it would take me, including all the testing, figuring, and corrections and adjustments along the way. It began to be very clear that if I were paying myself wages, it would certainly be cheaper to just buy the product (but material cost, barring an unexpected number of mistakes, would be less).
This realization got me thinking that maybe I should just buy the product and start using it right away and invest the time I would spend making my own doing work to pay for the product (and then some). Makes sense, right?
But the problem with doing this is that I would miss out on the experience and knowledge I would gain from making it myself. There is a lot to be learned from making something from scratch, and even more benefit if the process can be shared with others first hand.
Every product is priced to attract a certain buyer, but don’t forget that buying a product has a greater cost than just the money you trade for it – the knowledge not gained from learning to make it yourself.
Much of my education in woodworking has been from what I describe as the relentless push to fail. That is, coming up with an objective that pushes the limits of what I can do, what I feel is possible, or what is possible. I came up with the objective to tie a knot in a piece of wood about ten years ago and I now feel that I have succeeded.
September 2016
My first attempt was in September 2016. My wife and I were at home anticipating an imminent trip to the hospital for the birth of our first son, and were just trying to stay busy while not starting any projects that could not be completed or abandoned in a few minutes.
I picked through some air-dried ash for the straightest grain and ripped a handful of 1/4″ square strips. I cut them 10 inches long and proceeded to steam them in the kitchen using a large frying pan and sheet pan on the stovetop. Using my hands, I carefully began to bend the wood into a loop before coaxing one end through the loop. When the wood became too dry or cool, I returned it to the pan to steam more before squeezing the knot tighter.
There were certainly some failures where many of the wood fibres broke before bending enough to form into even a loose knot. There were a few moderate, encouraging successes, where I was able to form a knot about 2″ diameter with some fibre breakage.
May 2018
The next time I attempted a knot was before the birth of my second son. This time, I was armed with a compression bending jig to help bend the wood, made from a few scraps and an old hacksaw blade. The ideas is that the flexible metal compression strap (hacksaw blade) and attached stops keep the outside of the wood from expanding and splitting as the wood is forced around a form. In fact, since the length of the wood is matched to the space between the stops, the wood is not only held in compression during the bend, but compressed in length!
For a form, I used a piece of 6″ wide plywood with a 3″ radius cut at one end. Again, I cut and steamed my 1/4″ square air-dried ash strips, then quickly moved them, one at a time, to the bending jig and pulled the wood around the corner. I rotated the wood 180 degrees and bent it again, then turned it 90 and 180 degrees to bend it the other two directions. Some say that steaming and bending wood in all four directions effectively destroys the lignin bonds, allowing wood to be manipulated with extreme bends and even twists.
After using the compression jig to bend each piece of wood all four directions, they went back in the pan to steam before attempting to form them into knots by hand. There were still some failures where too many wood fibres broke, but I got two knots down to 1-1/2″ diameter with a medium amount of fibre breakage, and 1-1/4″ diameter with considerable fibre breakage. Despite the fibre breakage, I felt these two examples were indicative of significant progress.
July 2022
Last month, armed with some new and modified techniques, I once again prepped to attempt tying knots. For materials, I chose straight-grained air-dried black locust (I had some 5/4 scraps lying around the shop, but no ash). Instead of sawing blanks, I instead used a hatchet to split out some pieces about 1/2″ square, then ripped them to about 1/4″ with the bandsaw and finished planing them to 0.2″ with a hand plane with depth skids attached.
I reworked my compression bending jig by reducing the radius of the form from 3″ to about 1-1/2″ and positioning the end of the compression strap 0.2″ from the form. Due to the length of the strap compared to the radius of the form, the compression strap needed to make a 270 degree corner and a smaller radius would have required some sort of helical bend of which I was reluctant to try. (I also built a linear compression jig to compress the wood in a straight line by about 3/4″ using a screw press, but the method ended up being too slow and impractical to use so I abandoned it).
A steamed blank bent around the form using compression strap.
This time I pre-soaked the wood to ensure the wood was well saturated. The wood was put in a pan filled with water and soaked for about 1-3 weeks as I made attempts on three separate occasions for this round. The actual streaming was a two-step procedure this time. I first steamed the blanks in my largest fry pan with a sheet pan for a lid for about 15 minutes before bending each in the compression bending jig all four directions, one at a time.
Blank in compression bending jig shows the compressed length after bending. Blank was a tight fit between the wooden end stops prior to bending.
Then I fit the bent wood into a smaller pan with a proper-fitting lid to better control the steam and let it steam for another 15 minutes. I used my hands to form loose knots, returned then to the pan for 15 minutes, then proceeded to tighten the knots. I used a small wooden handscrew clamp to tighten some knots and hold them in position while they cooled.
Again, I had a few catastrophic bending failures where over half of the wood fibres broke. But yesterday I also had one very good result with a 7/8” diameter body that makes me comfortable saying that I’ve achieved my objective.
Here’s what I learned from tying knots in wood:
Split wood is a must. If you don’t split it before, it will certainly split during extreme bends. Even my split wood split more during bends.
For a knot of this scale, 1/4” square stock is huge and square doesn’t really make sense. My best knot was formed from a piece of quartersawn black locust about 3/32” thick and 0.2” wide.
The bending jig with compression strap was a great asset. Using a radius as tight as possible further helped. I could have improved the jig by adding an adjustment for one of the stops so a piece of wood already bent and compressed by about 0.18” could be bent and compressed further.
Wood bends best when wet and hot. Some of my steaming setups allowed too much steam to escape and when I took out a piece of wood, it wasn’t very hot or wet. A tight-fitting lid on the pan helped.
Our daughter was born last Wednesday. We have no plans for any more children and I have no desire to advance my knot tying skills in wood any further.
I’ve written many interesting articles for Canadian Woodworking & Home Improvement Magazine over the past 12 years, but this idea presented to me by editor Rob Brown was one of the most intriguing and challenging. The premise was simple: you’re interested in doing woodwork, but lack tools beyond the absolute basics like hammer, screwdriver, tape measure and pencil. You have a limited budget, so what do you buy?
I had fun doing some online shopping, scouting out the tools that I felt delivered versatility and capability while keeping to the budget. I also looked for tools that you could grow with – ones that wouldn’t soon be replaced as soon as the budget allowed.
Look for the article in the June/July 2022 issue of Canadian Woodworking & Home Improvement, or read it online here.
I spend a good deal of time organizing things and processes to facilitate efficiency. This may come in the form of organizing tools in a drawer where I can find them, building or modifying a tool, or designing and speed testing a process. Sometimes, the amount of time that I invest in creating this organization is greater than the time savings I will ever yield, but it is still worth it to me. This is because organization leads to efficiency, which in turn allows a more streamlined, automatic process, and that reduces the amount of thought required to complete the task. This ultimately means that I need to redirect less of my attention and thought and whatever I’m working on is more likely to continue with that distraction, and be completed sooner since less time is required.
Here are some specific examples of things that I do in the shop to allow my work to progress with less disruption to my thought process, so I can continue to keep my mind more on the big picture and less on the little tasks.
Keep tools at hand. There are certain tools that I use frequently in certain places. These include a tape measure, steel rule, and pencil. I keep them in specific places at the workbench, bandsaw and tablesaw so that I can pick them up almost without looking.
Reduce time spent doing peripheral tasks. It’s inevitable that a project will require tasks not directly related to it, such as sharpening a chisel. To ensure I get back to the project quickly so as to not lose focus and forget my place, I optimize the process for speed without sacrificing results. I prefer easy-to-sharpen tool steels such as O1, and use a diamond stone and strop which don’t require water (an extra step if not already set up, and more mess). When sharpening takes less than a minute (sometimes, I don’t even bother taking the sharpening equipment out of the drawer – I just use it in place!) and almost no thought, I can keep thinking about my project.
Organize the shop. When organized, I can find anything I need quickly and the most-used things are most accessible. The most used things are in neatly-organized drawers that don’t require rummaging, or at the front of shelves that I can reach. Less frequently-used items are at the back of shelves, on higher shelves that I need a ladder to reach, or in boxes tucked out of the way.
Keep it tidy. Although I don’t like to interrupt my work to clean up, I do make an effort to put things away and clean up when I am not in the middle of working. Sometimes that means putting away tools on the bench after a work session, or coming into the shop for a few minutes and dealing the scraps of wood on the floor.
When woodworkers think about the scroll saw, they often think of a tool that cuts slowly and is perhaps the power saw with which one is least likely to cut themselves. And, compared to stationary tools like the table saw, bandsaw, and mitre saw, I feel that it is an accurate description Perhaps a hand-held power saw like a jigsaw is safer to use, as the user’s hands are usually on the tool a fixed distance away from the blade at a safe distance.
But that’s not to say scroll saw work is not without risk. On a scroll saw, the delicate nature of the work that makes the scroll saw the best choice usually puts the user’s hands very near the blade – zero to six inches away, let’s say. This largely depends on the length and width of the workpiece, as well as the stiffness since flexible pieces may require support closer to the blade to prevent it from lifting which could cause bending or breakage to the workpiece and/or blade.
The other risk inherent with the scroll saw is the high amount of manual skills and focus required to manoeuvre the material through the blade. The only sort of guide a scroll saw affords is a table, to help ensure one angle of the cut is constant (unlike a hand-held coping saw or fret saw where all accuracy of the cut is up to the user). As with a bandsaw, great care must be taken guiding the workpiece along the desired cut line. However, due to the small, delicate nature of most scroll-sawn parts, a small over-cut or deviation from the cutline of 1/8 inch (or less) can be the difference between success and failure of the part.
Working at this scale requires good lighting, steady hands, patience, and blade selection and setup is key. When cutting my 3D jigsaw puzzles (whose pieces are typically 1 x 1 x 3/8 inch), I often find myself looking very closely at the cutline as I guide the wood through the blade and think to myself that I’m probably more likely to get hurt by being struck by the top of the upper blade clamping assembly (which goes up and down with the blade) than I am getting cut by the blade itself.
If you’ve never looked at scroll saw blades, you might be surprised at how small they are – at a casual glance, many look like a piece of wire. The tooth direction of some of the finest blades is difficult to determine visually and the best way is to lightly run your finger along them to feel in which direction they catch. Narrower blades cut tighter corners but are more fragile and liable to break (which isn’t a scary or dangerous thing, in my opinion – just a nuisance having to replace the blade). Finer teeth make cleaner, smoother cuts, but if the gullets in front of the teeth are not large enough to clear the sawdust, heat build-up and burning of the workpiece can occur. Blades with finer teeth also cut more slowly in material of a given thickness. This means more time to make the same cut, and, more importantly to me, affords more control and less chance of cutting too far. Over-cutting (that is, cutting off a detail or making a part too weak) is the greatest risk I face when cutting my puzzles.
Here is one of the large, coarse scrollsaw blades that I use to cut my 3D puzzles.
I must choose a blade that cuts cleanly without burning, while permitting sufficient control through the intricate cuts. The decision is made more complicated with the varying thickness of cuts in a typical 3D jigsaw puzzle. Effective material thicknesses that the blade passes through may range from 1/8 to over 1 inch. As with most decisions there is a compromise to be made. I can either change blades with every material thickness, select a blade on the finer side and hope for no burning, coarser side and rely on my skill and dexterity, or right in the middle and hope for no burning and rely on my skill.
Anyways, I’ve been busy restocking my supply of 18-Piece Puzzles since I sold my last one last week. You can order yours here.
Four months ago, we moved to Campbell River, BC on Vancouver Island and I set up shop in the 2-car garage. I was surprised to discover that it was harder to fit everything into two-thirds of this two-car garage than it was in the old 1-car garage. This, I realized, was mostly due to the fact that I was short one wall for hanging things and that the garage was shorter in length.
The shop is organized in a workable manner, but there is still much room for improvement.