
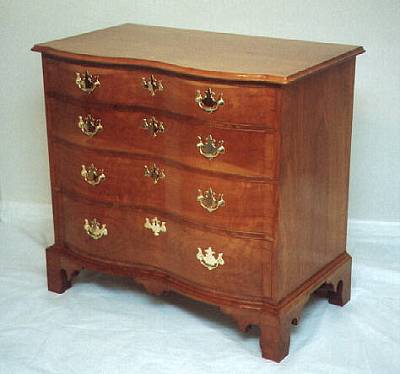
SERPENTINE FRONT BUREAU
Cherry with a classic 18th century style.
SHOP OWNER: Virgil Johnson
LOCATION: Versailles, KY
This is my rendition of an 18th century serpentine front bureau, also referred to as an oxbow bureau. It is not a true reproduction of an original but a reproduction with personal influences and joinery variations that will allow for wood movement. While the original was most likely made from mahogany, this one is cherry.
I took the serpentine feature from one bureau and the case dimensions from a scaled drawing of a block front by E. F. Schultz that appeared in FWW. I used sapwood cherry that is better off hidden, for all of the interior secondary wood such as drawer kickers and rear dividers. Southern yellow pine would most likely have been the secondary woods in the original. The back is tongue and groove maple fastened to the case with brass screws. The original maker would probably have used pine or poplar and nails to attach the boards.
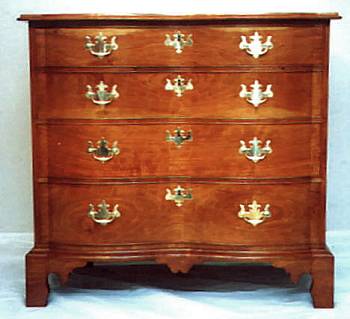
For ease of construction and to better allow for seasonal movement of the top and case sides, I added a drawer divider on the top and bottom. These dividers are absent from the original. This allowed me to dovetail the carcass together and make the bracket feet on a separate base. The top and sides were cut from a single 5/4, 24" wide cherry board that was close to 10' long.
The ash drawer sides are hand dovetailed to the fronts with half blind dovetails and through dovetailed at the rear. I used basswood for the drawer bottoms instead of poplar or soft maple but I don't care for it and will most likely never use it again. It is just too soft and dents too easily. The basswood bottoms are raised panels that float in a groove cut into the drawer sides. The brasses are from Ball and Ball.
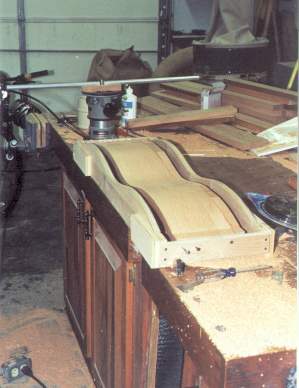
The drawer fronts were sawn from some 12/4 cherry that I had milled around1988. Sawing the drawer fronts from solid 12/4 stock helped relieve tensions in the wood. The two widest fronts still twisted slightly. To smooth the drawer fronts to an exact known profile and machine out the twist, I built a fixture designed to hold the drawer fronts at each end. I simply screwed drywall screws through the ends of the fixture until they lightly touched the ends of the fronts. I added "outriggers" to my router that followed the contour of the fixture. I used a -inch ball nosed end mill and made climb cut passes freehand across the front. Later I scraped (and scraped and scraped) the fronts inside and out until they were smooth enough to finish.
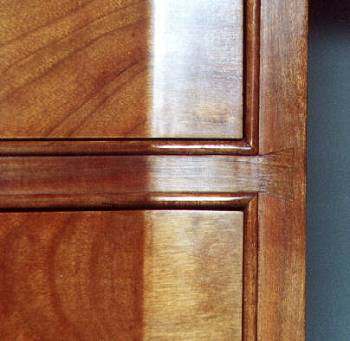
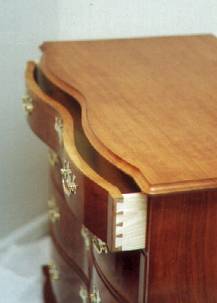
The picture (left) shows the "mason's miter" that is formed by the corners of the cockbead around the drawers. You can also see the dovetail joint that joins the drawer divider to the case side. I actually milled the cockbead into the drawer dividers and sides. It is not applied.
The finish is orange shellac padded on and rubbed out with pumice and rottenstone. A coat of boiled linseed oil was applied to add depth to the cherry before padding on the shellac.
Comments (0)
No comments yet. Be the first!
Leave a Comment